- A+
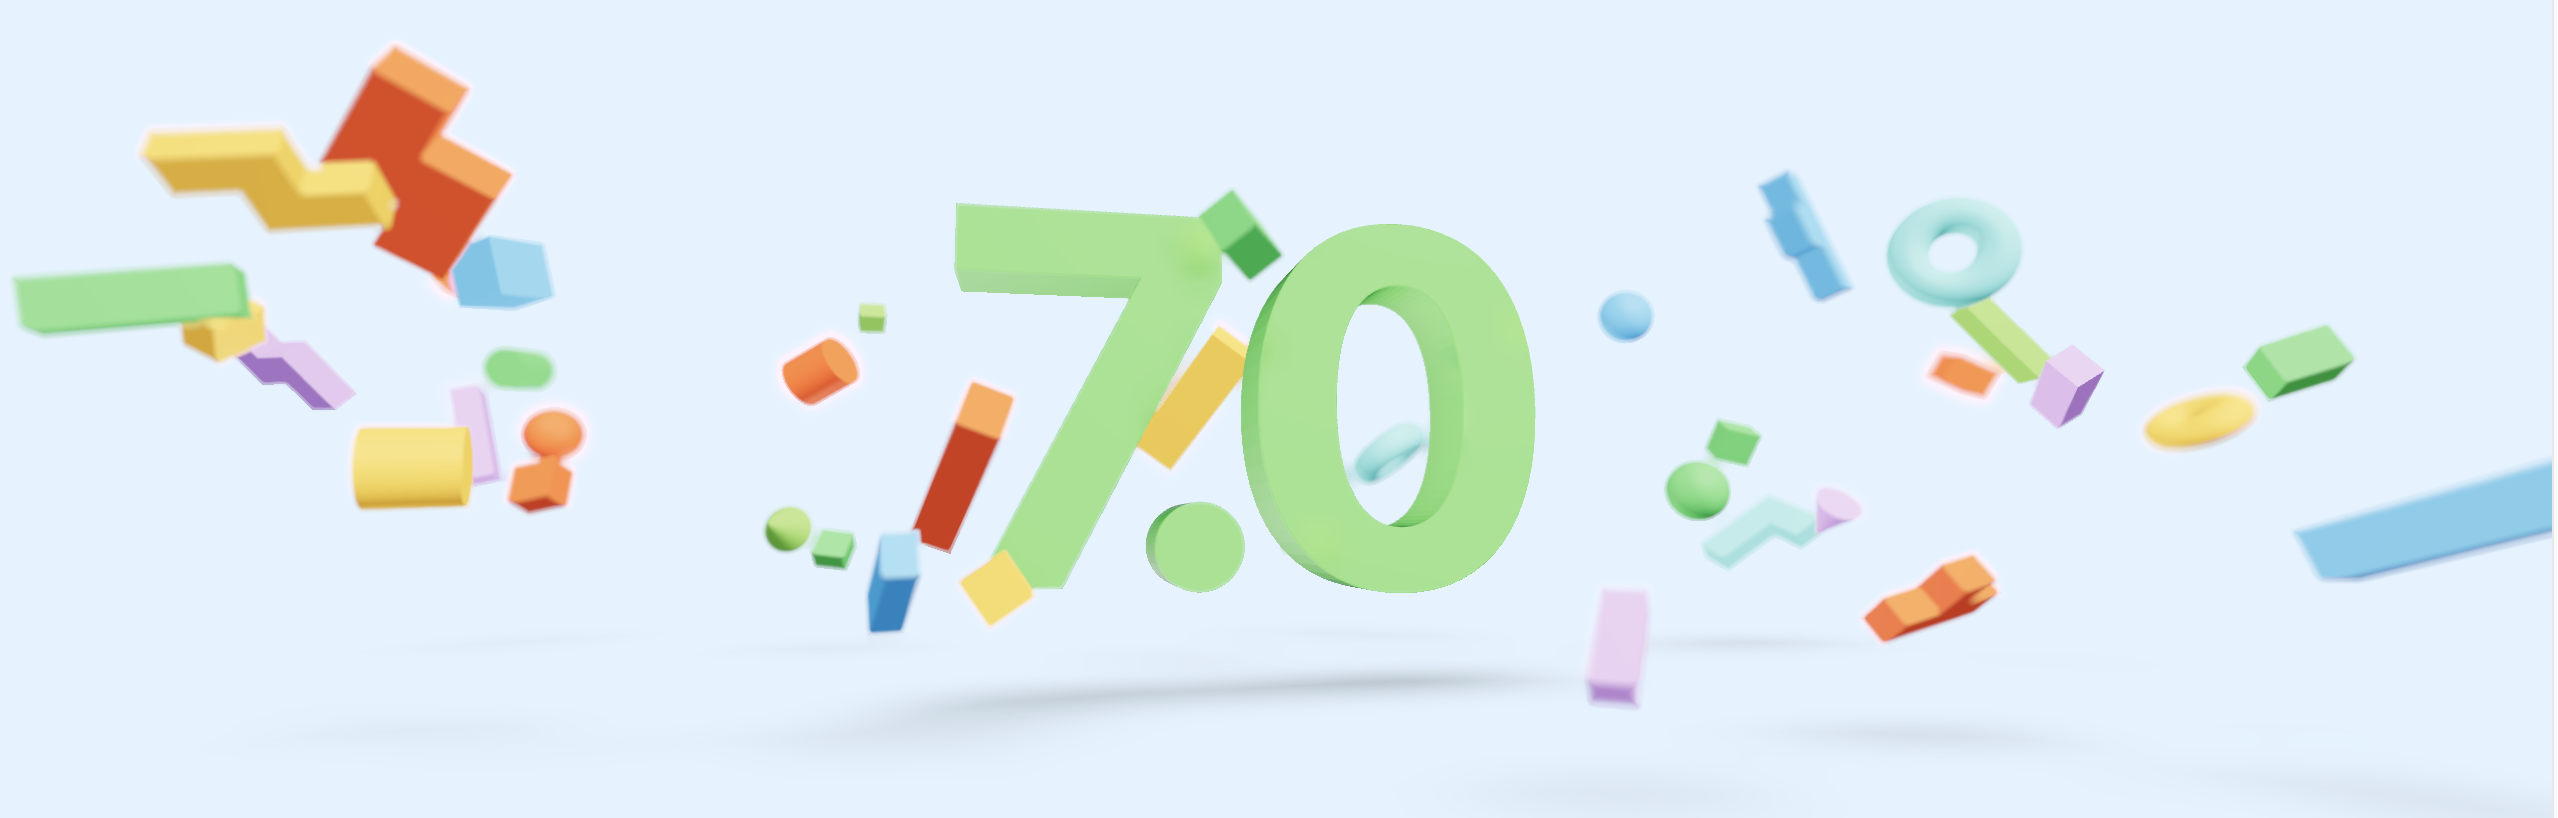
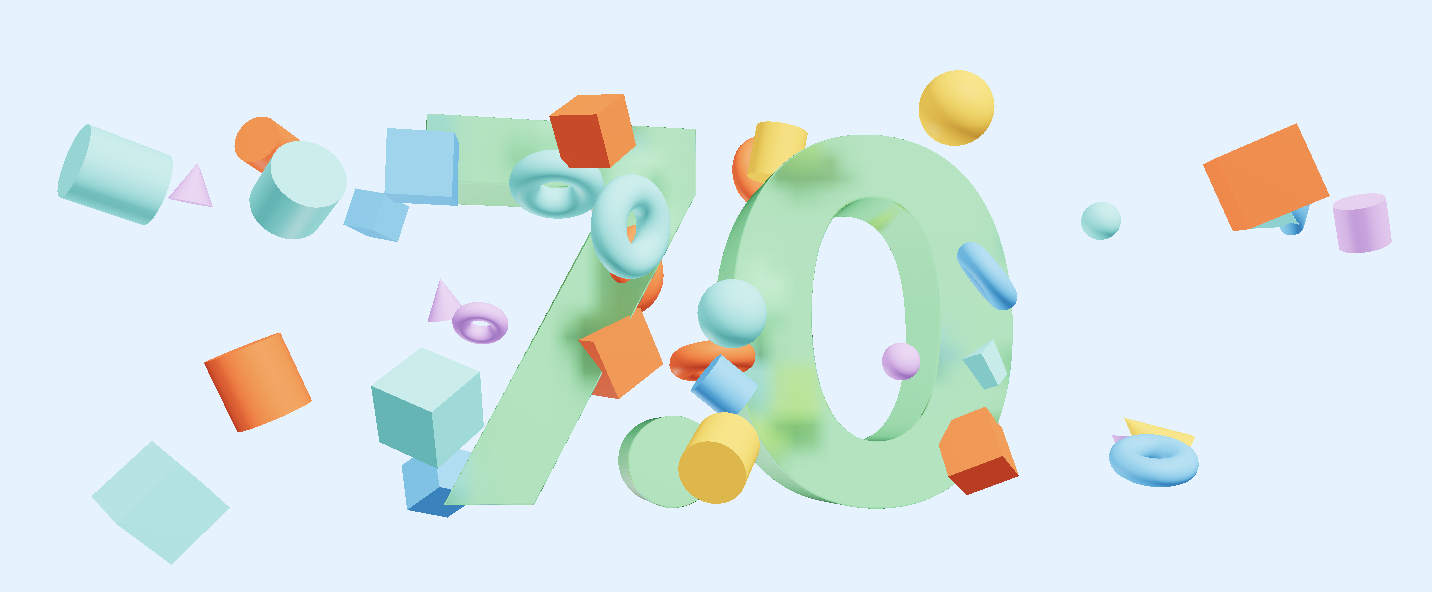
Storybook 刚刚达到了一个重要的里程牌:7.0 版本!为了庆祝,该团队举办了他们的第一次用户大会 - Storybook Day。为了更特别,在活动页面中添加了一个视觉上令人惊叹的 3D 插图。
原文:How we built the Storybook Day 3D animation
3D 插图使用 React Three Fiber (R3F) 实现,灵感来自俄罗斯方块。在本文中,将深入探讨。内容包含:
- 避免物体与球体堆积重叠
- 用挤压法模拟俄罗斯方块
- 通过景深和阴影等增强视觉效果
- 通过减少材料数量来优化性能
基本实现
脚手架创建:
npx create-react-app my-app --template typescript 安装依赖:
npm i @react-three/fiber @react-three/drei canvas-sketch-util -S App.tsx
import React from 'react'; import { Canvas } from '@react-three/fiber' import BlocksScene from './BlocksScene' function App() { return ( <div style={{ height: '100vh' }}> <Canvas shadows gl={{ antialias: false, stencil: false }} camera={{ position: [0, 0, 30], near: 0.1, far: 60, fov: 45 }} > <color attach="background" args={['#e3f3ff']} /> <ambientLight intensity={0.5} /> <directionalLight castShadow position={[2.5, 12, 12]} intensity={1} /> <pointLight position={[20, 20, 20]} intensity={1} /> <pointLight position={[-20, -20, -20]} intensity={1} /> <BlocksScene /> </Canvas> </div> ); } export default App; BlocksScene.tsx
import React, { Suspense } from "react" // @ts-ignore import * as Random from 'canvas-sketch-util/random' import Block, { blockTypes } from './Block' import * as THREE from 'three' import { Float } from '@react-three/drei' import VersionText from './VersionText' const size = 5.5 const colors = ['#FC521F', '#CA90FF', '#1EA7FD', '#FFAE00', '#37D5D3', '#FC521F', '#66BF3C'] const blocks = new Array(40).fill(0).map((_, index) => ({ id: index, position: [Random.range(-size * 3, size * 3), Random.range(-size, size), Random.range(-size, size)], size: Random.range(0.1875, 0.375) * size, color: Random.pick(colors), type: Random.pick(blockTypes), rotation: new THREE.Quaternion(...Random.quaternion()), })) const BlocksScene = () => { return ( <Suspense fallback={null}> <group position={[0, 0.5, 0]}> <VersionText /> {blocks.map(block => ( <Float key={block.id} position={block.position as any} quaternion={block.rotation} scale={block.size} speed={1} rotationIntensity={2} floatIntensity={2} floatingRange={[-0.25, 0.25]} > <Block type={block.type} color={block.color} /> </Float> ))} </group> </Suspense> ) } export default BlocksScene Block.tsx
import React from "react" import { Sphere, Cylinder, Torus, Cone, Box } from '@react-three/drei' export const BLOCK_TYPES = { sphere: { shape: Sphere, args: [0.5, 32, 32] }, cylinder: { shape: Cylinder, args: [0.5, 0.5, 1, 32] }, // 圆柱 torus: { shape: Torus, args: [0.5, 0.25, 16, 32] }, // 圆环 cone: { shape: Cone, args: [0.5, 1, 32] }, // 圆锥 box: { shape: Box, args: [1, 1, 1] }, } as const export type BlockType = keyof typeof BLOCK_TYPES export const blockTypes = Object.keys(BLOCK_TYPES) as BlockType[] interface BlockProps { type: BlockType color: string } const Block = ({ type, color }: BlockProps) => { const Component = BLOCK_TYPES[type].shape return ( <Component args={BLOCK_TYPES[type].args as any} castShadow> <meshPhongMaterial color={color} /> </Component> ) } export default Block VersionText.tsx
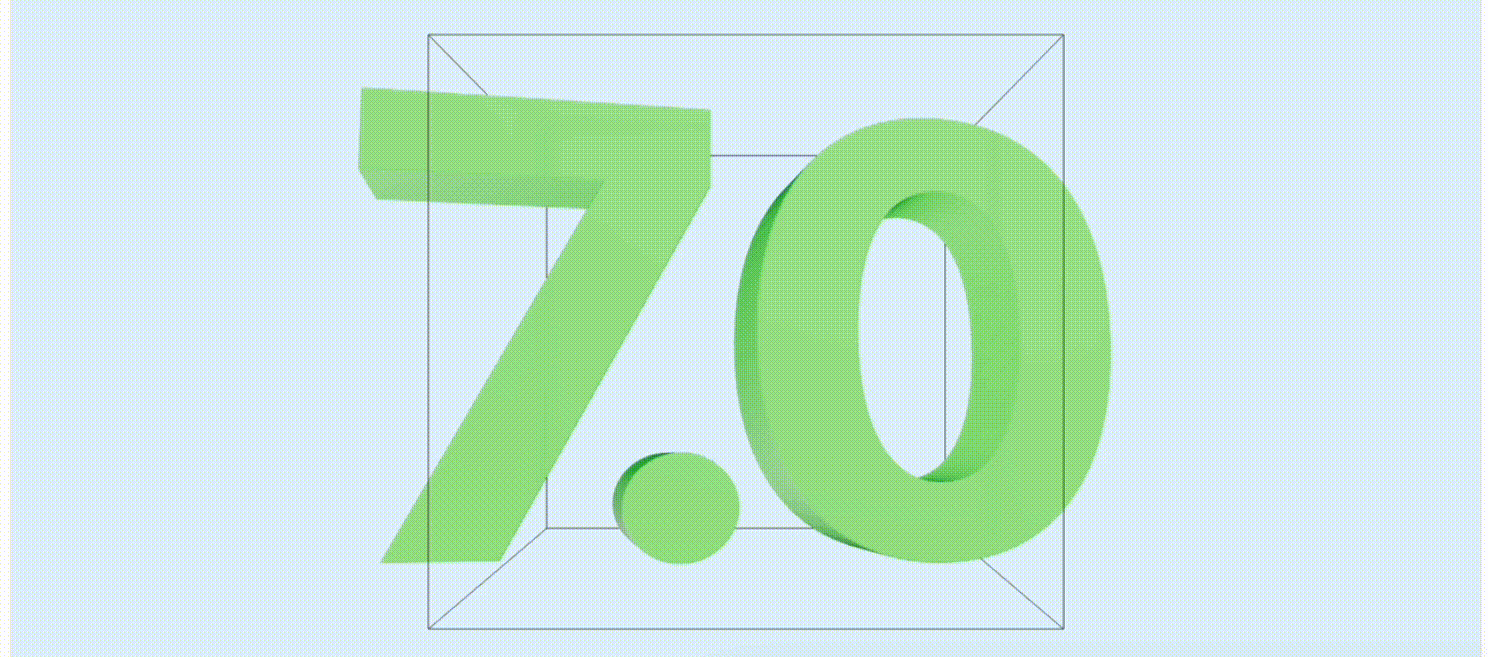
import React from 'react' import { Center, Text3D } from '@react-three/drei' import * as THREE from 'three' import font from './font' // 字体比较多,参考:原文 const textProps = { font: font, curveSegments: 32, size: 10, height: 2.5, letterSpacing: -3.25, bevelEnabled: true, bevelSize: 0.04, bevelThickness: 0.1, bevelSegments: 3 } const material = new THREE.MeshPhysicalMaterial({ thickness: 20, roughness: 0.8, clearcoat: 0.9, clearcoatRoughness: 0.8, transmission: 0.9, ior: 1.25, envMapIntensity: 0, // color: '#0aff4f' color: '#9de1b4' }) const VersionText = () => { return ( <Center rotation={[-Math.PI * 0.03125, Math.PI * 0.0625, 0]}> {/* @ts-ignore */} <Text3D position={[-4, 0, 0]} {...textProps} material={material}>7.</Text3D> {/* @ts-ignore */} <Text3D position={[4, 0, 0]} {...textProps} material={material}>0</Text3D> </Center> ) } export default VersionText 注意以上代码,虽然让块随机分布在整个场景中了,但是有的与文本重叠或彼此重叠。如果这些块没有重叠,那在美学上会更令人愉悦。那么如何避免重叠呢?
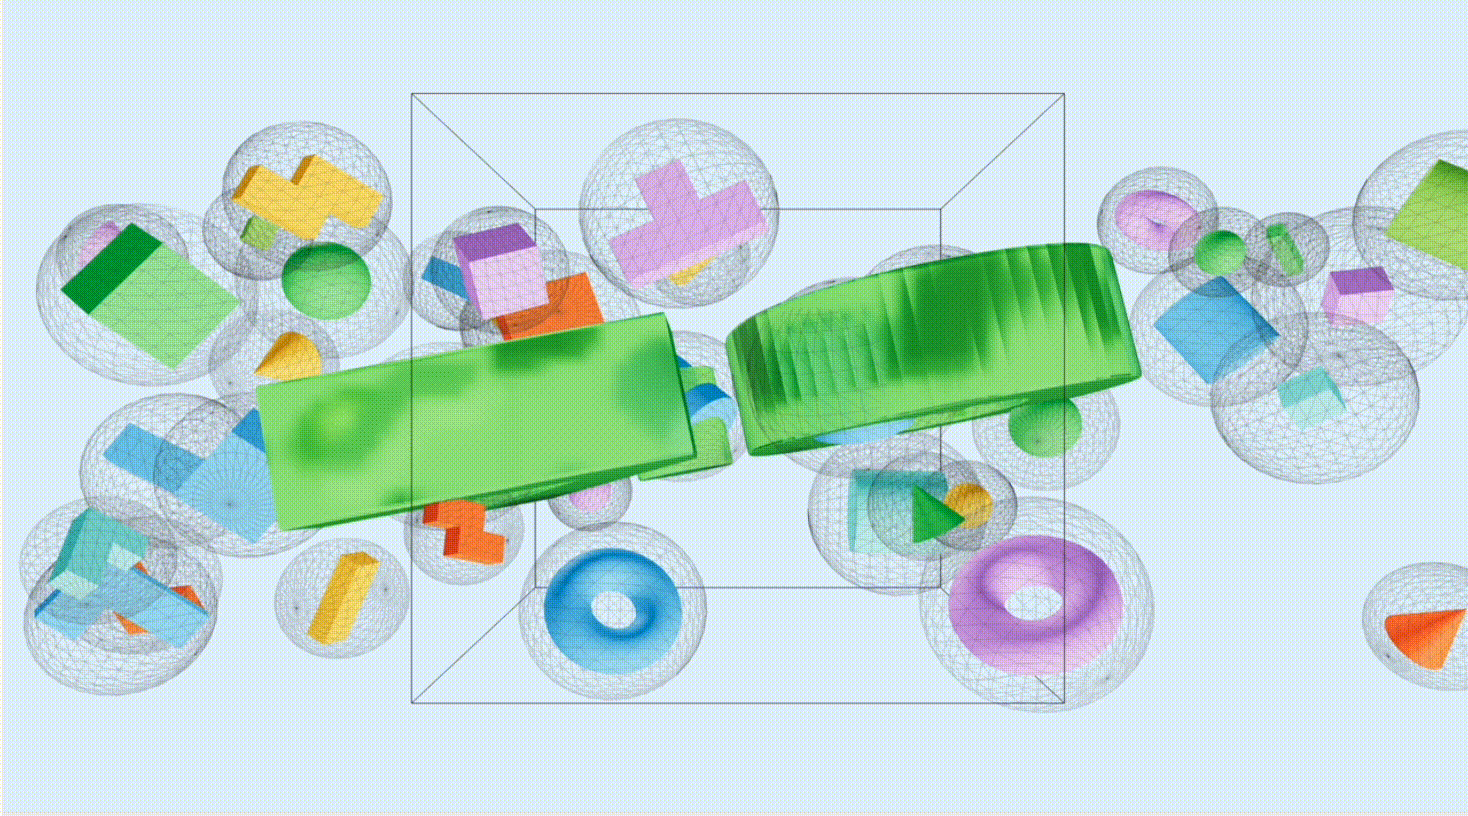
球体堆叠放置块
pack-spheres 库能够让块均匀分布,并防止任何潜在的重叠问题。该库采用蛮力方法在立方体内排列不同半径的球体。
安装依赖
npm i pack-spheres -S const spheres = pack({ maxCount: 40, minRadius: 0.125, maxRadius: 0.25 }) 缩放球体以适应场景空间,并沿 x 轴水平拉伸。最后,在每个球体的中心放置一个块,缩放到球体的半径。
这样就实现了块分布,大小和位置也令人满意。
处理文本和块之间的重叠,需要一种不同的方法。最初,考虑使用 pack-spheres 来检测球体和文本几何体之间的碰撞。最终选择了一个更简单的解决方案:沿 z 轴稍微移动球体。
文本本质上是所有块中的一部分。
全部更改都在 BlocksScene.tsx 文件中:
import React, { Suspense } from "react" // @ts-ignore import * as Random from 'canvas-sketch-util/random' import Block, { blockTypes } from './Block' import * as THREE from 'three' import { Float } from '@react-three/drei' import VersionText from './VersionText' // @ts-ignore import pack from 'pack-spheres' const size = 5.5 const colors = ['#FC521F', '#CA90FF', '#1EA7FD', '#FFAE00', '#37D5D3', '#FC521F', '#66BF3C'] // 横向拉伸 const scale = [size * 6, size, size] const spheres = pack({ maxCount: 40, minRadius: 0.125, maxRadius: 0.25 }).map((sphere: any) => { const inFront = sphere.position[2] >= 0 return { ...sphere, position: [ sphere.position[0], sphere.position[1], // 偏移以避免与 7.0 文本重叠 inFront ? sphere.position[2] + 0.6 : sphere.position[2] - 0.6 ] } }) const blocks = spheres.map((sphere: any, index: number) => ({ ...sphere, id: index, // 缩放 位置、半径,适应场景 position: sphere.position.map((v: number, idx: number) => v * scale[idx]), size: sphere.radius * size * 1.5, color: Random.pick(colors), type: Random.pick(blockTypes), rotation: new THREE.Quaternion(...Random.quaternion()), })) const BlocksScene = () => { return ( <Suspense fallback={null}> <group position={[0, 0.5, 0]}> <VersionText /> {blocks.map((block: any) => ( <Float key={block.id} position={block.position as any} quaternion={block.rotation} scale={block.size} speed={1} rotationIntensity={2} floatIntensity={2} floatingRange={[-0.25, 0.25]} > <Block type={block.type} color={block.color} /> </Float> ))} </group> </Suspense> ) } export default BlocksScene 挤压方式模拟俄罗斯方块
到目前为止,只使用了基础块,还没有俄罗斯风格的方块。
Three.js 中的 ExtrudeGeometry 的概念非常有趣。可以使用类似于 SVG 路径或 CSS 形状的语法为其提供 2D 形状,它将沿 z 轴拉伸它。次功能非常适合创建俄罗斯方块。
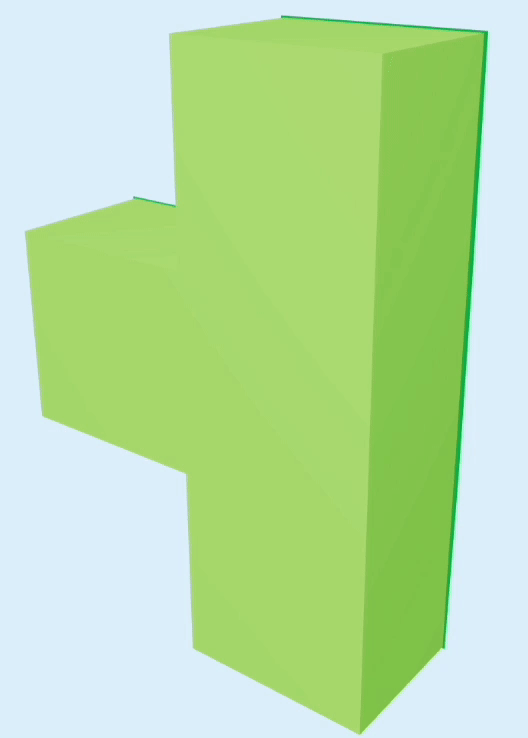
Drei 的 Extrude 提供了一种相对简单的语法创建此类形状。以下是如何生成 “T” 块的示例:
import React, { useMemo } from 'react' import * as THREE from 'three' import { Extrude } from '@react-three/drei' export const SIDE = 0.75 export const EXTRUDE_SETTINGS = { steps: 2, depth: SIDE * 0.75, bevelEnabled: false } export const TBlock = ({ color, ...props }: any) => { const shape = useMemo(() => { const _shape = new THREE.Shape() _shape.moveTo(0, 0) _shape.lineTo(SIDE, 0) _shape.lineTo(SIDE, SIDE * 3) _shape.lineTo(0, SIDE *3) _shape.lineTo(0, SIDE * 2) _shape.lineTo(-SIDE, SIDE * 2) _shape.lineTo(-SIDE, SIDE) _shape.lineTo(0, SIDE) return _shape }, []) return ( <Extrude args={[shape, EXTRUDE_SETTINGS]} {...props}> <meshPhongMaterial color={color} /> </Extrude> ) } 阴影
通过增加阴影深度可以使场景栩栩如生。可以在场景中设置光源和物体,使用 castShadow 投射阴影。为了提供更柔和的阴影,采用 Drei 提供的ContactShadows 组件。
ContactShadows 组件的阴影是一种“假阴影”效果。它们是通过从下方拍摄场景并将阴影渲染到接收器平面上来生成。阴影在几帧中积累,更加柔和、逼真。
ContactShadows 组件可以通过调整分辨率、不透明度、模糊、颜色等其他属性来自定义外观。
在 'App.tsx' 中加入 ContactShadows 组件,并进行设置。
import React from 'react'; import { Canvas } from '@react-three/fiber' import { ContactShadows } from '@react-three/drei'; import BlocksScene from './BlocksScene' function App() { return ( <div style={{ height: '100vh' }}> <Canvas shadows gl={{ antialias: false, stencil: false }} camera={{ position: [0, 0, 30], near: 0.1, far: 60, fov: 45 }} > <color attach="background" args={['#e3f3ff']} /> <ambientLight intensity={0.5} /> <directionalLight castShadow position={[2.5, 12, 12]} intensity={1} /> <pointLight position={[20, 20, 20]} intensity={1} /> <pointLight position={[-20, -20, -20]} intensity={1} /> <BlocksScene /> <ContactShadows resolution={512} opacity={0.5} position={[0, -8, 0]} width={20} height={10} color='#333' /> </Canvas> </div> ); } export default App; 景深效果(深度模糊效果)
在此阶段,场景中的每个对象都以相同的清晰度渲染,导致场景看起来有些平淡。摄影师会使用大光圈和浅景深来营造令人愉悦的模糊美感。可以通过对场景应用后处理(@react-three/postprocessing)来模拟这种效果,增加电影感。
EffectComposer 管理和运行后处理通道。它首先将场景渲染到缓冲区,然后在将最终图像渲染到屏幕上之前应用一个滤镜效果。
选取对焦距离
使用景深效果,可以将焦点放在场景中的特定距离(focusDistance)上,并使其他所有内容都变得模糊。但是如何定义对焦距离呢?它是以世界单位还是其他什么方式衡量?
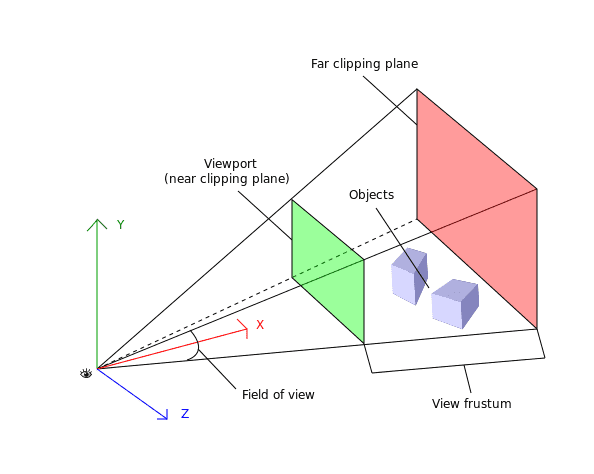
import { Canvas } from '@react-three/fiber'; import { EffectComposer, DepthOfField } from '@react-three/postprocessing'; export const Scene = () => ( <Canvas> {/* Rest of Our scene */} <EffectComposer multisampling={8}> <DepthOfField focusDistance={0.5} bokehScale={7} focalLength={0.2} /> </EffectComposer> </Canvas> ); 相机的视野由一个金字塔形状的体积定义,称为”视椎体“。距离相机最小(近平面)和最大(远平面)距离内的物体将被渲染。
focusDistance 参数表示处于焦点的物体距离相机的距离。它的值在 0 到 1 之间,其中 0 代表相机的近平面,1 代码相机的远平面。
本文将 focusDistance 设置为 0.5。靠近该值的物体将聚焦(清晰),而较远的物体将模糊。将 bokehScale 设置为 7, 值为 0 时不模糊,值越大越模糊。
使用材料库进行性能优化
阴影和景深是很酷的视觉效果,但它们的渲染成本相当高,会对性能产生重大影响。性能优化中,有用的建议是使用材料存储来避免为每个块创建新的材质实例。
Block 组件使用 color 为每个实例创建唯一的材质。例如,每个成色块都有自己的材质实例。很浪费,对吧?
const Block = ({ type, color }: BlockProps) => { const Component = BLOCK_TYPES[type].shape return ( <Component args={BLOCK_TYPES[type].args as any} castShadow> <meshPhongMaterial color={color} /> </Component> ) } 通过使用材质存储,可以在多个块实例中重复使用相同的材质。通过减少需要创建和渲染的材质数量提高性能。
import * as THREE from 'three'; THREE.ColorManagement.legacyMode = false; const colors: string[] = [ '#FC521F', '#CA90FF', '#1EA7FD', '#FFAE00', '#37D5D3', '#FC521F', '#66BF3C', '#0AB94F' ]; interface Materials { [color: string]: THREE.MeshPhongMaterial; } const materials: Materials = colors.reduce( (acc, color) => ({ ...acc, [color]: new THREE.MeshPhongMaterial({ color }) }), {} ); export { colors, materials }; store 为每种可能的块颜色生成一种材质,并将其存储在对象中。块组件无需为每个实例创建材质,只需从材质存储中引用即可。
const Block = ({ type, color }: BlockProps) => { const Component = BLOCK_TYPES[type].shape; return ( <Component args={OTHER_TYPES[type as OtherBlockType].args as any} material={materials[color]} /> ); } 总结
3D 现在是 Web 的一部分, R3F 是将 HTML 和 WebGL 交织在一起的绝佳工具。R3F 生态系统非常丰富,drei 和 postprocessing 等库简化了复杂的 3D 任务。 Storybook Day 的 3D 场景完美地展示了平台的可能性。使用球体包装(pack-sphere)、挤压(Extrude)、阴影、景深和材质存储来创建令人难忘的活动页面。