- A+
实战
首先介绍三个重要组件:
- Swashbuckle.AspNetCore.Swagger:一个把SwaggerDocument对象暴露成JSON端点(openapi.json对应的URI)的Swagger对象模型和中间件。
- Swashbuckle.AspNetCore.SwaggerGen:一个根据Routes(路由),Controllers(控制器),Models(模型对象)生成SwaggerDocument的生成器,它通常与Swagger端点中间件相结合,自动公开Swagger JSON(openapi.json)。
- Swashbuckle.AspNetCore.SwaggerUI:根据openapi.json生成的对应的UI界面
一、安装包
方式一:在与项目文件夹相同的目录下执行如下代码:
Install-Package Swashbuckle.AspNetCore -Version 6.2.3 方式二:使用Nuget包管理工具:

添加并配置Swagger中间件
在Program.cs文件中把Swagger生成器添加到服务集合
// This method gets called by the runtime. Use this method to add services to the container. public void ConfigureServices(IServiceCollection services) { services.AddControllers(); // Register the Swagger services services.AddSwaggerDocument(); } 也在Program.cs启用生成JSON文档和SwaggerUI的中间件
if (env.IsDevelopment()) { // Enable middleware to serve generated Swagger as a JSON endpoint. app.UseSwagger(); // Enable middleware to serve swagger-ui (HTML, JS, CSS, etc.), // specifying the Swagger JSON endpoint. app.UseSwaggerUI(); } 上面添加的两行代码只有在开发环境时才会生效,如果想在生产环境也使用Swagger,就别放在上面的if判断内
运行程序并访问https://localhost:<port>/swagger/v1/swagger.json就能看到openapi.json文档了。port为自己电脑对应的端口比如(默认5000或5001)
通过https://localhost:<port>/swagger路径访问SwaggerUI
如果想把SwaggerUI的路径设置成根路径(https://localhost:<port>/),把对应的RoutePrefix属性设为空字符串就行了
app.UseSwaggerUI(options => { options.SwaggerEndpoint("/swagger/v1/swagger.json", "v1"); options.RoutePrefix = string.Empty; }); 如果使用了IIS或者反向代理,用过添加./前缀来Swagger端点使用相对地址,例如 ./swagger/v1/swagger.json,/swagger/v1/swagger.json表示程序在URL的真实跟目录下寻找JSON文件,比如使用https://localhost:<port>/<route_prefix>/swagger/v1/swagger.json而不是https://localhost:<port>/<virtual_directory>/<route_prefix>/swagger/v1/swagger.json。
注意:默认Swagger JSON是3.0版本的,若要启用2.0版本,则添加如下代码:
app.UseSwagger(options => { options.SerializeAsV2 = true; }); API信息和描述
如果您想在Swagger UI中添加一些对API的描述信息,比如作者、许可证、服务条款等信息:
在Program.cs类中引入OpenApiInfo类的命名空间
using Microsoft.OpenApi.Models; 然后在Program.cs文件中的ConfigureServices方法中通过services.AddSwaggerGen方法的配置对象进行就改,模板如下:
services.AddControllers(); services.AddSwaggerGen(o=> { o.SwaggerDoc("v1", new OpenApiInfo { Version = "v1", Title = "WeatherForecastApi", Description = "try to use the swagger in asp.net core", TermsOfService = new Uri("https://www.baidu.com"), Contact = new OpenApiContact { Email = "[email protected]", Name = "Michael Shen", Url = new Uri("https://www.github.com/shenpingyuan"), }, License=new OpenApiLicense { Name="app license", Url = new Uri("https://example.com/license") } }); }); 然后你的SwaggerUI将会显示对应的配置信息

XML注释
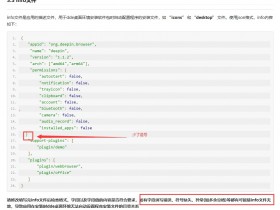
如果您想启用XML注释以及生成对应的XML注释文档,右击的的项目文件,然后点击编辑项目文件

添加<GenerateDocumentationFile>true</GenerateDocumentationFile>即可启用XML注释
<PropertyGroup> <!--生成XML注释文档--> <GenerateDocumentationFile>true</GenerateDocumentationFile> </PropertyGroup> 开启这个功能后,如果您的程序中有没有经过XML注释的类型或者成员,您将会看到如下警告信息:
warning CS1591: Missing XML comment for publicly visible type or member 'TodoController' 您觉得烦,可以在编辑项目文件中添加<NoWarn>$(NoWarn);1591</NoWarn>来取消这种警告
<PropertyGroup> <!--取消1591警告信息--> <NoWarn>$(NoWarn);1591</NoWarn> </PropertyGroup> 您也可以通过如下宏定义的方式对整段代码取消1591警告信息
namespace SwashbuckleSample.Models { #pragma warning disable CS1591 public class TodoContext : DbContext { public TodoContext(DbContextOptions<TodoContext> options) : base(options) { } public DbSet<TodoItem> TodoItems => Set<TodoItem>(); } #pragma warning restore CS1591 } 很多地方会用到这个XML注释文件,如果您想配置你的Swagger使用XML注释生成的XML注释文档,添加如下最后两行代码,通过反射方式获取目标服务器上对应的XML文件的路径。
注意:Linux或者非Windows系统上,文件名可能是区分大小写的,比如一个TodoApi.XML文件在Windows上有效,在CentOS上无效
services.AddSwaggerGen(o=> { o.SwaggerDoc("v1", new OpenApiInfo { Version = "v1", Title = "WeatherForecastApi", Description = "try to use the swagger in asp.net core", TermsOfService = new Uri("https://www.baidu.com"), Contact = new OpenApiContact { Email = "[email protected]", Name = "Michael Shen", Url = new Uri("https://www.github.com/shenpingyuan"), }, License=new OpenApiLicense { Name="app license", Url = new Uri("https://example.com/license") } }); // using System.Reflection; var xmlFilename = $"{Assembly.GetExecutingAssembly().GetName().Name}.xml"; o.IncludeXmlComments(Path.Combine(AppContext.BaseDirectory, xmlFilename)); }); 通过在在Controller上的Action上添加三重“/”(///),添加XML注释,比如在 “Delete” Action上添加XML注释:
/// <summary> /// Deletes a specific TodoItem. /// </summary> /// <param name="id"></param> /// <returns></returns> [HttpDelete("{id}")] public async Task<IActionResult> Delete(long id) { var item = await _context.TodoItems.FindAsync(id); if (item is null) { return NotFound(); } _context.TodoItems.Remove(item); await _context.SaveChangesAsync(); return NoContent(); } 在SwaggerUI中将会显示<summary>元素内的文本

对应的openapi.json文档会添加一行"summary": "Deletes a specific TodoItem.",
"delete": { "tags": [ "Todo" ], "summary": "Deletes a specific TodoItem.", "parameters": [ { "name": "id", "in": "path", "description": "", "required": true, "schema": { "type": "integer", "format": "int64" } } ], "responses": { "200": { "description": "Success" } } }, 添加<remark>元素:
/// <summary> /// Creates a TodoItem. /// </summary> /// <param name="item"></param> /// <returns>A newly created TodoItem</returns> /// <remarks> /// Sample request: /// /// POST /Todo /// { /// "id": 1, /// "name": "Item #1", /// "isComplete": true /// } /// /// </remarks> /// <response code="201">Returns the newly created item</response> /// <response code="400">If the item is null</response> [HttpPost] [ProducesResponseType(StatusCodes.Status201Created)] [ProducesResponseType(StatusCodes.Status400BadRequest)] public async Task<IActionResult> Create(TodoItem item) { _context.TodoItems.Add(item); await _context.SaveChangesAsync(); return CreatedAtAction(nameof(Get), new { id = item.Id }, item); } 对应SwaggerUI

属性注释
在模型对象上添加属性注释[Required]
using System.ComponentModel; using System.ComponentModel.DataAnnotations; namespace SwashbuckleSample.Models { public class TodoItem { public long Id { get; set; } [Required] public string Name { get; set; } = null!; [DefaultValue(false)] public bool IsComplete { get; set; } } } 对应openapi.json文档
"schemas": { "TodoItem": { "required": [ "name" ], "type": "object", "properties": { "id": { "type": "integer", "format": "int64" }, "name": { "type": "string" }, "isComplete": { "type": "boolean", "default": false } }, "additionalProperties": false } }, 给APIController添加[Produces("application/json")]属性注释,目的是声明,这个Controller的Action支持返回的数据类型为application/json
[ApiController] [Route("api/[controller]")] [Produces("application/json")] public class TodoController : ControllerBase { SwaggerUI

您还可以通过如下方式添加返回的状态码的描述信息
/// <response code="201">Returns the newly created item</response> /// <response code="400">If the item is null</response> [HttpPost] [ProducesResponseType(StatusCodes.Status201Created)] [ProducesResponseType(StatusCodes.Status400BadRequest)] public async Task<IActionResult> Create(TodoItem item) { _context.TodoItems.Add(item); await _context.SaveChangesAsync(); return CreatedAtAction(nameof(Get), new { id = item.Id }, item); } SwaggerUI

定制UI界面
默认的SwaggerUI界面既好看又实用,但如果您需要API文档页代表你的品牌和主题。
通过app.UseStaticFiles();启用静态文件中间件
app.UseHttpsRedirection(); app.UseStaticFiles(); app.MapControllers(); 把您的额外的CSS代码放到项目的wwwroot文件夹下,然后在中间件的配置选项中指定对应的相对路径
app.UseSwaggerUI(options => { options.InjectStylesheet("/swagger-ui/custom.css"); });