- A+
前言
读这么多原理,到底为了什么?真实项目中真的会用得到吗?
你正在疑惑 "知识的力量" 吗?
本篇会给一个非常非常好的案例,让你感悟 -- 知识如何用于实战。
记住,我的目的是让你感悟,而不是要你盲目相信知识。
很久很久以前的问题 (疑难杂症)
下面是我在 2020-11-06 记入的一个问题。
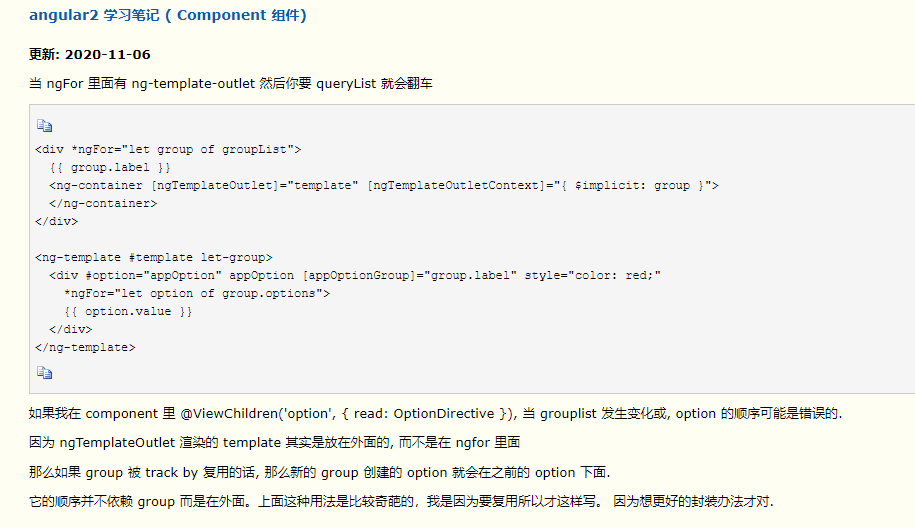
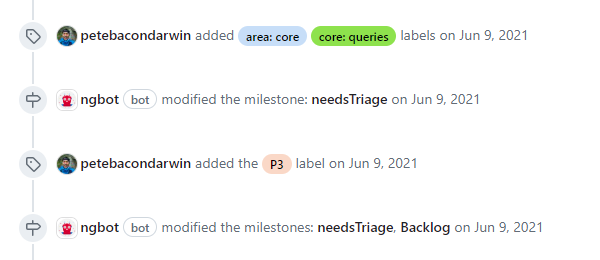
一模一样的问题也有人在 Github 提问 Github Issue – QueryList not sorted according to the actual state (提问于:2021-06-08)
这个 Issue 很特别,它没有被关闭,也没有任何的回复,提问者也没有继续追问。
没有被关闭是因为,它是一个事实,而且直觉告诉他们 (Angular Team) 这可能是一个 Bug 或者是一个可以尝试去调查的 Issue。
没有回复是因为,他们 (Angular Team) 没有一眼看出原因,然后他们懒得去调查。
提问者没有追问是因为,这个问题可以避开,并不是非要解决不可的问题。
从这里我们也可以看出 Angular 社区 (Angular Team and User) 对待 Issue 的态度?。
所以,千万不要把那群人 (Angular Team) 想得太高,其实他们和你周围的工作伙伴 level 差不多而已。
如何对待这类问题?(疑难杂症)
首先,如果你是 Angular 新手,那你不会遇到这类问题,因为你用的不深。
如果你不是新手,但项目不够复杂,那你也不会遇到这类问题,还是因为你用的不够深。
当有一天你遇到这类问题的时候,如果你不够等级,那你只能傻傻的 debug 半天,找半天的资料,最后傻傻的去提问。
几天后,等了一个寂寞,于是要嘛你避开这个问题,要嘛继续追问...并期待有个热心人士会为你解答。
很多年以后你会意识到,这世上没有那么多热心人士,你的疑问任然是疑问。
很多年以后你发现,你需要避开的问题越来越多,最后连 Angular 你都避开了,逃到了 Vue,React,但终究没有逃出问题的魔掌。
最后你意识到原来问题与框架无关,问题来自于项目的复杂度和你掌握知识的深度。
结论:直面问题,问题解决 33%,理解问题,问题解决 +33%,最后的 33% 就靠你的智慧了,而这 3 步都离不开知识。
当 ngForTemplate 遇上 Query Elements (疑难杂症)
上述的例子不够简单,这里我做一个更直观的例子来凸显同一个原因导致的问题。
NgForOf 指令 和 Query Elements
App 组件
export class AppComponent { names = signal(["Alice", "Bob", "Charlie", "David", "Eve", "Frank", "Grace", "Hannah", "Isaac", "Jane"]); trackByNameFn(_index: number, name: string): string { return name; } }
一组名字和一个 trackByNameFn 方法准备给 NgForOf 指令。
App Template
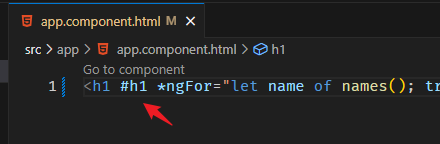
<h1 *ngFor="let name of names(); trackBy: trackByNameFn">{{ name }}</h1>
注:问题的原因并不出在 NgForOf 指令,它只是作为例子而已,请耐心往下看。
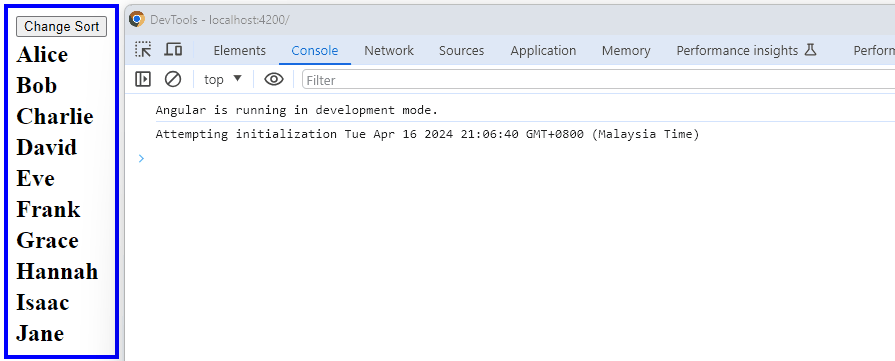
使用 NgForOf 指令 for loop 出所有名字。
效果
接着我们给 h1 添加一个 Template Variable
然后在 App 组件添加 Query Elements
export class AppComponent { // 1. Query Elements h1List = viewChildren<string, ElementRef<HTMLElement>>('h1', { read: ElementRef }); constructor(){ afterNextRender(() => { // 2. Log Query Results console.log(this.h1List().map(el => el.nativeElement.textContent)); }); } }
效果

目前为止一切正常,接下来,我们换个位置。
在 App Template 添加一个 change sort button
<button (click)="changeSort()">Change Sort</button>
在 App 组件添加 changeSort 方法
changeSort() { this.names.set([ ...this.names().slice(1, 5), this.names()[0], ...this.names().slice(5), ]) setTimeout(() => { console.log('after', this.h1List().map(el => el.nativeElement.textContent)); }, 1000); }
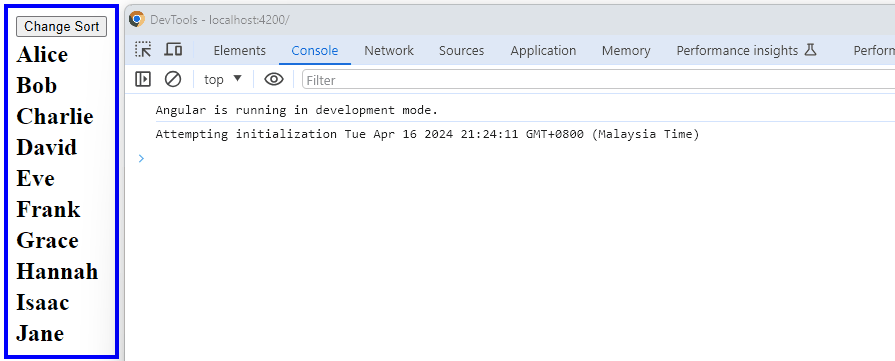
换位置后,我们查看 Query Results 的顺序是否也跟着换了位置。
效果

完全正确。
ngForTemplate 和 Query Elements
现在,我们做一些调整,改用 ngForTemplate。
<ng-template #template let-name> <h1 #h1>{{ name }}</h1> </ng-template> <ng-template ngFor [ngForOf]="names()" [ngForTrackBy]="trackByNameFn" [ngForTemplate]="template"></ng-template>
我在 NgForOf 指令教程中没有提到 @Input ngForTemplate 是因为它比较冷门,而且可能会遇到本篇的问题。
ngForTemplate 允许我们把 ng-template 定义在另一个地方,然后传入到 NgForOf 指令里。
这样的好处是 ng-template 可以另外封装,更 dynamic,更灵活,当然也更容易掉坑?。
接着,我们做回相同的测试
注意看,DOM render 是正确的,但是 Query Results 的顺序是完全错误的。
Smallest reproduction
首先,不要误会,这不是 NgForOf 指令的问题,更不是 @Input ngForTemplate 的问题。
这是 ng-template 和 ViewContainerRef 的问题。
如果你已经忘记了 ng-template 和 ViewContainerRef 的原理,你可以先复习这篇 Component 组件 の ng-template。
我们用 ng-template 和 ViewContainerRef 来重现上述的问题。
首先在 App Template 添加 ng-container
<button (click)="changeSort()">Change Sort</button> <ng-template #template let-name> <h1 #h1>{{ name }}</h1> </ng-template> <!-- 1. 加上 ng-container --> <ng-container #container />
注:NgForOf 指令可以删除了。
接着在 App 组件 Query TemplateRef 和 ViewContainerRef,然后 for loop createEmbeddedView 输出所有名字。
export class AppComponent implements OnInit { viewContainerRef = viewChild.required('container', { read: ViewContainerRef }); templateRef = viewChild.required('template', { read: TemplateRef }); ngOnInit() { for (const name of ["Alice", "Bob", "Charlie", "David", "Eve", "Frank", "Grace", "Hannah", "Isaac", "Jane"]) { this.viewContainerRef().createEmbeddedView(this.templateRef(), { $implicit: name }) } } h1List = viewChildren<string, ElementRef<HTMLElement>>('h1', { read: ElementRef }); trackByNameFn(_index: number, name: string): string { return name; } }
接着实现 changeSort 方法
changeSort() { this.viewContainerRef().move(this.viewContainerRef().get(0)!, 4); setTimeout(() => { console.log('after', this.h1List().map(el => el.nativeElement.textContent)); }, 1000); }
通过 ViewContainerRef.move 换位置
效果
注意看,DOM render 是正确的,但是 Query Results 的顺序是错误的。它和 ngForTemplate 都出现了顺序错误的问题。
The reason behind
我们逛过 Angular 源码,所以我们知道:
ng-template 会生成 LContainer (type = 4 号 Container)。
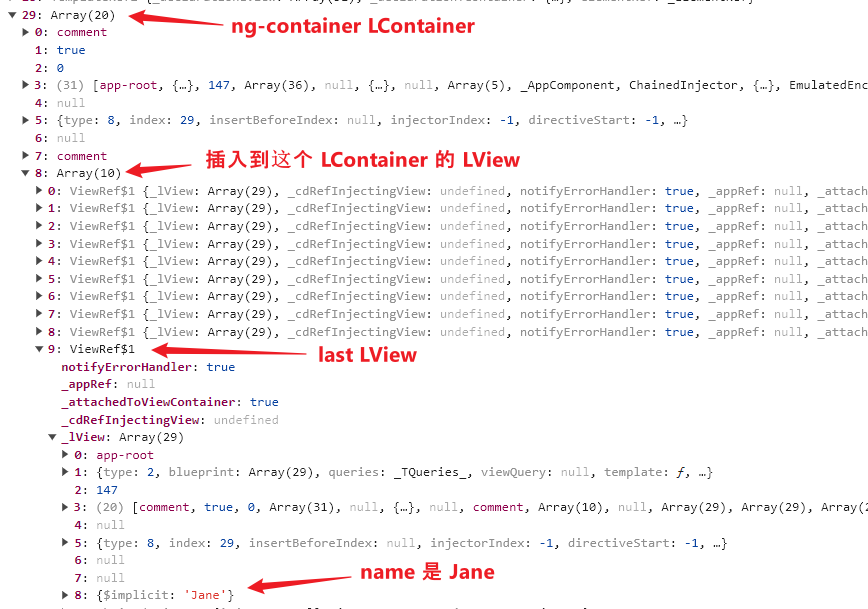
ng-container + Query ViewContainerRef 也会生成 LContainer (type = 8 号 ElementContainer)。
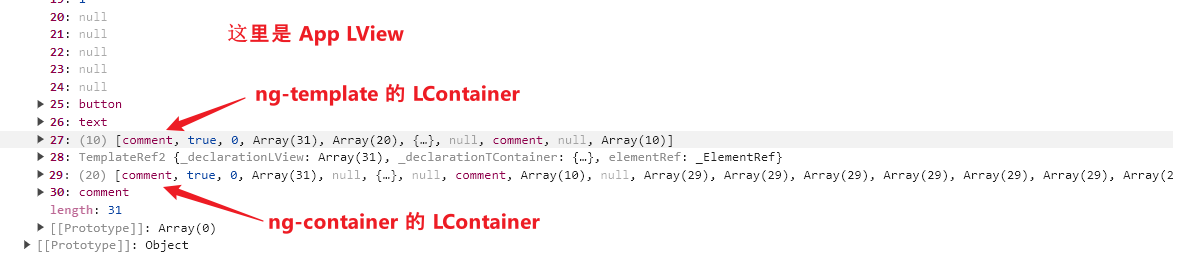
ViewContainerRef.createEmbededView 会生成一个 LView,
这个 LView 会被记入到 2 个地方:
-
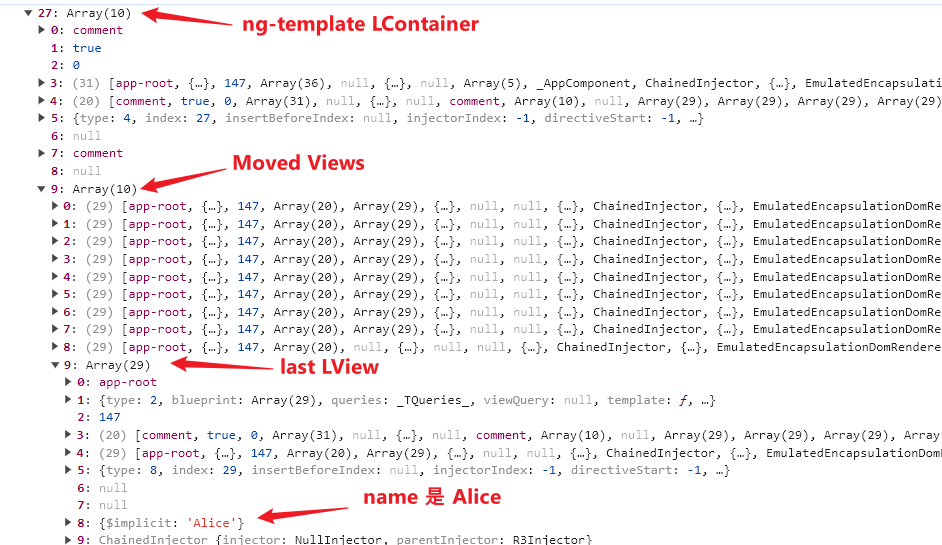
ng-container LContainer
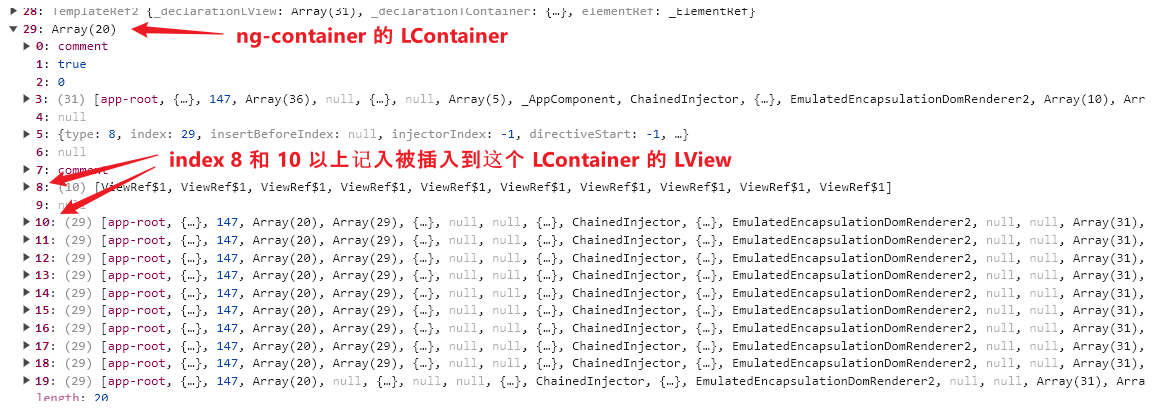
LVIew 会被记入到 ng-container LContainer[8 ViewRefs] 的 array 里,和 LContainer[10 以上],这两个始终是一致的啦,我们下面关注 LContainer[8 ViewRefs] 就好。
-
ng-template LContainer
LVIew 会被记入到 ng-template LContainer[9 MovedViews] 里头

index 9 装的是 Moved Views,意思是说,用这个 ng-template 创建出来的 LView 却没有被插入到这个 ng-template 的 LContainer 里,而是被插入到了其它的 LContainer。
好,重点来了。
第一个重点,此时 ng-template LContainer[9 MovedViews] 和 ng-container LContainer[8 ViewRefs] 的 LView array 顺序是一模一样的。
第二个重点,Query Elements 查找的是 ng-template LContainer[9 MovedViews] 里头的 LView,所以 Query Results 的顺序是依据 ng-template LContainer[9 MovedViews] array 的顺序。
接着,我们 change sort 看看
ng-template LContainer
ng-container LContainer
DOM render 是依据 ng-container LContainer[8 ViewRefs],Query 则是依据 ng-template LContainer[9 MovedViews],而这 2 个 array 的顺序在 change sort 以后竟然不一样了?。
好,原因算是找到了。
逛一逛 ViewContainerRef.move 源码
我们知道 ViewContainerRef.move 后,ng-container LContainer[8 ViewRefs] 和 ng-template LContainer[9 MovedViews] 的 array 顺序就不同了,但具体是哪一行代码导致的呢?
ViewContainerRef 源码在 view_container_ref.ts

ViewContainerRef.move 方法内部其实是调用了 insert 方法。

insert 内调用了 insertImpl
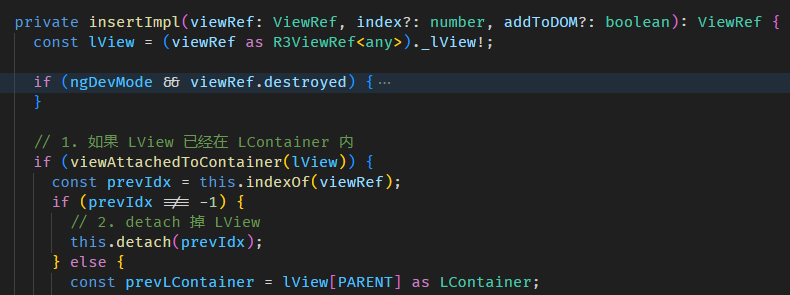
首先检查看要 insert 的 LView 是否已经在 LContainer 里,如果已经在,那就先 detach。
提醒:只是 detach,没有 destroy 哦。
detach 以后,ng-container LContainer[8 ViewRefs] 就少了这个 LView,同时 ng-template LContainer[9 MovedViews] 也少了这个 LView
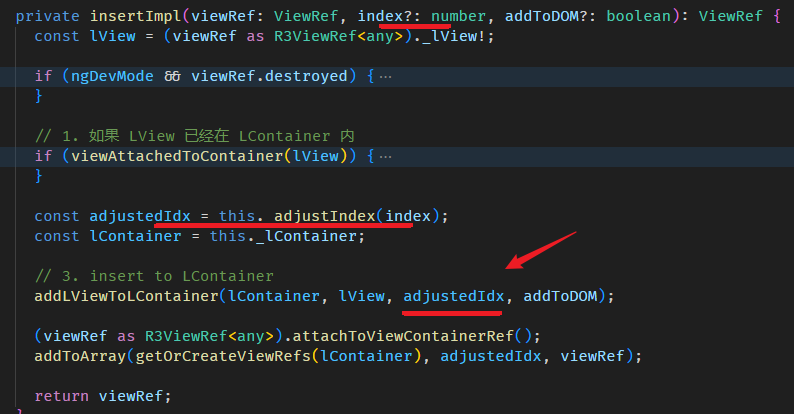
然后再重新插入回 LContainer。注:顺便留意那个要插入的 index 位置。
addLViewToLContainer 函数的源码在 view_manipulation.ts

insertView 函数的源码在 node_manipulation.ts
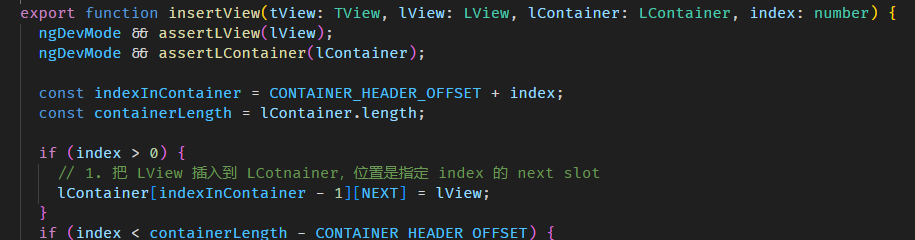
到这里,ng-container LContainer[10 以上] 就有正确的 LView 了。
继续往下

我们的例子就是 LView 来自其它地方。
ng-template 本身也可以作为 ViewContainerRef。
ng-template create LView 插入回自己作为 ViewContainerRef 叫做来自同一个地方。
ng-template create LView 插入到其它的 LContainer 叫做来自不同地方。
来自不同地方就需要调用 trackMovedView 函数
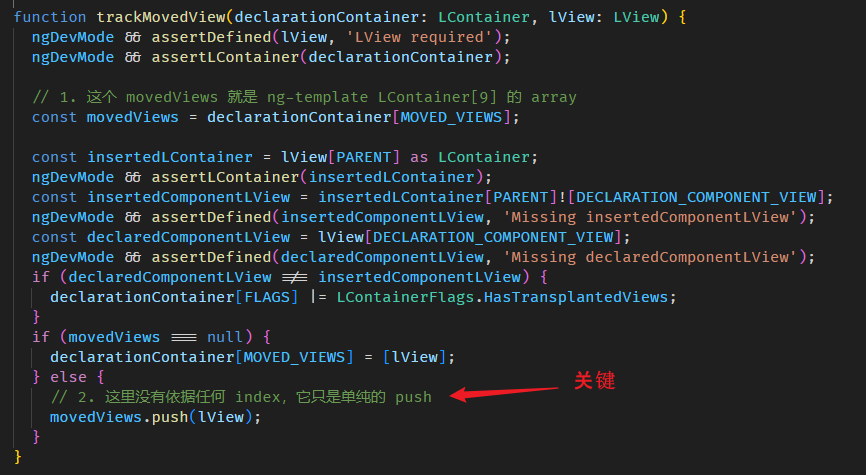
到这里,ng-template LContainer[9 MovedViews] 就有了 LView,但是顺序和 ng-container[10 以上] 是不同的。
因为它只是 push,完全没有依据 insert 指定的 index。
好,我们直接跳回 ViewContainerRef.insertImpl 方法
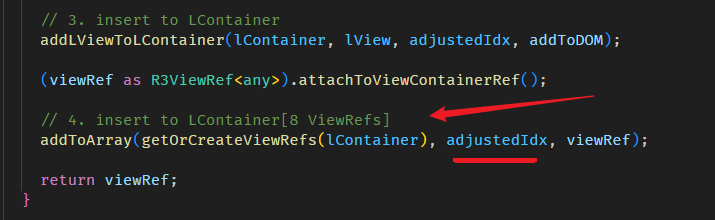
在 addLViewToLContainer 后,会跑一个 addToArray。它的作用是把 LView 添加到 LContainer[8 ViewRefs] array 里面。
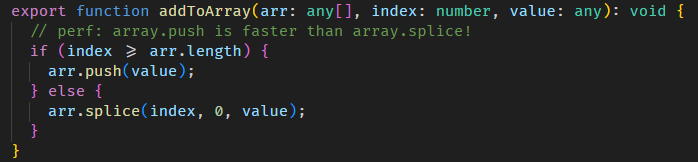
它是有依据 insert 指定的 index 的。
总结:
-
先 detach LView
ng-container LContainer 和 ng-template LContainer 都移除这个 LView
-
添加 LView 到 ng-container LContainer[10 以上]
这里会依据 insert 指定的 index
-
添加 LView 到 ng-template LContainer[9 MovedViews]
这里不会依据 insert 指定的 index,它一律只是 push。
这也是这个问题出错的地方。
-
添加 LView 到 ng-container LContainer[8 ViewRefs]
这里会依据 insert 指定的 index
对这个问题的思考
目前的行为是:ng-template 创建的 LView 被插入到 ng-container LContainer 后,ng-template LContainer[9 MovedViews] 只是一味的 push,没有顾虑到顺序。
要维护一个顺序其实也不难,只是我们也要考虑到 ng-template 的 LView 是可以插入到不同的 LContainer 的。
试想 ng-template 创建了 9 个 LView,分别插入到 3 个不同的 ng-container LContainer 里。
LView 的顺序可以 follow 个别的 ng-container LContainer[8 ViewRefs],但是 3 个 ng-container LContainer 的顺序呢?哪一个先?
这个就需要思考一下,最简单的选择或许是依据插入的顺序。
总之这样至少已经可以解决 80% 常见了,毕竟 ng-template 插入到多个 LContainer 是罕见的。
总结
本篇给了一个例子,示范当面对疑难杂症时如何面对,如何理解,如何一步一步思考,并且选出最合适的方案。
同时,让你对知识的力量有所感悟,以后你就知道什么时候需要深入学习,什么后该划水。happy coding...??
目录
上一篇 Angular 17+ 高级教程 – Prettier, ESLint, Stylelint
下一篇 Angular 17+ 高级教程 – 盘点 Angular v14 到 v17 的重大改变
想查看目录,请移步 Angular 17+ 高级教程 – 目录


