- A+
2)Ansible 介绍
Ansible 基本概念
Ansible 是一种自动化运维工具,基于 Paramiko 开发的,并且基于模块化工作,Ansible 是一种集成 IT 系统的配置管理、应用部署、执行特定任务的开源平台,它是基于 Python 语言,由 Paramiko 和 PyYAML 两个关键模块构建。集合了众多运维工具的优点,实现了批量系统配置、批量程序部署、批量运行命令等功能。
Ansible 是基于模块工作的,本身没有批量部署的能力,真正具有批量部署的是 Ansible 所运行的模块,Ansible 只是提供一种框架。Ansible 不需要在远程主机上安装 Client、Agents,因为它们是基于 SSH 来和远程主机通讯的。
Ansible 优势
- Ansible 不需要单独安装客户端,也不需要启动任何服务
- Ansible 是 Python 中的一套完整的自动化执行任务模块
- Ansible PlayBook,采用 yaml 配置,对于自动化任务执行一目了然
- Ansible 模块较多,对于自动化的场景支持较丰富
2.1)Ansible 发展史
官网:https://www.ansible.com/
作者: Michael DeHaan( Cobbler 与 Func 作者)
Ansible 的名称来自科幻小说《 安德的游戏 》中跨越时空的即时通信工具,使用它可以在相距数光年的距离,远程实时控制前线的舰队战斗。
2012-03-09,发布 0.0.1 版
2015-10-17,Red Hat 宣布 1.5 亿美元收购
官方文档:https://docs.ansible.com/
2.2)Ansible 功能
Ansible 功能介绍
- 批量执行远程命令,可以对远程的多台主机同时进行命令的执行
- 批量安装和配置软件服务,可以对远程的多台主机进行自动化的方式配置和管理各种服务
- 编排高级的企业级复杂的 IT 架构任务,Ansible 的 PlayBook 和 Role 可以轻松实现大型的 IT 复杂架构
- 提供自动化运维工具的 开发 API,有很多运维工具,如 JumpServer 就是基于 Ansible 实现自动化管理功能
2.3)Ansible 特性
Ansible 特性
- 模块化: 调用特定的模块完成特定任务,支持自定义模块,可使用任何编程语言写模块
- Paramiko( Python 对 SSH 的实现),PyYAML,Jinja2(模板语言)三个关键模块
- 基于 Python 语言实现
- 部署简单,基于 Python 和 SSH (默认已安装),agentless,无需代理不依赖 PKI( 无需 SSL )
- 安全, 基于 OpenSSH
- 幂等性: 一个任务执行 1 遍和执行 n 遍效果一样,不因重复执行带来意外情况,此特性非绝对。( Shell 脚本想实现幂等性很困难 )
- 支持 PlayBook 编排任务,YAML 格式,编排任务,支持丰富的数据结构( 存在 分支,循环,判断,变量 等功能 )
- 较强大的 多层解决方案 role( Role 角色管理 )
2.4)Ansible 架构
Ansible 是 基于模块工作 的,本身没有批量部署的能力。真正具有批量部署的是 Ansible 所运行的模块,Ansible 只是提供一种框架。
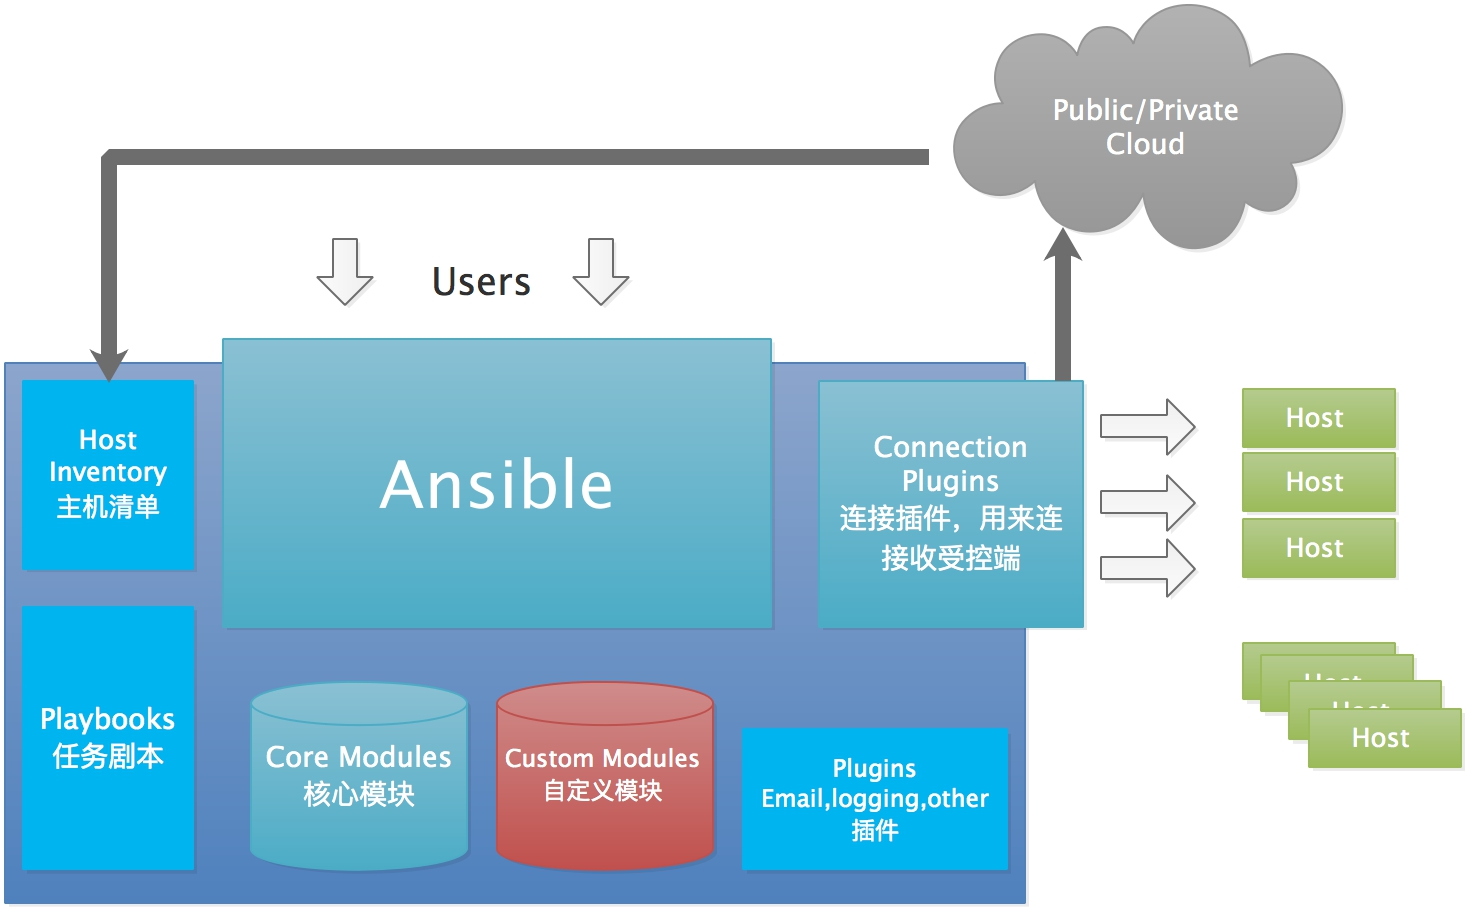
上图为 Ansible 的基本架构,从上图可以了解到其由以下部分组成:
- 核心: Ansible
- 核心模块(Core Modules):这些都是 Ansible 自带的模块
- 扩展模块(Custom Modules):如果核心模块不足以完成某种功能,可以添加扩展模块
- 插件(Plugins):完成模块功能的补充
- 剧本(Playbooks):Ansible 的任务配置文件,将多个任务定义在剧本中,由 Ansible 完成执行
- 连接插件(Connectior Plugins):Ansible 基于连接插件连接到各个主机上,虽然 Ansible 是使用 SSH 连接到各个主机的,但是它还支持其他的连接方法,所以需要有连接插件
- 主机清单(Host Inventory):定义 Ansible 管理的主机
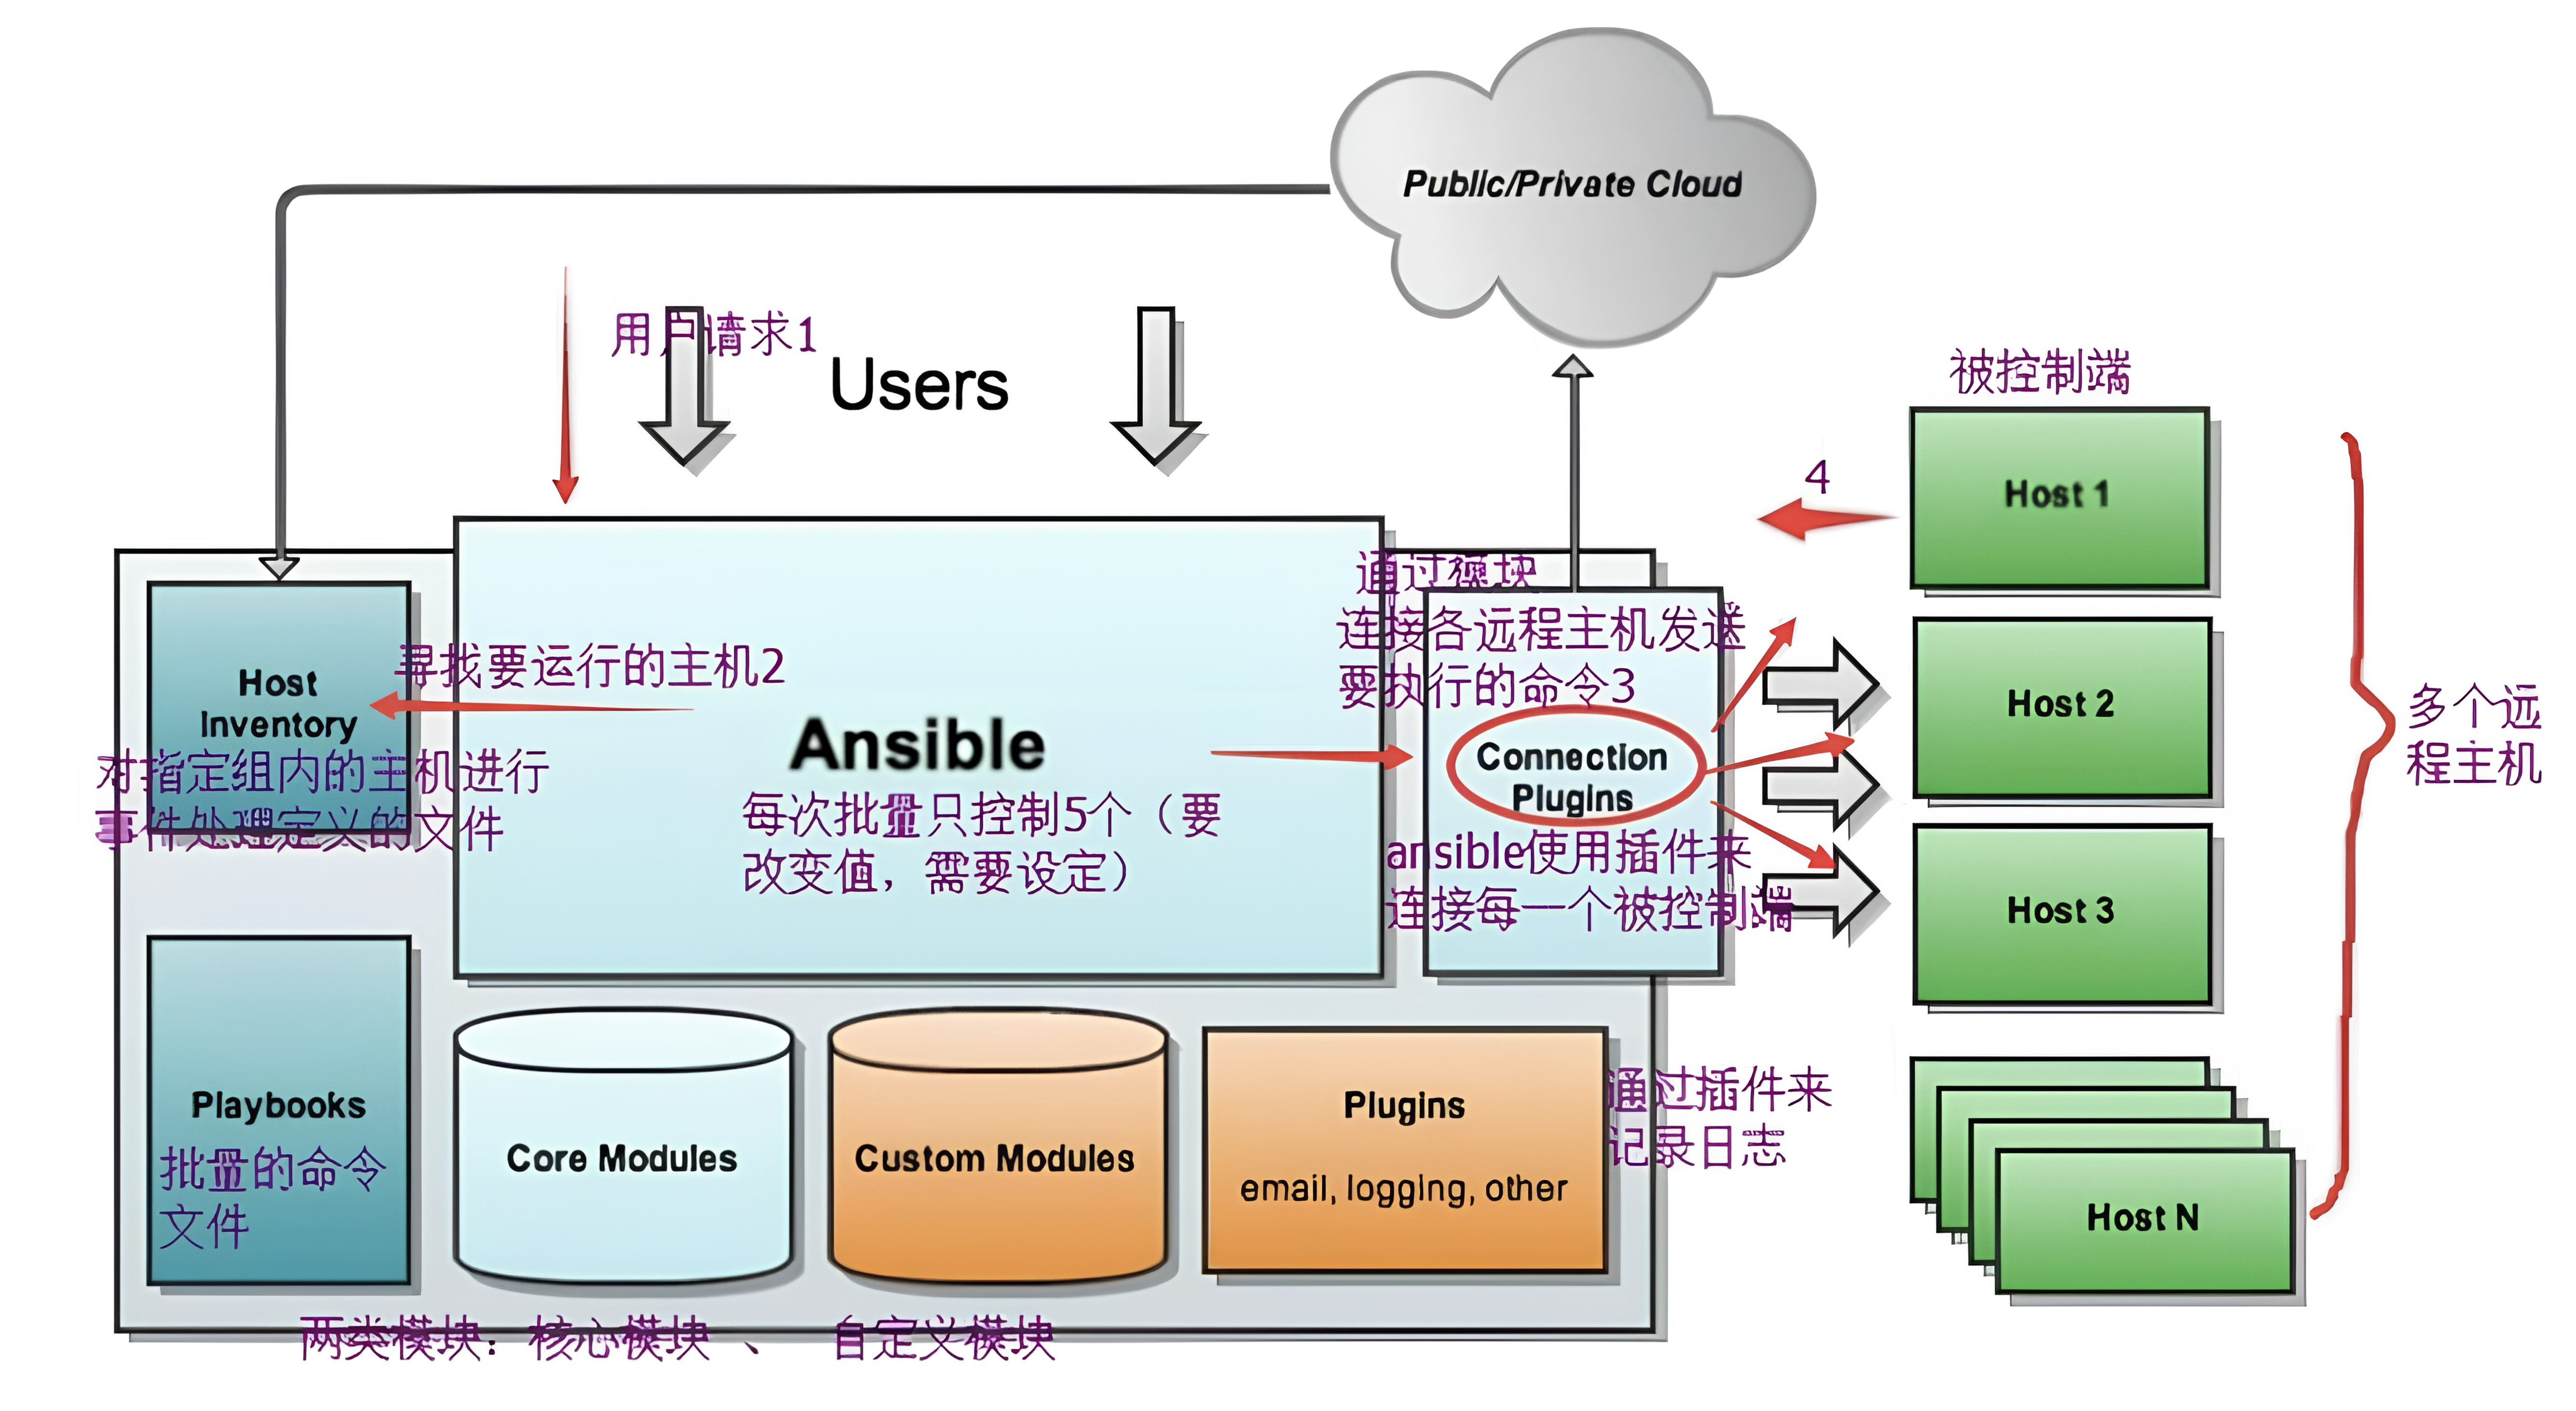
Ansible 工作逻辑
- 用户请求
- 寻找要运行的主机清单
- 通过模块连接远程主机发送要执行的命令
- 被控节点执行命令
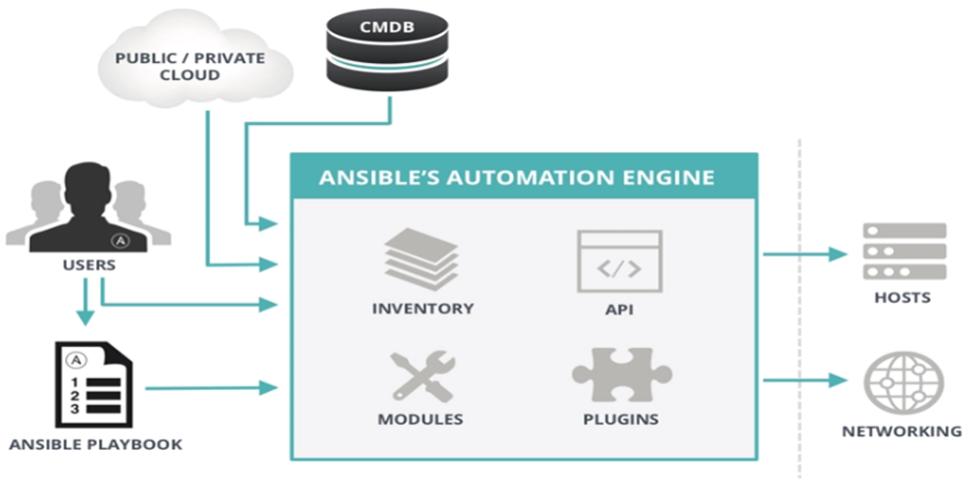
2.4.1)Ansible 组成
组合 INVENTORY、API、MODULES、PLUGINS 的绿框
为 Ansible 命令工具,其为 核心执行工具
INVENTORY:Ansible 管理主机的清单 /etc/anaible/hosts ( 主机清单 )
MODULES:Ansible 执行命令的 功能模块,多数为内置核心模块,也可自定义( 功能模块 )
PLUGINS:模块功能的补充,如 连接类型插件、循环插件、变量插件、过滤插件等,该功能不常用( 扩展插件 )
API:**供第三方程序调用 **的应用程序编程接口( 开发接口 )
2.4.2)Ansible 命令执行来源
USER 用户,即 SYSTEM ADMINISTRATOR
PLAYBOOKS:任务剧本(任务集),编排定义 Ansible 任务集的配置文件,由 Ansible 顺序依次执行,通常是 JSON 格式的 YML 文件
CMDB(配置管理数据库) API 调用
PUBLIC/PRIVATE CLOUD( 共有云私有云 )API 调用
USER -> Ansible Playbook -> Ansibile
2.4.3)注意事项
执行 Ansible 的主机 一般称为:管理端,主控端,中控,Master 或 堡垒机
主控端 Python 版本需要 2.6 或以上
被控端 Python 版本小于 **2.4 **时,需要安装 Python-simplejson
被控端 如开启 SELinux 需要安装 libselinux-python
Windows 不能做为主控端( 可以做被控端 )
3)Ansible 入门
3.1)Ansible 安装
官方文档:https://docs.ansible.com/ansible/latest/installation_guide/intro_installation.html
Ansible 的安装方法有多种
- Yum 源安装
- 编译安装
- Git 方式
- PIP 安装
3.1.1)Yum 源安装
注意:Ansible 软件包默认不在 Yum 仓库中,需配置 EPEL 源安装。
https://blog.csdn.net/weixin_74962223/article/details/134573366
// CentOS 的 EPEL 源的 rpm 包安装 [root@centos7 ~] yum repolist | grep epel [root@centos7 ~] yum install ansible -y // Ubuntu 安装 [root@ubuntu ~] apt install ansible -y 范例:查看 Ansible 版本
[root@centos7 ~] yum info ansible [root@centos8 ~] yum info ansible [root@ubuntu1804 ~] apt show ansible 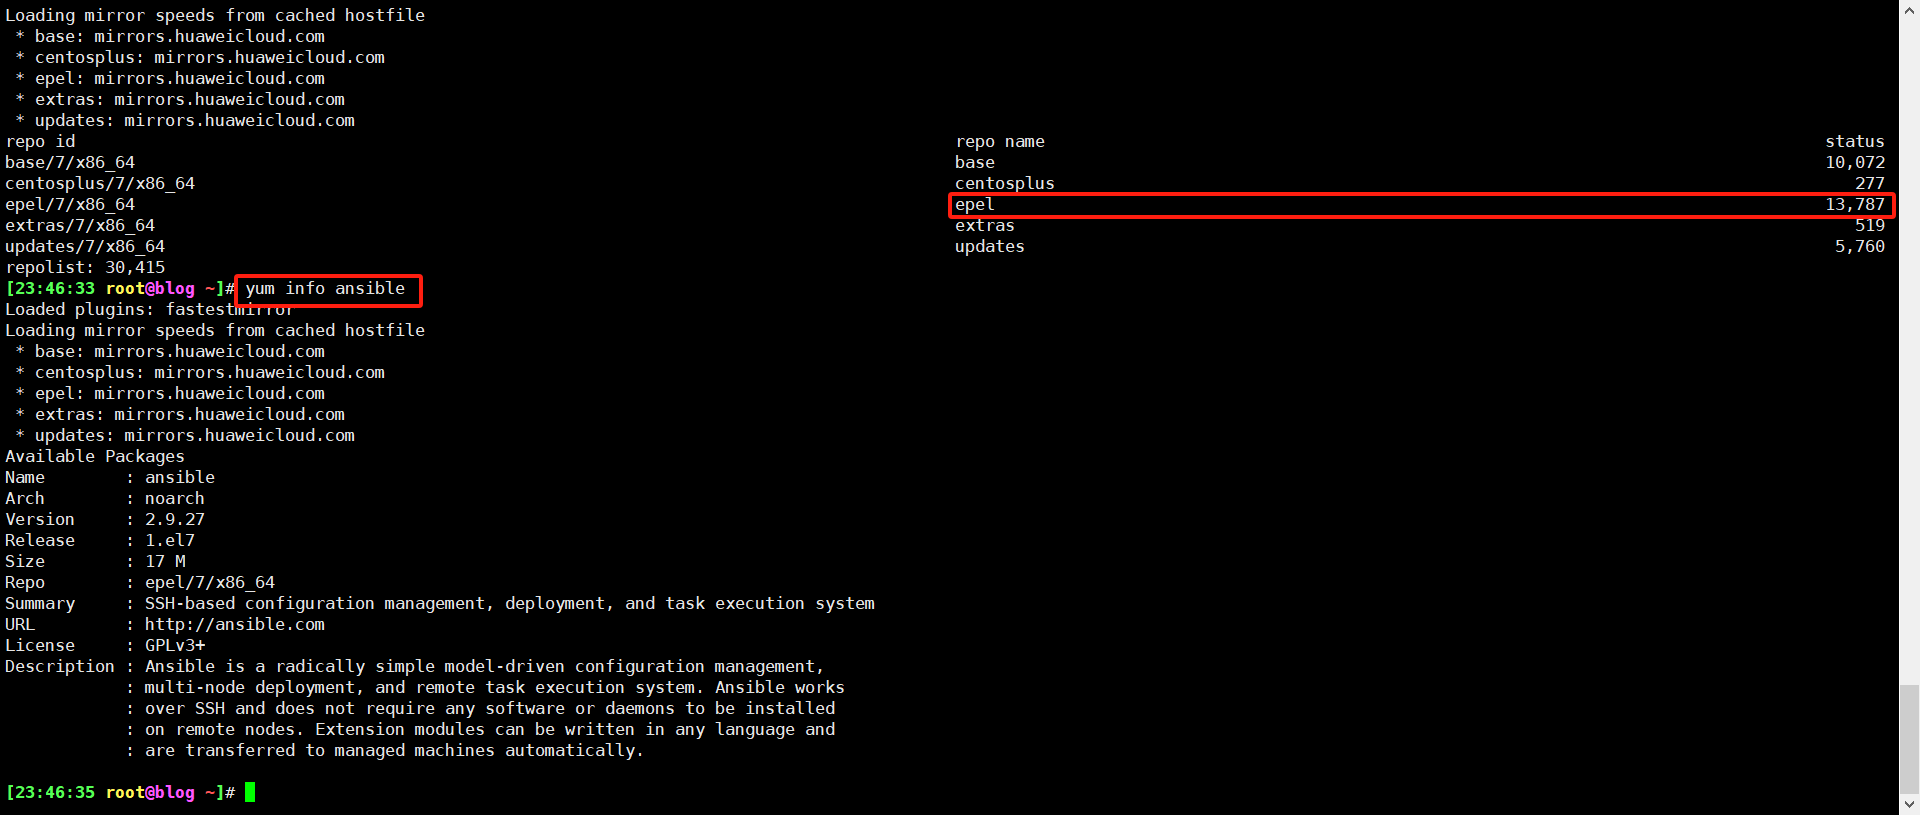
范例:Ubuntu18.04 安装最新版的 Ansible
[root@ubuntu1804 ~] apt update [root@ubuntu1804 ~] apt install software-properties-common [root@ubuntu1804 ~] apt-add-repository --yes --update ppa:ansible/ansible [root@ubuntu1804 ~] apt install ansible [root@ubuntu1804 ~] ansible --version 范例: CentOS 安装 Ansible
# 需要存在 EPEL 源 # 参考: https://blog.csdn.net/weixin_74962223/article/details/134573366 [root@centos7 ~] yum repolist [root@centos7 ~] yum install ansible -y [root@centos7 ~] ansible --version 
3.1.2)编译安装
yum -y install python-jinja2 PyYAML python-paramiko python-babel python-crypto wget https://releases.ansible.com/ansible/ansible-1.5.4.tar.gz tar xf ansible-1.5.4.tar.gz && cd ansible-1.5.4 python setup.py build python setup.py install mkdir /etc/ansible cp -r examples/* /etc/ansible 3.1.3)Git 方式
git clone git://github.com/ansible/ansible.git --recursive cd ./ansible source ./hacking/env-setup 3.1.4)PIP 安装
# PIP 是安装 Python 包的管理器, 类似 Yum [root@centos7 ~] yum install python-pip [root@centos7 ~] pip install --upgrade pip [root@centos7 ~] pip install ansible --upgrade [root@centos7 ~] ansible --version 3.1.5)验证安装
[root@ansible ~] ansible --version ansible 2.9.27 # 版本信息 config file = /etc/ansible/ansible.cfg # 配置文件 configured module search path = [u'/root/.ansible/plugins/modules', u'/usr/share/ansible/plugins/modules'] # 模块路径 ansible python module location = /usr/lib/python2.7/site-packages/ansible executable location = /usr/bin/ansible # ansible 可执行程序 ( 基于 Python 编写 ) python version = 2.7.5 (default, Oct 14 2020, 14:45:30) [GCC 4.8.5 20150623 (Red Hat 4.8.5-44)] 
3.2)Ansible 相关文件
3.2.1)配置文件
Ansible 是一款自动化运维工具,它并不是一个服务。
因此,它没有对应的 Service 文件。Ansible 无需长期运行,只在需要使用时运行其二进制文件即可。( 安装完成后,直接使用即可 )
/etc/ansible/ansible.cfg 主配置文件
配置 ansible 工作特性,也可以在项目的目录中创建此文件,
当前目录下如果也有 ansible.cfg,则此文件优先生效,建议每个项目目录下,创建独有的 ansible.cfg 文件
/etc/ansible/hosts 主机清单
/etc/ansible/roles 存放角色的目录
3.2.2)Ansible 主配置文件
Ansible 的配置文件 可以放在多个不同地方
优先级从高到低顺序如下
ansible will read ANSIBLE_CONFIG,ansible.cfg in the current working directory, .ansible.cfg in the home directory or /etc/ansible/ansible.cfg, whichever it finds first a. $ANSIBLE_CONFIG 变量 b. 项目目录下的配置文件 c. 当前用户家目录下的配置文件 d. /etc/ansible/ansible.cfg (默认) # 验证 Ansible 默认调用的主配置文件路径 ansible --version # 当前目录的 ansible 配置文件调用优先级高于 /etc/ansible/xxx Ansible 的 默认配置文件 /etc/ansible/ansible.cfg
其中大部分的配置内容无需进行修改( 下图:RHCE 考试默认使用的 ansible.cfg )
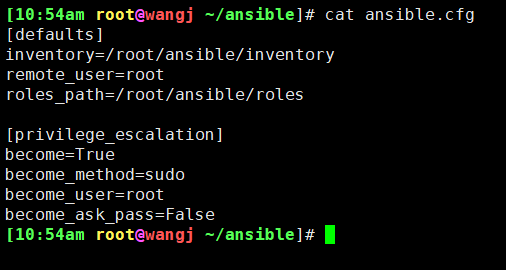
[defaults] # inventory = /etc/ansible/hosts // 主机列表配置文件 # library = /usr/share/my_modules // 库文件存放目录 # remote_tmp = $HOME/.ansible/tmp // 临时py命令文件存放在远程主机目录 # local_tmp = $HOME/.ansible/tmp // 本机的临时命令执行目录 # forks = 5 // 默认并发数 # sudo_user = root // 默认 sudo 用户 # ask_sudo_pass = True // 每次执行 ansible 命令是否询问 ssh 密码 # ask_pass = True # remote_port = 22 # host_key_checking = False // 检查对应服务器的 host_key, 建议取消此行注释, 实现第一次连接自动信任目标主机 # log_path=/var/log/ansible.log // 日志文件, 建议启用 # module_name = command // 默认模块, 可以修改为 shell 模块 [privilege_escalation] # 如果是普通用户则需要配置提权 # become=True # become_method=sudo # become_user=root # become_ask_pass=False 小技巧:当前目录下的 Ansible 的配置文件 优先生效
// 验证 Ansible [root@ansible ~] ansible --version // 复制 Ansible 配置文件至当前目录 [root@ansible ~] cp /etc/ansible/ansible.cfg . // 再次验证 [root@ansible ~] ansible --version ansible 2.9.17 config file = /root/ansible.cfg # 注意配置文件路径优先级为当前目录的 ansible.cfg 啦 configured module search path = ['/root/.ansible/plugins/modules', '/usr/share/ansible/plugins/modules'] ansible python module location = /usr/lib/python3.6/site-packages/ansible executable location = /usr/bin/ansible python version = 3.6.8 (default, Apr 16 2020, 01:36:27) [GCC 8.3.1 20191121 (Red Hat 8.3.1-5)] 3.2.3)inventory 主机清单
官方文档:https://docs.ansible.com/ansible/latest/inventory_guide/intro_inventory.html
Ansible 的主要功能 在于批量主机操作,为了便捷地使用其中的部分主机,可以在 Inventory 主机清单文件中将其分组组织。
默认的 inventory file 为 /etc/ansible/hosts
当然也可以自定义,然后使用 -i 指定 inventory 文件位置
注意: 生产环境建议在每个项目目录下创建项目独立的 hosts 文件
主机清单 文件格式
inventory 文件遵循 INI 文件风格
中括号中的字符为组名。可以将同一个主机同时归并到多个不同的组中
此外,当如若目标主机使用了非默认的 SSH 端口,还可以在主机名称之后使用冒号加端口号来标明
如果主机名称遵循相似的命名模式,还可以使用列表的方式标识各主机
Inventory 参数说明
ansible_ssh_host // 将要连接的远程主机名. 与你想要设定的主机的别名不同的话, 可通过此变量设置. ansible_ssh_port // ssh 端口号. 如果不是默认的端口号, 通过此变量设置. 这种可以使用 ip:端口 192.168.1.100:2222 ansible_ssh_user // 默认的 ssh 用户名 ansible_ssh_pass // ssh 密码 ( 这种方式并不安全, 我们强烈建议使用 --ask-pass 或 SSH 密钥 ) ansible_sudo_pass // sudo 密码 (这种方式并不安全, 我们强烈建议使用 --ask-sudo-pass ) ansible_sudo_exe (new in version 1.8) // sudo 命令路径 ( 适用于1.8及以上版本 ) ansible_connection // 与主机的连接类型. 比如: local, ssh 或者 paramiko. Ansible 1.2 以前默认使用 paramiko.1.2 以后默认使用 'smart', 'smart' 方式会根据是否支持 ControlPersist, 来判断'ssh' 方式是否可行. ansible_ssh_private_key_file // ssh 使用的私钥文件. 适用于有多个密钥, 而你不想使用 SSH 代理的情况. ansible_shell_type // 目标系统的 shell 类型. 默认情况下, 命令的执行使用 'sh' 语法, 可设置为 'csh' 或 'fish'. ansible_python_interpreter // 目标主机的 python 路径. 范例:列表形式
# vim /etc/ansible/hosts ( 默认主机清单文件 ) ntp.magedu.com # 1) 被管理主机名或 IP 地址 [webservers] # 2) 将被管理主机分类 www1.magedu.com:2222 # 3) 目标主机使用了非默认的 SSH 端口 www2.magedu.com [dbservers] db1.magedu.com db2.magedu.com db3.magedu.com 或者 db[1:3].magedu.com # 4) 可以使用列表的方式标识主机 范例:组嵌套
# vim /etc/ansible/hosts ( 默认主机清单文件 ) [webservers] www[1:100].example.com [dbservers] db-[a:f].example.com [appservers] 10.0.0.[1:100] # 列表形式: 10.0.0.1 - 10.0.0.100 // 定义 testsrvs 组包括两个其它分组, "实现组嵌套" [testsrvs:children] webservers dbservers 范例:
本机地址: 10.0.0.8 # vim /etc/ansible/hosts ( 默认主机清单文件 ) [local] 10.0.0.8 ansible_connection=local # 指定本地连接, 无需 ssh 配置 # 注意: ansible_connection=ssh 时 # 配置文件需要 StrictHostKeyChecking no [websrvs] # 也可以在被控主机行添加如下信息 ( 不推荐, 会暴露主机安全 ) 10.0.0.7 ansible_connection=ssh ansible_ssh_port=2222 ansible_ssh_user=wang ansible_ssh_password=magedu 10.0.0.6 ansible_connection=ssh ansible_ssh_user=root ansible_ssh_password=123456 # 执行 ansible 命令时显示别名, 如 web01 [websrvs] web01 ansible_ssh_host=10.0.0.101 web02 ansible_ssh_host=10.0.0.102 # 仅填写主机 IP 地址也可以 [websrvs] 10.0.0.7 10.0.0.17 --- [websrvs:vars] ansible_ssh_password=magedu some_host ansible_ssh_port=2222 ansible_ssh_user=manager aws_host ansible_ssh_private_key_file=/home/example/.ssh/aws.pem freebsd_host ansible_python_interpreter=/usr/local/bin/python ruby_module_host ansible_ruby_interpreter=/usr/bin/ruby.1.9.3 总结:
- 主机支持主机名通配以及正则表达式,例如 web[1:3].magedu.com 代表三台主机
- 主机支持基于非标准的 SSH 端口,例如 web1.magedu.com:6666
- 主机支持指定变量,可对个别主机的特殊配置,如登陆用户,密码
- 主机组支持指定变量 [group_name:vars],同时支持嵌套组 [game:children]
3.3)Ansible 相关工具
- /usr/bin/ansible 主程序,临时命令执行工具
- /usr/bin/ansible-doc 查看配置文档,模块功能查看工具,相当于 man
- /usr/bin/ansible-playbook 定制自动化任务,编排剧本工具,相当于脚本
- /usr/bin/ansible-pull 远程执行命令的工具
- /usr/bin/ansible-vault 文件加密工具( RHCE 有考该工具的使用 )
- /usr/bin/ansible-console 基于 Console 界面与用户交互的执行工具
- /usr/bin/ansible-galaxy 下载/上传优秀代码或 Roles 模块的官网平台
利用 Ansible 实现管理的主要方式:
Ansible Ad-Hoc:即利用 ansible 命令,主要用于临时命令使用场景
Ansible PlayBook:主要用于长期规划好的,大型项目的场景,需要有前期的规划过程
ansible 使用前 准备工作( 建议 )
Ansible 相关工具大多数是 通过 SSH 协议,实现对远程主机的配置管理、应用部署、任务执行等功能
建议: 使用此工具前,先配置 ansible 主控端能基于密钥认证的方式联系各个被管理节点
# 解决: 远程被控端主机是, 自动回复 yes 选项 # 第一次远程连接某个主机时, 对方主机会默认询问你是否 xxx, 输入 yes 后, 默认会将远程主机公钥写入本机 known_hosts 1) 修改 SSH 客户端配置文件 vim /etc/ssh/ssh_config StrictHostKeyChecking no // "自动回复 yes 选项" # 验证 known_hosts 文件 cat ~/.ssh/known_hosts 2) 或者, 修改 Ansible 配置文件 vim /etc/ansible/ansible.cfg host_key_checking = False // "建议取消该行注释" 
// 基于密码认证 ( "不常用" ) # 注意: websrvs 组的所有主机密码 必须都是 redhat # 如果 websrvs 组的某个主机密码不是 redhat, 则无法连接成功 # 因此推荐使用 Key 认证 !!! ansible websrvs -m ping -k SSH password: redhat 
范例: 利用 sshpass 批量实现基于 key 验证脚本 1
这个脚本的作用是批量向指定的 IP 地址列表传送 SSH 公钥,并且在执行过程中忽略对远程主机主机密钥的严格检查。
// 修改下面一行 ( 允许连接新的主机时,不需要手动确认密钥 ) [root@centos8 ~] vim /etc/ssh/ssh_config StrictHostKeyChecking no [root@centos8 ~] vim push_ssh_key.sh #!/bin/bash IPLIST=" 192.168.80.8 192.168.80.18 192.168.80.28" rpm -q sshpass &> /dev/null || yum -y install sshpass [ -f /root/.ssh/id_rsa ] || ssh-keygen -f /root/.ssh/id_rsa -P '' export SSHPASS=redhat # 主机密码 for IP in $IPLIST;do { sshpass -e ssh-copy-id -o StrictHostKeyChecking=no $IP }& done wait 范例: 实现基于 key 验证的脚本 2
这段脚本主要用于 在局域网中扫描活动的主机,然后通过 SSH 在这些主机之间传递 SSH 密钥 以便后续相互访问时不需要手动确认密钥
注意: 该脚本会实现主机之间相互免密认证
#!/bin/bash PASS=redhat # 主机密码 # 设置网段最后的地址, 4-255 之间, 越小扫描越快 END=254 IP=`ip a s eth0 | awk -F'[ /]+' 'NR==3{print $3}'` # 注意网卡名称 NET=${IP%.*}. rm -f /root/.ssh/id_rsa [ -e ./SCANIP.log ] && rm -f SCANIP.log for((i=3;i<="$END";i++));do ping -c 1 -w 1 ${NET}$i &> /dev/null && echo "${NET}$i" >> SCANIP.log & done wait ssh-keygen -P "" -f /root/.ssh/id_rsa rpm -q sshpass || yum -y install sshpass sshpass -p $PASS ssh-copy-id -o StrictHostKeyChecking=no $IP AliveIP=(`cat SCANIP.log`) for n in ${AliveIP[*]};do sshpass -p $PASS scp -o StrictHostKeyChecking=no -r /root/.ssh root@${n}: done # 把 .ssh/known_hosts 拷贝到所有主机, 使它们第一次互相访问时不需要输入回车 for n in ${AliveIP[*]};do scp /root/.ssh/known_hosts ${n}:.ssh/ done [root@centos7 ~] bash push_ssh_key.sh 推荐:使用该脚本
< '批量部署多台主机 基于 key 验证脚本' > [root@ansible ~] vim push_ssh_key.sh #!/bin/bash HOSTS=" 192.168.80.8 192.168.80.18 192.168.80.28 " PASS=redhat # 注意: 密码 [ -f /root/.ssh/id_rsa ] || ssh-keygen -P "" -f /root/.ssh/id_rsa &> /dev/null rpm -q sshpass &> /dev/null || yum -y install sshpass &> /dev/null for i in $HOSTS;do { sshpass -p $PASS ssh-copy-id -o StrictHostKeyChecking=no -i /root/.ssh/id_rsa.pub $i &> /dev/null }& done wait 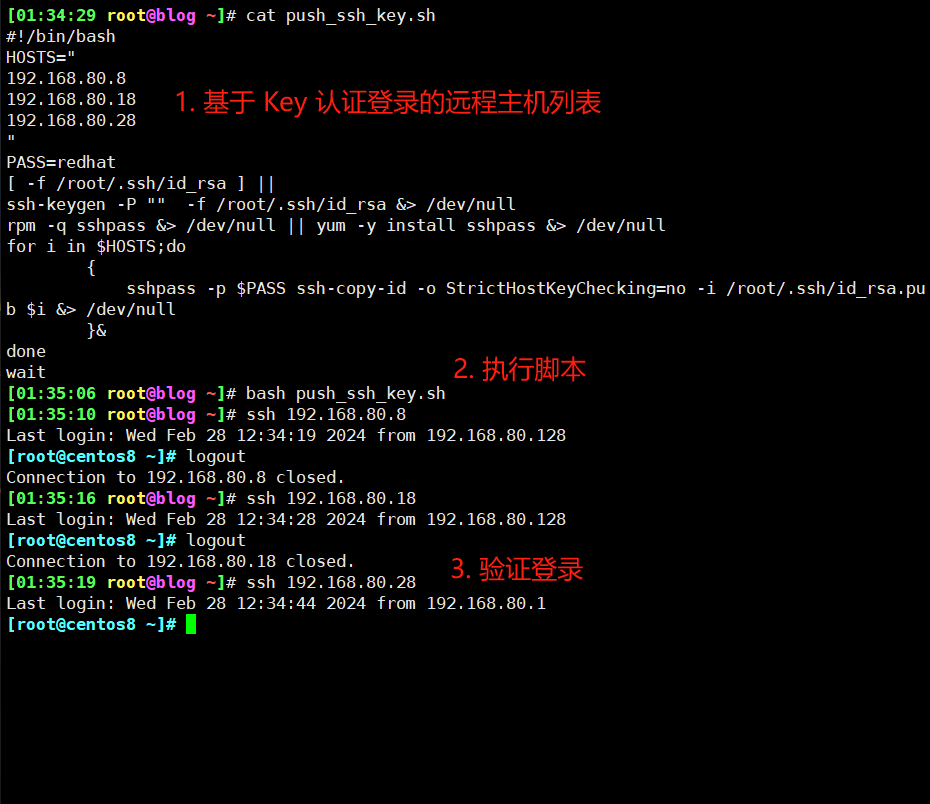
Ansible 命令 参数示范
# 列出 Ansible 可控制的所有主机 ansible all --list-hosts # 列出 Ansible 可控制的 websrvs 组主机 ansible websrvs --list-hosts 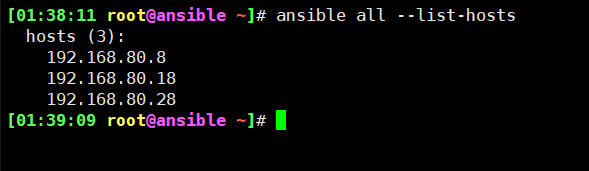
// 演示: 通配符 ansible "*" -m ping ansible 192.168.80.* -m ping ansible "192.168.80.8 192.168.80.18" -m ping # Ping 模块: 测试与目标主机的连通性 ( 注意: 该 Ping 模块并没有走 ICMP 协议 ) # -m 指定模块 # ping 模块 ansible all -m ping 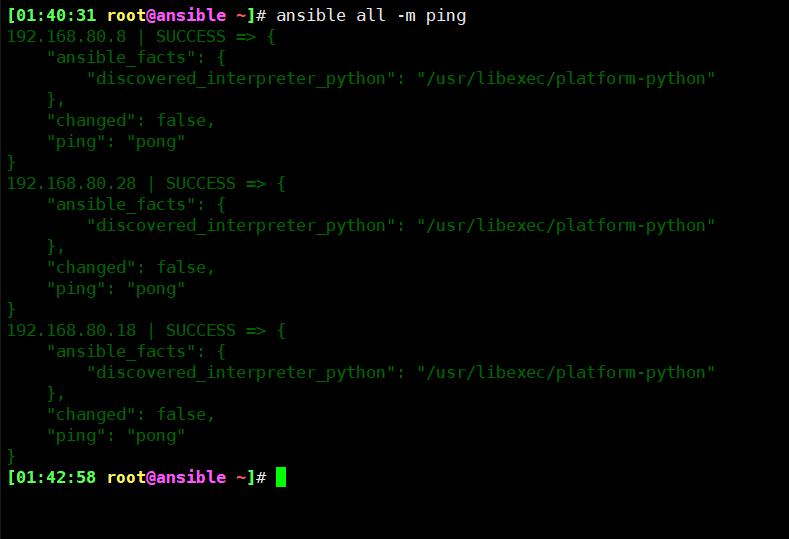
3.3.1)ansible-doc
此工具用来 显示模块的帮助,相当于 man
// 格式 ansible-doc [options] [module...] -l, --list // 列出可用模块 -s, --snippet // 显示指定模块的 playbook 片段 // 查看帮助 [root@ansible ~] ansible-doc --help 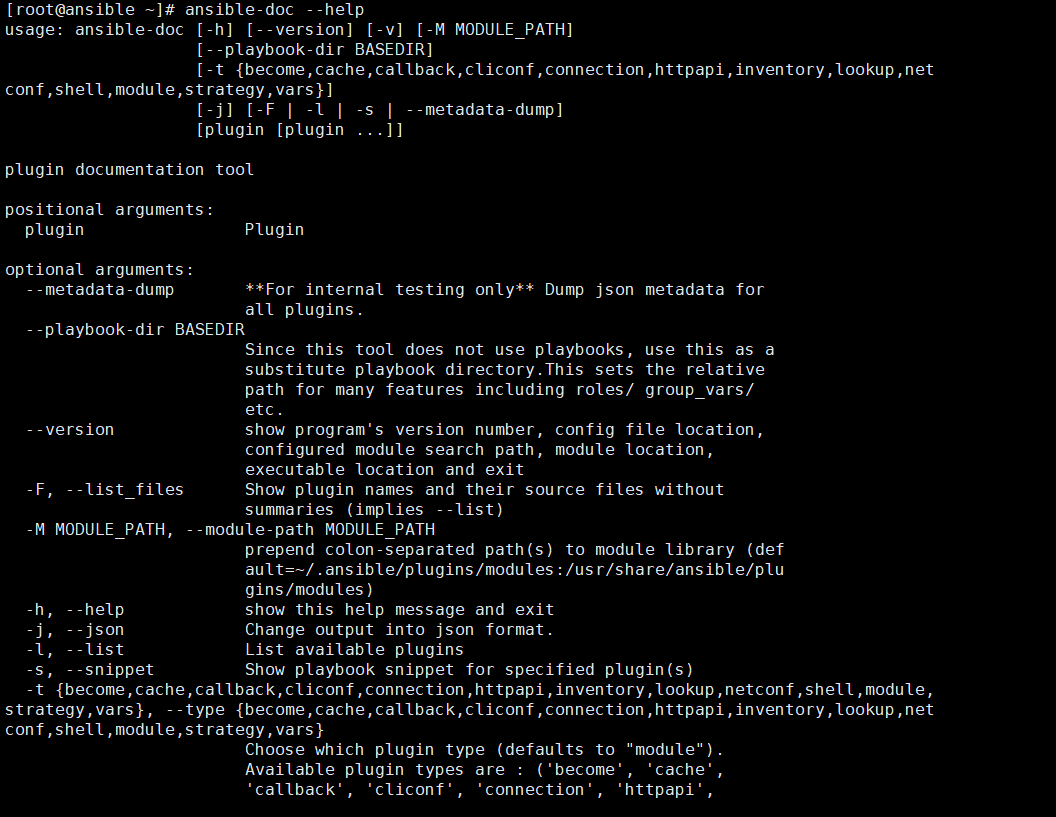
范例:
// 列出所有模块 ansible-doc -l // 查看指定模块帮助用法 ( 详细说明 ) ansible-doc ping // 查看指定模块帮助用法 ( 简单说明 ) ansible-doc -s ping ansible-doc -l | grep ^ping 
// "重要" // 查看模块的 "使用案例" ansible-doc ping | grep -A 100 EXA ansible-doc file | grep -A 100 EXA 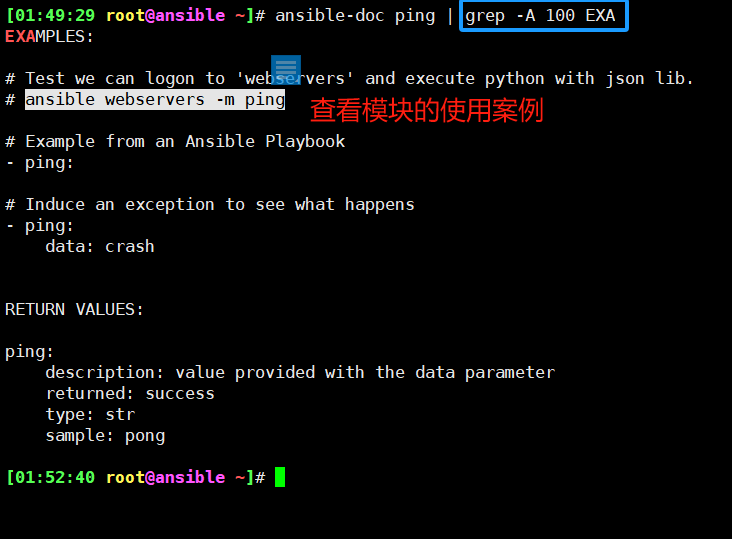
注意点
ansible-doc file ansible-doc file | grep ^= 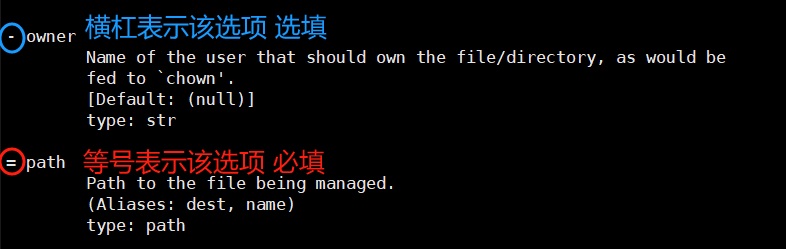
眼尖的小伙伴们可能会发现,上述操作其实可以通过 Linux 的 chown 命令来实现。但为什么我们不直接使用 chown,而要借助 Ansible 的 file 模块呢?这主要是因为 Shell 命令不具备幂等性,而 Ansible 的大部分模块都支持幂等性。这使得使用 Ansible 的 file 模块更加安全可靠。
范例: 查看指定的插件
[root@ansible ~] ansible-doc -t connection -l [root@ansible ~] ansible-doc -t lookup -l 3.3.2)ansible Ad-Hoc
Ansible 的执行方式的主要工具就是 ansible( 专业名词:Ad-Hoc )
用于执行一次性的任务,临时任务。
# 格式 ansible <host-pattern> [-m module_name] [-a args] # 特殊案例 ( localhost: 代表本机) ansible localhost -m ping # 常规案例 ( websrvs: 主机清单中的分组信息 ) ansible websrvs -m ping **
选项说明:
ansible 'oldboy' -m command -a 'df -h' 含义如下图

--version # 显示版本 -m module # 指定模块,默认为 command -v # 详细过程 -vv -vvv 更详细 --list-hosts # 显示主机列表, 可简写 --list -C, --check # 检查, 并不执行 -T, --timeout=TIMEOUT # 执行命令的超时时间, 默认 10S -k, --ask-pass # 提示输入 ssh 连接密码, 默认 Key 验证 -u, --user=REMOTE_USER # 执行远程执行的用户, 默认 root -b, --become # 代替旧版的 sudo 切换 --become-user=USERNAME # 指定 sudo 的 runas 用户, 默认为 root -K, --ask-become-pass # 提示输入 sudo 时的口令 -f FORKS, --forks FORKS # 指定并发同时执行 ansible 任务的主机数 显示详细过程
ansible websrvs -m ping -v ansible websrvs -m ping -vv ansible websrvs -m ping -vvv 案例: 使用 普通用户 身份 提升权限 操作 远程主机
# 先在被控制端 授权普通用户 sudo 权限 [root@centos8 ~] useradd wangj [root@centos8 ~] echo 123456 | passwd --stdin wangj [root@centos8 ~] vim /etc/sudoers wangj ALL=(ALL) NOPASSWD: ALL # 以 wangj 普通用户身份连接主机, 并利用 sudo 授权 root 权限执行 whoami 命令 [root@ansible ~] ansible 192.168.80.8 -m shell -a 'whoami' -u wangj -k -b --become-user=root SSH password: // 输入远程主机 wangj 用户 ssh 连接密码 10.0.0.8 | CHANGED | rc=0 >> root 
Ansible 的 Host-pattern
用于匹配被控制的主机列表
All:表示所有 Inventory 中的所有主机
ansible all -m ping *:通配符
ansible "*" -m ping ansible 192.168.1.* -m ping 或 关系
# websrvs 或 dbsrvs 主机 ansible "websrvs:dbsrvs" -m ping # 192.168.80.18 或 192.168.80.28 主机 ansible "192.168.80.18:192.168.80.28" -m ping 逻辑 与
// 在 websrvs 组并且在 dbsrvs 组中的主机 ansible "websrvs:&dbsrvs" -m ping 逻辑 非
// 在 websrvs 组, 但不在 dbsrvs 组中的主机 // 注意: 此处为单引号 ansible 'websrvs:!dbsrvs' -m ping 综合 逻辑
ansible 'websrvs:dbsrvs:&appsrvs:!ftpsrvs' -m ping 正则 表达式
ansible "websrvs:dbsrvs" -m ping ansible "~(web|db).*.magedu.com" -m ping 举例:
// 重启所有以 "kube" 开头 或 "etcd" 开头, 且不是 10.0.0.101 的主机 // 一般 10.0.0.101 为本机 IP 地址. [root@kube-master1 ~] ansible 'kube*:etcd:!10.0.0.101' -a reboot && reboot 范例:
[root@centos8 ~] ansible all --list-hosts hosts (3): 10.0.0.6 10.0.0.7 10.0.0.8 [root@centos8 ~] ansible websrvs --list-hosts hosts (3): 10.0.0.6 10.0.0.7 10.0.0.8 [root@centos8 ~] ansible appsrvs --list-hosts hosts (2): 10.0.0.7 10.0.0.8 // 使用 双引号 或者 单引号 都可以 [root@centos8 ~] ansible "appsrvs:dbsrvs" --list-hosts [root@centos8 ~] ansible 'appsrvs:dbsrvs' --list-hosts hosts (3): 10.0.0.7 10.0.0.8 10.0.0.6 [root@centos8 ~] ansible "dbsrvs" --list-hosts [root@centos8 ~] ansible 'dbsrvs' --list-hosts hosts (2): 10.0.0.6 10.0.0.7 [root@centos8 ~] ansible appsrvs --list-hosts hosts (2): 10.0.0.7 10.0.0.8 [root@centos8 ~] ansible "appsrvs:dbsrvs" --list-hosts hosts (3): 10.0.0.7 10.0.0.8 10.0.0.6 [root@centos8 ~] ansible "appsrvs:&dbsrvs" --list-hosts hosts (1): 10.0.0.7 // 注意: 引用 ! 号时, "不要用双引号" [root@centos8 ~] ansible "appsrvs:!dbsrvs" --list-hosts -bash: !dbsrvs: event not found // "而使用单引号" [root@centos8 ~] ansible 'appsrvs:!dbsrvs' --list-hosts hosts (1): 10.0.0.8 范例:Ansible 执行 并发控制
GIF 录制工具:https://www.cockos.com/licecap/
// 分别执行下面两条命令观察结果 [root@ansible ~] ansible all -a 'sleep 1' -f1 # 单台单台 执行任务 [root@ansible ~] ansible all -a 'sleep 1' -f10 # 一次性 执行任务 
Ansible 命令执行过程
参考:https://www.liushuang6296.com/posts/a71433d/
- 加载默认配置文件 /etc/ansible/ansible.cfg。
- 加载相应的模块,例如 command 模块。
- Ansible 生成临时 Python 文件,并传输到远程服务器的 $HOME/.ansible/tmp/ansible-tmp-数字/XXX.PY。
- 为文件添加执行权限。
- 执行文件并返回结果。
- 删除临时文件并退出。

// 演示 [root@ansible ~] ansible all -m shell -a 'sleep 100' // 验证 ( 临时 Python 文件 ) [root@centos8 ~] ll ~/.ansible/tmp/* 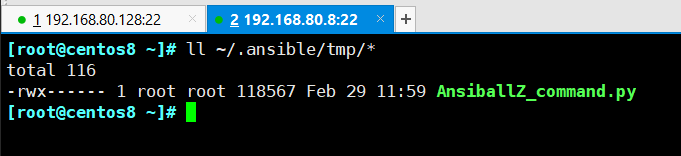
Ansible 的执行状态:
[root@centos8 ~] grep -A 14 '[colors]' /etc/ansible/ansible.cfg [colors] # highlight = white # verbose = blue # warn = bright purple # error = red # debug = dark gray # deprecate = purple # skip = cyan # unreachable = red # ok = green # changed = yellow # diff_add = green # diff_remove = red # diff_lines = cyan Ansible 执行返回 -> 颜色信息说明:
绿色: 成功执行,没有发生状态改变
黄色: 成功执行,有发生状态改变
红色: 执行失败
Ansible 使用范例
# 以 wang 用户执行 ping 存活检测 ansible all -m ping -u wang -k # 以 wang sudo 至 root 执行 ping 存活检测 ansible all -m ping -u wang -k -b # 以 wang sudo 至 mage 用户执行 ping 存活检测 ansible all -m ping -u wang -k -b --become-user=mage # 以 wang sudo 至 root 用户执行 ls ansible all -m command -u wang -a 'ls /root' -b --become-user=root -k -K 使用示范
// 单台主机 10.0.0.7 ansible 10.0.0.7 -m ping // websrvs 组 ansible websrvs -m ping 3.3.3)ansible-console
此工具可交互执行命令,支持 tab,ansible 2.0+ 新增
提示符格式:
执行用户@当前操作的主机组 (当前组的主机数量)[f:并发数]$
常用子命令:
- 设置并发数:forks n 例如: forks 10
- 切换组:cd 主机组 例如: cd web
- 列出当前组主机列表:list
- 列出所有的内置命令: ? 或 help
范例
ansible-console:可交互式执行 ansible 命令
[01:13:41 root@ansible ~]# ansible-console Welcome to the ansible console. Type help or ? to list commands. root@all (3)[f:5]$ ping 192.168.80.8 | SUCCESS => { "ansible_facts": { "discovered_interpreter_python": "/usr/libexec/platform-python" }, "changed": false, "ping": "pong" } 192.168.80.18 | SUCCESS => { "ansible_facts": { "discovered_interpreter_python": "/usr/libexec/platform-python" }, "changed": false, "ping": "pong" } 192.168.80.28 | SUCCESS => { "ansible_facts": { "discovered_interpreter_python": "/usr/libexec/platform-python" }, "changed": false, "ping": "pong" } 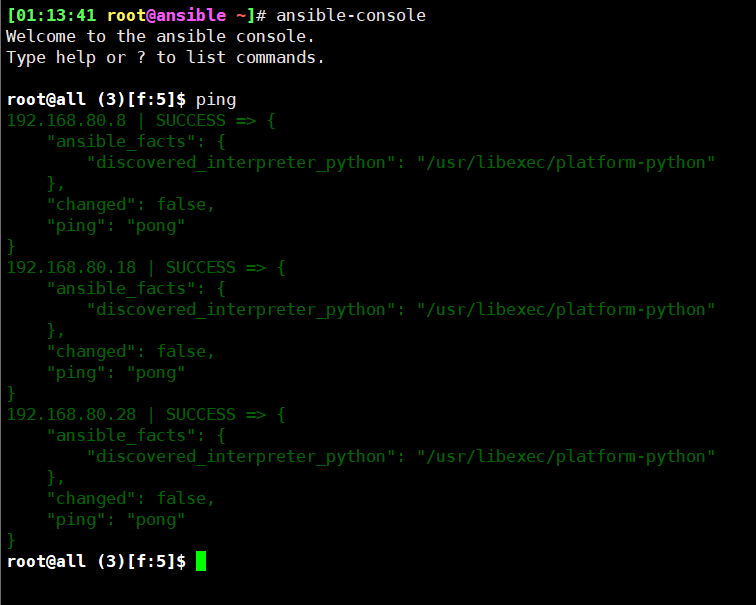
root@all (3)[f:5]$ list 192.168.80.8 192.168.80.18 192.168.80.28 root@all (3)[f:5]$ cd websrvs root@websrvs (2)[f:5]$ list 192.168.80.18 192.168.80.28 root@websrvs (2)[f:5]$ forks 1 root@websrvs (2)[f:1]$ ping 192.168.80.18 | SUCCESS => { "ansible_facts": { "discovered_interpreter_python": "/usr/libexec/platform-python" }, "changed": false, "ping": "pong" } 192.168.80.28 | SUCCESS => { "ansible_facts": { "discovered_interpreter_python": "/usr/libexec/platform-python" }, "changed": false, "ping": "pong" } root@appsrvs (2)[f:5]$ yum name=httpd state=present root@appsrvs (2)[f:5]$ service name=httpd state=started 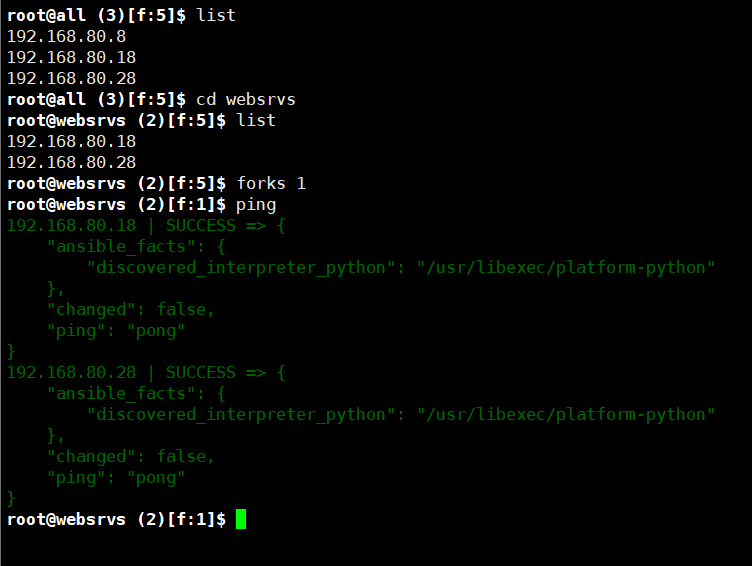
3.3.4)ansible-playbook
此工具 用于执行编写好的 PlayBook 任务
范例:
[root@ansible ~] vim hello.yml --- # hello world yml file - hosts: websrvs remote_user: root gather_facts: no tasks: - name: hello world command: /usr/bin/wall hello world [root@ansible ~] ansible-playbook hello.yml 
3.3.5)ansible-vault
此工具可以用于加密解密 yml 文件( RHCE 考试中存在该工具的考题 )
ansible-vault [create|decrypt|edit|encrypt|rekey|view] 范例
ansible-vault encrypt hello.yml # 加密 ansible-vault decrypt hello.yml # 解密 ansible-vault view hello.yml # 查看 ansible-vault edit hello.yml # 编辑加密文件 ansible-vault rekey hello.yml # 修改口令 ansible-vault create new.yml # 创建新文件 3.3.6)ansible-galaxy
Galaxy 是一个免费网站,类似于 GitHub 网站,网站上发布了很多的共享的 Roles 角色。
Ansible 提供了 ansible-galaxy 命令行工具连接 https://galaxy.ansible.com 网站下载相应的 Roles,进行 init (初始化)、search (查询)、install (安装)、 remove (移除)等操作。
范例:
# 搜索项目 [root@ansible ~] ansible-galaxy search lamp # 列出所有已安装的 galaxy ansible-galaxy list # 安装 galaxy, 默认下载到 ~/.ansible/roles 下 ansible-galaxy install geerlingguy.mysql ansible-galaxy install geerlingguy.redis # 删除 galaxy ansible-galaxy remove geerlingguy.redis 


