- A+
- 以属性侧重的类
- 以方法侧重的类
- 以事件侧重的类
- 关键字
- 操作符
- 标识符
- 字面值
- 栈溢出
- 堆内存分配
- C# 的五大数据类型
- C# 类型的派生谱系
- 变量、对象和内存
- 方法的调用与栈
- 2.4.1 委托的简单示例示例
- 2.4.2 访问数组与字典元素
- 2.4.3 typeof 和 default 操作符
- 2.4.4 new 操作符
- 2.4.5 checked 和 unchecked
- 2.4.6 delegate 操作符
- 2.4.7 sizeof 操作符
- 2.4.8 -> 操作符
- 2.4.8 逻辑运算符
- Visual Studio 中反汇编工具的使用
- 常见语句类型
- 字段的初始值
- 属性的完整声明
- 属性的简略声明
- 动态计算属性的值
- 值参数
- 引用参数
- 输出参数
- 数组参数
- 具名参数
- 可选参数
- 扩展方法(this 参数)
- 一切皆地址
- 直接调用与间接调用
- 委托的简单使用
- 自定义委托
- 委托的一般使用
- 委托的高级使用
- 事件模型的基本理论
- 事件的应用
- 事件的声明
- 委托和事件的区别
- 事件与委托的关系
- 实例构造器
- 静态构造器
- 类声明的位置
- 使用自定义库
- 类的继承
- 成员继承与访问
- 面向对象的实现风格
- 类的继承
- 方法重写(Override)
- 属性重写
- 多态(Polymorphism)
- partial 类作用
- C# 中接口的实现
- 单元测试中对接口的使用
- 引入单元测试
- 使用 Moq 进行 Mock
- 接口隔离
- 反射
- 依赖注入
- 反射与接口/特征的结合
- 泛型类
- 泛型接口
- 泛型方法
- 泛型委托
- 枚举类型的 bitwise 用法
1. C# 初识
因为先前已经学过 C++ 了,所以在C# 的学习中,大多只记录和 C++ 不同的点,在学习的过程中,感谢刘铁猛老师的教程,您是我C# 入门的领路人。
1.1 使用 .net cli
1.1.1 使用 VSCode 创建 C# 工程
先安装 C# 相关插件
创建新工程
dotnet new console -n ProjectName 构建
dotnet build 运行
dotnet run 更多信息访问:https://learn.microsoft.com/en-us/dotnet/core/tutorials/with-visual-studio-code?pivots=dotnet-8-0
1.1.2 使用 Visual Studio 创建工程
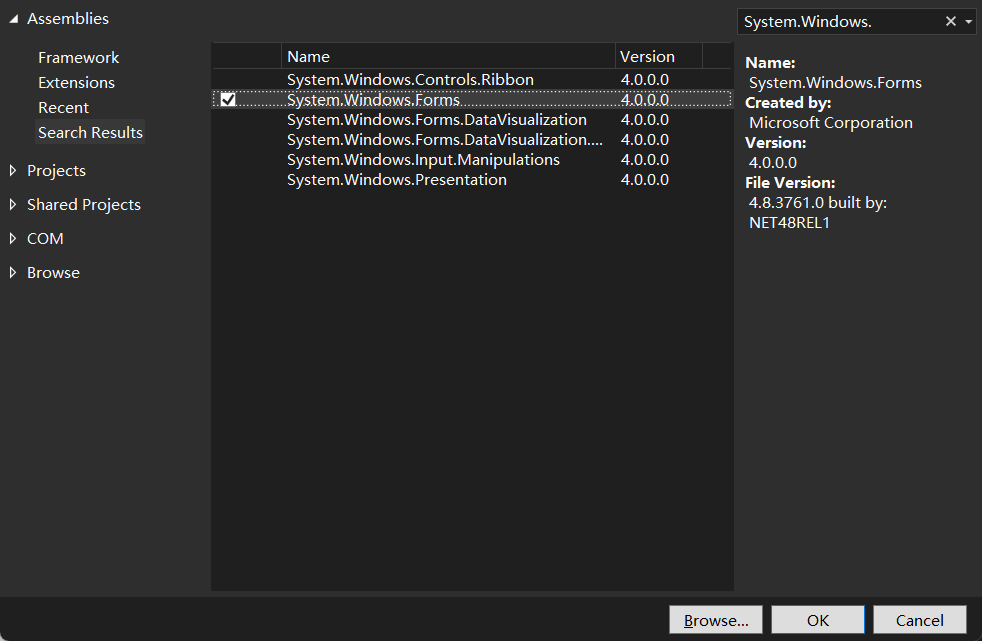
按照步骤操作,不需要使用命令行,但是注意,在这里想要添加我们使用的模块,要在工程窗口的 Reference 处右键选择添加,如我要创建一个窗口应用,就需要添加 System.Windows.Form:
1.2 类的本质
类是对显式世界事物进行抽象所得的结果
- 事物包括“物质”(实体)与“运动”(逻辑)
- 建模是一个去伪存真,由表及里的过程
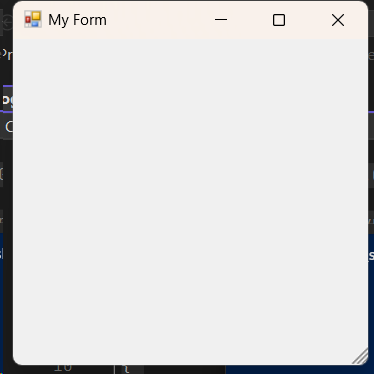
对象也叫实例,可以由类创建,是类经过“实例化”得到的内存中的实体。在这里我们创建一个窗口的实例,取名为 My From:
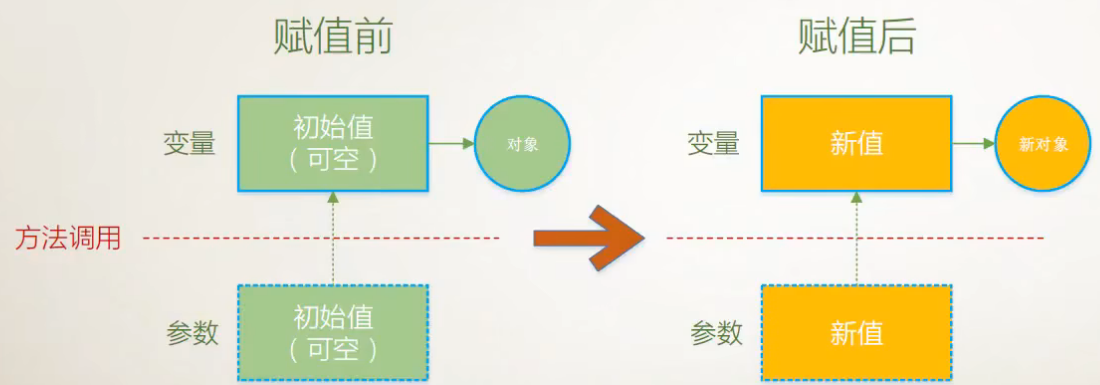
using System; using System.Collections.Generic; using System.Linq; using System.Security.Cryptography; using System.Text; using System.Threading.Tasks; using System.Windows.Forms; namespace ClassAndInstance { internal class Program { static void Main(string[] args) { // (new Form()).ShowDialog(); Form myForm = new Form(){ Text = "My Form"}; myForm.ShowDialog(); Form myForm2 = myForm; myForm2.Text = "I changed it"; myForm2.ShowDialog(); } } } 第 16 行的语句可以拆为两个部分,其中,myForm 是一个引用变量:
Form myForm = new Form(); myForm.Text = "My Form"; 在上面的 myForm 和 myForm2 是两个对象实例,不
在 C# 中,被 internal 修饰的类,只能在同一个程序集文件中才能被访问,而在外部是访问不到的。
构建运行:
1.2.1 类的三大成员
- 属性(Property):存储数据/组合起来表示类或对象当前的状态
- 方法(Method)
- 由 C 语言中的函数( function )进化而来,表示类或对象“能做什么”
- 工作中 90% 的时间是在与方法打交道,因为它是真正做事“构成逻辑”的成员
- 事件(Event)
- 类或对象通知其它类或对象的机制,为 C# 所特有( Java 通过其它办法实现这个机制,而在C++中要使用事件机制,则要使用
Qt或者libevent库) - 善用事件机制非常重要(但是不能滥用)
- 类或对象通知其它类或对象的机制,为 C# 所特有( Java 通过其它办法实现这个机制,而在C++中要使用事件机制,则要使用
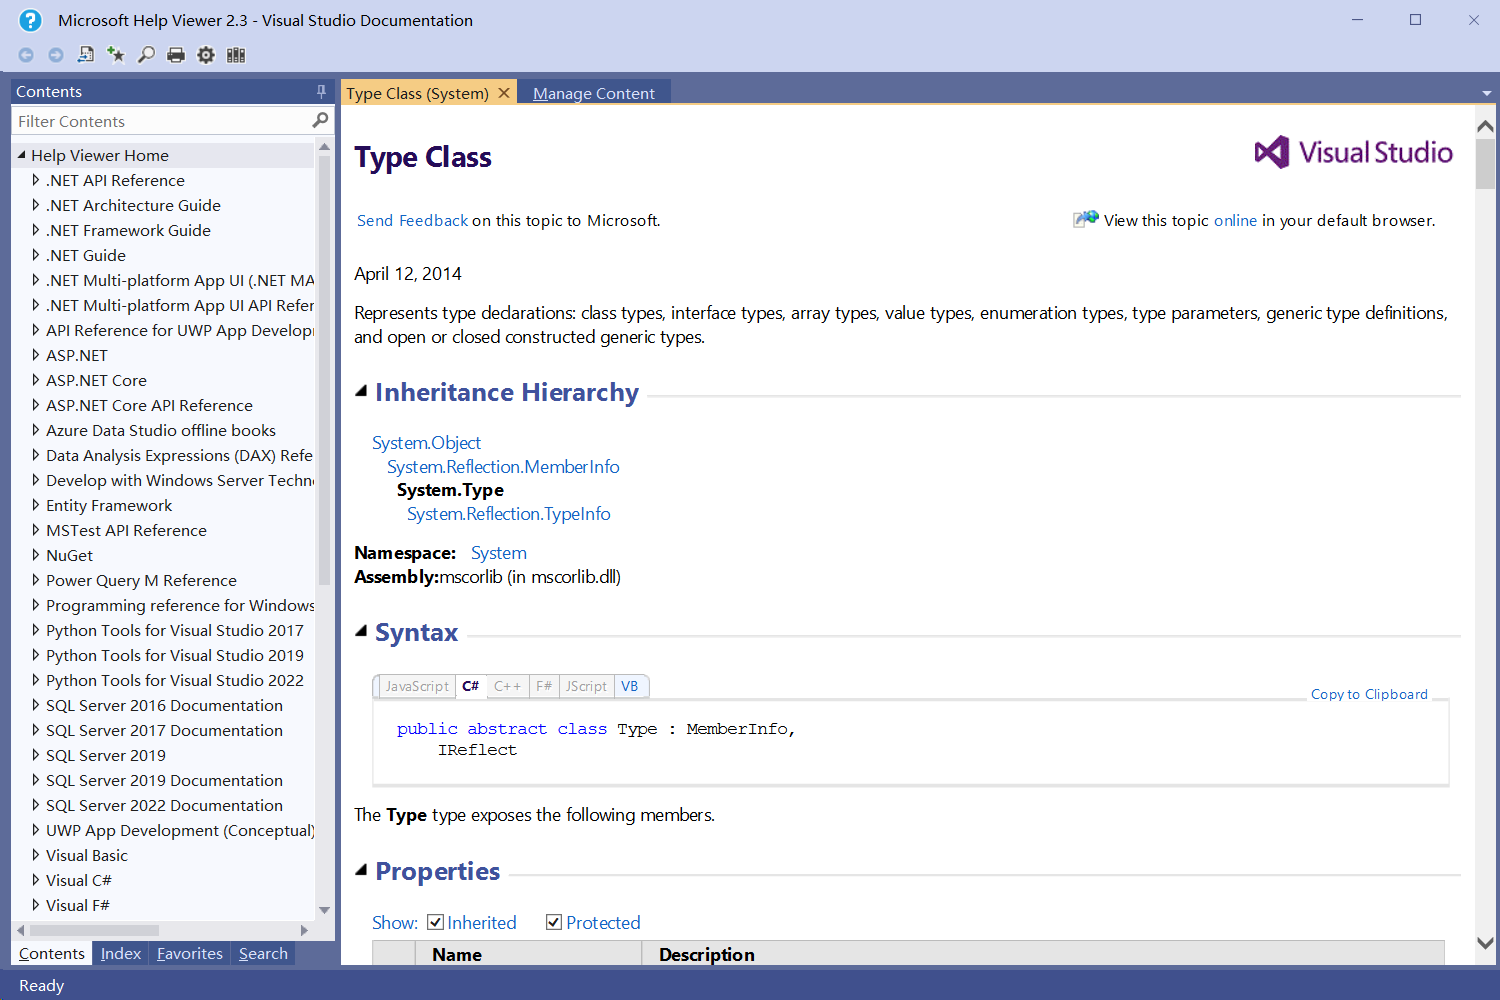
使用 MSDN 本地文档
将光标移动到想要查询的类上面,然后按 F1。不过新版的 VS 默认使用在线文档,但也可以手动替换为使用本地文档,步骤如下:
- Visual Studio 自带了 Help Viewer
- 点击 Visual Studio
Help --> Set Help Preference --> Launch in Help Viewer --> 若提示下载,就点击下载文档中的 Remarks 很有帮助,线程安全性也可以在 msdn 上面查询
本地文档界面:
以属性侧重的类
如 EntityFramework
-
先使用 NuGet 安装
EntityFramework:在工程模块的
Dependencies(Referencies)右键,然后选择Manage NuGet Packages,然后搜索EntityFramework(注意,如果是使用的 .net 框架,而不是 .net framework,要选择的是EntityFramworkCore,这两者是不一样的),然后点击安装。 -
然后下载示例数据库文件:
AdventureWorksLT2012.bak,具体的安装步骤参见链接,在这里我使用了 SQL Server Management Studio 19 -
选择我们需要的数据表:
SalesLT.Product,查询它的前 1000 行:SELECT TOP (1000) [ProductID] ,[Name] ,[ProductNumber] ,[Color] ,[StandardCost] ,[ListPrice] ,[Size] ,[Weight] ,[ProductCategoryID] ,[ProductModelID] ,[SellStartDate] ,[SellEndDate] ,[DiscontinuedDate] ,[ThumbNailPhoto] ,[ThumbnailPhotoFileName] ,[rowguid] ,[ModifiedDate] FROM [AdventureWorksLT2012].[SalesLT].[Product]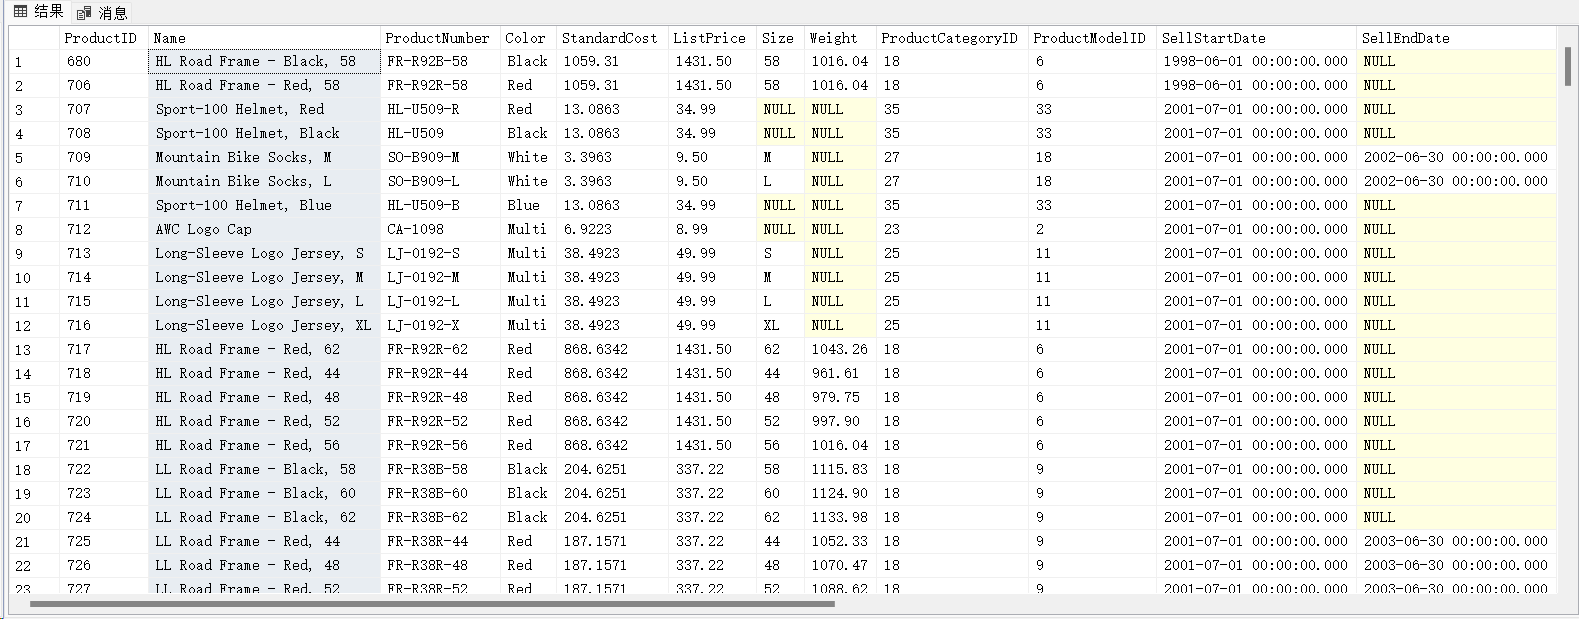
确实是可以查询到的
-
在Visual Studio 新建一个 Item,类型为:
ADO.NET Entity Data Model,连接到上面的AdventureWorksLT2012当前工程名 -> 右键 -> Add -> New Item...然后选择如下类型,名称为AdventureWorksModel: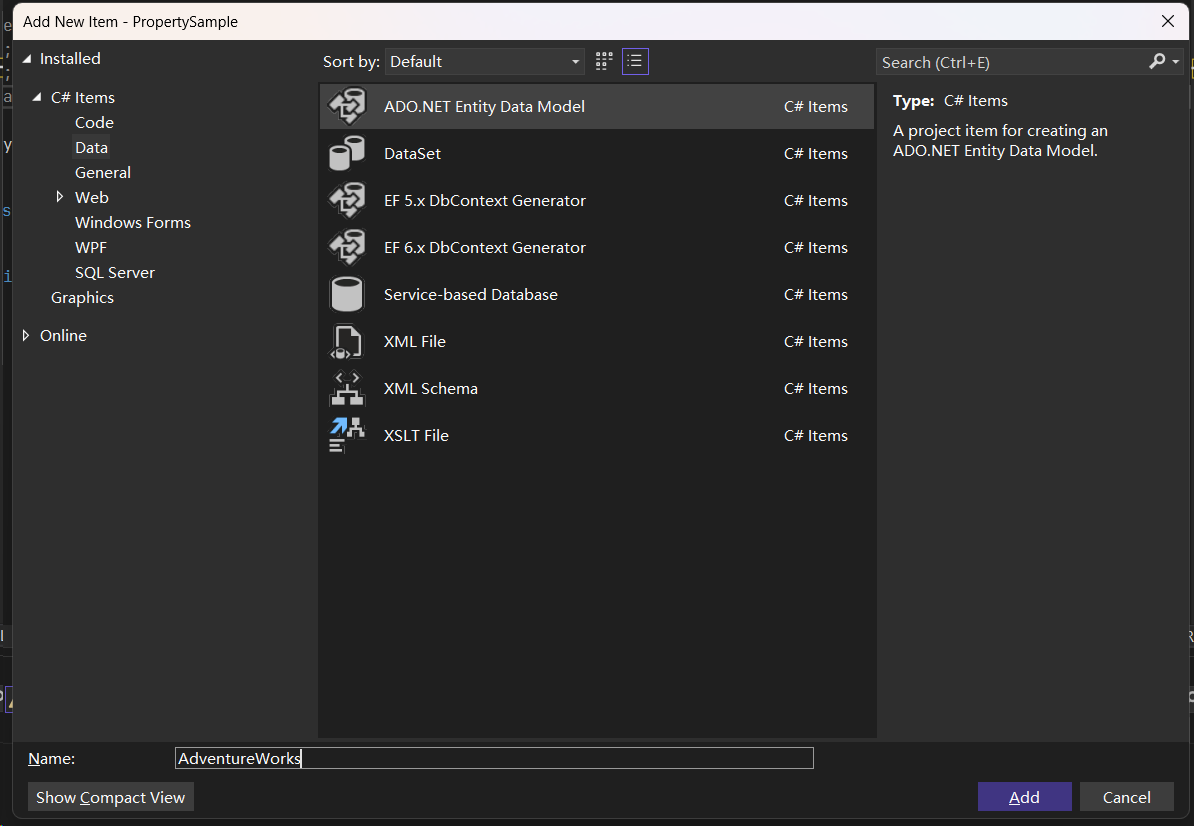
选择生成的方式:
EF Designer from database(老版本的直接选择数据库生成),然后点击下一步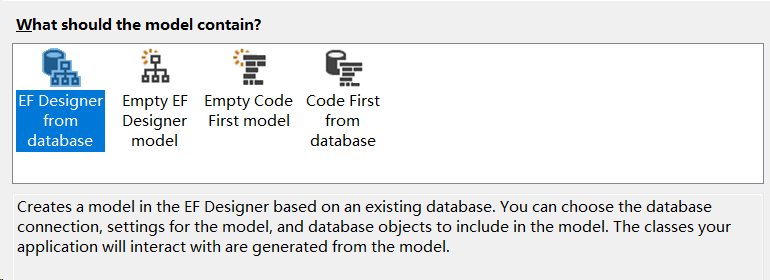
这里的主机名称等信息就填写自己的数据库那里的信息,如我的名称如下所示,然后再选择想要连接的数据库名(这里为
AdventureWorksLT2012)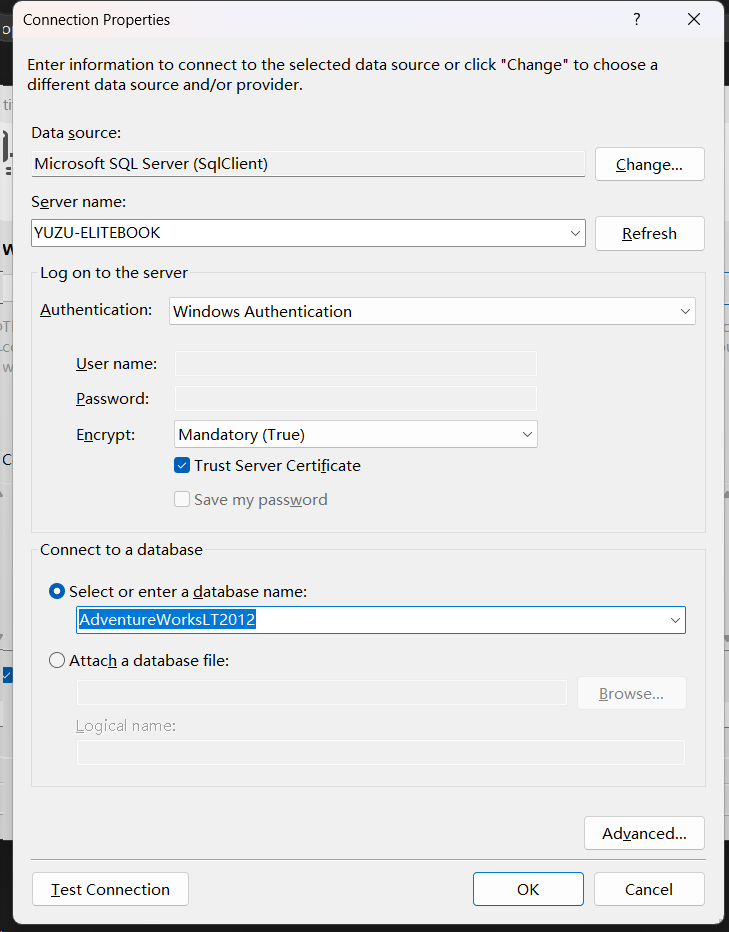
-
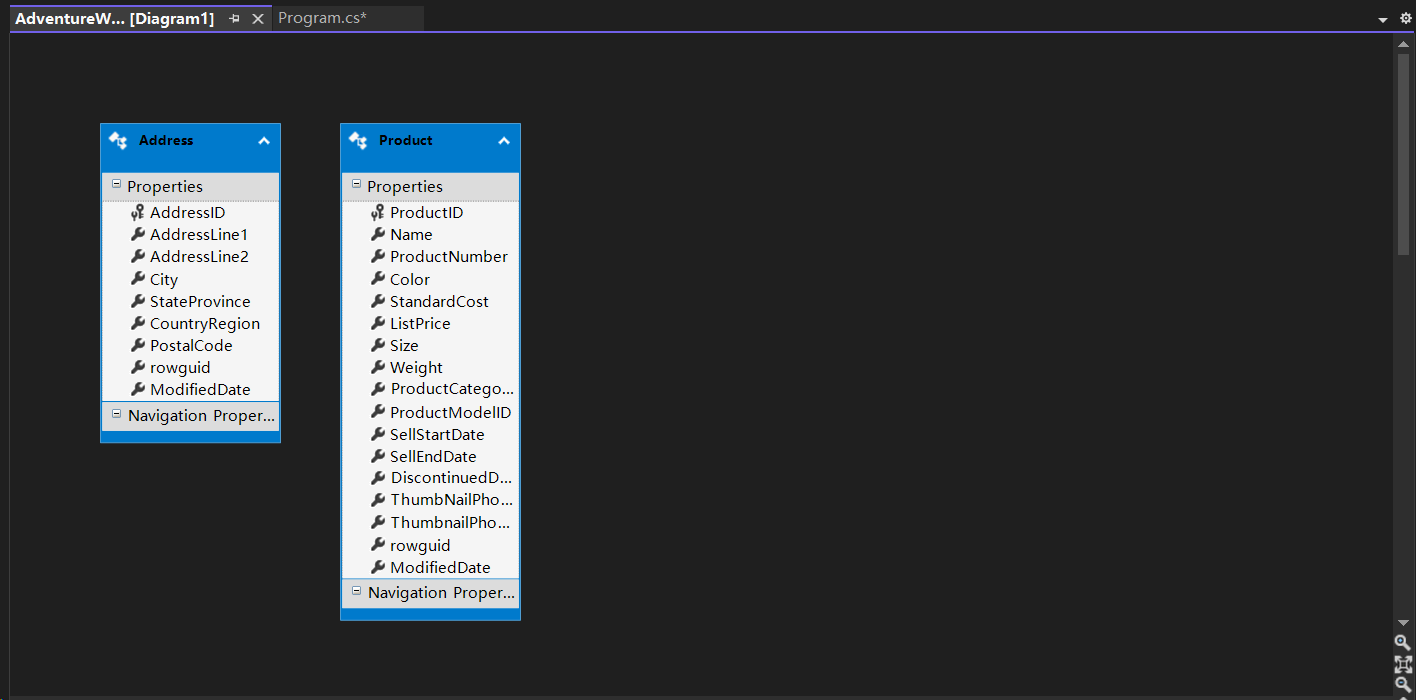
选择需要的数据表,我这里选择了
SalesLT中的Product和Address,注意这里生成的Model Namespace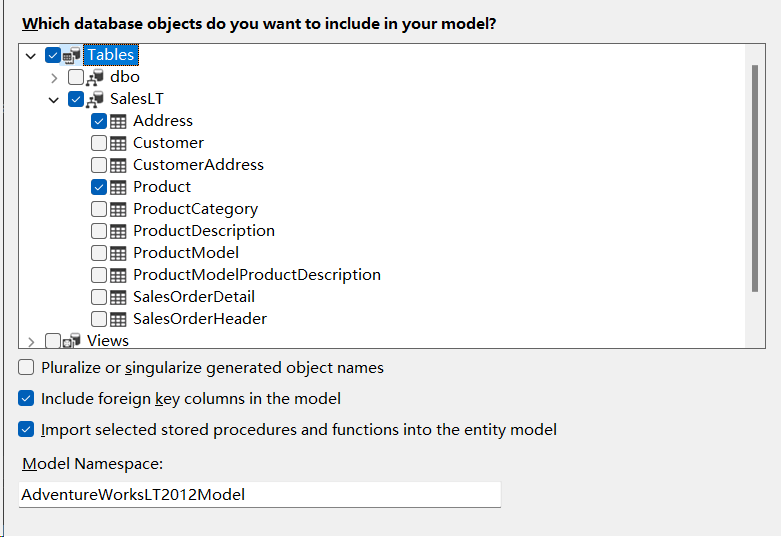
然后再我们的VS工程目录下就生成了数据传输使用的数据模式类:
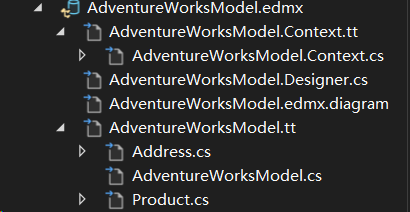
这个类里面都是属性(
Property),没有方法和事件,生成的这两个diagram中的小扳手图标表示的就是属性,这里的每一个属性,都是数据表中的一个字段:
编写代码:
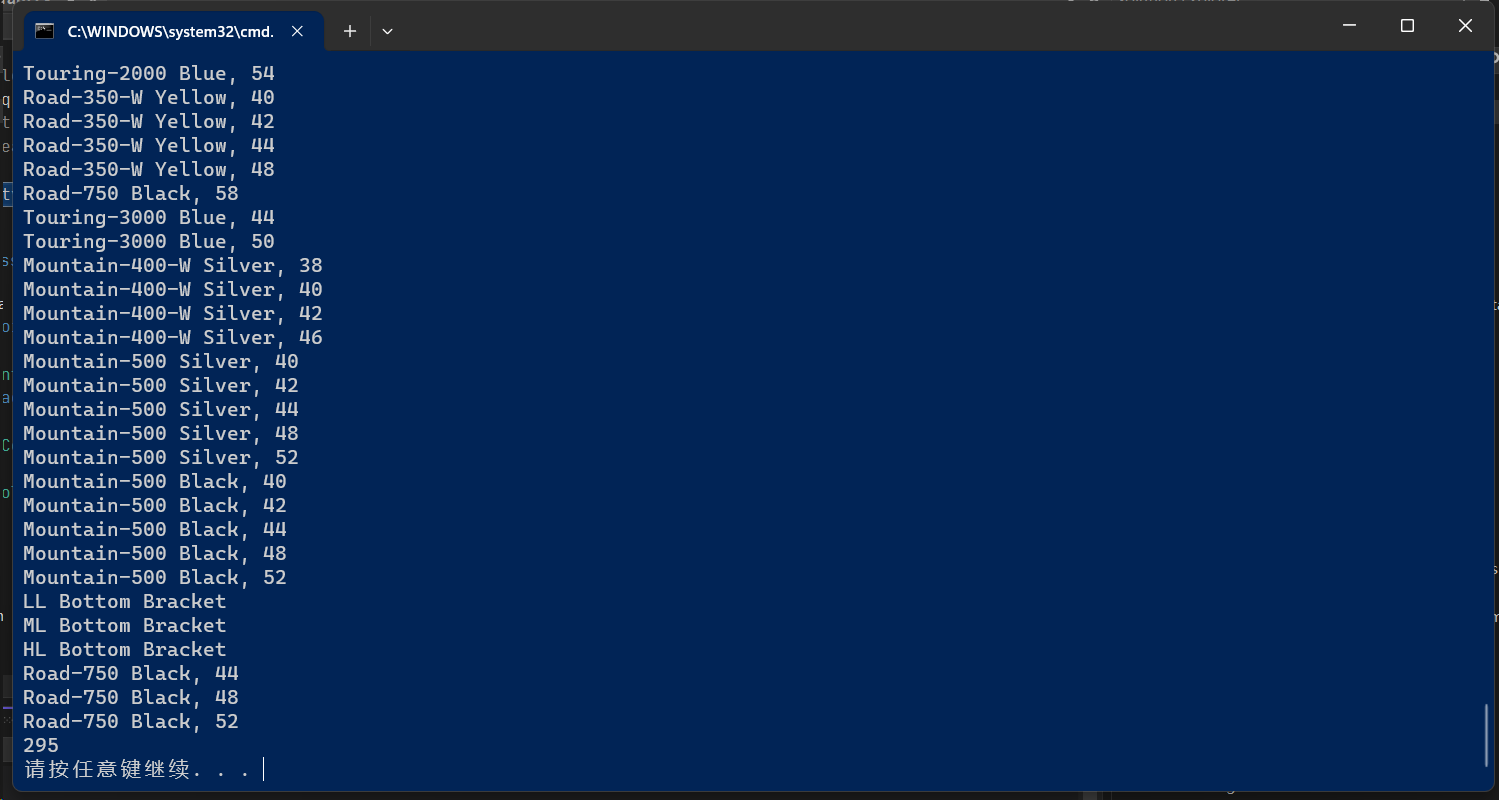
using System; using System.Collections.Generic; using System.Linq; using System.Text; using System.Threading.Tasks; namespace PropertySample { internal class Program { static void Main(string[] args) { AdventureWorksLT2012Entities proxy = new AdventureWorksLT2012Entities(); foreach (Product p in proxy.Product) { Console.WriteLine(p.Name); // 打印 Product 中的名字 } Console.WriteLine(proxy.Product.Count()); // 打印 Product 中的行数 } } }编译运行结果:
以方法侧重的类
如 Math, Console
示例:
using System; using System.Collections.Generic; using System.Linq; using System.Text; using System.Threading.Tasks; namespace MethodSample { internal class Program { static void Main(string[] args) { double x = Math.Sqrt(2); Console.WriteLine(x); double y = Math.Pow(x, 3); Console.WriteLine($"{y:f6}"); // 2.828427 } } } 编译运行结果:

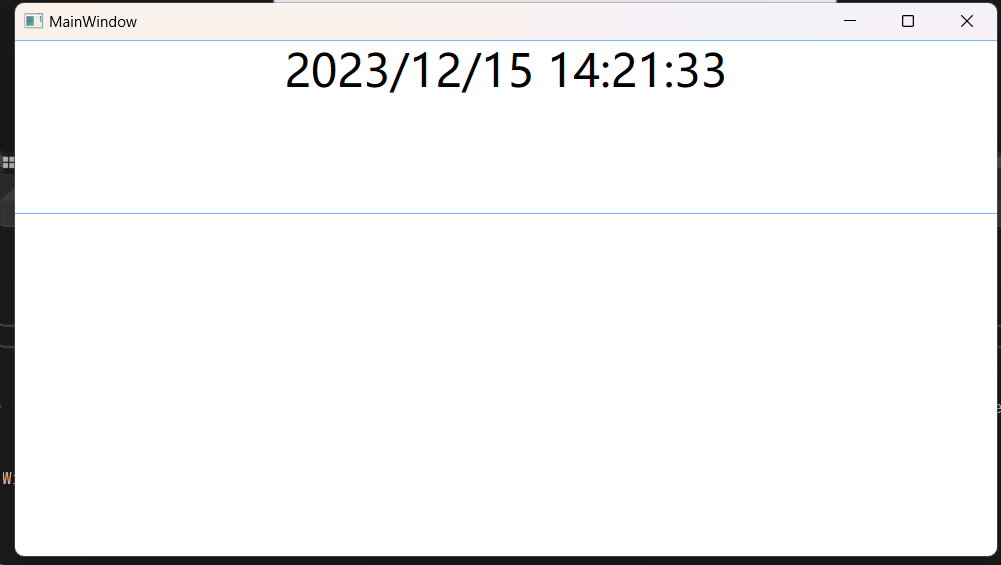
以事件侧重的类
如各种 Timer
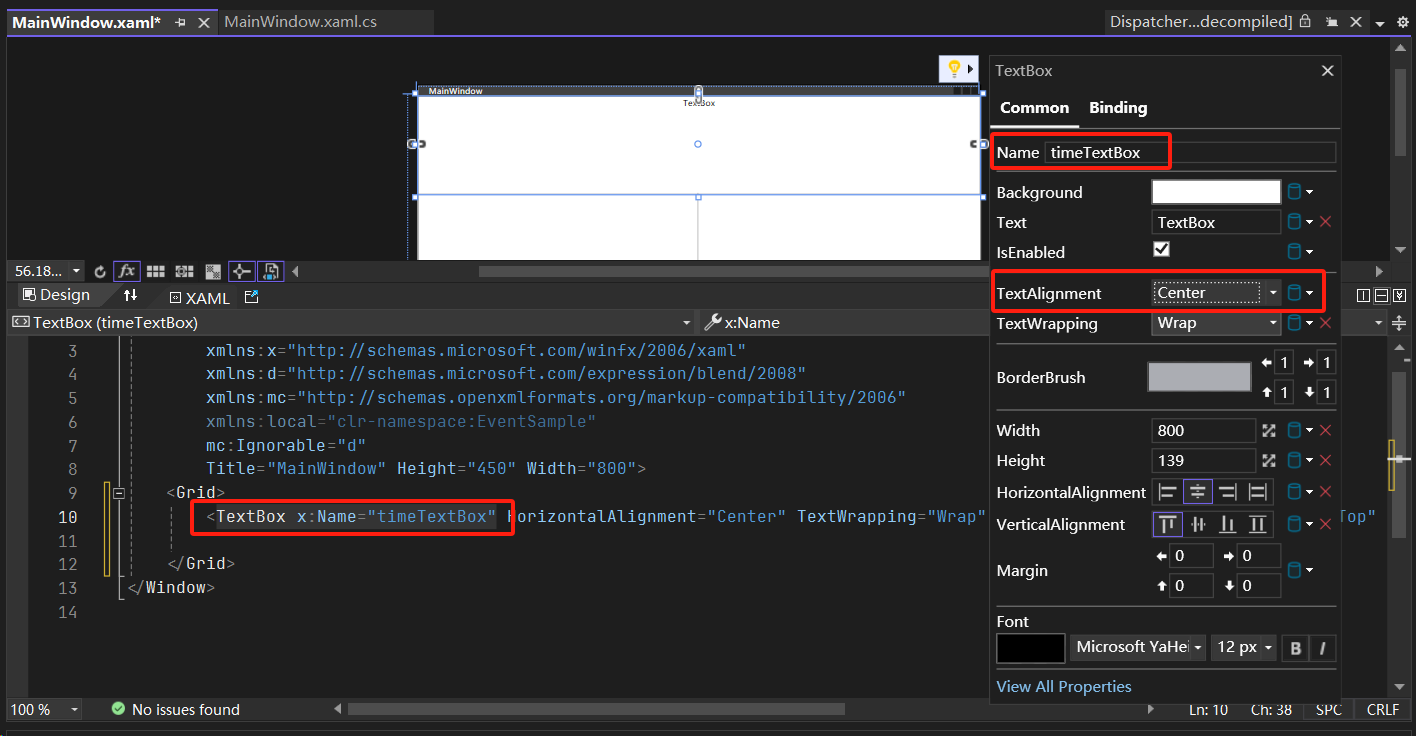
我们新建一个 WPF 示例程序,在里面拖入一个文本框(textBox),名称取为 timeTextBox,它会显式本地时间,文本设置为居中,将 FontSize 设置为 36px,将原本的 Text 清理掉:
然后编译运行,就编写了一个简单的本地计时器:
代码:
MainWindow.xmal.cs
using System; using System.Collections.Generic; using System.Linq; using System.Text; using System.Threading.Tasks; using System.Windows; using System.Windows.Controls; using System.Windows.Data; using System.Windows.Documents; using System.Windows.Input; using System.Windows.Media; using System.Windows.Media.Imaging; using System.Windows.Navigation; using System.Windows.Shapes; using System.Windows.Threading; // DispatcherTimer 类所在名称空间 namespace EventSample { /// <summary> /// Interaction logic for MainWindow.xaml /// </summary> public partial class MainWindow : Window { public MainWindow() { InitializeComponent(); // 主窗口的构造函数 DispatcherTimer timer = new DispatcherTimer(); // 创建一个计时器 timer.Interval = TimeSpan.FromSeconds(1); // 计时间隔 timer.Tick += timer_Tick; // 当Tick事件发生时,执行函数 timer_Tick timer.Start(); } private void timer_Tick(object sender, EventArgs e) { this.timeTextBox.Text = DateTime.Now.ToString(); // 获取窗口的文本框内容,该内容为当前的时间,格式转为string } } } 在上面的代码中,写到第 29 行的 += 处,可以按两下 TAB 键来生成事件处理器相关代码(包括下面的 timer_Tick 函数,不过里面的具体实现需要我们自己按照自己需求来写,这里是让 timeTextBox 文本框中的 Text 显示为本地时间)。
MainWindow.xaml
<Window x:Class="EventSample.MainWindow" xmlns="http://schemas.microsoft.com/winfx/2006/xaml/presentation" xmlns:x="http://schemas.microsoft.com/winfx/2006/xaml" xmlns:d="http://schemas.microsoft.com/expression/blend/2008" xmlns:mc="http://schemas.openxmlformats.org/markup-compatibility/2006" xmlns:local="clr-namespace:EventSample" mc:Ignorable="d" Title="MainWindow" Height="450" Width="800"> <Grid> <TextBox x:Name="timeTextBox" HorizontalAlignment="Center" TextWrapping="Wrap" VerticalAlignment="Top" Width="800" Height="139" TextAlignment="Center" FontSize="36"/> </Grid> </Window> 1.2.2 静态成员和实例成员
-
静态(Static)成员在语义上表示它是“类的成员”
-
实例(非静态)成员在语义上表示它是“对象的成员”
-
绑定(Binding)指的是编译期如何把一个成员与类或对象关联起来:
.操作符实现成员访问- 绑定分为早绑定和晚绑定,早绑定时在编译期间进行绑定,而晚绑定则是运行期间再进行绑定
2. 基础详解
2.1 构成 C# 语言的基本元素
2.1.1 标记(Token)
关键字(Keyword)、操作符(Operator)、标识符(Identifier)、标点符号、文本(字面值,Literal)都可以算作 Token
注释与空白不算做 Token
关键字
关键字是预定义的保留标识符,对编译器有特殊意义。 除非前面有 @ 前缀,否则不能在程序中用作标识符。 例如,@if 是有效标识符,而 if 则不是,因为 if 是关键字。C# 的关键字分为常见关键字和上下文关键字,可以见此网站
操作符
C# 中特殊的操作符为:?? 和 ?,除此之外与C++大致相同
?:指可为null的类型,将 null 赋值给数值类型或布尔型以及日期类型的功能??:称为 null 合并运算符,用于定义可为 null 值的类型和引用类型的默认值
示例代码:
class MyProgram { static void Main(string[] args) { int? x = null; // int y = null; // Error int z = x ?? 2000; // x 不为null,则返回左操作数,x为null则返回右操作数2000 Console.WriteLine(z); } } 编译运行结果:
2000 标识符
必须以字符(英文字母或者其他语言字符)或者下划线开头,我们要求标识符是有意义的。方法一般为动词(建议使用 lowerCamelCase ),类和名称空间为名词(建议采用 UpperCamelCase/PascalCase ),匈牙利命名法一般在 C# 中不常用
字面值
下面是常见的字面值:
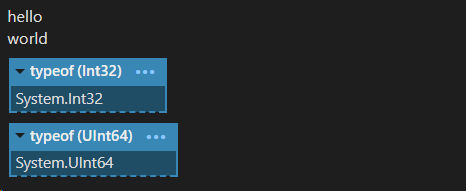
class MyProgram { static void Main(string[] args) { float fNum = 3.2f; double dbNum = 6.14d; char c = 'h'; string str = "hello"; string str1 = str; // string 是引用传递,但效果和值传递相同 str1 = "world"; Console.WriteLine(str); Console.WriteLine(str1); int aInt = 5; uint auInt = 5; long aLong = 5L; ulong ulongNum = 5ul; bool ok = true; bool no = false; string nullVal = null; Console.WriteLine(aInt.GetType()); Console.WriteLine(ulongNum.GetType()); } } 注意:在 C# 中,string 类型的传递为引用传递,但是看起来像是值传递。如上面代码的第 10 行:将 str 拷贝给 str1,实际上编译器先构造了一个临时的 string 类型实例,然后将这个新构造的实例引用传递给了 str1。
编译运行结果:
简单程序示例:
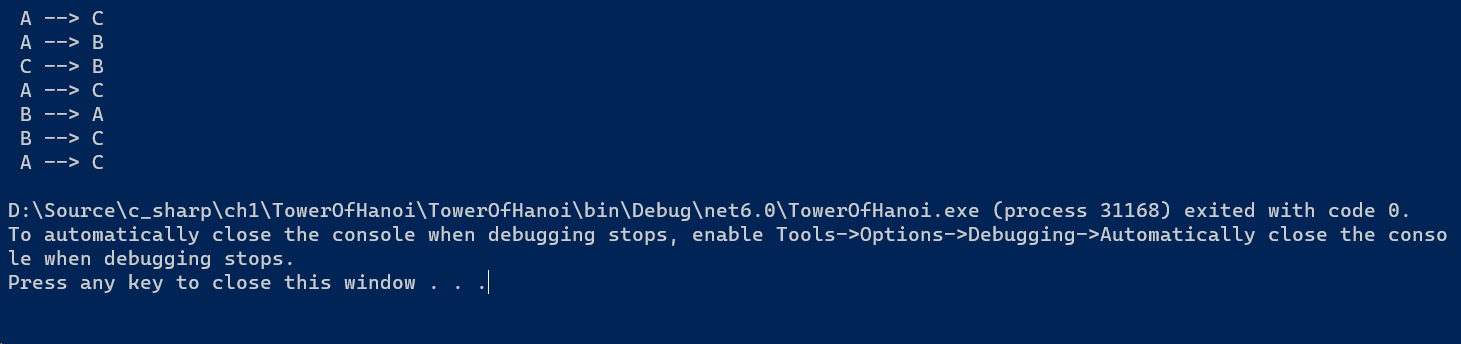
namespace MyCalculator { class Calculator { public double Add(double x, double y) { return x + y; } public double Mul(double x, double y) { return x * y; } public double Sub(double x, double y) { return x - y; } public double Div(double x, double y) { return (x / y) * y; } } internal class Program { static void Main(string[] args) { Console.WriteLine("Hello, World!"); double x1 = 3.1; double x2 = 0; Calculator cal1 = new Calculator(); double res = cal1.Mul(x1, x2); double res1 = cal1.Div(x1, x2); Console.WriteLine(res1); } } } 简单的算法题:汉诺塔
解法:将 n - 1 个碟看为一个,然后总步骤就为三个:
- 第 n - 1 个碟从起始柱 --> 辅助柱子
- 第 n 个碟从起始柱 --> 目的柱
- 第 n - 1 个从辅助柱 --> 目的柱
namespace TowerOfHanoi { internal class Program { static void Main(string[] args) { Hanoi h = new Hanoi(); uint n = 3; char start = 'A'; char dest = 'C'; char temp = 'B'; h.Move(n, start, dest, temp); } } class Hanoi { static int counter = 0; public void Move(uint count, char from, char to, char buffer) { if (count == 1) { Console.WriteLine($" {from} --> {to}"); counter++; } else { Move(count - 1, from, buffer, to); // 移动第 n - 1 个盘子,从起始柱 --> 辅助柱 Console.WriteLine($" {from} --> {to}"); // 移动第 n 个盘子,从起始柱 --> 目的柱 Move(count - 1, buffer, to, from); // 移动第 n - 1 个盘子,从辅助柱 --> 目的柱 } } } } 编译运行结果:
2.2 类型
2.2.1 布尔类型转换
C# 是典型的强类型语言。
在这里需要明确的是,C# 的类型是规定了具体长度的,如 int 为 32 bite(4 byte) ,long 为 64 bite,bool 为1 bit,且在 C# 中,bool类型量不能隐式转换为数值类型。
C# 布尔类型转换相对麻烦,如下:
class MyApp { static void Main() { bool a = true; bool b = false; int aInt = Convert.ToInt32(a); long bInt = Convert.ToInt64(b); Console.WriteLine($"{aInt}, {bInt}"); } } 而 bool 类型自带了 ToString 方法
C# 在4.0 之后引入了 dynamic 关键字,意在模仿弱类型语言。
注意:浮点值不要用来进行
==比较
2.2.2 类型在C#中的作用
一个C#类型中所包含的信息有:
-
存储次类型变量所需要的内存空间大小
-
此类型值可表示的最大、最小值范围
-
此类型所包含的成员(如方法、属性、事件等)
获取 Property(属性)信息和方法名,示例代码:
using System; // Type 类使用 using System.Reflection; // PropertyInfo 和 MethodInfo 需要 using System.Windows.Forms; namespace TypeSample { internal class Program { static void Main(string[] args) { Type myType = typeof(Form); Console.WriteLine(myType.FullName); // System.Windows.Forms.Form Console.WriteLine(myType.BaseType.FullName); PropertyInfo[] pInfos = myType.GetProperties(); MethodInfo[] methodInfos = myType.GetMethods(); foreach (PropertyInfo pi in pInfos) // 拿到所有的property信息 { Console.WriteLine(pi); } foreach (MethodInfo method in methodInfos) // 拿到所有的方法名 { Console.WriteLine(method.Name); } // 在反射中,可以拿到property和 method name,那么就可以进行访问和调用 } } }而在反射中,可以拿到 property 和 method name,那么就可以进行访问和调用。
-
此类型由何基类派生而来
-
程序运行的时候,此类型的变量分配在内存的什么位置
- 使用 Performance Monitor 查看进行的堆内存使用量
- 关于内存泄漏
栈溢出
在 C# 中使用不安全的代码
在 Visual Studio 中需要进行设置:Project --> 当前工程名 Properties --> Build --> General --> Unsafe code 打勾,然后才能使用不安全代码
namespace StackoverflowSample { internal class Program { static void Main(string[] args) { unsafe { int* ptr = stackalloc int[9999999]; // 栈溢出的代码 } } } } 堆内存分配
在这里使用一个 Form 的例子,单击按钮创建一个列表,列表元素都是 Form,总共20000个,然后使用 Performance Monitor 观察内存使用情况:
MainWindow.xaml.cs
using System; using System.Collections.Generic; using System.Linq; using System.Text; using System.Threading.Tasks; using System.Windows; using System.Windows.Controls; using System.Windows.Data; using System.Windows.Documents; using System.Windows.Input; using System.Windows.Media; using System.Windows.Media.Imaging; using System.Windows.Navigation; using System.Windows.Shapes; namespace HeapSample { /// <summary> /// Interaction logic for MainWindow.xaml /// </summary> public partial class MainWindow : Window { public MainWindow() { InitializeComponent(); } List<Window> windowList; private void Button1_Click(object sender, RoutedEventArgs e) { windowList = new List<Window>(); for (int i = 0; i < 20000; i++) { Window win = new Window(); windowList.Add(win); } } private void Button2_Click(object sender, RoutedEventArgs e) { windowList.Clear(); // 释放内存 } } } MainWindow.xaml
<Window x:Class="HeapSample.MainWindow" xmlns="http://schemas.microsoft.com/winfx/2006/xaml/presentation" xmlns:x="http://schemas.microsoft.com/winfx/2006/xaml" xmlns:d="http://schemas.microsoft.com/expression/blend/2008" xmlns:mc="http://schemas.openxmlformats.org/markup-compatibility/2006" xmlns:local="clr-namespace:HeapSample" mc:Ignorable="d" Title="MainWindow" Height="450" Width="800"> <Grid> <Button x:Name="Button1" Content="Consume Memory" HorizontalAlignment="Center" Margin="0,10,0,0" VerticalAlignment="Top" Width="780" Height="121" Click="Button1_Click"/> <Button x:Name="Button2" Content="Release Memory" HorizontalAlignment="Center" Margin="0,152,0,0" VerticalAlignment="Top" Width="780" Height="121"/> </Grid> </Window> 
构建此程序,然后执行构建后的可执行文件。使用 Window + R 键 ,输入 perfmon,打开性能监视器,观察我们刚才所运行窗口程序的内存消耗情况。
如下是我点击三次 Consume Memory 得到的内存示意图:
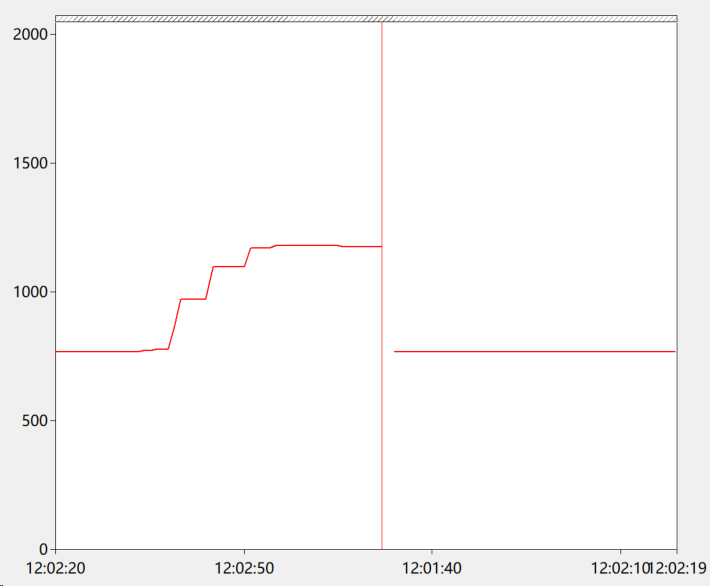
然后点击 Release Memory,发现并不会立马就释放内存。此时程序会在整体内存很吃紧的情况下,gc 才回收内存,所以不会看到曲线立马回落。
使用性能监视器监视当前进程内存消耗情况:
Process --> Private Bytes --> 要监视的进程名称 --> 添加
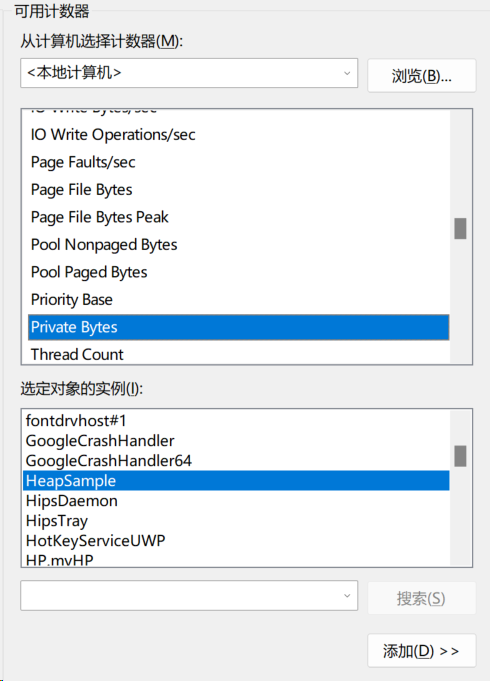
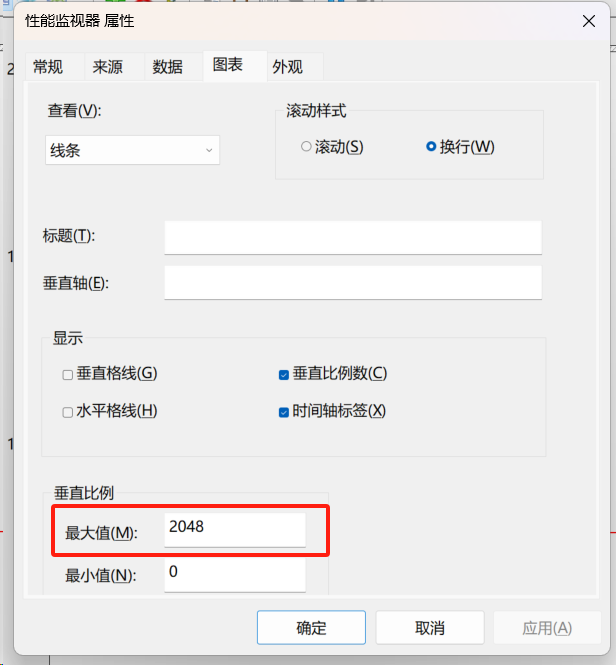
然后会发现,红线始终在顶上,说明这时候图表纵坐标分度太小,双击刚才添加的进程名称,在弹框中选择
图表,然后将垂直比例改为 1024,如果还是很高,则改为 2048,然后点击 “确定” 来应用:
- 此类型允许的操作(运算):涉及到后期的手动重载运算
程序的静态和动态:当程序还没运行的时候,称作静态时期;而当代码运行的时候,则是动态时期。和静态语言与动态语言类型中的“静态/动态是不一样的。
2.2.3 C# 的类型系统
C# 的五大数据类型
- 类(Classes):如 Windows, Form, Console, String
- 结构体(Structures):如:Int32,Int64, Single,Double
- 枚举(Enumerations):如 HorizontalAlignment,Visibility
- 接口(Interfaces)
- 委托(Delegates)
示例代码:
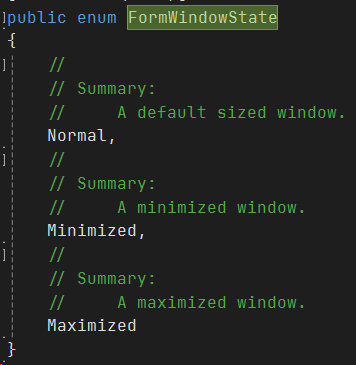
using System; using System.Collections.Generic; using System.Linq; using System.Text; using System.Threading.Tasks; using System.Windows.Forms; namespace TypeInCsharp { internal class Program { static void Main(string[] args) { Type myType = typeof(Form); // 查看类的具体属性名称 Console.WriteLine(myType.FullName); // System.Windows.Forms.Form // 查看是不是类 Console.WriteLine(myType.IsClass); // True // 查看是不是值类型 Console.WriteLine(myType.IsValueType); // False // 枚举类型的应用 Form f = new Form(); f.WindowState = FormWindowState.Maximized; f.ShowDialog(); } } } 下面是 FormWindowState 的实现:
C# 类型的派生谱系
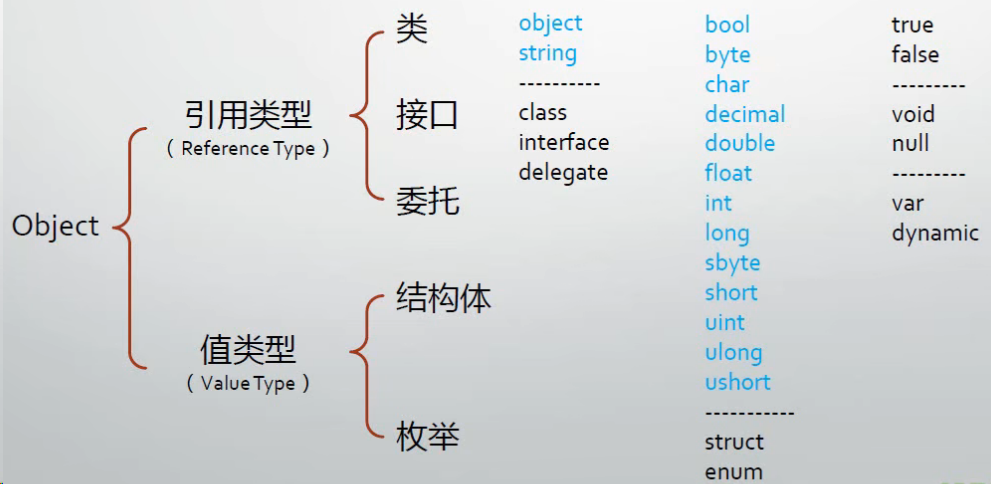
问:C# 里面有哪几种数据类型?
- C# 中分为引用类型和值类型两种。引用类型有:类、接口、委托;值类型有:结构体、枚举。引用类型和值类型的基类都为
object注意:上面图片中右侧黑色关键字:不是具体的数据类型,我们要使用这些关键字,定义自己的数据类型。蓝色关键字都是最常用的基本数据类型。
变量、对象和内存
什么是变量
- 表面来看,变量的用途是存储数据
- 实际上,变量表示了存储位置,并且每个变量都有一个类型,以决定什么样的值能够存入变量
- 变量共分为七种
- 静态变量,实例变量(成员变量,字段),数组元素,值参数,引用参数,输出形参,局部变量
- 下一的变量指局部变量,因为其他种类的变量都有自己的约定名称
- 简单来讲,局部变量就是方法体中声明的变量
- 变量的声明
有效的修饰符组合(可选) 类型 变量名 初始化器(可选)
示例代码:
using System; using System.Collections.Generic; using System.Linq; using System.Runtime.InteropServices.WindowsRuntime; using System.Text; using System.Threading.Tasks; using System.Windows.Forms; namespace TypeInCsharp { internal class Program { static void Main(string[] args) { // 变量类型 int[] array = new int[100]; // 声明长度为100的数组,默认都为零值 for (int i = 0; i < array.Length; ++i) { Console.WriteLine($"{array[i]}"); } Student s = new Student(); // double res1 = s.Add(1, 2); // 编译错误:CS1620 double x = 1, y = 2; double res1 =s.Add(ref x, ref y); Console.WriteLine(res1); } } class Student { // 静态变量(静态字段) public static int Amount; // 非静态变量(成员/字段) public int Age; public string Name; // 引用参数变量 public double Add(ref double x, ref double y) { return x + y; } } } 变量 = 以变量名所对应的内存地址为起点、以其数据类型所要求的存储空间为长度的一块内存区域
值类型的变量
-
以四种结构体类型
byte/sbyte/short/ushort为例byte:1 byte,包含 8 bit,可以表示的范围:0 ~ 28-1sbyte:1 byte,包含 8 bit,可以表示的范围:-27 ~ 27-1short:2 byte,包含 16 bit,可以包含的范围:-215 ~ 215-1ushort:2 byte,包含 16 bit,可以包含的范围:0 ~ 216-1
下面是常见C#基本类型的宽度:
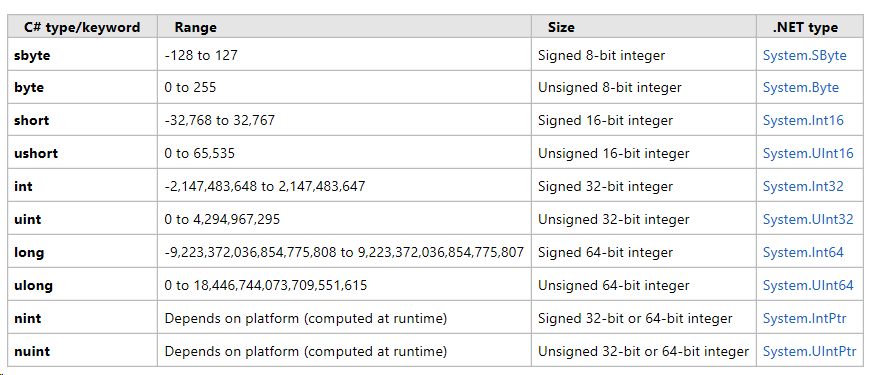
有符号的负数表示:正值按位取反,然后再加1,示例:
十进制: 1000
二进制表示(short):0000 0011 1110 1000
十进制: -1000
二进制表示(short):
对1000按位取反: 1111 1100 0001 0111 +1: 1111 1100 0001 1000
在 linqpad 中运行下面代码,可以打印出转为2进制的short变量:
short s = -1000; string str = Convert.ToString(s, 2); Console.WriteLine(str); // int 类型示例 int aInt = -1000; string intStr = Convert.ToString(aInt, 2); Console.WriteLine(intStr);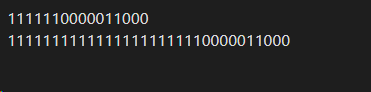
可以看到,无论是整型,还是短整型,都满足上述负数的表示规则
-
值类型没有实例,所谓的“实例”与变量合而为一
引用类型的变量与实例
- 引用类型变量与实例的关系:引用类型变量里存储的数据是对象的内存地址
局部变量是在栈上分配内存,实例变量在堆上分配内存
变量的默认值:零值,而且局部变量需要显示赋值,否则编译器将报错
装箱与拆箱
装箱(Boxing):
装箱是指将值类型转换为引用类型的过程。在装箱时,值类型的实例被包装在一个对象中(通常是 System.Object 类型的实例),从而使其可以存储在引用类型的变量中。
int intValue = 42; object boxedValue = intValue; // 装箱 在这个例子中,intValue 是一个值类型(int),通过将其赋值给 boxedValue,发生了装箱,intValue 被包装在一个 object 类型的实例中。
装箱涉及了一次值的拷贝,从栈上值类型的值拷贝到堆上。拆箱与装箱相反,但也涉及到一次值的拷贝。
装箱和拆箱都会损失程序的性能
拆箱(Unboxing):
拆箱是指将引用类型转换回值类型的过程。在拆箱时,存储在引用类型中的值被提取并转换为原始的值类型。
object boxedValue = 42; int intValue = (int)boxedValue; // 拆箱 在这个例子中,boxedValue 是一个引用类型,通过将其转换为 int,发生了拆箱,boxedValue 中的值被提取并转换为原始的 int 类型。
2.3 方法
其他和 C++ 中相同的地方就没必要记笔记了,在这里只记录值得记的信息。
2.3.1 构造器
构造器是类型的成员之一,狭义的构造器被称作“实例构造器”。当我们没有为类声明构造器时候,编译器会自动生成一个构造器。
using System; using System.Collections.Generic; using System.Linq; using System.Text; using System.Threading.Tasks; namespace MethodSample1 { internal class Program { static void Main(string[] args) { Student s = new Student(128129, "Yuzu"); Student s1 = s; // s1 为s的引用,这里没有调用构造函数,和C++不同,要注意! s.PrintInfo(); // Name: Yuzu, ID: 128129 s1.Name = "Neko"; s1.ID = 128128; s.PrintInfo(); // Name: Neko, ID: 128128 s1.PrintInfo(); // Name: Neko, ID: 128128 Student s2 = new Student(s); // s2 为深拷贝,不是s的引用,调用了自定义的构造器 s2.Name = "Anya"; s2.PrintInfo(); // Name: Anya, ID: 128128 s.PrintInfo(); // Name: Neko, ID: 128128 } } public class Student { public int ID; public string Name; public Student(int _ID, string _Name) { // 带参数的构造器,禁止无参构造 this.ID = _ID; this.Name = _Name; } public Student(Student input) { // 重载了构造器 this.ID = input.ID; this.Name = input.Name; } public void PrintInfo() { Console.WriteLine("Name: {0}, ID: {1}", Name, ID); } } } 构造新对象,如果想要深拷贝,就要使用 new 操作符进行构造。C# 中 = 不能重载,这就意味着不能 自定义 = 构造对象。
编译运行结果:
2.3.2 方法重载
方法重载的作用是适应调入时候传入的参数
方法签名(Method Signature):方法的名称、类型参数的个数和它的每一个形参(从左到右的顺序)的类型和种类(值、引用和输出组成)。方法签名不包含返回类型。
示例:
using System.Data.Common; namespace OverloadSample { internal class Program { static void Main(string[] args) { Console.WriteLine("Hello, World!"); } } class Calculator { public int Add(int x, int y) { return x + y; } // 不是重载,重载不看返回类型 //public double Add(int x, int y) { // return x + y; //} public double Add(double x, double y) { return x + y; } public double Add(double x, double y, double z) { return x + y + z; } public int Add<T>(T x, T y) { // T 为类型形参 //... } } } 重载决策:即选择到底调用哪一个重载,用于在给定了参数列表和一组候选函数成员的情况下,选择一个最佳函数成员来事实调用。C#中的重载决议没有C++中那么复杂,相对好理解很多。
2.3.3 Debug 方法讲解
示例代码如下:
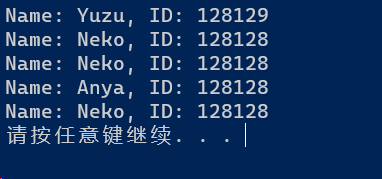
namespace DebugExample { internal class Program { static void Main(string[] args) { double circleArea = Calculator.GetCircleArea(100); double cylinderVol = Calculator.GetCylinderVolume(100, 30); double coneVol = Calculator.GetConeVolume(100, 20); Console.WriteLine(circleArea); Console.WriteLine(cylinderVol); Console.WriteLine(coneVol); } } public class Calculator { public static double GetCircleArea(double r) { return Math.PI * Math.Pow(r, 2); } public static double GetCylinderVolume(double r, double h) { return GetCircleArea(r) * h; } public static double GetConeVolume(double r, double h) { return 1.0 / 3.0 * GetCylinderVolume(r, h); } } } 在第 9 行添加一个断点,然后开启调试:
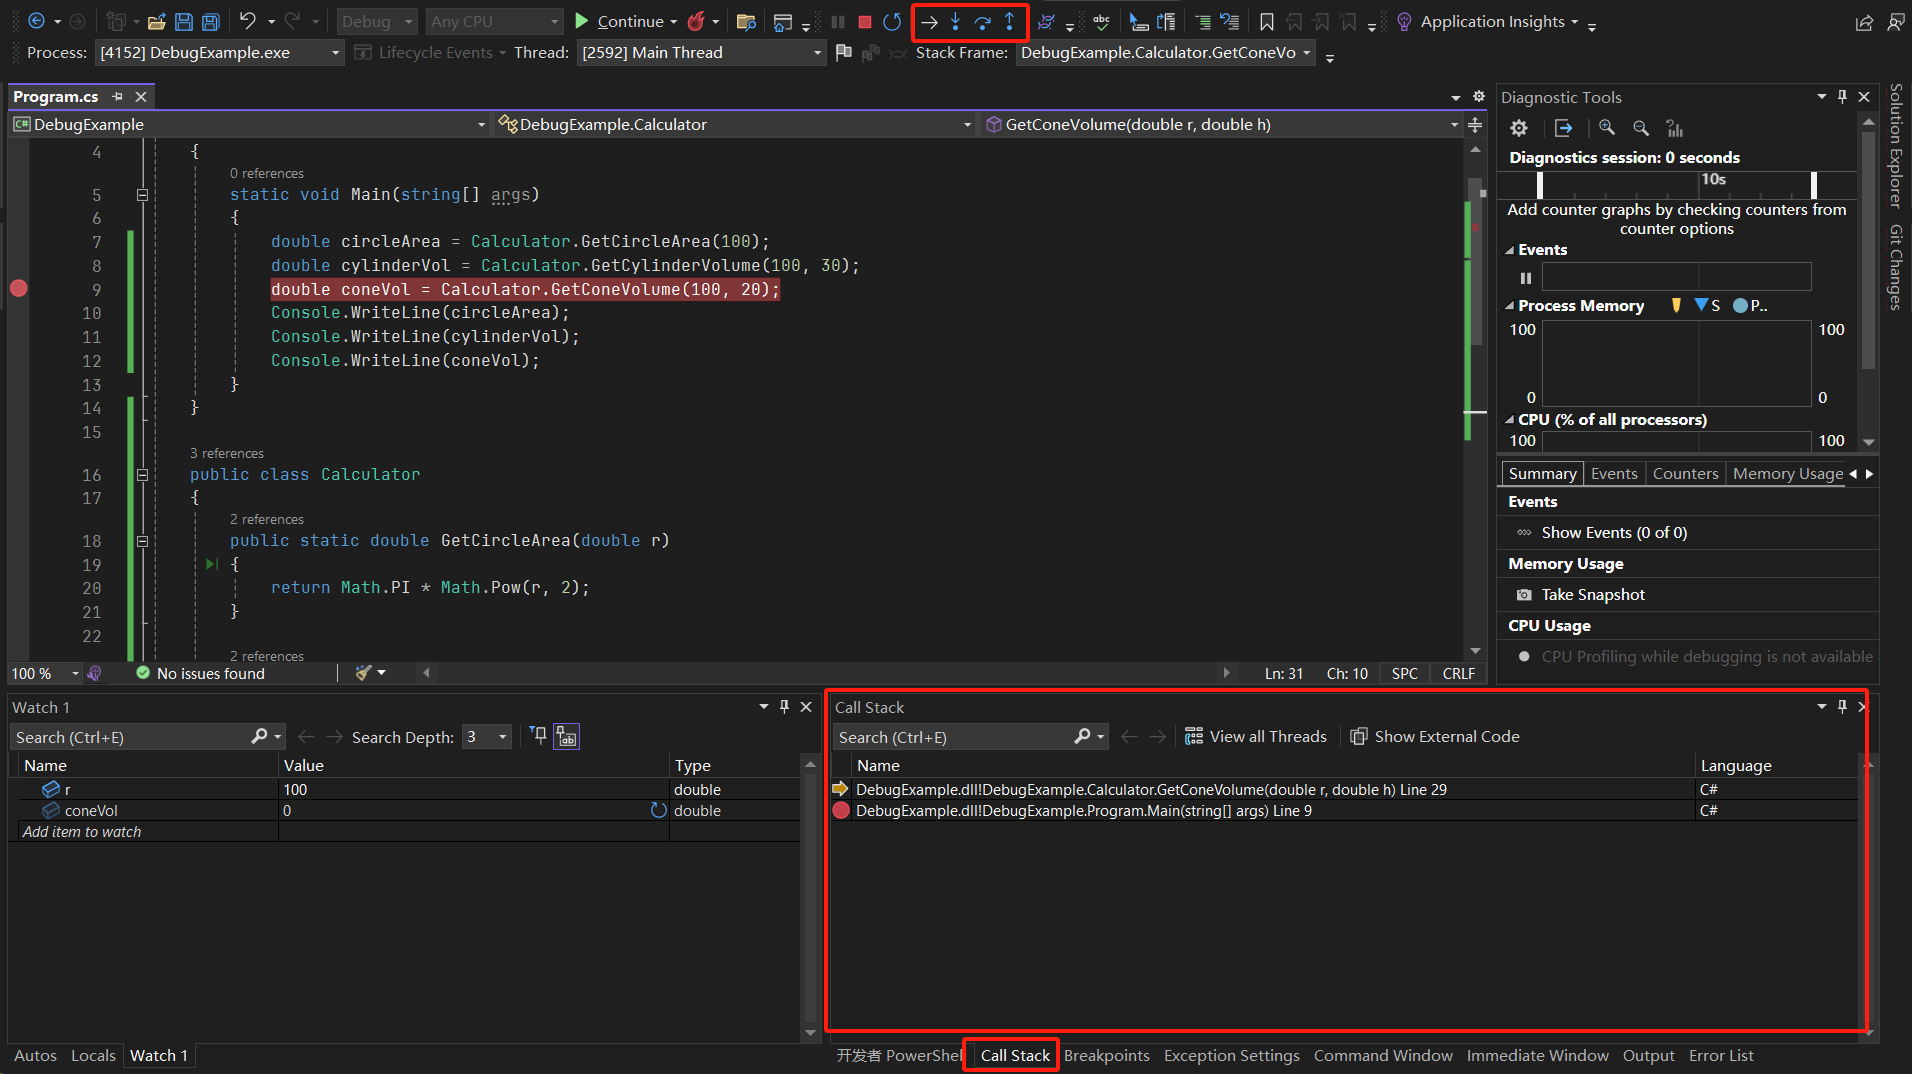
上面的三种debug方式:
- step into(F11):逐渐深入调试,进入每一层调用栈,这是最细腻的调试方式,一般用于仔细寻找错误
- step over(F10):直接获取调用结果,不进入调用栈
- step out(Shift + F11):跳出,返回到上一层调用栈
实际debug过程中,我们一般三种方式混合使用,前两者使用的更多一些。上面截图右下角可以看到调用栈信息,左下角可以观察当前变量的值
方法的调用与栈
这部分和 C++ 的相同(绝大部分语言中也是这样),即每调用一层,栈压入一次,调用结束,就弹出,当所有的栈都弹出了,则内存中所有的调用栈就清空了。C# 中参数入栈规则是:谁调用,谁压栈,谁调用,谁管理参数。参数入栈规则:先压入左侧参数,后压入右侧参数。而在C++中行为是未定义的,和编译器的具体实现有关。
函数的返回值一般存在寄存器中,如果存不下,则存在内存中。最终的返回值会被变量从寄存器中拿出,存在内存中。
2.4 操作符
C# 操作符概览:
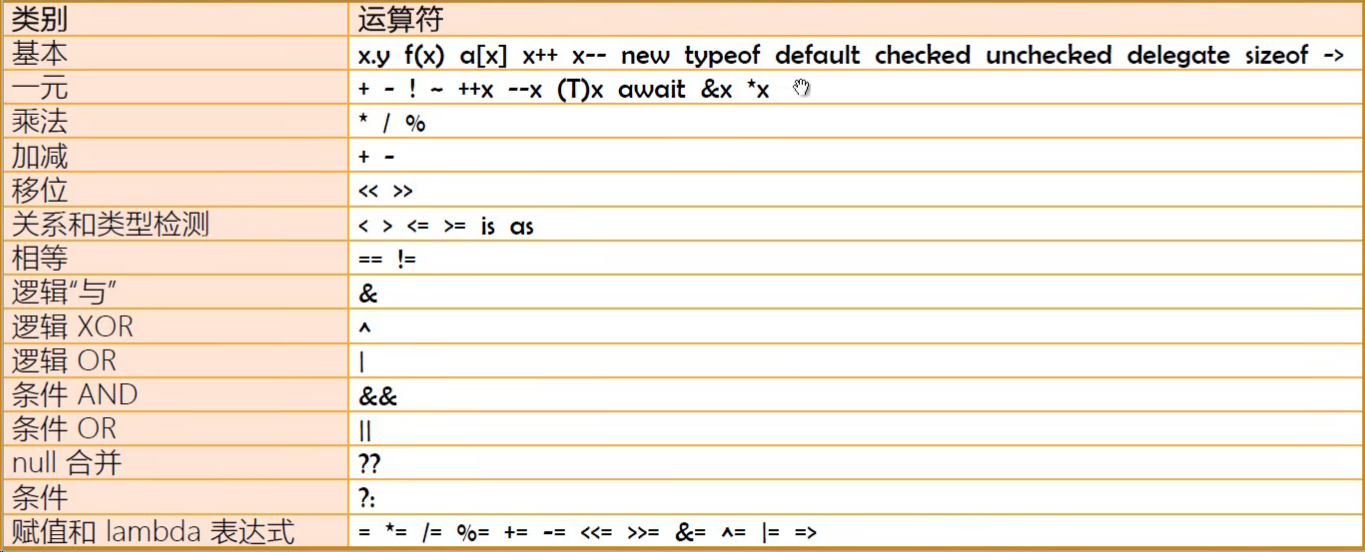
从上往下优先级依次降低。计算机语言中的操作符不能脱离与它相关联的数据类型。
= 的运算顺序:从右往左计算,而其他数学运算符的运算顺序为从左往右。
同一优先级运算顺序:
class MyProgram { static void Main(string[] args) { int x = 100; int y = 200; int z = 300; x += y += z; Console.WriteLine(x); // 600 Console.WriteLine(y); // 500 Console.WriteLine(z); // 300 } } 2.4.1 委托的简单示例示例
using System; using System.Collections.Generic; namespace OperatorExample { internal class Program { static void Main(string[] args) { Calculator cal = new Calculator(); Action ac = new Action(cal.PrintHello); ac(); // 调用被管理的方法 } } public class Calculator { public double Add(double x, double y) { return x + y; } // 无返回值且无参数的方法 public void PrintHello() { Console.WriteLine("Hello!"); } } } Action 是一个简单的委托类型,它要求传入参数是一个无返回值、无参数的方法。委托的作用类似于C++中的类成员指针,可以通过类的成员指针访问类中的数据成员和函数成员。
2.4.2 访问数组与字典元素
using System; using System.Collections.Generic; namespace OperatorExample { internal class Program { static void Main(string[] args) { // 访问数组中的元素 int[] myIntArray = new int[] { 1, 2, 3, 4, 5 }; // [] 是初始化器 for (int i = 0; i < myIntArray.Length; i++) { Console.WriteLine(myIntArray[i]); } // 访问字典中的元素 Dictionary<string, Student> keyValuePairs = new Dictionary<string, Student>(); for (int i = 0; i < 100; ++i) { string name = "stu_" + i.ToString(); Student stu = new Student(name, i); keyValuePairs.Add(name, stu); } Student obj = keyValuePairs["stu_99"]; Console.WriteLine(obj.ID); // 99 foreach(string name in keyValuePairs.Keys) { Console.WriteLine($"Student Name : {keyValuePairs[name].Name}, Student ID : {keyValuePairs[name].ID}"); } } } class Student { public string Name; public int ID; public Student(string _Name, int _ID) { this.Name = _Name; this.ID = _ID; } } } 使用 foreach 循环可以快捷的访问字典中的元素。如上述代码的第28行。
++和--的行为和C++中一致
2.4.3 typeof 和 default 操作符
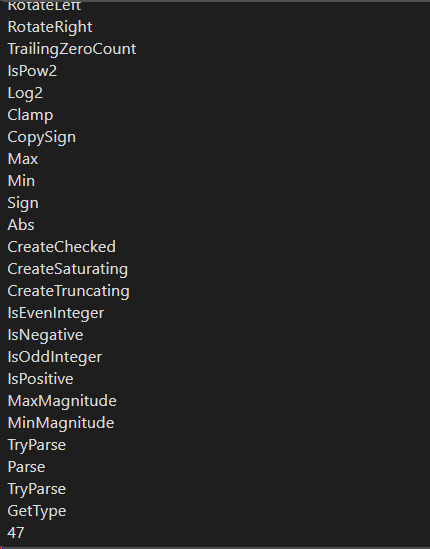
typeof 可以获取类型信息,如:
class MyProgram { static void Main(string[] args) { Type typeInfo = typeof(int); Console.WriteLine(typeInfo.Namespace); Console.WriteLine(typeInfo.FullName); Console.WriteLine(typeInfo.Name); int count = typeInfo.GetMethods().Length; foreach (var ms in typeInfo.GetMethods()) { Console.WriteLine(ms.Name); } Console.WriteLine(count); } } 部分编译运行结果:
default 操作符作用:设定当前类型的值为其默认零值,如果是引用类型,则设定为空值 null
namespace MyNameSpace { class Student { // ... } class MyProgram { static void Main(string[] args) { int aInt = default(int); // 0 Student s = default(Student); // null Console.WriteLine(s == null); // True // Console.WriteLine(s is null); // True } } } 2.4.4 new 操作符
变量类型根据是否显示注明类型,分为显式类型变量和隐式类型变量。隐式类型变量:要使用 var 声明
var x = 32; //x: int var x = 32L; //x: long new 操作符会创建实例,并调用类的实例构造器,从内存上创建相应区域用于存放该实例,并返回该内存地址给变量(如果有=)。
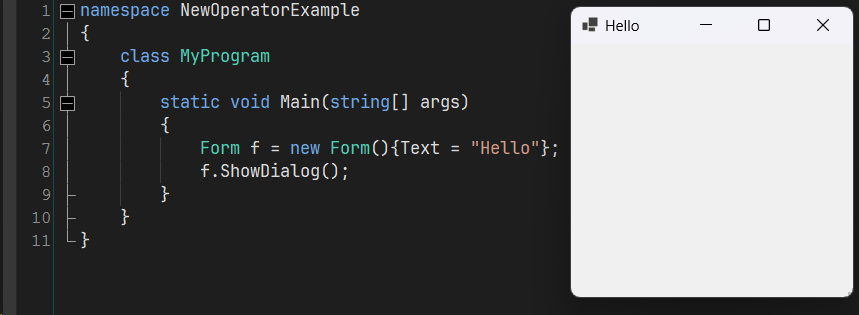
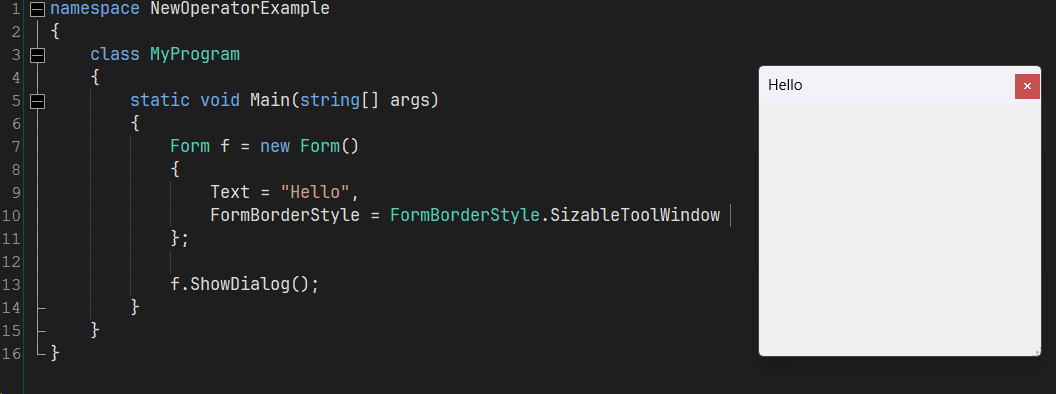
new 操作符除了可以访问构造器之外,还可以访问初始化器,如:
using System; using System.Windows.Forms; namespace NewOperatorExample { class MyProgram { static void Main(string[] args) { Form f = new Form() { Text = "Hello" }; f.ShowDialog(); } } } 编译运行结果:
将源代码进行修改,添加:FormBorderStyle = FormBorderStyle.SizableToolWindow; 可以取消最大化和最小化按钮,这就是初始化器的作用:
并不是创建所有的实例都要调用 new 操作符。
为匿名类型创建对象
即创建类型的时候使用 var 声明,而不给出具体类型:
using System; using System.Windows.Forms; namespace AnonymousType { class MyProgram { static void Main(string[] args) { // 匿名类型:person var person = new { Name = "Yuzu", Age = 99 }; Console.WriteLine(person.Name); Console.WriteLine(person.Age); Type t = person.GetType(); // 获取类型名称 Console.WriteLine(t.Name); } } } 编译运行结果:

可以访问到其中的数据,可以看到这个名称很奇怪,它是一个泛型类。
注意:new 操作符功能强大,但是不能随意使用,因为使用 new 创建的对象,它的实例和它的类之间就形成了紧密的耦合,这其实是有潜在风险的。而采用“依赖注入”的设计模式,可以降低耦合。
我们在编写代码的时候,要遵循:高内聚,低耦合的原则。
隐藏父类方法
使用 new 操作符可以隐藏父类的方法
如下,CsStudent 继承了 Student 类,在 CsStudent 中要对方法 PrintInfo 进行隐藏,使得对象调用同名方法时候调用的是子类的方法,而非父类的:
using System; using System.Windows.Forms; namespace HiddenBaseMethod { class MyProgram { static void Main(string[] args) { CsStudent cs1 = new CsStudent() { Name = "Yuzu", ID = "A12345"}; cs1.PrintInfo(); } } class Student { public string Name; public string ID; public void PrintInfo() { Console.WriteLine($"Name: {Name}, ID:{ID}"); } } class CsStudent : Student { // new 作为修饰符,可以对父类同名方法进行隐藏 new public void PrintInfo() { Console.WriteLine($"CS Student Name: {Name}, ID:{ID}"); } } } 编译运行结果:

注意:
override关键字只能用于虚函数中,且在 C# 中没有纯虚函数,但是有功能类似的抽象类,使用abstract关键字修饰。使用 override 修饰示例:
using System; using System.Windows.Forms; namespace HiddenBaseMethod { class MyProgram { static void Main(string[] args) { CsStudent cs1 = new CsStudent() { Name = "Yuzu", ID = "A12345"}; cs1.PrintInfo(); } } class Student { public string Name; public string ID; // 只用使用 virtual 修饰的方法,子类才能重写 public virtual void PrintInfo() { Console.WriteLine($"Name: {Name}, ID:{ID}"); } } class CsStudent : Student { // override 作为修饰符,表示对父类同名方法进行重写 public override void PrintInfo() { Console.WriteLine($"CS Student Name: {Name}, ID:{ID}"); } } }
2.4.5 checked 和 unchecked
checked 和 unchecked 是用来检测整型变量数值转换和求值导致的溢出异常的。示例:
namespace CheckedAndUnchecked { internal class Program { static void Main(string[] args) { // checked 和 unchecked 用法 uint a = uint.MaxValue; string binA = Convert.ToString(a, 2); // 转为二进制字符串 Console.WriteLine("{0} {1}", a, binA); // 4294967295 11111111111111111111111111111111 try { uint b = checked(a + 1); // 发生溢出异常 Console.WriteLine("{0} {1}", b, Convert.ToString(b, 2)); } catch (OverflowException e) { Console.WriteLine("Overflow! Msg : {0}", e); } uint x = uint.MinValue; try { uint y = unchecked(x - 1); // 不再检查异常,发生溢出也继续执行下一行代码 Console.WriteLine("{0}, {1}", y, Convert.ToString(y, 2)); } catch (OverflowException e) { Console.WriteLine("Overflow! Msg : {0}", e); } } } } 编译运行结果:

C# 默认采用的是 unchecked 模式。下面这种可以对模块批量进行设置:
checked{ // ... expression } 2.4.6 delegate 操作符
delegate 操作符可以用来声明匿名方法(这种用法现在已经被抛弃,因为使用 lambda 表达式会更加简单),这里只是用作示例:
MainWindow.xaml.cs
using System; using System.Windows; namespace DelegateExample { /// <summary> /// Interaction logic for MainWindow.xaml /// </summary> public partial class MainWindow : Window { public MainWindow() { InitializeComponent(); // 使用 delegate 挂载事件 this.myButton.Click += delegate (object sender, RoutedEventArgs e) { this.myTextBox.Text = "馬鹿馬鹿!"; }; } // 最传统的,另外定义一个事件的函数,然后调用 //private void MyButton_Click(object sender, RoutedEventArgs e) //{ // this.myTextBox.Text = "馬鹿馬鹿!"; //} } } 这上面的就是窗口的事件处理函数,挂载到了按钮 myButton 的点击事件,先前我们最常规的做法就是另外写一个函数,然后进行调用。现在可以使用 delegate 来声明匿名方法用以简化代码,但是不建议这么写,建议使用匿名函数将第 17 行代码写成如下形式:
// 使用 lambda 表达式挂接事件 this.myButton.Click += (object sender, RoutedEventArgs e) => { this.myTextBox.Text = "馬鹿馬鹿!"; }; MainWindow.xaml
<Window x:Class="DelegateExample.MainWindow" xmlns="http://schemas.microsoft.com/winfx/2006/xaml/presentation" xmlns:x="http://schemas.microsoft.com/winfx/2006/xaml" xmlns:d="http://schemas.microsoft.com/expression/blend/2008" xmlns:mc="http://schemas.openxmlformats.org/markup-compatibility/2006" xmlns:local="clr-namespace:DelegateExample" mc:Ignorable="d" Title="MainWindow" Height="450" Width="800"> <Grid Background="SeaGreen"> <Grid.RowDefinitions> <RowDefinition Height="auto"></RowDefinition> <RowDefinition Height="2"></RowDefinition> <RowDefinition Height="auto"></RowDefinition> </Grid.RowDefinitions> <TextBox x:Name="myTextBox" Grid.Row="0"></TextBox> <Button x:Name="myButton" Content="Click Me!" Grid.Row="2"></Button> </Grid> </Window> 
2.4.7 sizeof 操作符
sizeof 运算符只能用于基本数据类型变量所占的字节数大小(除了 string 和 object,因为 sizeof 只能用来获取结构体数据类型在内存中占的字节数,而 string 和 object 不是结构体数据类型)。
示例:
using System; using System.Windows.Forms; namespace AnonymousType { class MyProgram { static void Main(string[] args) { // 默认情况下 Console.WriteLine(sizeof(int)); // 4 Console.WriteLine(sizeof(long)); // 8 Console.WriteLine(sizeof(double)); // 8 Console.WriteLine(sizeof(float)); // 4 Console.WriteLine(sizeof(decimal)); // 16 Console.WriteLine(sizeof(byte)); // 1 Console.WriteLine(sizeof(char)); // 2 Console.WriteLine(sizeof(short)); // 2 Console.WriteLine(sizeof(bool)); // 1 // 自定义数据类型:必须写在 unsafe 中 unsafe { int x = sizeof(Student); // 16 Console.WriteLine(x); } } } struct Student{ int ID; long Score; } } 至于为什么上面的 struct 尺寸为 16 字节,涉及到了内存对齐相关知识,C# 中内存对齐机制比C++中还要不明晰,默认的规则粗略总结为:结构体在内存中所占大小一般为(单位:字节):2、4、8、8*n(n为整数,且大于等于1)。当内存大于8,则直接取最近的8的倍数。
2.4.8 -> 操作符
-> 是指针访问操作符,和C++中是一样的,下面是一个小例子:
namespace Ptr { class MyProgram { static void Main(string[] args) { Student s = new Student(12888, "Yuzu"); unsafe { Student* ptr = &s; ptr->Name = "Ayaka"; Console.WriteLine($"{ptr->Name} : {ptr->ID}"); } } } public class Student { public double ID; public string Name; public Student(double _ID, string _Name) { this.ID = _ID; this.Name = _Name; } } } 编译运行结果:
Ayaka : 12888 注:C# 中指针的使用十分有限,并且是“消毒”过的。没有顶层 const 和底层 const 等C++拥有的奇怪特性,真是让人快乐……
其他的 *x 和 &x 在 C++ 中常用,但是在 C# 中均不常用。
2.4.8 逻辑运算符
常见的逻辑运算都和C++中一致,条件运算(&& ||)照样使用短路逻辑,建议不要在代码中使用这个特性,而要尽量避开,很容易造成不易察觉的 bug。
逻辑非:!实际应用:
检查传入的构造参数是否符合要求,如下面的参数中,如果 string 类型的名称为空,则抛出异常,停止构造
namespace LogicNotExample { class MyProgram { static void Main(string[] args) { Student s = new Student("", 12888); // 传入空字符串 Console.WriteLine(s.Name); } } public class Student { public string Name; public double ID; public Student(string _Name, double _ID) { // 检查传入的字符串是否为 null 或者空 if (!string.IsNullOrEmpty(_Name)) { this.Name = _Name; this.ID = _ID; } else { throw new ArgumentException("_Name is Empty"); } } } } 运行结果:

2.5 数据类型与转换
数据类型转换是我们经常用到的,从最常见的需求:我们在命令行输入两个数,然后在控制台打印出他们相加的结果:
namespace ReadLineExample { internal class Program { static void Main(string[] args) { string str1 = Console.ReadLine() ?? "0"; // 若为null,则赋值为"0" string str2 = Console.ReadLine() ?? "0"; if (!string.IsNullOrWhiteSpace(str1) && !string.IsNullOrWhiteSpace(str2)) { double db1 = Convert.ToDouble(str1); double db2 = Convert.ToDouble(str2); Console.WriteLine(db1 + db2); } } } } 在这里使用了 Convert 类,该类可以直接调用其静态方法,实现各种类型之间的转换。查询文档可知,Convert 类的方法全部为静态方法。
2.5.1 类型转换
隐式类型转换
有三种:
-
不丢失精度的转换
-
子类向父类的转换
示例:定义一个动物类 Animal,Human 继承 Animal,Teacher 继承 Human。继承之后,子类就拥有了父类所有的方法和字段
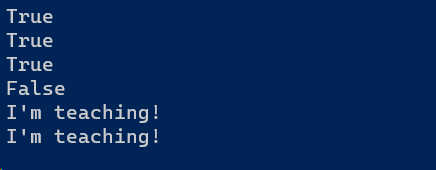
namespace ConversionSample { internal class Program { static void Main(string[] args) { // 1.隐式类型转换 Teacher t1 = new Teacher(); t1.Teach(); t1.Eat(); t1.Think(); // 子类向父类转换 Human h = t1; // 子类t1向父类转换,h 是 t1 的引用 h.Think(); h.Eat(); //h.Teach(); // 父类没有这个方法 } } class Animal { public void Eat() { Console.WriteLine("I'm eating!"); } } class Human : Animal { public void Think() { Console.WriteLine("I'm thinking!"); } } class Teacher : Human { public void Teach() { Console.WriteLine("I'm teaching!"); } } }编译运行结果:
I'm teaching! I'm eating! I'm thinking! I'm thinking! I'm eating!可以看出来, h 是 t1 的引用,但是h的类型为 Human,只能使用 Human 中拥有的方法。
-
装箱
显式类型转换
- 有可能丢失精度(甚至发生错误)
- 拆箱
- 使用
Convert类 - ToString 方法与各种数据类型的 Parse/TryParse 方法
示例代码:
namespace ConversionSample { internal class Program { static void Main(string[] args) { // 2.显式类型转换 uint iNum = uint.MaxValue; ushort usNum = (ushort)iNum; // 丢失了精度,截断导致 Console.WriteLine(iNum); Console.WriteLine(usNum); Console.WriteLine(Convert.ToString(iNum, 2).PadLeft(sizeof(uint) * 8, '0')); Console.WriteLine(Convert.ToString(usNum, 2).PadLeft(sizeof(ushort) * 8, '0')); uint iNum2 = 23453; Console.WriteLine(Convert.ToString(Convert.ToString(iNum2, 2).PadLeft(sizeof(uint) * 8, '0'))); // Parse / TryParse 方法 string s = Console.ReadLine(); // int num1 = int.Parse(s); // Parse(s) 中s格式不正确会抛出异常 int num2; bool success = int.TryParse(s, out num2); if (success) { Console.WriteLine(num2); } else { return; } } } } PadLeft(sizeof(uint) * 8, '0')) 作用是当位数不足时候,左侧补齐0。
建议使用 type.TryParse() 方法,因为不会抛出异常,我们可以直接处理格式错误的情况。
显式类型转换的实现:
如我们定义了两个类,西游记应该都看过,一个石头经历很多年,然后变成了一只猴子。下面定义了两个类,一个 Stone 类和一个 Monkey 类,都有成员 Age,当石头过了 500 年,如果变成猴子,就成了 1 岁的猴子。
那么怎么实现猴子类和石头类之间的转换呢?还要将他们之间的年龄进行换算。这时候明显不能使用继承,因为继承是同属性的,而猴子类和石头,一个属于有机生命,一个属于无机物,自然不能是继承关系。这时候就要用到显式类型转换了:
namespace ExplicitConvertSample { internal class Program { static void Main(string[] args) { Stone stone = new Stone("WuKong", 10000); Monkey m = (Monkey)stone; Console.WriteLine($"{m.Name} : {m.Age}"); } public class Stone { public string Code; public int Age; public Stone(string _Code, int _Age) { this.Code = _Code; this.Age = _Age; } public static explicit operator Monkey(Stone stone) { Monkey m = new Monkey("Monkey "+stone.Code, stone.Age / 500); return m; } } public class Monkey { public string Name; public int Age; public Monkey(string _Name, int _Age) { this.Name = _Name; this.Age = _Age; } } } } 编译运行结果:

只需要少许修改,就可以使用隐式转换(不过看起来有些奇怪):
先将上述代码第 25 行:operator Monkey 的重载修饰符改为 implicit
public static implicit operator Monkey(Stone stone) 然后调用处直接使用 = 即可,第 9 行可修改为:
Monkey m = stone; 搞明白这个,我们就能写自定义类型转换方法了。注意,自定义的类型转换方法,要写在原类型中(如在本处,原类型为 Stone,而目标类型为 Monkey)。
在运算符中,有的符号在C++中能够重载,但是在C#不能重载,查看C#运算符是否能重载:https://learn.microsoft.com/zh-cn/dotnet/csharp/language-reference/operators/operator-overloading#overloadable-operators
2.5.2 == 与 is 与 as 操作符
== 在C#的行为与C++中没什么差别,且也可以像C++中那样进行重载,没什么特殊的。这里举一个无穷的示例,这里需要注意:无穷值不能由整型产生
namespace InfinitySample { internal class Program { static void Main(string[] args) { // 无穷大 float flPositiveInfinity = float.PositiveInfinity; float flNegativeInfinity = float.NegativeInfinity; double dbPosInfinity = double.PositiveInfinity; double dbNegInfinity = double.NegativeInfinity; Console.WriteLine(dbPosInfinity); Console.WriteLine(dbNegInfinity); Console.WriteLine(flPositiveInfinity == null); } } } is 和 as 操作符的作用有些相似,这两个在C++中没有,要着重讲解下
is 操作符判断某对象是否由某类(或者其子类)构建所得,而 as 操作符则是判断某对象是否行为与某类生成的对象行为一致。
实际上,as 显式做了类型转换,若是转换不成功则返回 null,成功则返回一个引用,且不会抛出异常。
下面是一个示例:
namespace IsAsSample { internal class Program { static void Main(string[] args) { // is 操作符:判断所属关系,即某实例或者返回值是否为某类型(或者其子类型),返回布尔值 Teacher t = new Teacher(); Console.WriteLine(t is Teacher); // True Console.WriteLine(t is Human); // True Console.WriteLine(t is Animal); // True Car c = new Car(); Console.WriteLine(c is Animal); // False object o = new Teacher(); if(o is Teacher) // True { Teacher t1 = (Teacher)o; t1.Teach(); } // as 操作符:一定程度上替代 is:即判断某对象行为是否与某类型实例行为一致 object o1 = new Teacher(); Teacher? t2 = o1 as Teacher; // ? 表示 t2 可能为null,as 操作符做显式类型转换,即:将 o1 转为 Teacher 类型,若转换不成功则返回 null if (t2 != null) { t2.Teach(); } } } class Animal { public void Eat() { Console.WriteLine("I'm eating!"); } } class Human : Animal { public void Think() { Console.WriteLine("I'm thinking!"); } } class Teacher : Human { public void Teach() { Console.WriteLine("I'm teaching!"); } } class Car { string Name; } } 编译运行结果:
下面是文档中对 as 的解释:
The as operator explicitly converts the result of an expression to a given reference or nullable value type. If the conversion isn't possible, the as operator returns null. Unlike a cast expression, the as operator never throws an exception.
2.5.3 可空类型
可空类型(Nullable)即可指定一个类型为空值 null。如:
namespace NullableSample { internal class Program { static void Main(string[] args) { Nullable<int> num1 = null; Console.WriteLine(num1.HasValue); // 简写:? int? num2 = null; if (num2.HasValue) { Console.WriteLine(num2); } int res = num2 ?? 1; // null 值合并运操作符 ?? Console.WriteLine(res); } } } Nullable<T> 的简写为 T? ,如第 11 行所示,即当前变量取 null 值做保留,一般为后续使用。
第 15 行的 ?? 被称作 null 值合并运算符,格式:expression1 ?? expression2。如果左操作数 expression1 运算结果为 null,则返回右操作数
// ??(null 值合并运操作符):如果左操作数为 null,则返回右操作数 int res = num2 ?? 1; 2.6 表达式和语句
2.6.1 表达式
表达式英语为 Expression,下面是书籍 Programming Languages: Principles and Paradigms 对它的定义:
Expression, together with commands and declarations, are one of the basic components of every language, We can say that expressions are the essential component of every language.
An expression is a syntactic entity whose evaluation either produces a value or fails to terminate, in which case the expression is undefined.
C# 语言中对它的定义:
An expression is a sequence of one or more operands and zero or more operators that can be evaluated to a single value, object, method, or namespace. Expressions can consist of a literal value, a method invocation, an operator and its operands, or a simple name. Simple names can be the name of a variable, type member, method parameter, namespace or type.
C# 中对表达式的分类:
-
A value. Every value has a associated type
-
A variable. Every variable has a associated type
-
A namespace
-
A method group, eg.
Console.WriteLine,这是一组方法,重载决议(Overload Resolution)会选择具体调用哪个 -
A null literal
-
An Anonymous function
-
A property access
-
An event access
下面为如何使用事件访问器,在窗体加载时动态更改窗体的标题。
如新建一个 Form,如果发生了 Load 事件,则更换标题(Text 属性):
using System; using System.Windows.Forms; namespace EventAccessSample { internal class Program { static void Main(string[] args) { Form myForm = new Form(); myForm.Text = "Hello"; // Load:加载事件,sender 为事件发起者,以object类型进行传输 myForm.Load += (object sender, EventArgs e) => { Form form = sender as Form; if (form == null) { return; } form.Text = "New Title"; }; myForm.ShowDialog(); } } }第 13 行就访问了 myForm 的 Load 事件
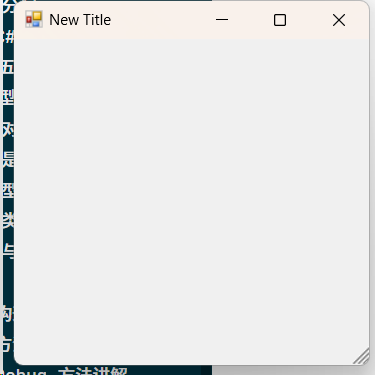
myForm.Load += (object sender, EventArgs e) => { ... };:这一行代码订阅了窗体的Load事件。当窗体加载时,将执行括号内的代码块。使用 Lambda 表达式创建了一个匿名方法,该方法接受两个参数:sender和e,分别表示事件的发起者和事件参数。sender:是事件的发起者,以object类型传输。在这里,它被强制转换为Form类型,并赋值给form变量。e:是事件的参数,这里是EventArgs类型,表示不包含任何特定数据的事件参数。
-
An indexer access
-
Nothing. 对返回值为 void 的方法的调用
2.6.2 语句
语句在英语中翻译为 statement,下面是维基百科对它的定义:
In computer programming a statement is the smallest standalone element of an imperative programming language which expresses some action to be carried out. A program written in such a language is formed by a sequence of one or more statements. A statement will have internel components(eg. expressions).
语句是高级语言的语法,语句等价于一个或一组由明显逻辑关联的指令。
C# 中对语句的定义:
The actions that a program takes are expressed in statements. Common actions include declaring variables, calling methods, looping through collections, and branching to one or another block of code, depending on a given condition. The order in which statements are executed in a program is called the flow of control or flow of execution. The flow of control may vary every time that a program is running, depending on how the program reacts to input that it receives at run time.
C# 语言的语句除了能够让程序员“顺序地”(sequentially)表达算法思想,还能通过条件判断、跳转和循环等方式控制程序逻辑的走向。简而言之就是:陈述算法思想,控制逻辑走向,完成有意义的动作(action)。
C# 的语句由分号(;)结尾,但是以分号结尾的不一定都是语句。语句一定出现在方法体里。
如 using System; 就不是语句(这个叫 using 指令),类中字段的定义也不是语句。
Visual Studio 中反汇编工具的使用
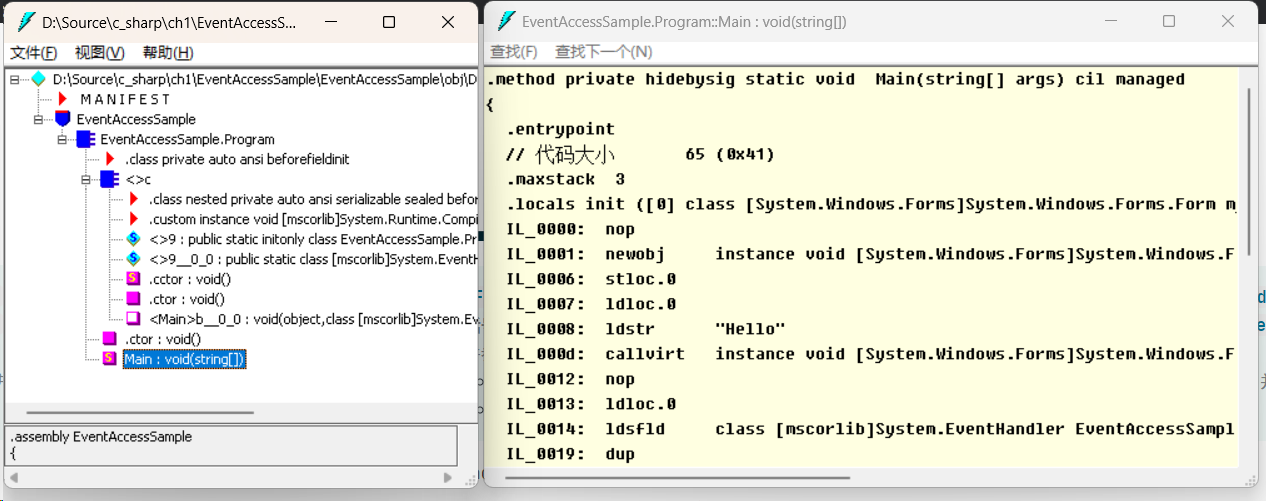
打开x64_x86 Cross Tools Command Prompt for VS 2022,即开发者命令行工具。该工具随着 Visual Studio 一同安装的,然后打开它。或者直接在 Visual Studio 按 Control + `,也能直接打开开发者命令行工具。

输入 ildasm 即打开反汇编程序。然后点击左上角:文件 -- 打开,然后打开我们使用 Visual Studio 构建的可执行程序或者库文件。
常见语句类型
和C++中基本一致,这里只解释不一样的。复合语句在这里也被称作嵌套语句。下面是一个嵌入式语句:
namespace FlowControlSample { internal class Program { static void Main(string[] args) { string? input = Console.ReadLine(); double dbNum; bool pass = double.TryParse(input, out dbNum); if (pass) { if(dbNum >= 60) { Console.WriteLine("PASS"); } else { Console.WriteLine("FAILED"); } } else { Console.WriteLine("Not a Number"); } } } } C# 中的 dangling-else 问题
如下面这种不清晰的代码,最后一个 else 匹配的究竟是哪一个 if ?
namespace FlowControlSample { internal class Program { static void Main(string[] args) { string? input = Console.ReadLine(); double dbNum; bool pass = double.TryParse(input, out dbNum); if (pass) if (dbNum >= 60) Console.WriteLine("PASS"); else Console.WriteLine("FAILED"); } } } 实际上是匹配的最近的 if,在这里是内层的 if,而 Visual Studio 会自动格式化代码(像上面这样),让代码看起来更清晰。
此外,我们应当尽量避免多层条件语句嵌套,这会让代码易读性十分差,且不利于后期维护。
在这里可以见到常见语言给 dangling-else 的解决方案:https://stackoverflow.com/questions/967511/how-do-different-languages-handle-the-dangling-else
switch 语句
switch 语句的语法:
switch(Expression) { case x: // code block break; case y: // code block break; default: // code block break; } 上面语句中,表达式类型为 sbyte, byte, ushort, short, uint, int, long, ulong, bool, char, string 或 枚举类型,或者为对于上面某种类型的可空类型(nullable type),该类型就是 switch 语句的主导类型。
注意:
- switch 中的表达式不能使用任何浮点类型,否则编译器会报错!
- case 后面跟常量表达式,且类型要和 Expression 类型相同
- C# 中的 switch 语句不允许 fallthrough,默认要在 case 结束了添加 break,否则编译器会报错
C# 中 switch 的高级用法:模式匹配
示例代码:
namespace SwitchSample { class MyProgram { static void Main(string[] args) { DisplayMeasurement(-4); // Output: Measured value is -4; too low. DisplayMeasurement(5); // Output: Measured value is 5. DisplayMeasurement(30); // Output: Measured value is 30; too high. DisplayMeasurement(double.NaN); // Output: Failed measurement. Console.WriteLine("Please input day number(eg. Monday, input '1'): "); string? d = Console.ReadLine(); WeekDay day; bool success = Enum.TryParse(d, out day); if (success) { day--; switch (day) { case <= WeekDay.Sat: Console.WriteLine("Working Day"); break; case <= WeekDay.Sun: Console.WriteLine("Weekend"); break; default: Console.WriteLine("Wrong input"); break; } } } enum WeekDay : uint { Mon, Tues, Wed, Thur, Sat, Fri, Sun, } static void DisplayMeasurement(double measurement) { switch (measurement) { case < 0.0: Console.WriteLine($"Measured value is {measurement}; too low."); break; case > 15.0: Console.WriteLine($"Measured value is {measurement}; too high."); break; case double.NaN: Console.WriteLine("Failed measurement."); break; default: Console.WriteLine($"Measured value is {measurement}."); break; } } } } 上面的枚举类型定义,里面的元素类型为 uint。
enum WeekDay : uint { Mon, Tues, Wed, Thur, Sat, Fri, Sun, } try 语句
try 语句一般用作异常捕捉和处理。
try() { // ... } catch (Exception e) { // ... } finally { // ... } 每当我们查看一个方法的时候,我们要查看它能够抛出的异常类型,如 int.Parse 的异常如下: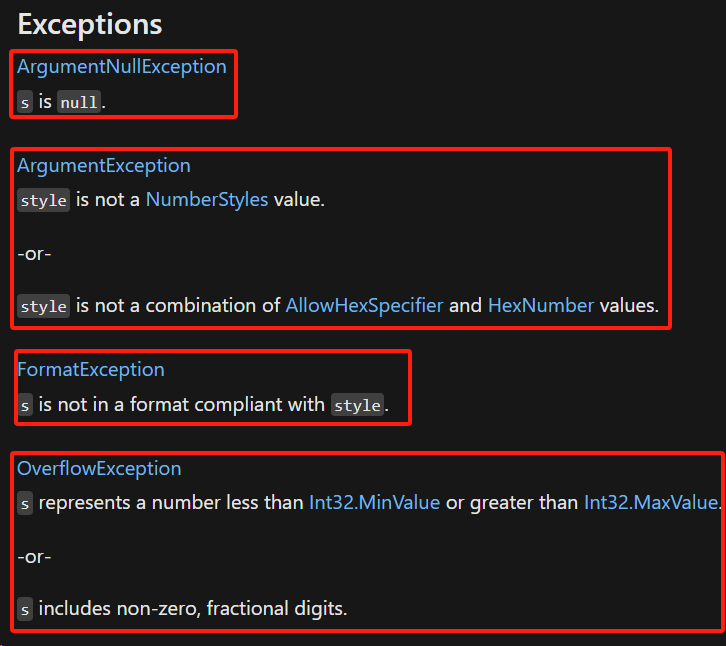
如下面我们定义了一个计算器类,里面有一个加法方法:
using System.ComponentModel; namespace TrySample { internal class Program { static void Main(string[] args) { Calculator calc1 = new Calculator(); //int result = calc1.Add(null, "12") // System.ArgumentNullException //int result = calc1.Add("abc", "123"); // System.FormatException // int result = calc1.Add("99999999999", "9999999999"); // System.OverflowException int result = calc1.Add("12", "42"); Console.WriteLine(result); } } class Calculator { public int Add(string input1, string input2) { int a = int.Parse(input1); int b = int.Parse(input2); return a + b; } } } 这个程序的缺点:只要输入的参数不符号要求,则会抛出异常,然后整个程序就会因为异常直接退出。而我们需要处理这些异常。
我们在写程序的时候,要极力避免逻辑导致的程序崩溃。要让方法具有容错能力,就要使用 try 语句。
上面代码中,会发生的错误的代码有以下三个地方:
int a = int.Parse(input1); int b = int.Parse(input2); return a + b; 通用异常处理
代码添加通用异常处理后:
using System.ComponentModel; namespace TrySample { internal class Program { static void Main(string[] args) { // ... 和上面一样 } } class Calculator { public int Add(string input1, string input2) { int a = 0; int b = 0; try { a = int.Parse(input1); b = int.Parse(input2); } catch { Console.WriteLine("Your argument(s) have error!"); } return a + b; } } } try catch 语句
使用捕捉特定类型异常的 try catch 语句,异常类型信息可以在MSDN的文档中查看
using System.ComponentModel; namespace TrySample { internal class Program { static void Main(string[] args) { // ... } } class Calculator { public int Add(string input1, string input2) { int a = 0; int b = 0; try { a = int.Parse(input1); b = int.Parse(input2); } catch (ArgumentNullException) { Console.WriteLine("Your argument(s) is(are) null!"); } catch (FormatException) { Console.WriteLine("Your argument(s) is(are) not a number!"); } catch (OverflowException) { Console.WriteLine("Input out of range!"); } catch (ArgumentException) { Console.WriteLine("Your argument(s) is(are) not number style Value!"); } int result = a + b; return result; } } } 这里的四个错误,都来自于微软给出的文档中。
上面还能打印出具体的错误信息:
public int Add(string input1, string input2) { int a = 0; int b = 0; try { a = int.Parse(input1); b = int.Parse(input2); } catch (ArgumentNullException ane) { Console.WriteLine(ane.Message); } catch (FormatException fe) { Console.WriteLine(fe.Message); } catch (OverflowException oe) { Console.WriteLine(oe.Message); } catch (ArgumentException ae) { Console.WriteLine(ae.Message); } int result = a + b; return result; } finally 子句
完整的错误处理语句,后面还有一个 finally 子句。它用于最终一定要执行的语句,一般作用如下:
- 释放系统资源:无论是否出现异常,系统资源最终一定要释放,否则及那个会带来意想不到的情况
- 打印 Log 信息:便于查看程序状态和调试
示例代码:
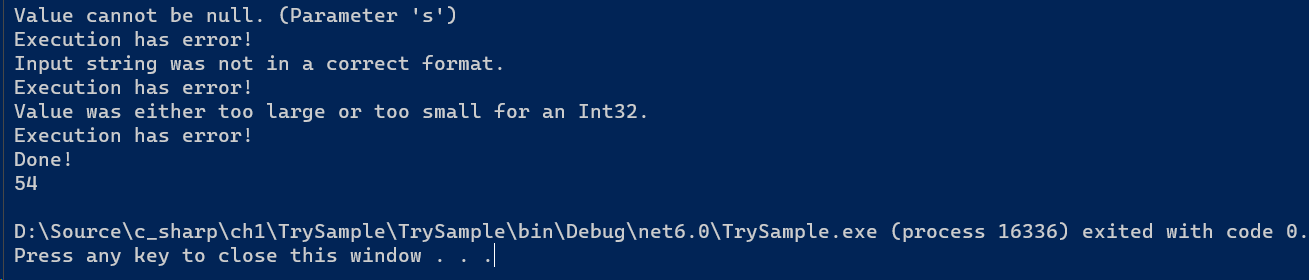
namespace TrySample { internal class Program { static void Main(string[] args) { Calculator calc1 = new Calculator(); int result1 = calc1.Add(null, "12"); // System.ArgumentNullException int result2 = calc1.Add("abc", "123"); // System.FormatException int result3 = calc1.Add("99999999999", "9999999999"); // System.OverflowException int result = calc1.Add("12", "42"); Console.WriteLine(result); } } class Calculator { public int Add(string input1, string input2) { int a = 0; int b = 0; bool hasError = false; try { a = int.Parse(input1); b = int.Parse(input2); } catch (ArgumentNullException ane) { Console.WriteLine(ane.Message); hasError = true; } catch (FormatException fe) { Console.WriteLine(fe.Message); hasError = true; } catch (OverflowException oe) { Console.WriteLine(oe.Message); hasError = true; } catch (ArgumentException ae) { Console.WriteLine(ae.Message); hasError = true; } finally { if (hasError) { Console.WriteLine("Execution has error!"); } else { Console.WriteLine("Done!"); } } int result = a + b; return result; } } } 编译运行结果,可以看到,程序打印出了 Log 信息,即使遇到了错误,也不会直接退出执行:
throw 子句
throw 子句的作用是抛出异常,如上面的异常中,我不想处理溢出产生的异常,那么 throw 就可以将异常抛出,由调用者进行处理,如下:
namespace TrySample { internal class Program { static void Main(string[] args) { Calculator calc1 = new Calculator(); // 处理抛出的异常 int result3 = 0; try { result3 = calc1.Add("99999999999", "9999999999"); // System.OverflowException } catch (OverflowException oe) { Console.WriteLine(oe.Message); } Console.WriteLine(result3); } } class Calculator { public int Add(string input1, string input2) { int a = 0; int b = 0; bool hasError = false; try { // ... } catch (OverflowException oe) // 可以不要这里的 oe { // Console.WriteLine(oe.Message); hasError = true; throw oe; } // ... finally { if (hasError) { Console.WriteLine("Execution has error!"); } else { Console.WriteLine("Done!"); } } int result = a + b; return result; } } } 编译运行结果:

throw 子句比较灵活,可以没有标识符,也能直接抛出异常。如 Visual Studio就会建议抛出异常的语句这么写:
try { //... } catch(OverflowException) // 不需要标识符 { hasError = true; throw; // 直接抛出异常 } 开发者本着对软件质量和可靠性负责的态度,须尽可能捕捉和处理异常,程序崩溃的 bug 是最严重的。
迭代语句
即循环语句。可以用作多次执行一个代码片段,常见的迭代语句:
while语句do...while语句for语句foreach语句
while 语句
循环体执行零次或者多次
一个简短的数字相加的游戏:
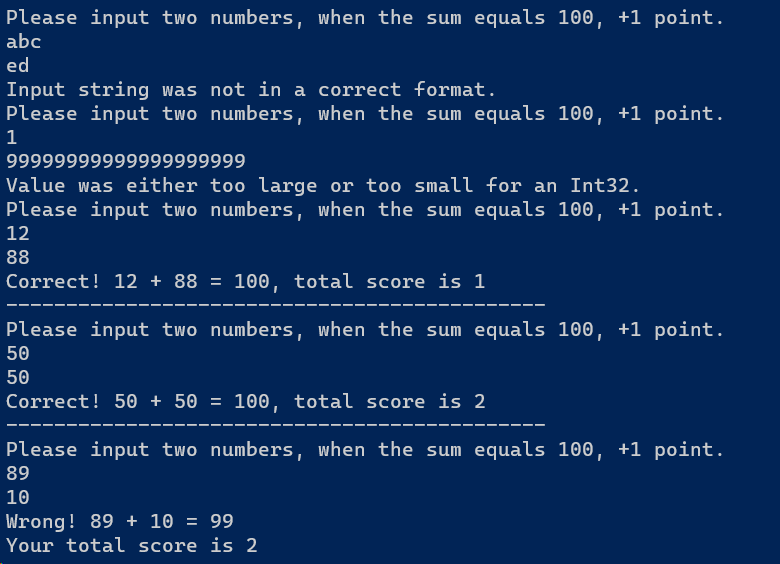
namespace HundredSample { internal class Program { static void Main(string[] args) { string s1, s2; bool flag = true; uint score = 0; while (flag) { Console.WriteLine("Please input two numbers, when the sum equals 100, +1 point."); s1 = Console.ReadLine(); s2 = Console.ReadLine(); int sum = 0; try { int num1 = int.Parse(s1); int num2 = int.Parse(s2); sum = num1 + num2; if (sum == 100) { score++; Console.WriteLine($"Correct! {num1} + {num2} = {sum}, total score is {score}"); Console.WriteLine("---------------------------------------------"); } else { flag = false; Console.WriteLine($"Wrong! {num1} + {num2} = {sum}"); Console.WriteLine($"Your total score is {score}"); } } catch(OverflowException oe) { Console.WriteLine(oe.Message); } catch (FormatException fe) { Console.WriteLine(fe.Message); } catch (ArgumentNullException ane) { Console.WriteLine(ane.Message); } } } } } 运行结果:
do...while 语句
循环体执行一次或者多次
将上面的代码优化为 do...while 循环语句:
namespace DoWhileSample { internal class Program { static void Main(string[] args) { string s1, s2; bool flag = true; uint score = 0; do { Console.WriteLine("Please input two numbers, when the sum equals 100, +1 point."); s1 = Console.ReadLine(); s2 = Console.ReadLine(); int sum = 0; try { int num1 = int.Parse(s1); int num2 = int.Parse(s2); } catch (OverflowException oe) { Console.WriteLine(oe.Message); } catch (FormatException fe) { Console.WriteLine(fe.Message); } catch (ArgumentNullException ane) { Console.WriteLine(ane.Message); } sum = num1 + num2; if (sum == 100) { score++; Console.WriteLine($"Correct! {num1} + {num2} = {sum}, total score is {score}"); Console.WriteLine("---------------------------------------------"); } else { flag = false; Console.WriteLine($"Wrong! {num1} + {num2} = {sum}"); Console.WriteLine($"Your total score is {score}"); } } while (flag); } } } break 和 continue
break :跳出当前所在的循环,对于嵌套的循环结构,如果 break 在内层,则只是跳出当前内层循环。
for (int outer = 0; outer < 5; outer++) { for (int inner = 0; inner < 5; inner++) { if (inner > outer) { break; } Console.Write($"{inner} "); } Console.WriteLine(); } // Output: // 0 // 0 1 // 0 1 2 // 0 1 2 3 // 0 1 2 3 4 continue :当前循环轮空,进入下一轮循环,如代码所示:
for (int i = 0; i < 5; i++) { Console.Write($"Iteration {i}: "); if (i < 3) { Console.WriteLine("skip"); continue; } Console.WriteLine("done"); } // Output: // Iteration 0: skip // Iteration 1: skip // Iteration 2: skip // Iteration 3: done // Iteration 4: done 将上面的数字游戏进行修改,使它的流程变得更加合理:
namespace DoWhileSample { internal class Program { static void Main(string[] args) { string? s1, s2; bool flag = true; uint score = 0; do { Console.WriteLine("Please input first number to continue or 'end' to stop."); s1 = Console.ReadLine() ?? ""; if(s1.ToLower() == "end") { break; } else { Console.WriteLine("Please input second number"); s2 = Console.ReadLine(); int num1 = 0; int num2 = 0; int sum = 0; // 对最有可能出问题的参数进行异常捕获 try { num1 = int.Parse(s1); } catch { Console.WriteLine("First argument has problem! Restarting"); continue; } try { num2 = int.Parse(s2); } catch { Console.WriteLine("Second argument has problem! Restarting"); continue; } sum = num1 + num2; if (sum == 100) { score++; Console.WriteLine($"Correct! {num1} + {num2} = {sum}, total score is {score}"); Console.WriteLine("---------------------------------------------"); } else { flag = false; Console.WriteLine($"Wrong! {num1} + {num2} = {sum}"); Console.WriteLine($"Your total score is {score}"); } } } while (flag); } } } for 语句
最佳使用场景:计数循环,即循环的次数是固定的。比起 do...while 语句,for 语句看起来更加简洁。
for(for_initialization; for_condition; for_iteration) {//...} for_initialization 只执行一次,但是要记得:最后一次,for_iteration 也会执行。
如下面是一个面试题,请问打印出来的 counter 值是多少?
namespace forSample { internal class Program { static void Main(string[] args) { int counter = 0; for(; counter < 10; counter++) { // do something } Console.WriteLine(counter); } } } 因为当 counter = 9 的时候,counter < 10 依旧成立,此时循环体内代码再次执行,最后执行 counter++,然后 counter 的值就为 10 了。此时 10 < 10 明显不成立,于是跳出 for 循环,最后打印的 counter 值就是 10 了。
在实际开发中,不要将 counter 写在for循环外面,而是写在 for_initialization 处。
下面是使用 for 循环实现的一个九九乘法表:
namespace MulTableSample { internal class Program { static void Main(string[] args) { int i, j; for (i = 1; i <= 9; ++i) { for(j = 1; j < i; ++j) { Console.Write($"{j} x {i} = {i * j}t"); } Console.WriteLine($"{j} x {i} = {i * j} "); } } } } 编译运行结果:

foreach 语句
foreach 是一个集合遍历语句。
什么样的集合可以被遍历?
在 C# 中,所有实现了 IEnumerable 接口的类,都为可被遍历的集合。在 C# 中,可以被迭代的集合,都有自己的迭代器。
using System.Collections.Generic; using System.Collections; using System; namespace ForeachSample { internal class Program { static void Main(string[] args) { // C# 中的迭代器 int[] intArr = { 1, 2, 3, 4, 5 }; IEnumerator enumerator = intArr.GetEnumerator(); // 获取 int[] 的迭代器 while(enumerator.MoveNext()) // 当前集合是否有下一个元素? { Console.WriteLine(enumerator.Current); // 获取当前元素 } // 在这里,迭代器指向集合的末尾(类似C++的 arr.(c)end()) } } } 写成 for 循环:
using System.Collections.Generic; using System.Collections; using System; namespace ForeachSample { internal class Program { static void Main(string[] args) { // C# 中的迭代器 int[] intArr = { 1, 2, 3, 4, 5 }; for(IEnumerator enumerator = intArr.GetEnumerator(); enumerator.MoveNext();) { Console.WriteLine(enumerator.Current); } // 在这里,迭代器指向集合的末尾(类似C++的 arr.(c)end()) // enumerator.Reset(); } } } 而 foreach 语句,则是对迭代器的一种简记法(语法糖),类似C++中的for(auto ele:arr) {...},也是一种简记法。
using System.Collections.Generic; using System.Collections; using System; namespace ForeachSample { internal class Program { static void Main(string[] args) { // C# 中的迭代器 int[] intArr = { 1, 2, 3, 4, 5 }; foreach(var ele in intArr) { Console.WriteLine(ele); } } } } foreach 语句最适合的场合就是对集合对进行遍历。
2.7 OOP 初步
2.7.1 字段
什么是字段?
字段(field)是一种表示与对象或类型(类与结构体)关联的变量。字段是类型的成员,旧称“成员变量”,与对象相关联的字段亦称“实例字段”,与类型关联的字段称作“静态字段”,由 static 修饰。
字段不是语句,虽然有分号。在 C# 中,字段的名称是名词。
字段的初始值
无显式初始化时,字段获得其类型的默认值,所以字段“永远都不会未被初始化”
实例字段初始化的时机一一对象创建时
静态字段初始化的时机一一类型被加载(load)时
只读字段:实例只读字段、静态只读字段
示例:
namespace FieldSample { internal class Program { static void Main(string[] args) { Student stu1 = new Student("Yuzu", 1000, 60); Student stu2 = new Student("kia", 1001, 70); int res = Student.TotalScore; Console.WriteLine(res); Console.WriteLine(Student.AverageScore); } } class Student { public string Name; public readonly uint ID; public int Score; public static int Counter = 0; public static int TotalScore = 0; public static int AverageScore; public Student(string _Name, uint _ID, int _Score) { this.Name = _Name; this.ID = _ID; this.Score = _Score; Student.Counter++; Student.TotalScore += this.Score; Student.AverageScore = TotalScore / Counter; } } } 注意,第 32 行代码不能写到第 23 行后面,因为会导致除 0 错误。原因:C# 编译器在处理静态字段时候,在环境第一次加载就会处理,处理到静态字段 TotalScore / Counter ,此时 Counter 值为0,自然会出错。
当环境被加载的时候,静态构造器会被调用
静态构造器:
namespace BrushSample { internal class Program { static void Main(string[] args) { Brush br = new Brush(); Console.WriteLine(Brush.DefaultColor.Red); Console.WriteLine(Brush.DefaultColor.Green); Console.WriteLine(Brush.DefaultColor.Blue); //Brush.DefaultColor.Blue = 255; // CS1650 } } struct Color { public int Red; public int Green; public int Blue; } class Brush { public static readonly Color DefaultColor; static Brush() // 静态构造器 { Brush.DefaultColor = new Color() { Red = 0, Green = 0, Blue = 0 }; // 也可以写在25行后 } } }
对于只读字段(readonly 字段):只能在创建对象时候被初始化(在构造器中),且被初始化后就不可再被赋值了。
2.7.2 属性
这里的属性指的是 property,是一种用于访问对象或类型的特征的成员,特征反映了状态
属性是对象的自然扩展:
- 从命名上看:field 更偏向于实例对象在内存中的布局,property 更偏向于反映现实世界对象的特征
- 对外:暴露数据,数据可以是存储在字段里的,也可以是动态计算出来的
- 对内:保护字段不被非法值“污染”
属性是由 Set/Get 方法进化而来,传统的 Get/Set 方法如下:
namespace PropertySample1 { internal class Program { static void Main(string[] args) { Student s1 = new Student(12, "Yuzu"); Console.WriteLine(s1.GetAge()); s1.SetAge(32); // PASS } } class Student { private int age; public string Name; public Student(int _age, string _Name) { this.age = _age; this.Name = _Name; } public int GetAge() { return age; } public void SetAge(int input) { if (input >= 0 && input <= 130) { this.age = input; } } } } 在这段代码里面,有专门的 Get/Set 方法来控制对 private 变量的访问,这是C++ / Java 中常见的一种写法。
属性的完整声明
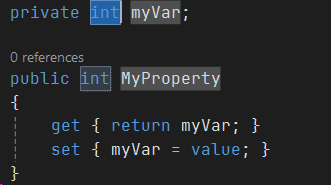
而在 C# 语言中,微软提供了一个语法糖,可以不写Get/Set 方法,来实现字段的访问控制,如下代码的第 15~31 行:
namespace PropertySample1 { internal class Program { static void Main(string[] args) { Student s1 = new Student(12, "Yuzu"); Console.WriteLine(s1.Age); s1.Age = 32; } } class Student { private int age; public int Age { set { if (value >= 0 && value <= 130) { this.age = value; } else { throw new Exception("Input Wrong Age"); } } get { return age; } } public string Name; public Student(int _age, string _Name) { this.Age = _age; this.Name = _Name; } } } 在上面的代码中,不需要定义私有成员的Set/Get方法,而是使用一个包装器(第 16 到第 31 行代码所示,里面有一个 setter 和 getter),它的作用是用来控制私有成员的访问(在这里控制 private int age 的访问)。在这个包装器里面,value 是一个上下文关键字(即在当前部分它是一个关键字,而出了这个上下文,它就不是关键字了)。
属性(包装器)的声明中,如果要为一个静态字段声明属性,那么该属性也要是静态的,如:
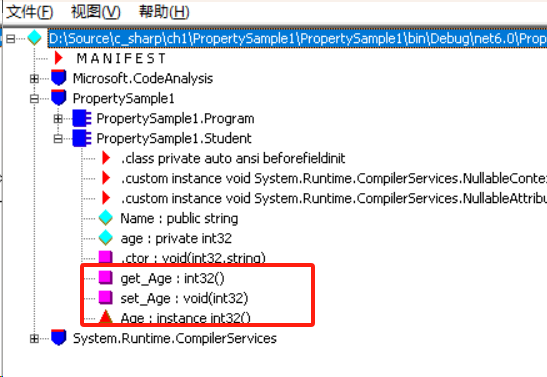
private static int age; public static int Age { set { if( value >= 0 && value <= 130) { age = value; } else { throw new Exception("Input age number error!") } } get { return age; } } 属性是一种语法糖,语法糖即使用一个简单语句来隐藏一个复杂逻辑。这里的包装器作用也是如此,查看反汇编文件,可以看到,这里其实是有 Get/Set 方法的,不过这是编译器为我们创建的:
不是所有属性都同时具有 Get/Set,有些属性只有 Get 属性,只有 Set 的属性很少。
使用 Visual Studio 快速建立属性:
键入 propfull + TAB + TAB:

属性的简略声明
属性的简略声明:也是语法糖一种语法糖
namespace PropertySample2 { internal class Program { static void Main(string[] args) { try { Student s = new Student(12, "Yuzu"); s.Age = 140; Console.WriteLine($"Name: {s.Name}, Age: {s.Age}"); } catch (Exception ex) { Console.WriteLine(ex.Message); } } } class Student { public int Age { set; get; } // 简略的属性(包装器)写法,不会抛出任何异常 public string Name; public Student(int _Age, string _Name) { Age = _Age; Name = _Name; } } } 简略的属性声明:只有访问器,是不会抛出任何异常的。
使用 Visual Studio 的 Encapsulate Field 功能,可以快速封装简略的属性,方法如下:
选中我们要封装的字段,按 Control + R + E ,然后就能看到封装后的代码示例:
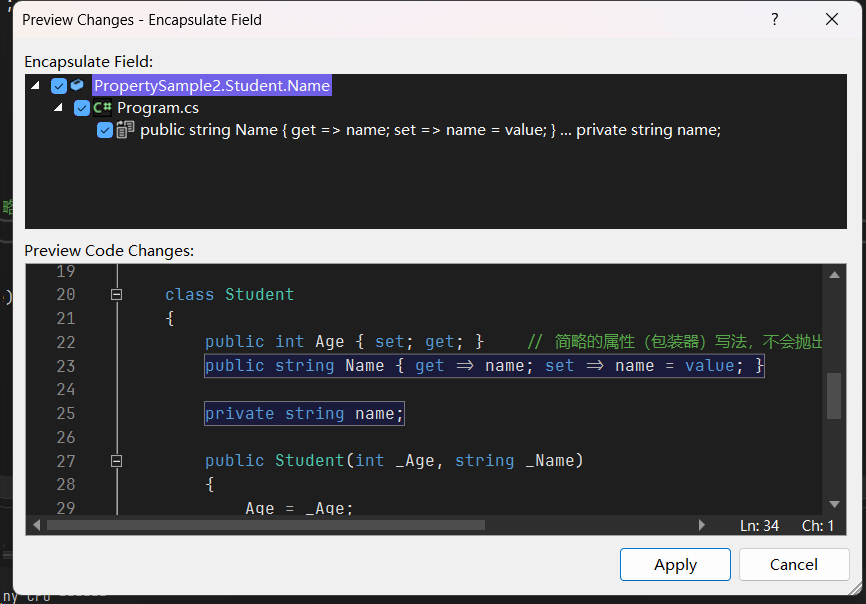
然后点击 Apply 即可
还有其他的一些访问控制,如控制字段只在类的内部可查看/修改:
class Student { public string Name { private get => name; set => name = value; } private string name; } 但是不能将两个属性同时设为 private,此时编译器会报错(和前面的 public 限定符功能违背)。注意区分这种从内部可访问的属性和只读属性的区别,只读属性是只有一个 getter,若是调用 setter,编译器会报错(因为没有 setter)。
动态计算属性的值
即属性的值和我们输入的变量有关,如在国内,一个学生没满 16 岁,是不能工作的,可以动态计算该学生是否能工作:
namespace PropertySample2 { internal class Program { static void Main(string[] args) { try { Student s = new Student(12, "Yuzu"); Console.WriteLine("{1} Can Work: {0}", s.CanWork, s.Name); Student s1 = new Student(22, "Akita"); Console.WriteLine("{1} Can Work: {0}", s1.CanWork, s1.Name); } catch (Exception ex) { Console.WriteLine(ex.Message); } } } class Student { public int Age { get; set; } // 简略的属性(包装器)写法,不会抛出任何异常 public string Name; public Student(int _Age, string _Name) { Age = _Age; Name = _Name; } // 根据输入值动态 public bool CanWork { get { if (Age >= 16) { return true; } else { return false; } } } } } 编译运行结果:

这里的 CanWork 属性,就只是一个只读属性,只读属性只有 getter,没有 setter。
CanWork 会根据输入不同,产生不同的结果(类似动态方法)。
属性和字段的关系:
- 属性是字段的包装器,用来控制对字段的访问
- 一般情况下,属性都用于表示实体(对象或类型)的状态
- 建议:永远使用属性(而不是字段)来暴露数据,即字段永远是
private或protected的
2.7.3 索引器
索引器(indexer)是一种成员,它使得对象能够用与数组相同的方式(即下标)来进行索引。
注:没有静态索引器这一说。
namespace IndexerSample { internal class Program { static void Main(string[] args) { Student s1 = new Student("math", 60); var mathScore = s1["math"]; Console.WriteLine(mathScore); s1["English"] = 95; s1["Physics"] = 80; Console.WriteLine(s1["Physics"]); } } class Student { public Student(string key, int val) { scoreDict[key] = val; } private Dictionary<string, int> scoreDict = new Dictionary<string, int>(); public int? this[string subject] // this 为可空类型 { get { if (scoreDict.ContainsKey(subject)) { return scoreDict[subject]; } else { return null; } } set { if (!value.HasValue) { throw new Exception("Score cannot be null"); } else { if (scoreDict.ContainsKey(subject)) { scoreDict[subject] = value.Value; } else { scoreDict.Add(subject, value.Value); } } } } } } 其中较为复杂的就是索引器的定义:
public int? this[string subject] { get { // ... } set { // ... } } 这是 Student 类中的索引器定义。通过 this[string subject] 可以像数组一样访问对象。get 部分用于获取指定科目的分数,set 部分用于设置指定科目的分数。在 set 中,如果传递的值为 null,则抛出异常;否则,更新或添加对应科目的分数。
2.7.4 常量
常量可以加快程序的运行效率。
常量是针对类型而言的,没有“实例常量”这一说。而接近于实例常量这一概念的,可以用前面的 readonly 关键字修饰只读实例。
各种只读的应用场景:
- 为了提高程序可读性和执行效率 -- 常量
- 为了防止对象的值被修改 -- 只读字段
- 向外暴露不允许修改的数据 -- 只读属性(静态或者非静态),功能与常量有一定重叠
- 当希望成为常量的值其类型不能被常量声明接受时(类/自定义结构体)-- 静态只读字段
2.7.5 参数
值参数
值类型
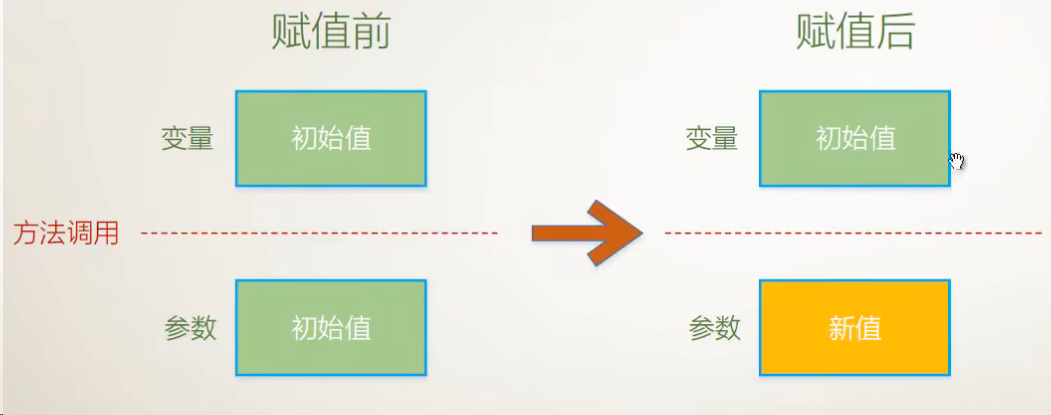
不带修饰符的形参就是值参数。
示例代码:
namespace ParameterSample { internal class Program { static void Main(string[] args) { Student s = new Student(); int y = 10; s.AddOne(y); Console.WriteLine(y); // 10 } } class Student { public void AddOne(int input) // input 为值参数,int 类型为值类型 { input++; Console.WriteLine(input); // 11 } } } 引用类型
-
丢弃原有对象,创建新的对象
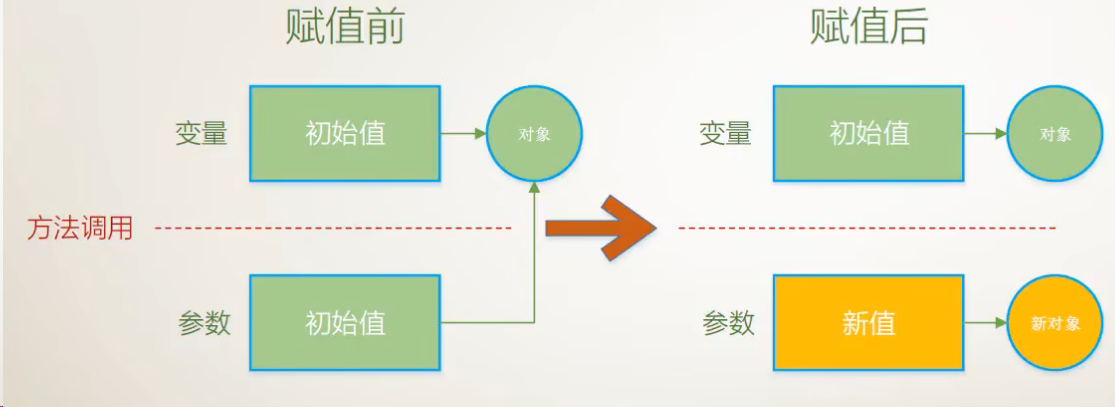
示例代码:
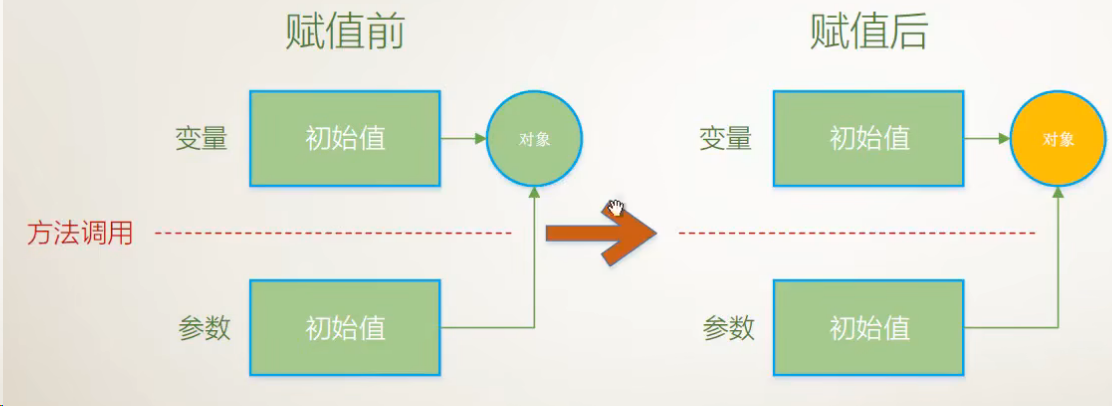
namespace ParameterSample { internal class Program { static void Main(string[] args) { Student s1 = new Student() { Name = "Yuzu" }; SomeMethod(s1); Console.WriteLine(s1.Name); Console.WriteLine($"{s1.GetHashCode()}: {s1.Name}"); } public static void SomeMethod(Student stu) { stu = new Student() { Name = "Ayaka" }; // 丢弃掉原有对象,重新创建对象(少见) Console.WriteLine(stu.Name); Console.WriteLine($"{stu.GetHashCode()}: {stu.Name}"); } } class Student { public string Name { get; set; } } }编译运行结果:
Ayaka 27252167: Ayaka Yuzu 43942917: Yuzu我们再将上面的代码修改下,将
SomeMethod中的形式参数修改为和传入参数相同:namespace ParameterSample { internal class Program { static void Main(string[] args) { Student s1 = new Student() { Name = "Yuzu" }; SomeMethod(s1); Console.WriteLine(s1.Name); Console.WriteLine($"{s1.GetHashCode()}: {s1.Name}"); } public static void SomeMethod(Student s1) { s1 = new Student() { Name = "Yuzu" }; // 丢弃掉原有对象,重新创建对象(少见) Console.WriteLine(s1.Name); Console.WriteLine($"{s1.GetHashCode()}: {s1.Name}"); } } class Student { public string Name { get; set; } } }编译运行结果:
Yuzu 27252167: Yuzu Yuzu 43942917: Yuzu从结果可以得到,虽然名字不同,但是两个对象确实并不相同。
注意:
- 值参数创建变量的副本
- 对值参数的操作永远不影响变量的值。
-
只操作对象,不创建新的对象
对象仍旧是原本的对象,但对象内的值(字段、属性)已经发生改变。
示例代码:
namespace ParameterSample { internal class Program { static void Main(string[] args) { Student s2 = new Student() { Name = "Mio" }; UpdateObject(s2); Console.WriteLine($"Name = {s2.Name}, HashCode = {s2.GetHashCode()}"); } public static void UpdateObject(Student s) { s.Name = "Kamigami"; // 避免修改值,较为少用 Console.WriteLine($"Name = {s.Name}, HashCode = {s.GetHashCode()}"); } } class Student { public string Name { get; set; } } }编译运行结果:
Name = Kamigami, HashCode = 59941933 Name = Kamigami, HashCode = 59941933
引用参数
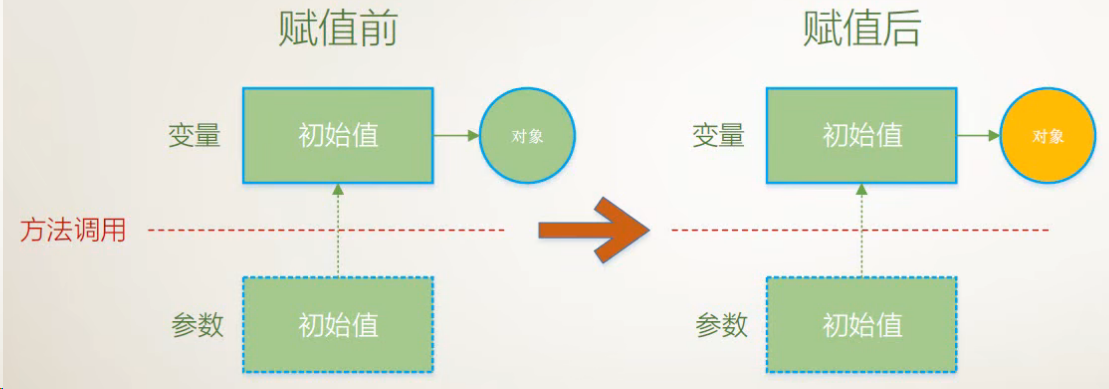
-
值类型的引用参数
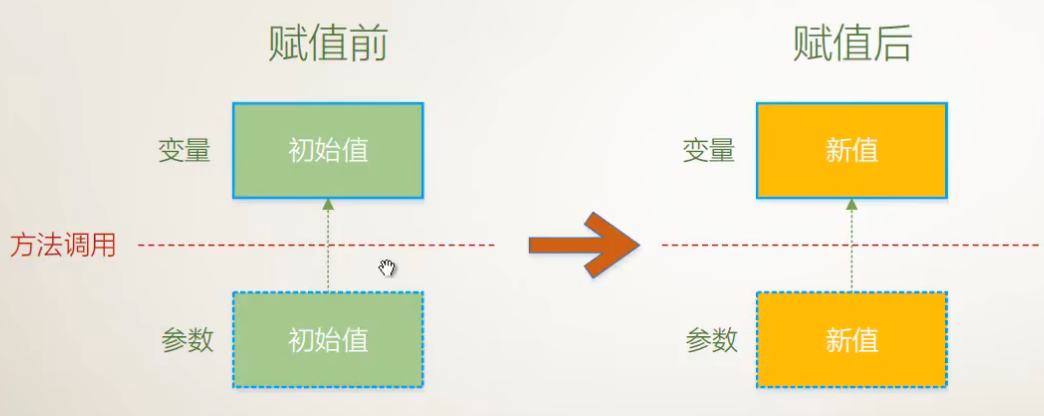
示例代码:
namespace RefSideEffect { internal class Program { static void Main(string[] args) { int num = 42; UseSideEffect(ref num); // Console.WriteLine($"Num = {num}"); } public static void UseSideEffect(ref int input) // 声明 { input += 3; Console.WriteLine($"Num = {input}"); } } }引用参数在声明和调用的时候都要显式使用
ref显式注明!并且一般要利用引用参数的副作用才这么写。 -
引用类型的引用参数:创建新对象

示例代码:
namespace RefSideEffect { internal class Program { static void Main(string[] args) { // 引用类型引用参数 Student stu = new Student() { Name = "Ayaka" }; Console.WriteLine($"Name = {stu.Name}, HashCode = {stu.GetHashCode()}"); Console.WriteLine("===================================="); UseSideEffect(ref stu); Console.WriteLine($"Name = {stu.Name}, HashCode = {stu.GetHashCode()}"); } // 引用类型引用参数 public static void UseSideEffect(ref Student s) { s = new Student() { Name = "Yuzu" }; Console.WriteLine($"Name = {s.Name}, HashCode = {s.GetHashCode()}"); } } class Student { public string Name { get; set; } } }编译运行结果:
Name = Ayaka, HashCode = 27252167 ==================================== Name = Yuzu, HashCode = 43942917 Name = Yuzu, HashCode = 43942917注意:
- 引用参数不创建变量的副本
- 使用
ref修饰符显式指出 -- 此方法的副作用是改变实际参数的值
-
引用类型引用参数:只改变对象
还有一种较为少见的引用类型引用参数使用方式:不创建新对象,只改变对象值,此时值参数(见上面的值参数第三个示例,只修改对象,但不创建对象)在效果上没有不同,但是机理不一样。
namespace RefSideEffect { internal class Program { static void Main(string[] args) { // 值类型引用参数:不创建新对象,只改变对象的值 Student st = new Student() { Name = "Azaka" }; Console.WriteLine($"Name = {st.Name}, HashCode = {st.GetHashCode()}"); Console.WriteLine("============================="); SomeEffect(ref st); Console.WriteLine($"Name = {st.Name}, HashCode = {st.GetHashCode()}"); } // 值类型引用参数:不创建新对象,只改变对象的值 public static void SomeEffect(ref Student s) { s.Name = "Tom"; Console.WriteLine($"Name = {s.Name}, HashCode = {s.GetHashCode()}"); } } class Student { public string Name { get; set; } } }编译运行结果:
Name = Azaka, HashCode = 2606490 ============================= Name = Tom, HashCode = 2606490 Name = Tom, HashCode = 2606490
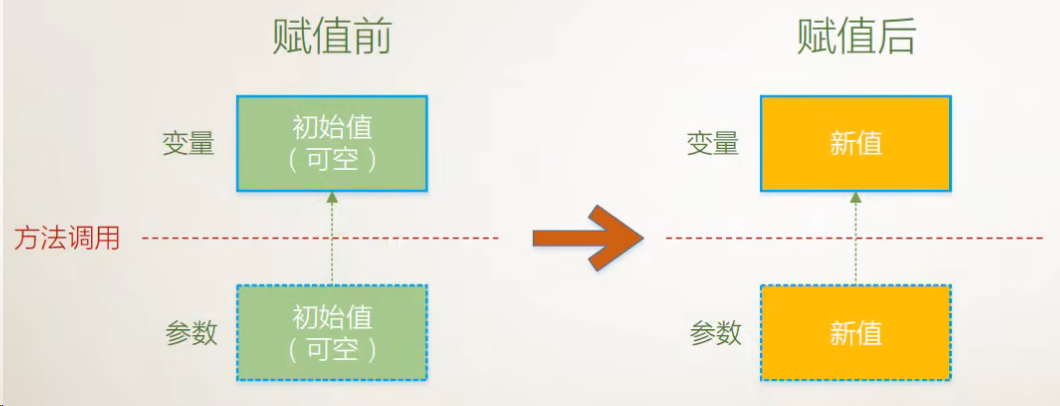
输出参数
在声明的时候使用 out 修饰的参数,即为输出参数。当希望一个方法一次运行,就产生多个输出结果,就可以使用 out 关键字。
带有 out 关键字的方法一定是有副作用,可以用来获得了除了返回值之外的额外输出。
- 值类型
示例代码:
namespace OutParamSample { internal class Program { static void Main(string[] args) { Console.WriteLine("Please input a number: "); string arg1 = Console.ReadLine(); double db1 = 0.0; bool success = double.TryParse(arg1, out db1); if (!success) { Console.WriteLine("Input error!"); } else { Console.WriteLine(db1); } } } } TryParse 方法是不会抛出异常的,只会返回一个布尔值类型的状态。
注意:
- 输出参数并不创建变量的副本
- 方法体内必须有对输出参数赋值的操作
- 使用
out修饰符显式指出 -- 此方法的副作用是通过参数向外输出值- 从语义上来讲 --
ref是为了改变,out是为了输出
-
引用类型
示例代码:创建一个产出
Student对象的工厂类,里面有一个Create方法namespace OutParamSample { internal class Program { static void Main(string[] args) { // 引用类型 Student stu = null; bool ok = StudentFactory.Create("Yuzu", 20, out stu); if (!ok) { Console.WriteLine("Create student instance failed!"); return; } else { Console.WriteLine("Create instance success!"); Console.WriteLine($"Name = {stu.Name} Age = {stu.Age}"); } } } class Student { public string Name { get; set; } public int Age { get; set; } } class StudentFactory { public static bool Create(string stuName, int stuAge, out Student result) { result = null; if (string.IsNullOrEmpty(stuName)) { return false; } if (stuAge <= 3 || stuAge >= 85) { return false; } result = new Student() { Name = stuName, Age = stuAge }; return true; } } }编译运行结果:
Create instance success! Name = Yuzu Age = 20注意事项同值类型
数组参数
必须是形参列表中的最后一个,由 params 修饰,一个方法中最多只能有一个 params 参数
举例:String.Format 和 String.Split 方法
示例代码:
namespace ParamSample { // 数组参数params 示例 internal class Program { static void Main(string[] args) { // 必须先声明一个数组 double[] arr1 = new double[] { 1.1, 3.14, 6.18 }; Console.WriteLine(SumArr(arr1)); // 以 params 的形式输入参数:不再需要提前声明数组,编译器会根据给出的值自动创建数组 double res2 = SumArr(1.1, 2.2, 3.14, 6.18); Console.WriteLine(res2); // 其他示例 int x = 1; int y = 2; int z = x + y; Console.WriteLine("{0} + {1} = {2}", x, y, z); //split string hamlet = "to,be.or;not.to,be"; string[] hamletSplited = hamlet.Split(',','.',';', ' '); if(hamlet.Length != 0) { foreach(var ele in hamletSplited) { Console.WriteLine(ele); } } } public static double SumArr(params double[] arr) { double res = 0; for (int i = 0; i < arr.Length; i++) { res += arr[i]; } return res; } } } 编译运行结果:
10.42 12.620000000000001 1 + 2 = 3 to be or not to be 具名参数
剧名参数即我们在调用的时候可以指定参数的名称,这样代码的可读性会更佳。
下面是一个简单的示例
namespace ParameterSample { internal class Program { static void Main(string[] args) { // 具名参数 string personName = "Yuzu"; int personAge = 99; PrintInfo(Name: personName, Age: personAge); } static void PrintInfo(string Name, int Age) { Console.WriteLine($"Name : {Name}, Age : {Age}"); } } } 在第 11 行,我们指定了变量名称,这样具有了更佳的可读性,而且比起不具名参数,具名参数在传值时可以调换顺序。
可选参数
即带有默认值的参数,不建议使用,和 C++ 中的写法类似。
扩展方法(this 参数)
-
方法必须是公有的、静态的、即被
public static所修饰 -
必须是形参列表中的第一个,由
this修饰 -
必须由一个静态类(一般类名为
SomeTypeExtension)来统一收纳对SomeType类型的拓展方法
举例:LINQ 方法
namespace ThisSample { // 扩展参数 (This方法) internal class Program { static void Main(string[] args) { double PI = 3.1415926; // double res = Math.Round(PI, 4); //double 没有 Round 方法 // 扩展方法:为原本类型增加方法 double res1 = PI.Round(4); } } // double 类型的扩展方法 static class DoubleExtension { public static double Round(this double input, int digits) { return Math.Round(input, digits); } } } 编译运行结果:
3.1416 在调用的时候,只需要输入一个参数(第一个参数为 this)。
Linq 示例:
using System.Linq; using System.Collections.Generic; using System.Collections; namespace QuerySample { internal class Program { static void Main(string[] args) { // 判断List元素是否都大于10 List<int> lst = new List<int>() { 11, 13, 15, 17, 19, 10 }; bool result = lst.All(e => e > 10); Console.WriteLine(result); } } } 上述代码的第 14 行 bool result = lst.All(e => e > 10); 中的 All 方法就为一个扩展方法。
编译运行结果:
false 源码中 All 的定义:
public static bool All<TSource>( this IEnumerable<TSource> source, Func<TSource, bool> predicate ) 返回值:如果 source 中的每个元素都通过了指定谓词(predicate)中的测试逻辑,或者序列为空,则为 true;否则为 false。
使用场景:
传值参数:参数的默认传递方式
输出参数:用于除返回值外还需要输出的场景
引用参数:用于需要修改实际参数的场景
数组参数:用于简化方法的调用
具名参数:提高可读性
可选参数:参数拥有默认值
扩展方法(
this参数):为目标数据类型 “追加” 方法
2.8 委托与事件
2.8.1 委托
什么是委托?
简单来说,委托就是函数指针的 “升级版”,是更加安全的函数指针。也可以说委托封装了方法。
下面是 C/C++ 中函数指针的示例:
#include <iostream> int add(int a, int b) { int result = a + b; return result; } int sub(int a, int b) { int result = a - b; return result; } int main() { int x = 42; int y = 40; // 常规调用 std::cout << add(x, y) << 'n'; std::cout << sub(x, y) << 'n'; // 函数指针: C++11 用法 using funcPtr = int (*)(int, int); // 声明指针类型:函数指针,接收两个int参数,返回一个int类型值 funcPtr calcPtr = add; // 创建指针类型变量 auto result = calcPtr(x, y); // 调用函数指针变量 calcPtr = sub; auto result1 = calcPtr(x, y); std::cout << result << 'n'; std::cout << result1 << 'n'; // C 类型函数指针 typedef int (*FunctionPtr)(int, int); // 声明指针类型,作用同上 FunctionPtr calcPointer = add; int r1 = calcPointer(x, y); calcPointer = sub; int r2 = calcPointer(x, y); printf("%dn", r1); printf("%dn", r2); return 0; } 对第 24 ~ 29 行的代码进行解释:
在上面的示例中,using FuncPtr = int (*)(int, int);创建了一个名为 FuncPtr- 的别名,它是一个指向接受两个整数参数并返回整数的函数的指针。然后,我们声明一个函数指针变量 calcPtr,并将其指向add函数。最后,通过调用calcPtr来使用函数指针调用add函数,得到并输出结果。
C 和 C++11 函数指针声明写法稍有不同,但都是相同作用。建议在 C++ 上使用 using 关键字声明函数指针类型
一切皆地址
-
变量(数据)是以某个地址为起点的一段内存中所存储的值
-
函数(算法)是以某个地址为起点的一段内存中所存储的一组机器指令
直接调用与间接调用
直接调用:通过函数名来调用函数,CPU 通过函数名直接获得函数所在地址并开始执行 -> 返回
间接调用:通过函数指针来调用函数,CPU 通过读取指针存储的值获得函数所在地址并开始执行 -> 返回
Java 中没有对应的功能实体
委托的简单使用
Action 委托
Action 委托类型必须绑定没有返回值、没有形参的方法
示例:
namespace DelegateSample { internal class Program { static void Main(string[] args) { // C# 中预定义了很多委托类型供使用 Calculator cal = new Calculator(); // 1. Action 委托类型:绑定没有返回值、没有形参的方法 Action? ac = new Action(cal.Report); ac(); // 使用委托变量调用 cal 的 Report 方法,这种写法为模仿函数指针的书写方式 // ac = null; // 清空委托 ac += cal.SayHi; // 将方法(或委托)添加到调用列表中 ac.Invoke(); } } class Calculator { public void Report() { Console.WriteLine("I have 3 methods."); } public void SayHi() { Console.WriteLine("Hello Test!"); } } } 编译运行结果:
I have 3 methods. I have 3 methods. Hello Test! 在第 14 行的代码中,在调用列表中添加了一个方法(也可以添加委托),当使用 ac.Invoke() 调用委托的时候,调用列表内的方法都会被执行。
Func 委托
Func 委托类型用来绑定有参数、有返回值的方法
示例代码:
namespace DelegateSample { internal class Program { static void Main(string[] args) { // C# 中预定义了很多委托类型供使用 Calculator cal = new Calculator(); // 2. Func 委托类型:绑定有参数、有返回值的方法 int x = 42; int y = 40; int res = 0; Func<int, int, int> func = new Func<int, int, int>(cal.Add); // <> 最后一个参数为返回值类型,前面的为形参类型 res = func.Invoke(x, y); Console.WriteLine(res); // 82 func = new Func<int, int, int>(cal.Sub); res = func.Invoke(x, y); Console.WriteLine(res); // 2 } } class Calculator { public int Add(int x, int y) { return x + y; } public int Sub(int x, int y) { return x - y; } } } 编译运行结果:
82 2 自定义委托
委托是一种类,类是数据类型,所以委托也是数据类型。委托的声明方式与一般的类不同,主要是为了照顾可读性和 C/C++ 传统
namespace DelegateSample1 { internal class Program { static void Main(string[] args) { Type t = typeof(Func<>); Console.WriteLine(t.IsClass); Type t2 = typeof(Action); Console.WriteLine(t2.IsClass); } } } 编译运行结果:
True True -
注意声明委托的位置
- 避免写错地方,结果声明成嵌套类型
-
委托与封装的方法必须“类型兼容”
- 返回值的数据类型一致
- 参数列表在个数和数据类型上一致(参数名不需要一样)
示例代码:
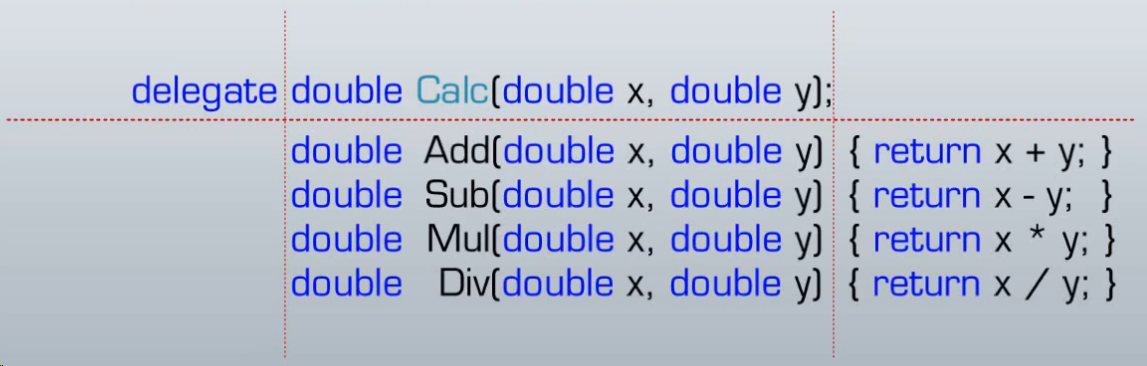
namespace DelegateSample1 { delegate double Calc(double a, double b); // Calculator 中方法的委托 internal class Program { static void Main(string[] args) { Calculator calculator = new Calculator(); Calc addCalc = new Calc(calculator.Add); Calc subCalc = new Calc(calculator.Sub); Calc divCalc = new Calc(calculator.Div); Calc mulCalc = new Calc(calculator.Mul); double x = 3.15; double y = 6.18; var res1 = addCalc(x, y); var res2 = subCalc(x, y); var res3 = divCalc(x, y); var res4 = mulCalc(x, y); Console.WriteLine("{0:f4}, {1:f4}, {2:f4}, {3:f4}", res1, res2, res3, res4); } } class Calculator { public double Add(double x, double y) { return x + y; } public double Sub(double x, double y) { return x - y; } public double Div(double x, double y) { return x / y; } public double Mul(double x, double y) { return x * y; } } } 编译运行结果:
9.3300, -3.0300, 0.5097, 19.4670 注意:
- 委托是一种类,它的声明要在名称空间中。 如果声明在
Program类中,它就成了一个嵌套类,不方便使用delegate RetType Name(T1 t, T2 U)中,不要求参数名称与被委托使用的函数相同,但是要求返回类型和参数类型一定要一致。
委托的一般使用
示例:把方法当作参数传给另一个方法
模板方法
-
正确使用1:模板方法,“借用” 指定的外部方法来产生结果
- 相当于“填空题”
- 常位于代码中部
- 委托有返回值
示例代码:简单工厂模式
namespace DelegateSample2 { internal class Program { static void Main(string[] args) { //世界上出现了一个生产产品的工厂(创建产品生产工厂实例) ProductFactory productFactory = new ProductFactory(); //世界上出现了一个包装产品的工厂(创建包装产品工厂实例) WrapFactory wrapFactory = new WrapFactory(); //产品工厂找到了包装厂让他给进行包装产品的订单(两个订单:ToyCar和Pizza)(创建委托实例) Func<Product> func1 = new Func<Product>(productFactory.MakePizza); Func<Product> func2 = new Func<Product>(productFactory.MakeToyCar); //包装厂进行订单处理,对生产产品的工厂下的订单进行产品包装(获取包装好的产品) Box box1 = wrapFactory.WrapProduct(func1); Box box2 = wrapFactory.WrapProduct(func2); //生产产品的厂子对包装厂包装的产品进行查验 Console.WriteLine(box1.Product.Name); Console.WriteLine(box2.Product.Name); } } class Product { public string Name { get; set; } } class Box { public Product Product { get; set; } } class WrapFactory { public Box WrapProduct(Func<Product> getProduct) { Box box = new Box(); Product product = getProduct.Invoke(); box.Product = product; return box; } } class ProductFactory { public Product MakePizza() { Product product = new Product(); product.Name = "Pizza"; return product; } public Product MakeToyCar() { Product product = new Product(); product.Name = "Toy Car"; return product; } } }编译运行结果:
Pizza Toy Car这里通过委托实现了一个简单工厂模式,这个简单工厂模式示例中,最重要的就是
WrapFactory中实现了动态的方法绑定。这种方式的好处:我们不用修改Product Box WrapFactory这三个类中的代码,每需要新生产一个产品,只需要新增ProductFactory中的方法 。
回调方法
-
正确使用2:回调(Callback)方法,调用指定的外部方法
-
相当于“流水线”
-
常位于代码末尾
-
委托无返回值
回调方法的简单比喻:当我需要给某人打电话的时候,找到了对应联系人的名片,就可以给他打电话。即用得着的时候调用,此时传入的方法是动态的。
示例代码:
namespace DelegateSample2 { internal class Program { static void Main(string[] args) { //世界上出现了一个生产产品的工厂(创建产品生产工厂实例) ProductFactory productFactory = new ProductFactory(); //世界上出现了一个包装产品的工厂(创建包装产品工厂实例) WrapFactory wrapFactory = new WrapFactory(); //产品工厂找到了包装厂让他给进行包装产品的订单(两个订单:ToyCar和Pizza)(创建委托实例) Func<Product> func1 = new Func<Product>(productFactory.MakePizza); Func<Product> func2 = new Func<Product>(productFactory.MakeToyCar); // 声明Logger类实例 Logger logger = new Logger(); Action<Product> log = new Action<Product>(logger.Log); //包装厂进行订单处理,对生产产品的工厂下的订单进行产品包装(获取包装好的产品) Box box1 = wrapFactory.WrapProduct(func1, log); // log 为回调方法 Box box2 = wrapFactory.WrapProduct(func2, log); //生产产品的厂子对包装厂包装的产品进行查验 Console.WriteLine(box1.Product.Name); Console.WriteLine(box2.Product.Name); } } class Logger { public void Log(Product product) { Console.WriteLine("Product '{0}' created at {1}. Price is {2}", product.Name, DateTime.UtcNow, product.Price); } } class Product { public string Name { get; set; } public double Price { get; set; } } class Box { public Product Product { get; set; } } class WrapFactory { public Box WrapProduct(Func<Product> getProduct, Action<Product> logCallback) { Box box = new Box(); Product product = getProduct.Invoke(); // 产品价格大于50块,log记录一次 if (product.Price > 50) { logCallback(product); } box.Product = product; return box; } } class ProductFactory { public Product MakePizza() { Product product = new Product(); product.Name = "Pizza"; product.Price = 40; return product; } public Product MakeToyCar() { Product product = new Product(); product.Name = "Toy Car"; product.Price = 60; return product; } } }代码运行结果:
Product 'Toy Car' created at 2023-12-30 9:36:07. Price is 60 Pizza Toy Car -
注意:难精通+易使用+功能强大的东西,一旦被滥用,后果很严重
缺点一:这是一种方法级别的紧耦合(往往违反设计模式),现实工作中要慎之又慎
缺点二:使代码可读性下降,debug 难度增加
缺点三:把委托回调、异步回调和多线程纠缠在一起,会让代码变得难以阅读和维护
缺点四:委托使用不当,有可能导致内存泄漏和程序性能下降
委托的高级使用
多播委托
多播委托(Multicast Delegate)是委托的一种特殊类型,它可以包含对多个方法的引用(一个委托注册多个方法)。多播委托允许你将多个方法连接到同一个委托实例,当调用该委托时,所有被注册的方法都会被依次调用。
示例代码:
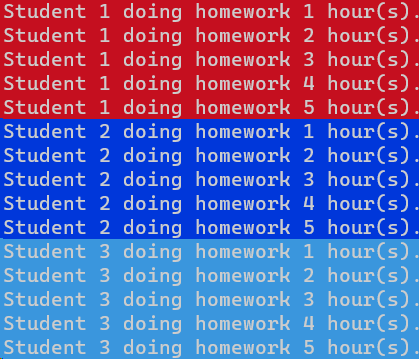
namespace MultiCastSample { // 多播委托 internal class Program { static void Main(string[] args) { Student stu1 = new Student() { ID = 1, PenColor = ConsoleColor.DarkRed }; Student stu2 = new Student() { ID = 2, PenColor = ConsoleColor.DarkBlue }; Student stu3 = new Student() { ID = 3, PenColor = ConsoleColor.DarkCyan }; // 一个委托封装一个方法:单播委托 // Action ac1 = new Action(stu1.DoHomeWork); // Action ac2 = new Action(stu2.DoHomeWork); // Action ac3 = new Action(stu3.DoHomeWork); // 一个委托封装多个方法:多播委托 Action ac1 = stu1.DoHomeWork; ac1 += stu2.DoHomeWork; ac1 += stu3.DoHomeWork; ac1.Invoke(); // ac2.Invoke(); // ac3.Invoke(); } } class Student { public int ID { set; get; } public ConsoleColor PenColor { get; set; } public void DoHomeWork() { for (int i = 1; i <= 5; ++i) { Console.BackgroundColor = this.PenColor; Console.WriteLine($"Student {this.ID} doing homework {i} hour(s)."); Thread.Sleep(1000); // 线程睡 1000ms } } } } 一个委托可以注册多个方法,在这里委托实例 ac1 注册了三个方法,当它被调用的时候(第 22 行),委托列表中的函数会依次执行。
编译运行结果:
隐式异步调用
-
同步和异步的简介
-
中英文的语言差异
-
同步:你做完了我(在你的基础上)接着做
-
异步:我们两个同时做(相当于汉语中的“同步进行”)
-
-
同步调用与异步调用的对比
- 每一个运行的程序是一个进程(process)
- 每个进程可以有一个或者多个线程(thread)
- 同步调用时在同一线程内
- 异步调用的底层机理时多线程
串行 == 同步 == 单线程;并行 == 异步 == 多线程
-
隐式多线程 v.s. 显式多线程
-
直接同步调用:使用方法名
-
间接同步调用:使用 单播/多播委托 的
Invoke方法 -
隐式异步调用:使用委托的
BeginInvoke方法(新版 dotnet 不再支持,但在 Framework 中保留)将上面的代码稍作修改:
using System; using System.Threading; // .net framework 中需要 namespace MultiCastSampleFramwork { // 多播委托 internal class Program { static void Main(string[] args) { Student stu1 = new Student() { ID = 1, PenColor = ConsoleColor.DarkRed }; Student stu2 = new Student() { ID = 2, PenColor = ConsoleColor.DarkBlue }; Student stu3 = new Student() { ID = 3, PenColor = ConsoleColor.DarkCyan }; // 一个委托封装一个方法:单播委托 Action ac1 = stu1.DoHomeWork; Action ac2 = stu2.DoHomeWork; Action ac3 = stu3.DoHomeWork; // 隐式创建异步调用:新版 dotnet 不再支持 ac1.BeginInvoke(null, null); // 创建一个分支线程调用封装的方法 ac2.BeginInvoke(null, null); ac3.BeginInvoke(null, null); for (int i = 0; i < 10; ++i) { Console.ForegroundColor = ConsoleColor.Cyan; Console.WriteLine("Main thread {0} ", i); Thread.Sleep(1000); } } } class Student { public int ID { set; get; } public ConsoleColor PenColor { get; set; } public void DoHomeWork() { for (int i = 1; i <= 5; ++i) { Console.ForegroundColor = this.PenColor; Console.WriteLine($"Student {this.ID} doing homework {i} hour(s)."); Thread.Sleep(1000); // 线程睡 1000ms } } } }编译运行结果:
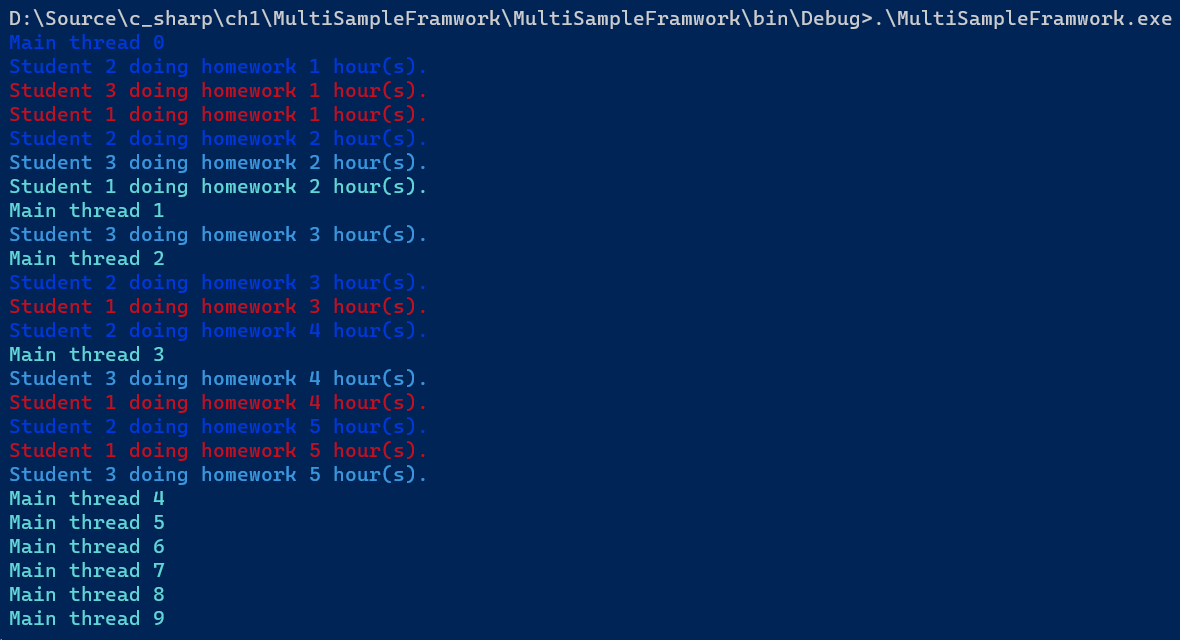
很容易发现问题:按代码来说,不同 Student 实例打印出来的颜色应该是不同的,可是
stu1和stu3一开始打印的结果都是红色。这说明了发生了资源争抢的情况,此时需要对线程加线程锁。 -
显式异步调用:使用
Thread和Task使用
Thread:这种方式相对古老,并且还是会有资源上的争抢。namespace MultiCastSample { // 多播委托 internal class Program { static void Main(string[] args) { Student stu1 = new Student() { ID = 1, PenColor = ConsoleColor.DarkRed }; Student stu2 = new Student() { ID = 2, PenColor = ConsoleColor.DarkBlue }; Student stu3 = new Student() { ID = 3, PenColor = ConsoleColor.DarkCyan }; // 1. Thread 进行异步调用:较为古老 // Thread th1 = new Thread(new ThreadStart(stu1.DoHomeWork)); // Thread th2 = new Thread(new ThreadStart(stu2.DoHomeWork)); // Thread th3 = new Thread(new ThreadStart(stu3.DoHomeWork)); // // th1.Start(); // th2.Start(); // th3.Start(); // 2. Task 进行异步调用:常用 Task tk1 = new Task(new Action(stu1.DoHomeWork)); Task tk2 = new Task(new Action(stu2.DoHomeWork)); Task tk3 = new Task(new Action(stu3.DoHomeWork)); tk1.Start(); tk2.Start(); tk3.Start(); for (int i = 0; i < 10; ++i) { Console.ForegroundColor = ConsoleColor.Cyan; Console.WriteLine("Main thread {0} ", i); Thread.Sleep(1000); } } } class Student { public int ID { set; get; } public ConsoleColor PenColor { get; set; } public void DoHomeWork() { for (int i = 1; i <= 5; ++i) { Console.ForegroundColor = this.PenColor; Console.WriteLine($"Student {this.ID} doing homework {i} hour(s)."); Thread.Sleep(1000); // 线程睡 1000ms } } } }编译运行结果:
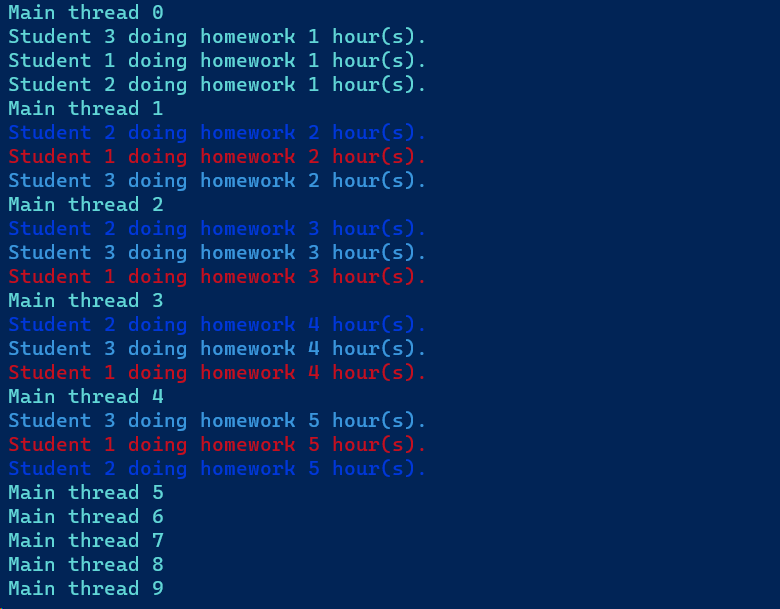
-
应该实时使用接口(interface)取代一些对委托的使用
- Java 中完全使用接口替代了委托的功能,即 Java 没有与 C# 中委托相对应的功能实体
2.8.2 事件
事件模型的基本理论
-
定义:单词 Event,译为”事件“,事件是对现实生活中抽象出来的客观存在
- 通常的解释就是:能够发生的什么事情
-
角色:使对象或类具有通知能力的成员
- (中译)事件(event)是一种使对象或类能够提供通知的成员
- (原文)An event is a member that enables an object or class to provide notisfications.
- “对象O拥有一个事件E” 想表达的思想是:当事件E发生时,O有能力通知别的对象
-
使用:用于对象或类间的动作协调与信息传递(消息推送)
-
原理:事件模型(event model,又称“发生 —— 响应模型”)中的两个 “5”
- “发生 -> 响应” 中的 5 个动作 —— 闹钟响了你起床、孩子饿了你做饭…… 这里隐含着“订阅”关系
- “发生 -> 响应” 中的 5 个动作:
- (1)我有一个事件 -> (2)一个人或者一群人关心我的这个事件 -> (3)我的这个事件发生了 -> (4)关心这个事件的人会被依次通知到(先订阅的先被通知) -> (5)被通知到的人根据拿到的事件信息(又称“事件数据”、“事件参数”、“通知”)对事件进行响应(又称“处理事件”)
以下概念为同一个事物:
- 事件的订阅者(Microsoft 使用)
- 事件消息的接收者
- 事件的响应者
- 事件的处理者
- 被事件所通知的对象
以下概念也为同一个事物:
- 事件消息
- 事件信息
- 事件数据
- 事件参数(Microsoft 使用)
-
提示
- 事件多用于桌面、手机等开发的客户端编程,因为这些程序经常是用户通过事件来“驱动”的
- 各种编程语言对这个机制的实现方法不尽相同
- Java 语言没有事件这种成员,也没有委托这种数据类型。Java 的“事件”是使用接口来实现的
- MVC、MVP、MVVM等模式,是事件模式更高级、更有效的“玩法”
- 日常开发的时候,使用已有事件的机会比较多,自己声明事件的机会比较少,所以先学使用
事件的应用
实例演示:派生(继承)与扩展(extends)
事件模型的五个组成部分
- 事件的拥有者(event source,对象)
- 事件成员(event,成员)
- 事件的响应者(event subscriber,对象)
- 事件处理器(event handler,方法成员)—— 本质是一个回调方法
- 事件订阅 —— 把事件处理器与事件关联在一起,本质上是一种以委托类型为基础的“约定”
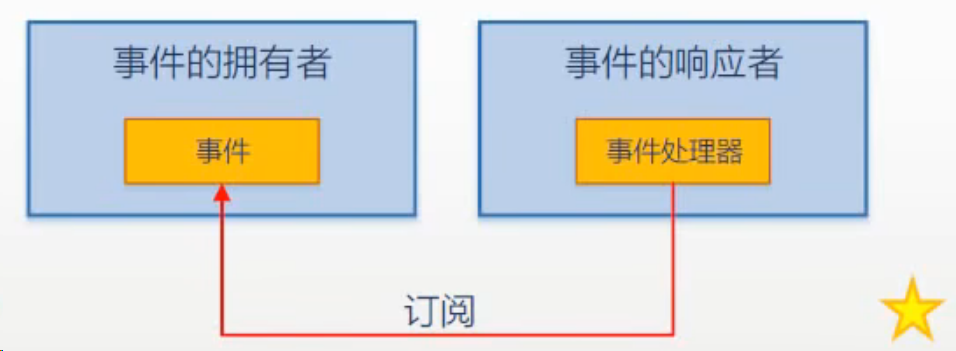

事件模型的简单使用示例
示例代码,使用 System.Timers.Timer 定时器的事件,来控制小男孩和小女孩跳跃频率(该例子中使用了多个事件处理器,挂载到了一个事件):
using System; using System.Timers; namespace EventSample1 { using Timer = System.Timers.Timer; // 指定Timer,否则可能导致 ambiguous reference 错误 internal class Program { public static void Main(string[] args) { Timer timer = new Timer(); // 事件拥有者timer,拥有Elapsed事件 timer.Interval = 1000; // timer每1000ms触发一次Elapsed事件 Boy boy = new Boy(); // 事件响应者:boy Girl girl = new Girl(); timer.Elapsed += boy.Action; // 事件订阅:+=,左侧为事件,右侧为事件处理器 timer.Elapsed += girl.Action; timer.Start(); Console.ReadLine(); } } class Boy { internal void Action(object sender, ElapsedEventArgs e) { Console.WriteLine("Jump!"); } } class Girl{ internal void Action(object sender, ElapsedEventArgs e) { Console.WriteLine("Sing!"); } } } 然后每一秒,屏幕上就会打印一次如下信息:
发生如下错误时候:
CS7036: There is no argument given that corresponds to the required parameter 'sender' of 'Boy.Action(object, ElapsedEventArgs)' 说明我们事件订阅写错了,后面绑定的事件处理器不能加括号(否则就是绑定了事件处理器的执行结果,自然是有问题的)。
注意:
- 事件处理器是方法成员
- 挂接事件的时候,可以使用委托实例,也可以直接使用方法名,这是个语法糖
- 事件处理器对事件的订阅不是随意的,匹配与否由声明事件时使用的委托类型来检测
- 事件可以同步调用也可以异步调用
- 类的三大功能:存储数据、执行功能、发送消息(通知)
此外,事件不会主动发生,事件被触发,一定是被事件拥有者内部的某个内部逻辑触发的。
问题:用户点击按钮,然后界面做出响应,“用户点击”这个,明明是外部逻辑啊?是外部逻辑触发了事件!
回答:用户点击按钮,实际上是用户的鼠标发送了一个电信号,Windows就会查看鼠标指针在屏幕上的当前位置,实际上,从Windows操作系统一启动,系统就一直在追踪鼠标指针在屏幕上的位置,这也是所有图形界面的基本功能之一。
当Windows发现当前鼠标位置有一个按钮,且包含该按钮的窗口处于激活状态的时候,系统就会通知这个按钮:你被用户按下了。这时候就会执行按钮内部的逻辑代码。典型的逻辑包含:快速重新绘制当前按钮为被按下后的状态。然后将当前状态标记为按钮被按下。
当松开按钮,此时又会执行松开按钮的相关逻辑,如再次绘制当前按钮样式(典型的为绘制成弹起的状态),同时将自己的状态标记为没有被按下。
按钮的内部逻辑检测到当前按钮被连续的 按下-松开,即被点击了。所以按钮马上会使用自己的 click 事件来通知外界说自己被点击了。站在程序员的角度,就可以说:click 事件发生了,这时候若有别的对象订阅了该按钮的 click 事件,这些事件的响应者就可以开始工作了。即程序在事件的驱动下开始运行了。
最终明白了,是用户的操作调用了按钮的内部逻辑,而按钮的内部逻辑触发了 click 事件。
第一种情况⭐
事件的拥有者和事件的响应者不同类
示例代码(.net framework):
using System; using System.Windows.Forms; namespace EventSample2 { internal class Program { public static void Main(string[] args) { Form form = new Form(); Controller controller = new Controller(form); form.ShowDialog(); } } class Controller { private Form form; public Controller(Form mForm) { // 空对象无法返回事件,所以要先判断 form 是否为空 if (mForm != null) { this.form = mForm; this.form.Click += (object sender, EventArgs e) => { this.form.Text = DateTime.Now.ToString(); }; } } } } 编译后运行,点击 form 的内部:

第二种情况⭐⭐
即事件拥有者同时也是事件的响应者
示例代码:
using System; using System.Windows.Forms; namespace EventSample3 { internal class Program { public static void Main(string[] args) { MyForm form = new MyForm(); // 事件拥有者:form,事件响应者:form form.Click += form.FormClickedAction; // 事件处理器:FormClickedAction;挂接到事件:Click,即订阅 form.ShowDialog(); } } class MyForm : Form { internal void FormClickedAction(object sender, EventArgs e) { this.Text = DateTime.Now.ToString(); } } } 第三种情况⭐⭐⭐
即事件拥有者是事件响应者的字段成员,事件响应者用方法订阅了自己成员的某个事件。这也是Windows默认采取的事件处理方式。
示例代码:事件拥有者为一个按钮,该按钮在form中,
using System; using System.Windows.Forms; namespace EventSample4 { internal class Program { public static void Main(string[] args) { MyForm form = new MyForm(); // 事件响应者:form form.ShowDialog(); } } class MyForm : Form { private TextBox textBox; private Button button; // 事件拥有者:button public MyForm() { this.textBox = new TextBox(); this.button = new Button(); this.button.Text = "Say Baka!"; this.button.Top = 30; // button 距离form上边沿的距离 // 让这两个控件显示在当前form内 this.Controls.Add(this.textBox); this.Controls.Add(this.button); // 挂接事件Click和事件处理器ButtonClickedAction this.button.Click += this.ButtonClickedAction; } internal void ButtonClickedAction(object sender, EventArgs e) { this.textBox.Text = "馬鹿馬鹿!"; this.textBox.TextAlign = HorizontalAlignment.Center; } } } 编译运行,点击按钮后:
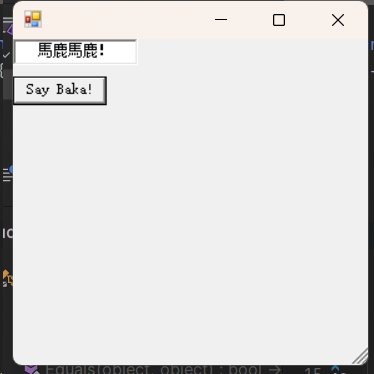
这种是非可视化的程序开发方式,开发者会花很多时间在样式调整上,这是不划算的。
事件应用举例
Windows Form 示例
Windows Form是微软的一种桌面应用开发方式,使用这种开发方式,能够使用可视化的方式编写代码,开发效率高。
下面的示例就是事件机制在 WinForm 中的应用:
界面:
代码:
//Form1.cs using System; using System.Collections.Generic; using System.ComponentModel; using System.Data; using System.Drawing; using System.Linq; using System.Text; using System.Threading.Tasks; using System.Windows.Forms; namespace WindowsFormsSample { public partial class Form1 : Form { public Form1() { InitializeComponent(); // 挂接方式1:使用 委托 充当事件处理器,EventHandler是个委托,参数为(object sender, EventArgs e //this.button3.Click += new EventHandler(ButtonClicked); // 挂接方式2:使用 匿名委托 充当事件处理器,depricated,do not use! //this.button3.Click += delegate (object sender, EventArgs e) //{ // this.textBox1.Text = "Use anonymous delegate, it's depricated!"; //}; // 挂接方式3:使用 Lambda表达式 充当事件处理器,推荐使用,参数类型可以不写(可推导) this.button3.Click += (object sender, EventArgs e) => { this.textBox1.Text = "Use lambda"; }; } // 一个事件处理器 ButtonClicked 可挂接多个事件:三个按钮的点击事件 private void ButtonClicked(object sender, EventArgs e) { if (sender == this.button1) { this.textBox1.Text = "button1 clicked!"; } if (sender == this.button2) { this.textBox1.Text = "button2 clicked!"; } if (sender == this.button3) { this.textBox1.Text = "use named delegate"; } } } } 在这段代码中可以看到,能够使用多种机制实现事件和事件处理器的挂接,常见的如以下四种(按照使用率和推荐程度由上到下排列):
-
使用方法直接充当事件处理器,如上面代码,可以这样挂接事件处理器和事件:
this.button3.Click += ButtonClicked; // ButtonClicked 已被实现 -
使用委托充当事件处理器(此时委托需要与编写好的事件处理方法遵循相同的约束条件)
this.button3.Click += new EventHandler(ButtonClicked);这里的
EventHandler参数和ButtonClicked参数类型都相同,就和使用普通的委托没有区别 -
使用匿名函数充当事件处理器,这种方法可以实现类型推导,个人建议不要省略参数,不利于代码阅读和代码调试
this.button3.Click += (object sender, EventArgs e) => { this.textBox1.Text = "Use Lambda!"; }; // 还可以这么写:省略参数类型 this.button3.Click += (sender, e) => { this.textBox1.Text = "Use Lambda!"; }; -
(不推荐)使用匿名委托充当事件处理器,这种方法可以被匿名函数替代
this.button3.Click += delegate(object sender, EventArgs e) { this.textBox1.Text = "Use Anonymous delegate, depricated!"; }
注意:
- 一个事件处理器可以挂接多个事件(一个事件处理器
ButtonClicked挂接了三个按钮的Click事件)- 一个事件也可以被多个事件处理器挂接(如先前示例中
Timer的Elaped事件,挂接了两个事件处理器:girl.Action和boy.Action)
WPF 应用示例
这里使用 .net framework 4.8,.net core 下的WPF的API可能与前者的有所区别。
在WPF中拖控件,如往面板中添加 TextBox 和 Button,会看到如下的锁链标记:
该标记可以通过点击更改状态,默认为 ,即打开状态,该状态下如果对窗体边缘进行拖拽,对应的控件不会随之改变大小。点击后变为
 ,此状态下,拖动窗体边缘,对应控件会随着窗体改变。该图标一般有左右两个

界面
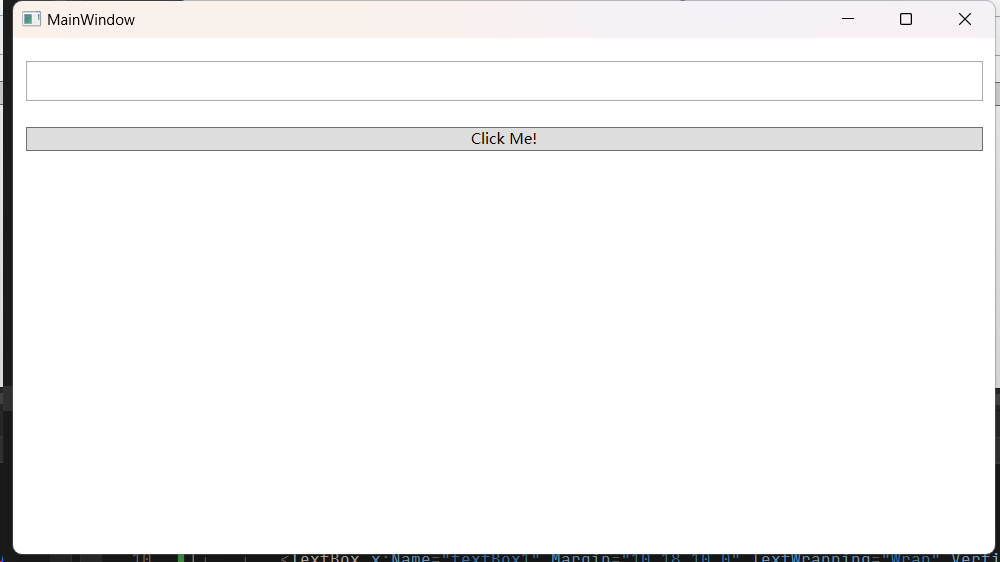
MainWindow.xaml
<Window x:Class="WPFSample.MainWindow" xmlns="http://schemas.microsoft.com/winfx/2006/xaml/presentation" xmlns:x="http://schemas.microsoft.com/winfx/2006/xaml" xmlns:d="http://schemas.microsoft.com/expression/blend/2008" xmlns:mc="http://schemas.openxmlformats.org/markup-compatibility/2006" xmlns:local="clr-namespace:WPFSample" mc:Ignorable="d" Title="MainWindow" Height="450" Width="800"> <Grid> <TextBox x:Name="textBox1" Margin="10,18,10,0" TextWrapping="Wrap" VerticalAlignment="Top" TextAlignment="Center" Height="32"/> <Button x:Name="button1" Content="Click Me!" Margin="10,71,10,0" VerticalAlignment="Top" Click="ButtonClicked"/> </Grid> </Window> xaml 中挂接事件和事件处理器写法和 C# 中不一样,XAML 中为:
<Button x:Name="button1" Content="Click Me!" Margin="10,17,10,0" VerticalAlignment="Top" Click="ButtonClicked" /> XAML 中可以挂载事件处理器给事件。最后面的 Click="ButtonClicked" 就是事件和事件处理器的挂接方式。
MainWindow.xaml.cs
using System; using System.Collections.Generic; using System.Linq; using System.Text; using System.Threading.Tasks; using System.Windows; using System.Windows.Controls; using System.Windows.Data; using System.Windows.Documents; using System.Windows.Input; using System.Windows.Media; using System.Windows.Media.Imaging; using System.Windows.Navigation; using System.Windows.Shapes; namespace WPFSample { /// <summary> /// Interaction logic for MainWindow.xaml /// </summary> public partial class MainWindow : Window { public MainWindow() { InitializeComponent(); } private void ButtonClicked(object sender, RoutedEventArgs e) { this.textBox1.Text = "Hello YUZU!"; } } } 如果不在 XAML 中挂载事件和事件处理器,也可以直接在 C# 中使用先前的方式(传统的方式)进行事件处理:
变更后的MainWindow.xaml
<Window x:Class="WPFSample.MainWindow" xmlns="http://schemas.microsoft.com/winfx/2006/xaml/presentation" xmlns:x="http://schemas.microsoft.com/winfx/2006/xaml" xmlns:d="http://schemas.microsoft.com/expression/blend/2008" xmlns:mc="http://schemas.openxmlformats.org/markup-compatibility/2006" xmlns:local="clr-namespace:WPFSample" mc:Ignorable="d" Title="MainWindow" Height="450" Width="800"> <Grid> <TextBox x:Name="textBox1" Margin="10,18,10,0" TextWrapping="Wrap" VerticalAlignment="Top" TextAlignment="Center" Height="32"/> <Button x:Name="button1" Content="Click Me!" Margin="10,71,10,0" VerticalAlignment="Top" /> </Grid> </Window> 删除了第 11 行的代码:Click="ButtonClicked",在 MainWindow.xaml.cs 中添加代码:this.button1.Click += ButtonClicked
变更后的MainWindow.xaml.cs
using System; using System.Collections.Generic; using System.Linq; using System.Text; using System.Threading.Tasks; using System.Windows; using System.Windows.Controls; using System.Windows.Data; using System.Windows.Documents; using System.Windows.Input; using System.Windows.Media; using System.Windows.Media.Imaging; using System.Windows.Navigation; using System.Windows.Shapes; namespace WPFSample { /// <summary> /// Interaction logic for MainWindow.xaml /// </summary> public partial class MainWindow : Window { public MainWindow() { InitializeComponent(); this.button1.Click += ButtonClicked; // this.button1.Click += new RoutedEventHandler(this.ButtonClicked); // RoutedEventHandler 和 ButtonClick 遵循相同的约束条件 } private void ButtonClicked(object sender, RoutedEventArgs e) { this.textBox1.Text = "Hello YUZU!"; } } } RoutedEventHandler 和 ButtonClicked 的约束条件相同,即参数类型都为 (object, RoutedEventArgs) 类型。
事件的声明
完整声明
我们声明一个 Waiter 类作为事件接收者,一个 Customer 类作为事件拥有者。Customer 经过一连串的动作,向 Waiter 发起点餐操作,而 Waiter 响应 Customer 的点餐操作,完成服务。
下面的声明该这么写:
using System; using System.Timers; namespace EventSample { class Program { static void Main() { Customer customer = new Customer(); Waiter waiter = new Waiter(); customer.Order += waiter.Action; customer.Trigger(); // 触发事件 customer.PayTheBill(); } } public delegate void OrderEventHandler(Customer customer, OrderEventArgs e); // 事件响应者 public class Waiter { public void Action(Customer customer, OrderEventArgs e) { Console.WriteLine("I will serve you {0}", e.DishName); double price = 10.0; switch (e.Size) { case "large": price = price * 1.5; break; case "small": price = price * 0.8; break; case "middle": price = price; break; default: break; } customer.Bill += price; } } // 事件消息类:继承 EventArgs public class OrderEventArgs: EventArgs { public string DishName{get; set;} public string Size{get; set;} } // 事件拥有者 public class Customer { public static double Bill{get; set;} private OrderEventHandler orderEventHandler; // private约束的事件处理器字段 public event OrderEventHandler Order // Order 事件,是事件处理器orderEventHandler的包装器 { add { this.orderEventHandler += value; } remove { this.orderEventHandler -= value; } } public void WalkIn() { Console.WriteLine("Walk into KFC..."); } public void SitDown() { Console.WriteLine("Sit Down."); } public void Think() { for(int i = 0; i < 5; ++i) { Console.WriteLine("Let me think!"); Thread.Sleep(1000); } // 一定要判断事件封装的委托是否为空 if(this.orderEventHandler != null) { // 触发事件的代码部分 OrderEventArgs e = new OrderEventArgs(); e.DishName = "KFC Chicken Wings"; e.Size = "large"; this.orderEventHandler.Invoke(this, e); } } public void PayTheBill() { Console.WriteLine("I will pay you ${0}", this.Bill); } // 事件触发方法 public void Trigger() { Console.ReadLine(); this.WalkIn(); this.SitDown(); this.Think(); } } } 编写思路如下:
-
声明事件处理器的委托
事件是基于委托的:事件这种成员,无论是从表层约束来讲,还是底层实现来讲,都是依赖于委托类型的。
此外,应当注意:不要将事件处理器声明写到类中,否则这个类就成了一个嵌套类型,在这里委托并不是类的一个字段
public delegate void OrderEventHandler(Customer customer, OrderEventArgs e);声明委托类型:写在和类平级的地方。
使用 EventHandeler 作为事件处理器后缀的原因:- 委托类型是为了声明 Order 事件使用的
- 使用 EventHandler 后缀,表明该委托是为了约束事件处理器的
- 这个委托创建的实例,未来是为了存储事件处理器的
-
声明事件参数
OrderEventArgs,要继承EventArgs类,XxxEventArgs中的Xxx是我们的事件名称。public class OrderEventArgs : EventArgs { public string DishName { get; set; } public string Size { get; set; } } -
编写事件拥有者的事件以及触发方法。
第一:声明事件
Order,以及触发该事件的方法Trigger;第二:声明一个委托实例,如
private OrderEventHandler orderEventHandler;第三:使用一个包装器对该私有字段进行封装,这里的
Order就是该委托实例orderEventHandler的包装,供外界访问。该包装返回类型被封装的事件类型,返回值要用event进行修饰(如:event OrderEventHandler)第四,触发方法中需要创建相关事件参数
EventArgs实例,再使用事件处理器委托类型实例的Invoke方法(如下第 41 行代码)传递参数在使用该事件的时候,要和对应的事件处理器进行挂接
// 事件的拥有者 public class Customer { private OrderEventHandler orderEventHandler; public event OrderEventHandler Order // 包装事件处理器 { // 事件处理器的添加器 add { this.orderEventHandler += value; } // 事件处理器的删除器 remove { this.orderEventHandler -= value; } } public double Bill { get; set; } public void PayTheBill() { Console.WriteLine($"I will pay ${this.Bill}"); } // 以下有简写部分 public void WalkIn(){/*Expression(s)*/} public void SitDown(){/*Expression(s)*/} public void Think() { for(int i = 0; i < 5; ++i) { Console.WriteLine("Let me think!"); Thread.Sleep(1000); } if(this.orderEventHandler != null) { OrderEventArgs e = new OrderEventArgs(); e.DishName = "KFC Chicken Wings"; e.Size = "large"; this.orderEventHandler.Invoke(this, e); } } // 事件触发的方法 public void Trigger() { Console.ReadLine(); this.WalkIn(); this.SitDown(); this.Think(); } } -
编写事件响应者和实现事件处理器。事件处理器应当遵循第一步声明委托的参数约束条件。一般以
XxxAction作为名称// 事件响应者 public class Waiter { // 实现事件处理器:遵循第一步委托的约束条件 public void Action(Customer customer, OrderEventArgs e) { Console.WriteLine("I will serve you {0}", e.DishName); double price = 10.0; switch (e.Size) { case "large": price = price * 1.5; break; case "small": price = price * 0.8; break; case "middle": price = price; break; default: break; } customer.Bill += price; } }
简略声明
字段式声明(field-like):只是看起来像是字段,本身是一个语法糖。但是事件本身不是类的字段,使用简略声明:
using System; using System.Timers; namespace EventSample { class Program { static void Main() { // ... } } public delegate void OrderEventHandler(Customer customer, OrderEventArgs e); public class Waiter { public void Action(Customer customer, OrderEventArgs e) { // ... } } public class OrderEventArgs: EventArgs { // ... } // 事件拥有者 public class Customer { public static double Bill{get; set;} public event OrderEventHandler Order; // 事件的简略声明,不是字段! // ... public void Think() { //... if(this.Order != null) // 修改后 { OrderEventArgs e = new OrderEventArgs(); e.DishName = "KFC Chicken Wings"; e.Size = "large"; this.Order.Invoke(this, e); // 修改后 } } // ... } } 从完整声明换成简略声明,会有破坏性的更改(有好有坏),这个特性使用的时候要注意,需要将后续对事件的变量名全部进行修改。
查看我们生成的可执行文件(或者dll文件),如下:
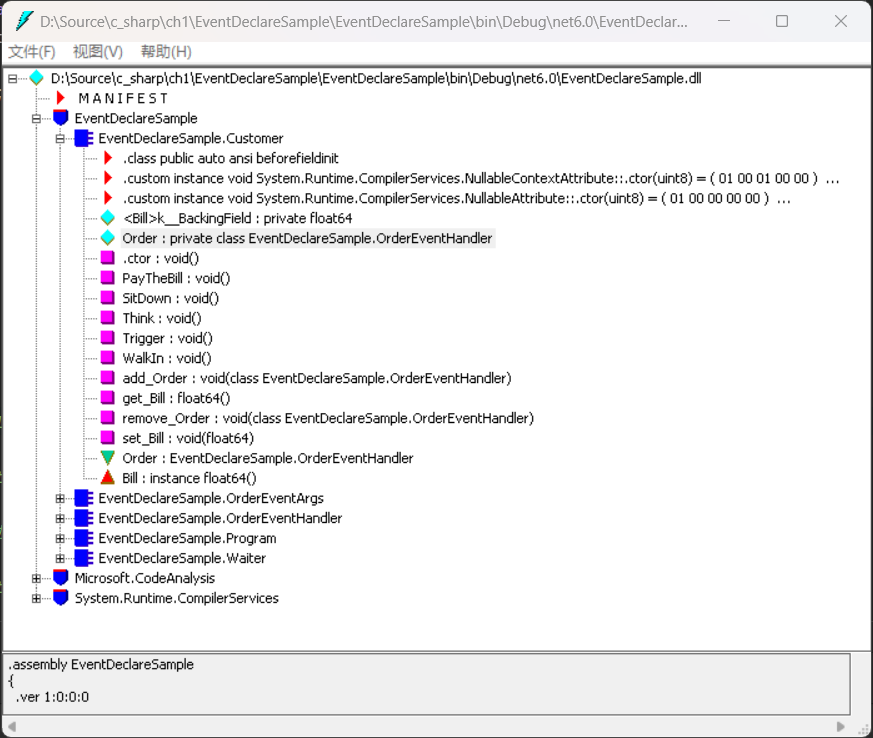
- 水蓝色方块:字段
- 紫色方块:方法
- 绿色倒三角:事件
可以看到事件
Order有一个对应的同名字段,这是在使用简略事件声明之后,编译器自己生成的。
委托和事件的区别
有了委托字段/属性,为什么还需要事件?
回答:为了保证程序安全,防止功能被乱用。事件本质上是委托的一层包装,封闭了绝大多委托自带的方法,下面是《C#图解教程》中的示意图:
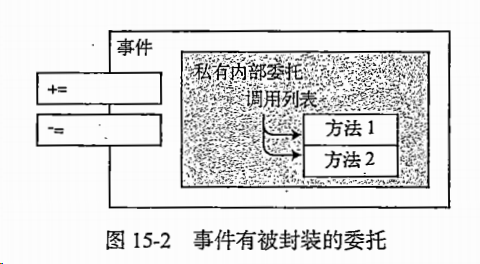
使用事件作为字段可能会导致一些问题,主要有以下几点:
-
直接访问事件可能导致不安全的调用:
在
Customer类中,事件Order被当作字段使用,可以直接访问。这样的设计可能导致外部代码直接触发事件,而不经过类的封装和控制。这违反了封装的原则,使得外部代码可以绕过类的逻辑进行事件的触发,可能导致不可预料的行为。 -
事件丧失了事件的本质:
事件是一种特殊的委托,它提供了一种更安全、更封装的方式来处理发布-订阅模型。将事件当作字段使用,丧失了事件的封装性,失去了事件的特有优势,如添加和移除事件处理程序的安全性。
-
无法防止外部代码直接赋值:
如果事件被当作字段使用,外部代码可以直接将新的委托赋值给事件,而不经过事件的
add和remove操作。这可能导致未经检查的事件处理程序,而无法进行必要的验证和控制。
修复这些问题的方法是将事件声明为标准的事件,使用 event 关键字。这样可以确保事件的封装性和安全性,同时提供了更好的控制机制。在先前的代码修复中,已经将 Customer 类中的 Order 事件声明改正为标准的事件。
可以给他人私自点菜的代码
using System; using System.Timers; namespace EventSample { class Program { static void Main() { // 第一个顾客 customer 点餐 Customer customer = new Customer(); Waiter waiter = new Waiter(); customer.Order += waiter.Action; customer.Trigger(); // 不怀好意的人badGuy点餐给customer Customer badGuy = new Customer(); // 仿冒参数e1 OrderEventArgs e1 = new OrderEventArgs(); e1.DishName = "Oyster"; e1.Size = "large"; // 仿冒参数e2 OrderEventArgs e2 = new OrderEventArgs(); e2.DishName = "Mapo Tofu"; e2.Size = "large"; badGuy.Order += waiter.Action; // 绕过Customer类的逻辑,直接触发事件(制造了仿冒的参数e1和e2并进行传递) badGuy.Order.Invoke(customer, e1); badGuy.Order.Invoke(customer, e2); customer.PayTheBill(); } } public delegate void OrderEventHandler(Customer customer, OrderEventArgs e); // 事件响应者 public class Waiter { public void Action(Customer customer, OrderEventArgs e) { Console.WriteLine("I will serve you {0}", e.DishName); double price = 10.0; switch (e.Size) { case "large": price = price * 1.5; break; case "small": price = price * 0.8; break; case "middle": price = price; break; default: break; } customer.Bill += price; } } // 事件消息类:继承 EventArgs public class OrderEventArgs: EventArgs { public string DishName{get; set;} public string Size{get; set;} } // 事件拥有者 public class Customer { public static double Bill{get; set;} public OrderEventHandler Order // 将事件当作字段来使用 public void WalkIn() { Console.WriteLine("Walk into KFC..."); } public void SitDown() { Console.WriteLine("Sit Down."); } public void Think() { for(int i = 0; i < 5; ++i) { Console.WriteLine("Let me think!"); Thread.Sleep(1000); } if(this.orderEventHandler != null) { OrderEventArgs e = new OrderEventArgs(); e.DishName = "KFC Chicken Wings"; e.Size = "large"; this.orderEventHandler.Invoke(this, e); } } public void PayTheBill() { Console.WriteLine("I will pay you ${0}", this.Bill); } // 事件触发方法 public void Trigger() { Console.ReadLine(); this.WalkIn(); this.SitDown(); this.Think(); } } } 编译运行结果:
Walk into the restaurant Sit Down Let me think... Let me think... Let me think... Let me think... Let me think... I will serve you the dish: KFC Chicken Wings I will serve you the dish: Oyster I will serve you the dish: Mapo Tofu I will pay $45 此时顾客本来只点了一份食物,而别人替他点另外两份,那么他就要付三份食物的钱,这是一种让人原地飞升的操作。
事件的本质
事件的本质是委托字段的一个包装器
-
这个包装器对委托字段的访问起限制作用,相当于一个“蒙版”
-
封装(encapsulation)的一个重要功能就是隐藏
-
事件对外界隐藏了委托实例的大部分功能,仅暴露添加/移除事件处理器的功能
-
添加/移除事件处理器的时候可以直接使用方法名,这是委托实例所不具备的功能
用于声明事件的委托类型的命名规定
-
用于声明 Foo 事件的委托,一般命名为
FooEventHandler(除非是一个非常通用的事件约束) -
FooEventHandler委托的参数一般有两个(由 Win32 API演化而来,历史悠久)直接使用
EventHandler委托,可以省略委托类型的声明,此时代码会变成这样,此时需要进行类型转换,如第 12 到 13 行代码所示:using System; using System.Threading; namespace EventDeclareSample { // ... public class Waiter { public void Action(object sender, EventArgs e) { // 类型转换:直接使用C#自带的委托类型,但要进行类型转换 Customer customer = sender as Customer; OrderEventArgs orderInfo = e as OrderEventArgs; Console.WriteLine($"I will serve you the dish: {orderInfo.DishName}"); double price = 10; switch (orderInfo.Size) { case "small": price = price * 0.5; break; case "large": price = price * 1.5; break; default: break; } customer.Bill += price; } } }- 第一个是
object类型,名字为sender,实际上就是事件的拥有者、事件的 source - 第二个是
EventArgs类的派生类,类名一般为FooEventHandler,参数名为e。也就是前面讲过的事件参数 - 虽然没有官方的说法,但我们可以把委托的参数列表看作是事件发生后发送给事件响应者的“事件消息”
- 第一个是
-
触发
Foo 事件的方法一般命名为OnFoo,即“因何引发”、“事出有因”-
访问级别为
protected,不能为public,不然又成了可以“借刀杀人”了将
Customer的触发方法重写:using System; using System.Threading; namespace EventDeclareSample { // ... public class Customer { // ... public void Think() { for (int i = 0; i < 5; ++i) { Console.WriteLine("Let me think..."); Thread.Sleep(1000); } this.OnOrder("KFC Chicken Wings", "large"); // 调用事件的触发方法 } public void Trigger() { // ... } // 事件的方法名:OnOrder protected void OnOrder(string dishName, string size) { // 一定要判断事件封装的委托是否为空 if (this.Order != null) { OrderEventArgs e = new OrderEventArgs(); e.DishName = dishName; e.Size = size; this.Order.Invoke(this, e); // 事件必须要求事件拥有者触发,所以在这里传递 this } } } public class OrderEventArgs : EventArgs { // ... } public class Waiter { public void Action(object sender, EventArgs e) { // ... } } }
-
事件的命名约定
- 带有时态的动词或者动词短语
- 事件拥有者“正在做”什么事情,用进行时;事件拥有者“做完了”什么事情,用完成时
事件与委托的关系
事件是“以特殊方式声明的委托字段/实例”吗?
- 不是!只是声明的时候“看起来像”(对比委托字段与事件的简化声明,field-like)
- 事件声明的时候使用了委托类型,简化声明造成事件看上去像是一个委托的字段(实例),而 event 关键字则更像一个修饰符 —— 这是错觉的来源之一
- 订阅事件的时候
+=操作符后面可以是一个委托实例,这与委托实例的赋值方法语法相同,这也让事件看起来更像是一个委托字段 —— 这是错觉的又一来源- 重申:事件的本质是加装在委托字段上的一个“蒙版”(Mask),是个起掩蔽作用的包装器。这个用于阻挡非法操作的“蒙版”绝不是委托字段本身
为什么要使用委托类型来声明事件?
- 站在 source 的角度看,是为了表明 source 能对外传递哪些消息
- 站在 subscriber 角度来看,它像是一种约定,是为了约束能够使用什么样签名的方法来处理(响应)事件
- 委托类型的实例将用于存储(引用)事件处理器
对比事件与属性
- 属性不是字段 —— 很多时候属性是字段的包装器,这个包装器用来保护字段不被滥用
- 事件不是委托字段 —— 它是委托字段的包装器,这个包装器用来保护委托字段不被滥用
- 包装器永远不可能是被包装的东西
2.9 OOP 详解
在两章之前学习了面向对象编程初步的知识,这一章来详解 C# 中的 OOP 编程范式
什么是类?
- 是一种数据结构
- 是一种数据类型
- 代表现实世界中的“种类”
2.9.1 两种构造器
C# 中构造器有两种:实例构造器和静态构造器
使用多种方式创建类型实例:
- 直接调用实例构造器
- 使用反射,这种方式充分展示了类的类型一面
- 使用
dynamic关键字
示例:编写一个 Student 类,将它的代码写在单独的一个文件种
Student.cs
using System; namespace HelloClass { class Student { public static int Amount { get; private set; } public string Name { get; set; } public int ID { get; set; } // 创建自己的实例构造器:看起来像一个方法,但是没有返回值。快捷键:ctor + Enter public Student(string name, int id) { this.Name = name; this.ID = id; Amount++; } // 实例析构器 ~Student() { Amount--; Console.WriteLine("Bye, Releasing System Resources ..."); } // 静态构造器:只能构造静态成员 static Student() { Amount = 0; } public void Report() { Console.WriteLine($"I'm No.{this.ID} student, my name is {this.Name}"); } } } Program.cs
using System; namespace HelloClass { internal class Program { public static void Main(string[] args) { // 1.使用实例构造器创建对象 Student stu1; // 声明变量 // stu1 = new Student() { Name = "Yuzu", ID = 12 }; // 创建实例,调用默认构造器 stu1 = new Student("Yuzu", 12); // 使用自建实例构造器,stu1 为 Student 类的实例 Console.WriteLine(stu1.Name); // Yuzu Console.WriteLine(stu1.ID); // 12 stu1.Report(); // 2.使用反射创建实例:充分展现类的类型一面 Type t = typeof(Student); // 拿到类型信息 // 使用类型信息创建实例 o, CreateInstance 创建的实例都为 object 类型 object o = Activator.CreateInstance(t, "Aoko", 1); // 此时 o 类型已经丢失了很多信息,但是它的类型名字还是 Student,说明可以找回来 Console.WriteLine(o.GetType().Name); // Student // 转换为 Student 类型 Student s = o as Student; s?.Report(); // 3.使用 dynamic 创建实例 Type t1 = typeof(Student); dynamic stu2 = Activator.CreateInstance(t1, "Shizuku", 18); Console.WriteLine(stu2.Name); // Shizuku Console.WriteLine(Student.Amount); // 3 } } } 代码编译运行结果:
Yuzu 12 I'm No.12 student, my name is Yuzu Student I'm No.1 student, my name is Aoko Shizuku 3 Bye, Releasing System Resources ... Bye, Releasing System Resources ... Bye, Releasing System Resources ... 使用第三种方式创建类型的实例,可能遇到如下错误:
Error CS0656 : 缺少编译器要求的成员“Microsoft.CSharp.RuntimeBinder.CSharpArgumentInfo.Create” 此时需要使用 nuget 安装包:Microsoft.CSharp 版本为 v4.8,安装了基本就能解决这个问题
实例构造器
上述代码中,实例构造器如下,如果自定义了实例构造器,那么默认的实例构造器就会失效,要按照我们约定的构造器传入参数进行实例构造。
// 创建自己的实例构造器:看起来像一个方法,但是没有返回值。快捷键:ctor + Enter public Student(string name, int id) { this.Name = name; this.ID = id; Amount++; // 每创建一个实例,Amount自增一次 } 此外还有实例析构器
// 实例析构器 ~Student() { Console.WriteLine("Bye, Releasing System Resources ..."); } 静态构造器
静态构造器只能用来初始化静态成员,无法构造实例成员。
这里的静态成员只有 Amount(public static int Amount { get; private set; })
// 静态构造器:只能构造静态成员 static Student() { Amount = 0; // 将 Amount 初始化为0 } 2.9.2 类的声明、继承与控制
类声明的位置
类可以声明在名称空间内、其他类中(作为成员类)、或者声明在所有显式名称空间之外
namespace MyNS { public class Teacher // 声明在名称空间中 { public Teacher() // constructor { } public class PersonalInfo{} // 声明在另一个类中,作为成员类 } } class Computer{} // 声明在所有的显示名称空间之外 在C++中,类的声明和定义是分离的,而在 C# 和Java 中,类的声明和定义和合并在一起的。
C++ 中类的定义示例:
Student.h
#pragma once #include <string> #include <iostream> class Student { public: std::string Name; Student(std::string _Name); ~Student(); void SayHello(); }; Student.cpp
#include "Student.h" Student::Student(std::string _Name):Name(_Name) { } Student::~Student() { } void Student::SayHello() { std::cout << "My Name is " << this->Name << 'n'; } CPPClassSample.cpp
#include <iostream> #include "Student.h" int main() { Student* stuPtr = new Student("Yuzu"); stuPtr->SayHello(); } 编译运行结果:
My Name is Yuzu 使用自定义库
首先需要新建一个可执行文件工程,这里以 .net framework 作为示例,然后再在当前 Solution 下新建一个 Project,类型选为 Library。
此时,当前 Solution 下有两个 Project,第一个 Project 为可执行文件类型。第二个 Project 为库,库的作用为供外部使用(在这里供第一个使用)。
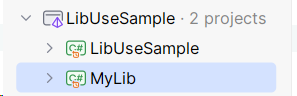
创建自定义库
-
在当前 Solution 下创建一个新的 Project,命名为
MyLib,类型选为 Library。 -
然后新增一个目录(Directory),该目录的名称就为当前名称空间的名称,我这里命名为
MyNamespace -
在第二步创建的目录下新增一个类(Class),命名为你想要的名称,我这里命名为
Calculator,为一个计算器的类,里面包含了计算方法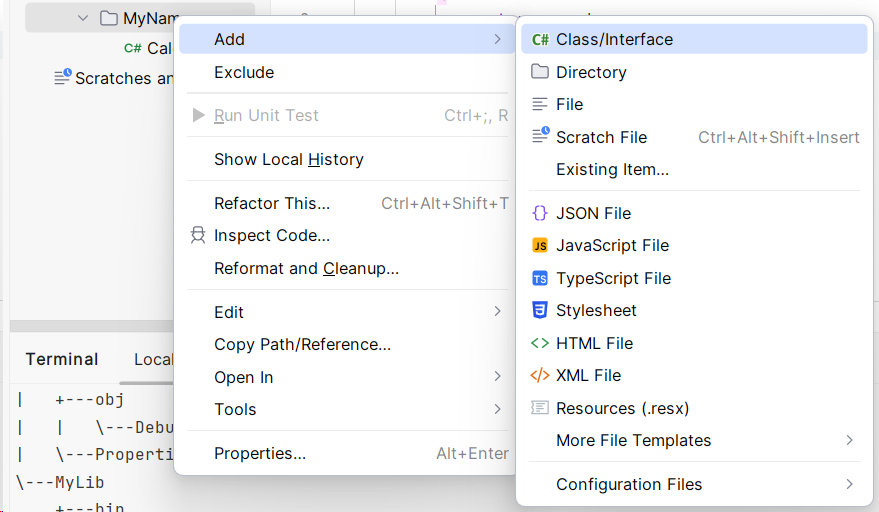
可以看到,此时
Calculator.cs中自动生成了名称空间:namespace MyLib.MyNamespace{} -
在名称空间内编写我们的类,
Calculator.cs的代码如下:namespace MyLib.MyNamespace { // 若无限定符,则默认为 internal,外部要调用,则设为public public class Calculator { public double Add(double a, double b) { return a + b; } } } -
构建选项:在一个Solution包含多个 Project 的情况下,我们可以一次编译整个Solution,也可以分别构建单个 Project,如下:
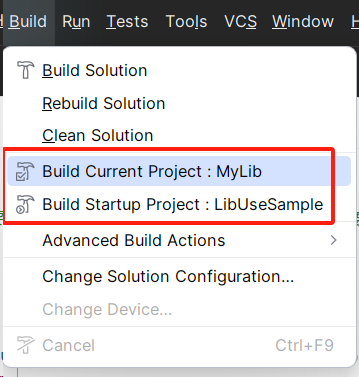
引用自定义库
一个项目想要引用自定义库或者外部库,首先需要创建外部库,如果已经存在,再从 Dependencies -- Reference... 中引入
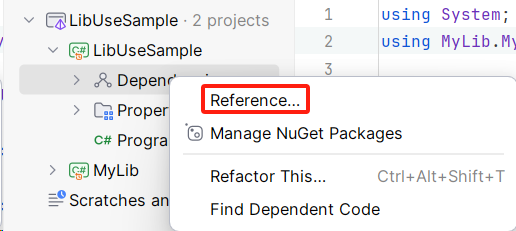
输入需要引入的外部库的名称:MyLib,选择打勾,然后点击 “add”
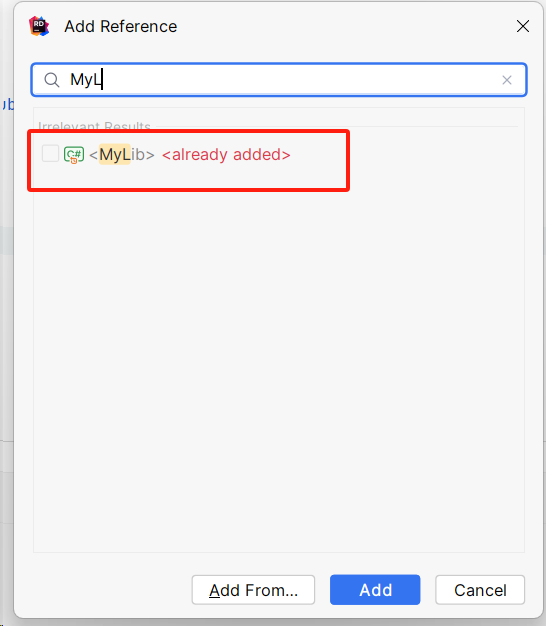
使用 using XXX 来引入: using MyLib.MyNamespace;。这样就能引入当前 MyNamespace 中定义的类了。
using System; using MyLib.MyNamespace; // 使用自定义的 Lib.Namespace namespace LibUseSample { internal class Program { public static void Main(string[] args) { Calculator cal = new Calculator(); double res = cal.Add(3.14, 6.18); Console.WriteLine(res); } } } 然后编译,运行:
9.32 在 C# 中,一个 Project 就是一个Assembly,中文译作 “程序集”,在开发工具中,可以对 Project(程序集)的输出结果进行配置,Visual Studio 和 Rider 的配置方式相同:
Project 名称 -> 右键选择 "Properties"
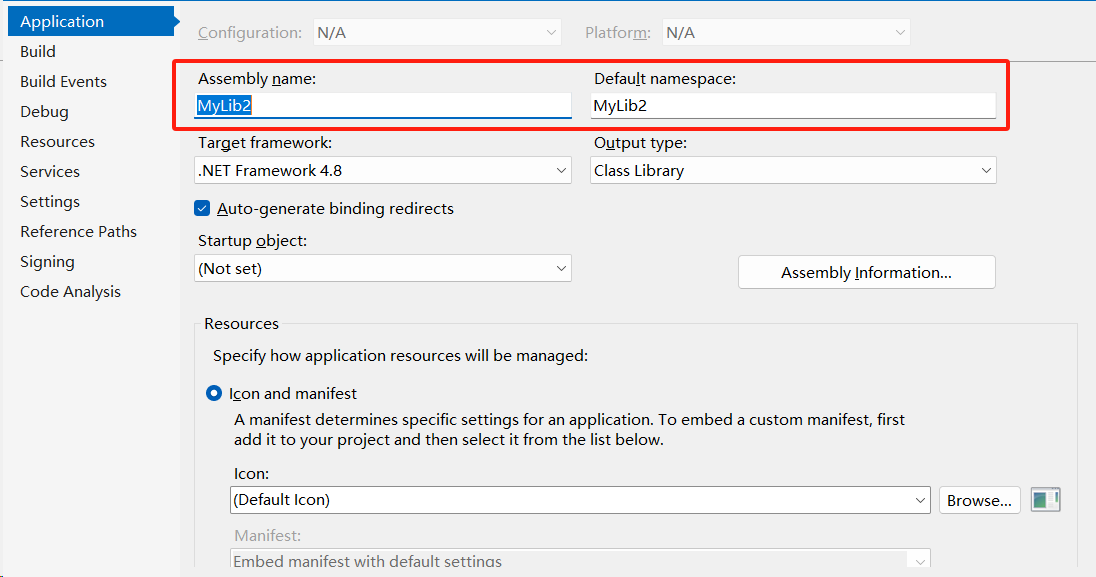
可以修改 Assembly Name 来设定当前程序集的名称,但是建议不要修改 Default namespace(在 Rider 中叫 Root namespace)
这里我将可执行文件程序集的名称由 UseLibSample 改为 UseLibSampleX,然后单独Build,生成的文件如下:
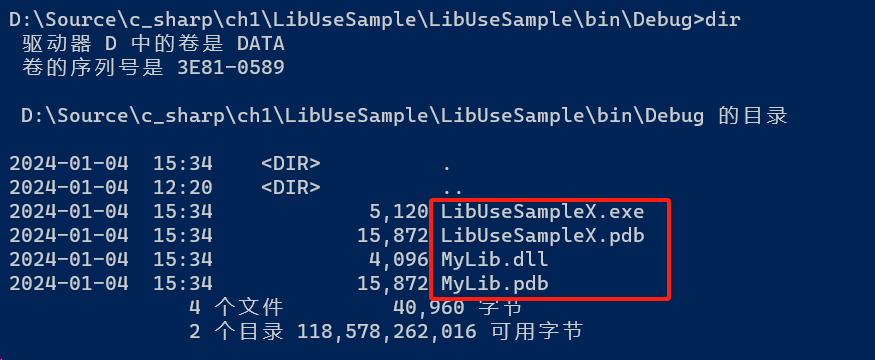
可以看到,可执行文件的文件名称发生了改变。
访问限定修饰符修饰 class :
在C#中,使用访问限定符
internal、private、protected和public修饰 class 时,它们的可见性有以下不同:
private(私有的):
private访问限定符使得 class 只能在包含它的类或结构体内部可见。- 这意味着除了包含该类的类或结构体之外的任何地方都无法直接访问这个类。
private class MyPrivateClass { }
protected(受保护的):
protected访问限定符允许 class 在包含它的类或结构体以及派生类中可见。- 这表示除了包含该类的类或结构体之外,任何继承自这个类的类也能访问它。
protected class MyProtectedClass { }
internal(内部的):
internal访问限定符允许 class 在包含它的程序集中的任何地方可见。- 这意味着只有在同一程序集中的代码可以直接访问该类,而在其他程序集中则无法访问。
internal class MyInternalClass { }
public(公共的):
public访问限定符使得 class 对所有类可见,不论是否在同一程序集中。- 这允许在任何地方都能够直接访问该类。
public class MyPublicClass { }总体来说,
private提供了最高的封装性,只允许包含它的类直接访问。protected允许派生类访问,internal允许在同一程序集中的任何地方访问,而public允许在任何地方都能访问。选择适当的访问限定符取决于你的设计需求,确保对类的可见性进行适当的控制,以保持良好的封装性和代码安全性。
类的继承
C# 中所有类都是单根的,意思就是,所有类的继承链的顶端都是 Object,示例:
using System; namespace HelloOOP { internal class Program { public static void Main(string[] args) { // 获取Car的类型和Car的基类 Type t = typeof(Car); Type baseType = t.BaseType; string baseTypeName = baseType.FullName; // HelloOOP.Vehicle Console.WriteLine(baseTypeName); // 获取Car的基类的基类 Type objectType = baseType.BaseType; Console.WriteLine(objectType.FullName); // System.Object // 获取Car的基类的基类的基类 Type nullType = objectType.BaseType; Console.WriteLine(nullType); Console.WriteLine(nullType == null); // True } } class Vehicle { } class Car : Vehicle { } } 编译运行结果:
HelloOOP.Vehicle System.Object True 在声明 Vehicle 类时,没有注明继承类型,实际上继承了 Object,可以这么写(一般不这么写):
class Vehicle : Object { } 注意:
需要明确的概念:是一个(英语译作 is a),即 A 是一个 B,在面向对象编程中,一个子类的实例,同时也 是一个 父类的实例。
如:汽车是一个交通工具;一个老师是一个人;一个学生是一个人。
反之,交通工具不一定是汽车,人也不一定是老师,这类在C#中统统判定为 False
使用代码进行验证:
using System; namespace HelloOOP { internal class Program { public static void Main(string[] args) { Car car = new Car(); Console.WriteLine(car is Vehicle); // True,一辆汽车是一个交通工具 Console.WriteLine(car is Object); // True,一辆汽车是一个Object(物件) Vehicle vehicle = new Vehicle(); Console.WriteLine(vehicle is Car); // False } } class Vehicle { } class Car : Vehicle { } }编译运行结果:
True True True False
可以使用父类类型的变量,引用子类类型的实例(因为一个子类的实例,同时也是一个父类的实例),示例:
using System; namespace HelloOOP { internal class Program { public static void Main(string[] args) { // 可用 父类变量 引用 子类实例 Object o1 = new Car(); Object o2 = new Vehicle(); // 错误,不可用子类变量引用父类实例 // Car c2 = new object(); // ERROR // 将父类实例转回子类实例 Car c1 = o1 as Car; Vehicle v1 = o2 as Vehicle; Console.WriteLine(c1.GetType()); Console.WriteLine(v1.GetType()); } } class Vehicle { } class Car : Vehicle { } } -
类在功能上的扩展(extend)
-
只能有一个基类(即单继承),但可以实现多个其接口
-
类访问级别对继承的影响:子类的访问级别不能超越父类的访问级别,但是可以持平
-
sealed类不能被继承(类似 C++ 中的 final 限定符)示例:
using System; namespace HelloOOP { internal class Program { public static void Main(string[] args) { } } class Vehicle { } sealed class Car : Vehicle { } // class BMW : Car // 不允许继承 // { // // } }错误信息:
Error CS0509 : “BMW”: 无法从密封类型“Car”派生
成员继承与访问
与 C++ 不同,C# 中的继承默认为公有的,不存在明确的私有继承概念。在C++中我们这么写一个类的继承:
car.hpp
#ifndef CAR_H #define CAR_H #include <string> class Vehicle { public: std::string owner; explicit Vehicle(std::string& inputName):owner(inputName) { } [[nodiscard]] std::string GetOwner() const { return owner; } }; class Car:public Vehicle { public: explicit Car(std::string& inputName):Vehicle(inputName) { } // 要将参数传递给父类 }; class RaceCar:public Car { public: explicit RaceCar(std::string& inputName):Car(inputName){} }; #endif //CAR_H C++ 中,类的继承方式分为公有继承、私有继承和保护继承,默认为私有继承,在这里我们需要使用公有继承(public)
main.cpp
#include <iostream> #include "Car.h" int main() { std::string owner = "Yuzu"; const RaceCar* const race_car = new RaceCar(owner); std::cout << race_car->GetOwner() << 'n'; delete race_car; // 人工回收指针空间内存 return 0; } CMakeLists.txt
cmake_minimum_required(VERSION 3.17) set(CMAKE_CXX_STANDARD 17) set(CMAKE_CXX_STANDARD_REQUIRED ON) set(CMAKE_CXX_EXTENSIONS OFF) set(CMAKE_POSITION_INDEPENDENT_CODE ON) if(NOT CMAKE_BUILD_TYPE) set(CMAKE_BUILD_TYPE Release) endif() project(test LANGUAGES C CXX VERSION 0.1.0) if(WIN32) add_definitions(-DNOMINMAX -D_USE_MATH_DEFINES) endif() # Windows 平台相关设置 -- 生成动态库:一定要导出符号表 if(MSVC) set(CMAKE_WINDOWS_EXPORT_ALL_SYMBOLS ON) set(BUILD_SHARED_LIBS ON) endif() if(NOT MSVC) find_program(CCACHE_PROGRAM ccache) if(CCACHE_PROGRAM) message(STATUS "Found CCache: ${CCACHE_PROGRAM}") set_property(GLOBAL PROPERTY RULE_LAUNCH_COMPILE ${CCACHE_PROGRAM}) set_property(GLOBAL PROPERTY RUEL_LAUNCH_LINK ${CCACHE_PROGRAM}) endif() endif() file(GLOB SRC ${CMAKE_CURRENT_SOURCE_DIR}/*.cpp ${CMAKE_CURRENT_SOURCE_DIR}/*.hpp) add_executable(main ${SRC}) 而在 C# 中,同样的代码可以这么写:
Car.cs
namespace InheritSample { class Vehicle { public Vehicle(string inputName) { this.Owner = inputName; } public string Owner { get; set; } } class Car : Vehicle { public Car(string inputName) : base(inputName) // 调用父类构造器 { } } class RaceCar : Car { public RaceCar(string inputName) : base(inputName) // 调用父类构造器 { } } } Program.cs
using System; namespace InheritSample { internal class Program { public static void Main(string[] args) { RaceCar raceCar = new RaceCar("Yuzu"); string ownerName = raceCar.Owner; Console.WriteLine(ownerName); } } } 构造对象时候构造器的执行顺序:先执行基类构造器,后执行子类构造器(一层包一层)。
base 关键字只能访问上一级父类的对象。
类的访问级别
- 派生类对继承成员的访问
- 派生类对基类成员的访问
- 构造器的不可继承性:实例构造器是不被继承的
继承发生时:
当继承发生的时候,子类全盘获得父类的成员(除了实例构造器、析构器、静态构造器)。
在派生和继承的过程中,类进行了扩展(成员增加,不能减少)
导致的问题:类成员在被引入之后,就会一直传递下去,不会消失。所以我们在设计类的时候需要小心,不要随意引入新的类成员。
类的“横向扩展”与“纵向扩展”:
- 横向扩展:增加成员数量
- 纵向扩展:对成员版本进行更新,即
重写(Override)访问级别:
类成员的访问级别以类的访问级别为上限,不能超过类的访问级别
例如声明了一个
internal的类,它的成员为public,别的Assembly 想要访问这个类,也是不可能的声明了一个 public 的类,但是它的成员为
internal的,那么该成员也只能在同一个程序集中访问,不可被别的程序集的程序访问最低的访问级别:
private,会将成员的访问级别限制在类的类体中,为了保证数据的安全性,是默认的成员访问级别问题:子类继承了父类的 private 成员,但是没办法访问,那么要怎么证明确实继承下来了父类的 private 成员?
下面是一个车提速的例子,在其中将车的转速设为私有字段,然后为它提供一个速度的包装器(有换算关系),然后再添加一个提速功能,每提速一次(调用提速功能),转速增加 1000,车速自然随之增加了。
Car.csnamespace AccelerateSample { public class Vehicle { public Vehicle(string inputName) { this.Owner = inputName; } private int m_rpm; // 转速 public string Owner { get; set; } public int Speed // m_rpm 的包装器,只读,车速和发动机转速有关 { get { return m_rpm / 100; } } public void Accelerate() { m_rpm += 1000; // 每加速一次,提升转速1000 } } public class Car:Vehicle { public Car(string inputName):base(inputName) { } } }
Program.csusing System; namespace AccelerateSample { internal class Program { public static void Main(string[] args) { Car car = new Car("Yuzu"); car.Accelerate(); car.Accelerate(); car.Accelerate(); Console.WriteLine($"Car owner: {car.Owner}, speed: {car.Speed} km/s"); } } }编译运行结果:
Car owner: Yuzu, speed: 30 km/s继承链上可访问的访问级别:
protected,使用场景:不能对外暴露,但是子类又可能使用到的字段/方法。如下面定义了
Vehicle的类,里面有一个方法:Burn表示耗油,加速的时候需要耗油,但是驾驶员并不需要知道车是怎么消耗油的;但是我们定义了一个
Vehicle的子类:Car,该类的加速方法为涡轮加速,耗油量和普通车不同,提速速率也不同,它的提速方法:TurboAccelerate,这个方法需要专门调用Burn方法和重写转速。protected修饰的成员可以跨程序集访问。代码如下:
Car.csnamespace AccelerateSample { public class Vehicle { public Vehicle(string inputName) { this.Owner = inputName; } protected int m_rpm; // 转速 private int m_fuel; public int Fuel { get { return m_fuel; } } public string Owner { get; set; } public int Speed // m_rpm 的包装器,只读,车速和发动机转速有关 { get { return m_rpm / 100; } } public void Refuel() { m_fuel = 100; } protected void Burn(int fuel) // protected 修饰的成员/方法,子类可以访问(仅继承链上的类可以访问),外部无法访问 { m_fuel -= fuel; } public void Accelerate() { Burn(1); m_rpm += 1000; // 每加速一次,提升转速1000 } } public class Car : Vehicle { public Car(string inputName) : base(inputName) { } public void TurboAccelerate() { Burn(2); m_rpm += 3000; } } public class Bus : Vehicle { public Bus(string inputName):base(inputName) { } public void SlowAccelerate() // 巴士起步慢,但是可以载更多人 { Burn(1); m_rpm += 500; } } }
Program.csusing System; namespace AccelerateSample { internal class Program { public static void Main(string[] args) { // car Car car = new Car("Yuzu"); car.Refuel(); car.Accelerate(); car.TurboAccelerate(); car.TurboAccelerate(); Console.WriteLine($"Car owner: {car.Owner}, speed: {car.Speed} km/s"); Console.WriteLine($"Rest fuel: {car.Fuel}"); // bus Bus bus = new Bus("Aoko"); bus.Refuel(); bus.SlowAccelerate(); Console.WriteLine($"Bus owner: {bus.Owner}, speed: {bus.Speed} km/s"); Console.WriteLine($"Left fuel: {bus.Fuel}"); } } }编译运行结果:
Car owner: Yuzu, speed: 70 km/s Rest fuel: 95 Bus owner: Aoko, speed: 5 km/s Left fuel: 99
Bus类需要缓慢加速,所以加速方法也需要重写
internal和protected可以组合,组合起来表示:该成员既能被程序集内其他类访问,又可以被子类(派生类)访问。
private和protected也可以组合
面向对象的实现风格
2.9.3 继承和多态
类的继承
-
类成员的“横向扩展”:成员越来越多
-
类成员的“纵向扩展”:行为改变,版本增高
现在有这样一个问题:我有两个类
Vehicle和Car,后者是前者的子类。他们都有同名方法Run,但是实现不一样。如下:Vehicle.csusing System; namespace OverrideSample { public class Vehicle { public int Speed { get; set; } public void Run() { Console.WriteLine("Vehicle is running!"); } } }Car.csusing System; namespace OverrideSample { public class Car : Vehicle { public void Run() { Console.WriteLine("Car is running!"); } } }主函数在
Program.cs中,正常情况下我们调用:Program.csusing System.Threading; namespace OverrideSample { internal class Program { public static void Main(string[] args) { Car c = new Car(); c.Run(); Vehicle v = new Vehicle(); v.Run(); } } }输出结果:
Car is running! Vehicle is running!在主函数末尾添加如下两行代码:
v = c; // 此时 v 是 Car 类型:v is a Car // Console.WriteLine(v.GetType()); // OverrideSample.Car v.Run(); // Vehicle is running!按道理来说,v 的类型是 Car,那么调用
Run方法,也应该调用的是Car的Run方法,而实际上却调用了Car父类的Run方法,这和我们的需求可能是违背的,因为根本调用不到子类成员。所以,怎样才能让变量 v 调用到
Car的Run方法?
方法重写(Override)
而要解决上面提到的子类成员方法被隐藏的问题,就需要将我们需要使用重写,重写一般指方法的重写:
为父类成员添加 virtual 关键字
Vehicle.cs
using System; namespace OverrideSample { public virtual class Vehicle // 父类方法添加 virtual 关键字 { public int Speed { get; set; } public void Run() { Console.WriteLine("Vehicle is running!"); } } } 为子类成员添加 override 关键字
Car.cs
using System; namespace OverrideSample { public override class Car : Vehicle // 子类方法添加 override 关键字,并写出新的逻辑 { public void Run() { Console.WriteLine("Car is running!"); } } } 在这里,子类方法对父类方法进行了重写,更新了同名方法的逻辑。
即:当父类变量引用子类类型实例的时候,要该变量顺利调用子类的方法,那么需要重写。
而父类和子类的同名方法没有 virtual 和 override 的时候,实际上编译器隐藏(hide)了子类的方法。
此外,变量引用的方法是和实例相关的,而和类型声明没关系,变量和实例的绑定发生运行期间,又称作“动态绑定”。如上面新增的代码 v = c;,是让父类的变量指向了子类的实例。
注意:
重写中的
virtual建议理解为:可被重写的、名存实亡的被
override标记的成员,它在子类中依旧是可被重写的,如RaceCar类继承了Car类,重写了Run方法:using System; namespace OverrideSample { public class Vehicle { public int Speed { get; set; } public virtual void Run() { Console.WriteLine("Vehicle is running!"); } } public class Car : Vehicle { public override void Run() { Console.WriteLine("Car is running!"); } } public class RaceCar : Car { public override void Run() { Console.WriteLine("Race car is running!"); } } internal class Program { public static void Main(string[] args) { Car c = new RaceCar(); c.Run(); } } }编译运行结果:
Race car is running!问题:当去掉
RaceCar类中的override时,此时c.Run()打印出来的结果是什么?回答:是
Car is running!,因为实例总会调用到继承链上的最新的方法(被重写的方法比原方法要新)。
-
类成员的隐藏(不常用)
而父类和子类的同名方法没有
virtual和override的时候,实际上编译器隐藏了子类的方法。这时候子类和父类的同名方法之间没有版本联系。 -
重写与隐藏的发生条件:函数成员,可见,签名一致
属性重写
除了方法以外,属性(Property)也可以被重写,示例:
Car.cs
using System; namespace PropertyOverrideSample { public class Vehicle { private int _speed; public virtual int Speed // 父类属性,可被重写:使用 virtual 关键字 { get { return _speed; } set { _speed = value; } } public virtual void Run() { Console.WriteLine("Vehicle is running!"); Speed = 100; } } public class Car : Vehicle { private int _rpm; public override int Speed // 子类重写了属性:使用 override 关键字 { get { return _rpm / 100; } set { _rpm = value * 100; } } public override void Run() { Console.WriteLine("Car is running!"); _rpm = 15000; } } } Program.cs
using System; namespace PropertyOverrideSample { internal class Program { public static void Main(string[] args) { Vehicle v = new Vehicle(); v.Run(); Console.WriteLine(v.Speed); Vehicle v1 = new Car(); v1.Run(); Console.WriteLine(v1.Speed); } } } 编译运行:
Vehicle is running! 100 Car is running! 150 只有当父类成员对子类是可见的,才可以重写。
访问级别由大到小:
public > internal > protected > private
多态(Polymorphism)
-
基于重写机制
-
函数成员的具体行为(版本)由对象决定
-
回顾:C# 语言的变量和对象都是有类型的,所以会有“代差”
动态语言和静态语言重写和多态的区别:
在动态类型的语言中存在重写,但是不表现出多态性,不如说,动态类型语言,处处都展现了多态性:
下面的 Python 代码,尽管使用了类型注解,但是并不会对程序执行起什么作用,变量的类型会随着程序执行发生变化:
class Vehicle: def Run(self): print("Vehicle is running!") class Car(Vehicle): def Run(self): print("Car is running!"); if __name__ == "__main__": v:Vehicle = Car() v.Run() # Car is running print(type(v)) # 这种做法在 C# 中是不被准许的,但Python的类型注解在运行时候会被忽略 c:Car = Vehicle() c.Run() # Vehicle is running print(type(c))运行:
Car is running! <class '__main__.Car'> Vehicle is running! <class '__main__.Vehicle'>可以看到:Python 解释器本身在运行时并不会因为类型注解而改变其行为。类型注解通常在开发阶段被编辑器或类型检查工具使用,而在运行时被忽略。
2.9.4 partial 类
partial 类作用
C# 编译器允许我们将一个类拆分为两个或者多个部分进行编写,并且每个部分能以自己的节奏进行更新。而它们合起来还是同一个类。
partial 类的作用:减少类的派生,从而减少复杂度。
partial 类与 Entity Framework
使用 Entity Framework 查询数据表,这是生成的 datagram:
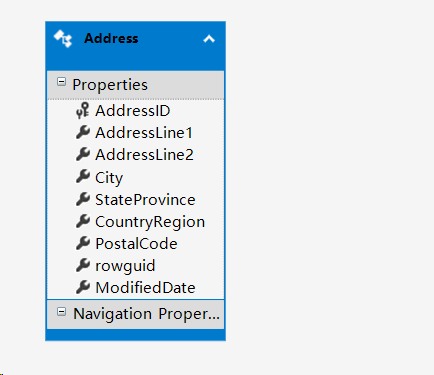
示例代码:
Program.cs
using System; namespace PartialClassSample1 { internal class Program { public static void Main(string[] args) { var dbContext = new AdventureWorksLT2012Entities(); var cts = dbContext.Address; foreach(var item in cts) { Console.WriteLine(item.PostalCode); item.Report(); } } } } AddressPart2.cs
using System; using System.Collections.Generic; using System.Linq; using System.Text; using System.Threading.Tasks; namespace PartialClassSample1 { public partial class Address { public void Report() { Console.WriteLine($"Address: {this.AddressLine1}; City: {this.City}"); } } } 使用 partial 类的特征,给 Address 类新增一个 Report 方法。
此时我在 Address 表单中新增一列:Price,允许设为 null 值:
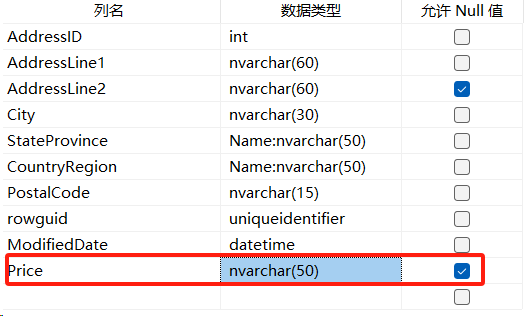
然后要在 Visual Studio 中更新生成的 Datagram:
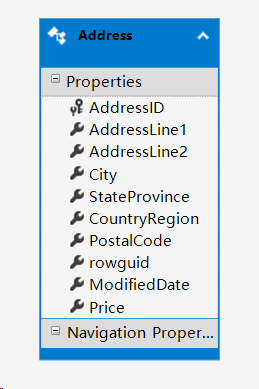
可以看到,最后一行已经可以看到我们新增的字段了。然后保存一下(这是必要的,因为此时会重新生成C#代码,否则没有这一列的自动提示字段)。
partial 类与 Windows Forms,WPF,ASP.Net Core
partial 类允许使用不同语言编写代码,如 WPF 中允许使用 XAML 语言设计UI界面,然后使用C#语言实现其逻辑。
2.10 接口和抽象类
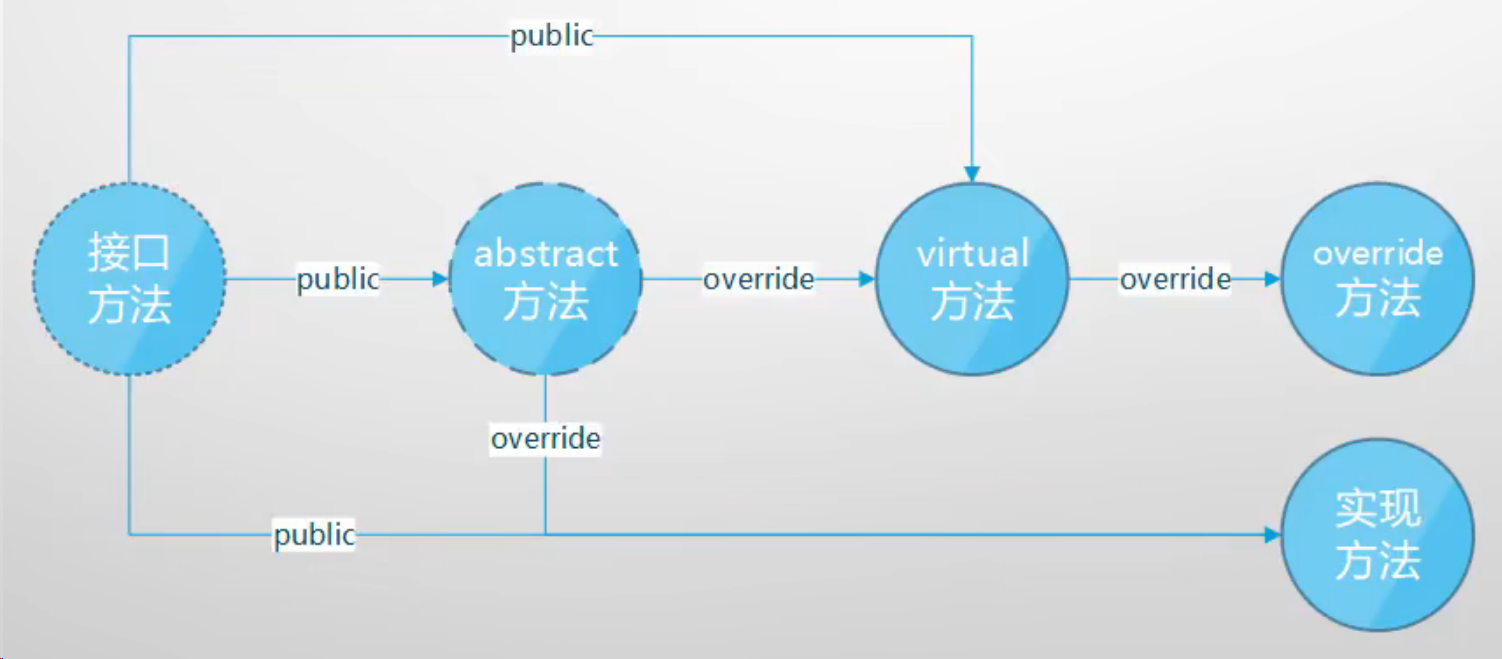
接口和抽象类写的好,代码更加容易测试和维护。抽象类不可以实例化。
编写工程代码的 SOLID 原则:
SOLID 是一组设计原则,旨在帮助开发者创建更容易理解、灵活、可维护的软件系统。这些原则由罗伯特·C·马丁(Robert C. Martin)等人提出,每个原则代表了一种设计思想。下面是 SOLID 原则的简要介绍:
- 单一职责原则 (Single Responsibility Principle - SRP): 一个类应该只有一个引起变化的原因。换句话说,一个类应该只有一个职责。这有助于确保类在软件系统中的变化是可控的。
- 开放/封闭原则 (Open/Closed Principle - OCP): 软件实体(类、模块、函数等)应该对扩展是开放的,但对修改是封闭的。这意味着在不修改现有代码的情况下,可以通过添加新的代码来扩展系统的功能。
- 里氏替换原则 (Liskov Substitution Principle - LSP): 子类应该能够替换其基类而不影响程序的正确性。这意味着任何基类可以被其子类无缝替换,而程序行为不会受到影响。
- 接口隔离原则 (Interface Segregation Principle - ISP): 不应该强迫客户端依赖于它们不使用的接口。一个类不应该被迫实现它不使用的接口。这有助于避免不必要的依赖和复杂性。
- 依赖反转原则 (Dependency Inversion Principle - DIP): 高层模块不应该依赖于低层模块,两者都应该依赖于抽象。抽象不应该依赖于具体细节,而具体细节应该依赖于抽象。这有助于减少模块之间的紧耦合关系。
这些原则一起形成了 SOLID 的缩写,每个原则都有助于提高软件设计的灵活性、可维护性和可扩展性。在实际编码中,遵循这些原则有助于编写清晰、可读、易于维护的代码。
2.10.1 定义
- 接口和抽象类都是“软件工程产物”
- 具体类 -> 抽象类 -> 接口:越来越抽象,内部实现的东西越来越少
- 抽象类是未完全实现逻辑的类(可以有字段和非 public 成员,它们代表了“具体逻辑”
- 抽象类为复用而生:专门作为基类来使用,也有解耦功能
- 封装确定的,开放不确定的,推迟到合适的子类中去实现
- 接口时完全未实现逻辑的“类”(“纯虚类”;只有函数成员;成员全部 public)
- 接口为解耦而生:“高内聚,低耦合”,方便单元测试
- 接口时一个“协约”,早已为工业生产所熟知(有分工必然有协作,有协作必然有协约)
- 它们都不能被实例化,只能用来声明变量、引用具体类(concrete class)的实例
设计一个父类和两个子类,他们都有重名方法(相同的功能) Run :
目的:使用父类变量调用子类实例,第一种解决方式:使用 virtual 和 override 进行重写:
MyLib1TransportToolsCar.cs
using System; namespace MyLib1.TransportTools { public class Vehicle { public virtual void Run() { Console.WriteLine("Vehicle is running!"); } public void Stop() { Console.WriteLine("Stopped!"); } public void Fill() { Console.WriteLine("Pay and fill"); } } public class Truck : Vehicle { public override void Run() { Console.WriteLine("Truck is running!"); } } public class Car : Vehicle { public override void Run() { Console.WriteLine("Car is running!"); } } } 主函数调用:
Program.cs
using MyLib1.TransportTools; namespace ClassDesignSample1 { internal class Program { public static void Main(string[] args) { Vehicle v = new Car(); v.Run(); Vehicle v1 = new Truck(); v1.Run(); } } } 调用结果:
Car is running! Truck is running! 可以看到,在这里,基类 Viecle 中的 Run 方法不会被调用到,那么,实际上可以只声明这个方法但不加以实现,具体的实现根据派生类的需求而定。这时候就用到了抽象类(abstract class)和抽象方法(abstract method,又被叫做纯虚方法)。子类在实现抽象方法的时候,要添加 override 关键字,否则编译器会报错。
抽象类专门为作基类而生。
using System; namespace MyLib1.TransportTools { public abstract class Vehicle // 声明抽象类:抽象类拥有抽象方法 { public abstract void Run(); // 声明抽象方法 public void Stop() { Console.WriteLine("Stopped!"); } public void Fill() { Console.WriteLine("Pay and fill"); } } public class Truck : Vehicle { public override void Run() { Console.WriteLine("Truck is running!"); } } public class Car : Vehicle { public override void Run() { Console.WriteLine("Car is running!"); } } } 2.10.2 接口
再极端一点,有没有一种类,它里面全部方法都是抽象方法?所有的方法否需要后面的类继承了然后去实现?
实际上确实有,这种只含抽象方法(abstract method)的类被称作纯虚类,而纯虚类其实就是接口(interface):
MyLib1TransportToolsVehicleBase.cs
namespace MyLib1.TransportTools { public abstract class VehicleBase { public abstract void Fill(); public abstract void Run(); public abstract void Stop(); } } MyLib1TransportToolsCar.cs:若该类没有实现基类的全部接口,那么要给 class 添加 abstract 关键字
using System; namespace MyLib1.TransportTools { public abstract class Vehicle : VehicleBase // 因为没有实现所有方法,所以 abstract 不可少 { public override void Stop() { Console.WriteLine("Stopped!"); } public override void Fill() { Console.WriteLine("Pay and fill"); } } public class Truck : Vehicle { public override void Run() { Console.WriteLine("Truck is running!"); } } public class Car : Vehicle { public override void Run() { Console.WriteLine("Car is running!"); } } } Program.cs
using MyLib1.TransportTools; namespace ClassDesignSample1 { internal class Program { public static void Main(string[] args) { Vehicle v = new Car(); v.Run(); v.Stop(); Vehicle v1 = new Truck(); v1.Run(); } } } 因为接口已经隐含了 “纯虚类” 和 “public” 的意思,所以声明时候不允许添加 public abstract
MyLib1TransportToolsVehicle.cs
namespace MyLib1.TransportTools { interface IVehicle { void Fill(); void Run(); void Stop(); } } 同时,在实现接口的时候,也需要注意如下几点:
- 未实现的接口,需要写成抽象方法
- 不用写
override关键字
MyLib1TransportToolsCar.cs
using System; namespace MyLib1.TransportTools { public abstract class Vehicle : IVehicle // 表示在 Vehicle 中要实现接口 IVehicleBase { public abstract void Run(); // 没有完全实现接口,予以保留 public void Stop() { Console.WriteLine("Stopped!"); } public void Fill() { Console.WriteLine("Pay and fill"); } } public class Truck : Vehicle // 不需要 override 关键字 { public override void Run() { Console.WriteLine("Truck is running!"); } } public class Car : Vehicle { public override void Run() { Console.WriteLine("Car is running!"); } } } 举例:接口类型在实际代码编写中的应用:
using System; using System.Collections; namespace IEnumerableSample { internal class Program { static void Main(string[] args) { ArrayList a = new ArrayList() { 1, 2, 3, 4, 5, 7.1 }; double res = Sum(a); double ave = Average(a); Console.WriteLine(res); Console.WriteLine(ave); int[] b = new int[] { 1, 2, 3, 4, 5 }; double res1 = Sum(b); // 22.1 double ave1 = Average(b); // 3.683 Console.WriteLine(res1); // 15 Console.WriteLine(ave1); // 3 } public static double Sum(IEnumerable nums) { double sum = 0.0; foreach (var item in nums) { if (item is double) { sum += (double)item; } else if (item is int) { sum += (int)item; } // 如果不希望处理其他类型,可以抛出异常 else { throw new InvalidOperationException( $"Unsupported element type {item.GetType().FullName} in collection."); } } return sum; } public static double Average(IEnumerable input) { double sum = 0.0, average = 0.0; int count = 0; foreach (var item in input) { if (item is int) { sum += (int)item; count++; } else if (item is double) { sum += (double)item; count++; } else { throw new InvalidOperationException($"Unsupported type {item.GetType()} in collection."); } } average = sum / count; return average; } } } 编译允许结果:
22.1 3.6833333333333336 15 3 C# 中接口的实现
耦合:说们说A和B的耦合度高,意思就是 B 能否正常工作,严重依赖于 A 是否能正常工作,也被称作依赖(Dependencies)。我们设计的类的耦合度过高并不是好事,可能导致局部问题扩大,从而影响全局,或者让代码变得难以调试和维护,错误难以查找。
下面是紧耦合的代码,一个类中有另一个类的字段,且这个字段在该类中广泛被使用,即 Car 的功能严重依赖于 Engine:
namespace TightCoupling; class Program { static void Main(string[] args) { Engine engine = new Engine(); Car car = new Car(engine); car.Run(1); Console.WriteLine(car.Speed); } } public class Engine // 假如 Engine 出了问题 { public int RPM { get; private set; } public void Work(int gas) { this.RPM = gas * 1000; } } public class Car { private Engine _engine; // 紧耦合 public int Speed { get; private set; } public Car(Engine engine) { _engine = engine; // 紧耦合 } public void Run(int gas) { _engine.Work(gas); // 紧耦合 this.Speed = gas * 100; } } 而接口的引入可以显著降低耦合度,使得各模块功能相对独立。
现实生活中,我们拿着任何一部手机都会使用,原因是那些手机的功能都是类似的,手机最基础的功能可以抽象为一个接口。
下面是示例:该例子的代码耦合度很低,我们可以轻易更换使用者使用的手机(iPhone 或 Pixel ),而且我们随时可以创建新的手机给他用(只需要更换传入第 10 行的参数即可),而且编写新的手机类也很容易,只需要实现响应的接口即可。
namespace InterfaceSample { internal class Program { static void Main(string[] args) { Apple iPhone = new Apple(); // 创建一部iPhone Android pixel = new Android(); // 创建一部pixel手机 PhoneUser user1 = new PhoneUser(pixel); // 创建一个人,将手机给他 user1.UsePhone(); // 让他使用手机 } } // 四个都需要有的功能 interface IPhone { void Dial(); void PickUp(); void Send(); void Receive(); } // 手机使用者类: class PhoneUser { // // 拥有一部私人手机 private IPhone phone; // 实例化 public PhoneUser(IPhone _phone) { this.phone = _phone; } // 拥有使用手机的能力 public void UsePhone() { phone.Dial(); phone.Receive(); phone.PickUp(); phone.Send(); } } // Android 类:实现了四个接口(尽管样式可能不同) class Android : IPhone { public void Dial() { Console.WriteLine("Android phone dialing..."); } public void PickUp() { Console.WriteLine("Hey, this is Google Assistant."); } public void Send() { Console.WriteLine("I send you an message on Hangout."); } public void Receive() { Console.WriteLine("I received your message from my Android phone."); } } // IPhone类:实现了四个接口 class Apple : IPhone { public void Dial() { Console.WriteLine("iPhone Dialing..."); } public void PickUp() { Console.WriteLine("Hi, this is siri!"); } public void Send() { Console.WriteLine("I send you an imessage."); } public void Receive() { Console.WriteLine("I received your message from an apple device."); } } } 代码中如果有可以替换的地方,那么一定有接口存在。接口就是为了松耦合而生的,松耦合的最大好处:让功能的提供方变得可替换。
接口的产生:自底向上(重构),自顶向下(设计)
C# 中接口的实现有:隐式、显式、多接口
语言对面向对象设计的内建支持:依赖反转(DIP, Dependency Inversion Principle),接口隔离(ISP, Interface Segregation Principle),开/闭原则(OCP, Open-closed Principle)……
-
依赖反转(DIP)原则的产生,是为了平衡自顶向下这一单一的思维方式
从
紧耦合 -> 松耦合 -> 更松的耦合的发展方向:引入接口-
第一步:紧耦合,司机是依赖于车的(因为有车才有司机)
-
第二步:将车的共性提炼成接口
IVehicle,具体的车的类实现接口;司机类Driver包含IVehicle的字段,拥有驾驶技能(方法)Drive。此时司机类和IVehicle接口依旧是紧耦合的,不过比第一步的耦合程度已经小了很多。 -
第三步:在第二步的基础上,将
Driver共性的东西提炼成接口IDriver(该接口有IVehivle的字段和Drive方法声明),然后由具体类司机类来实现接口,此时司机类因为对Drive方法的不同实现,对应现实中不同的驾驶员(如AI驾驶员、小汽车驾驶员、客车驾驶员等)。这一步做到了进一步解耦有。 -
第四步:设计模式
由第一步到第二三步:从依赖具体的汽车种类,到不依赖具体的汽车种类,而是依赖接口,依赖的方向发生了转换,这就是依赖反转(DIP)
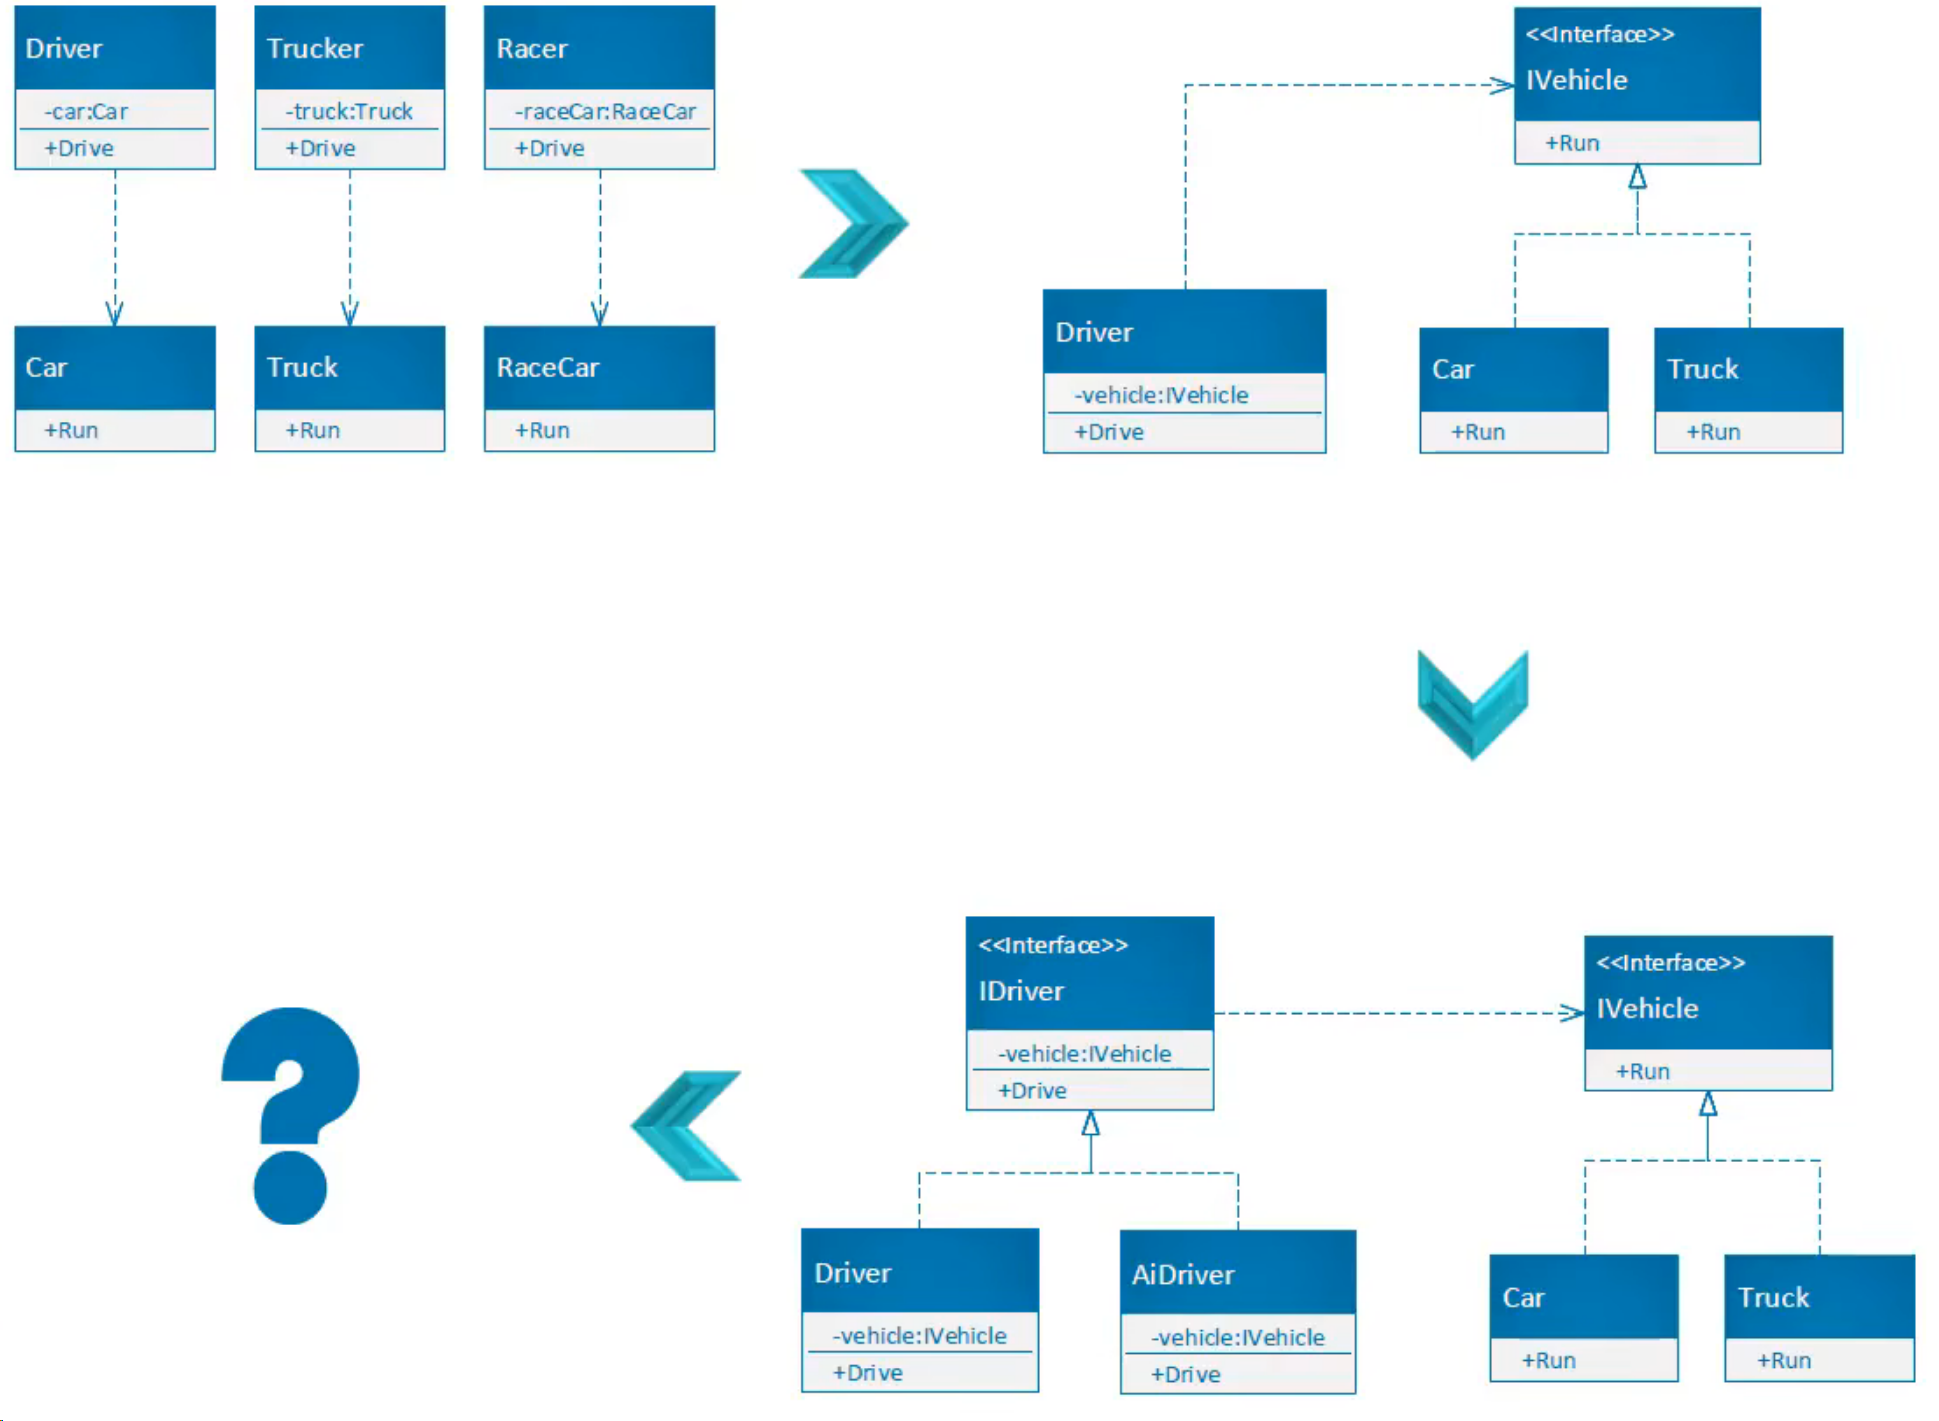
单元测试中对接口的使用
如我们要设计一个电扇的类,下面是它的 UML 图示:
--- title: 高耦合度 --- classDiagram PowerSupply <|-- DeskFan class PowerSupply{ + GetPower():int } class DeskFan{ - PowerSpply _powerSupply + DeskFan(PowerSupply powerSupply) + Work():string }此时代码如下所示:
namespace TightCoupled1 { public class PowerSupply { public int GetPower() { return 100; } } public class DeskFan { private PowerSupply _powerSupply; // 紧耦合 public DeskFan(PowerSupply powerSupply) { this._powerSupply = powerSupply; // 紧耦合 } public string Work() { int power = _powerSupply.GetPower(); int noPower = 0; int lowPowerThreshold = 100; int moderatePowerThreshold = 200; if (power <= noPower) { return "Won't work"; } else if (power < lowPowerThreshold) { return "Slow"; } else if (power < moderatePowerThreshold) { return "Work fine!"; } else if (power >= moderatePowerThreshold) { return "warning!"; } else { return "Unknown"; } } } }mermaid.js 中使用
~表示 internal或者package,#表示 protected,使用~Type~表示<Type> -
使用接口,降低耦合度:引入 IPowerSupply,现在依赖关系如图所示:
此时 PowerSupply 和 DeskFan 类都依赖接口 IPowerSupply,根据实现的不同,可以有不同的电源类,而因为在 DeskFan 中,留有 IPowerSupply (协议)的接口,任何实现了这个接口的类产生的实例,都能传入 DeskFan 的实例中。实际代码:
namespace IntroduceInterface { public interface IPowerSupply { int GetPower(); } public class PowerSupply : IPowerSupply { public int GetPower() { return 100; } } public class DeskFan { private IPowerSupply _powerSupply; public DeskFan(IPowerSupply powerSupply) // 紧耦合: IPowerSupply { this._powerSupply = powerSupply; } public string Work() { int power = _powerSupply.GetPower(); int noPower = 0; int lowPowerThreshold = 100; int moderatePowerThreshold = 200; if (power <= noPower) { return "Won't work"; } else if (power < lowPowerThreshold) { return "Slow"; } else if (power < moderatePowerThreshold) { return "Work fine!"; } else if (power >= moderatePowerThreshold) { return "warning!"; } else { return "Unknown"; } } } } 引入单元测试
使用 xUnit 进行单元测试,在当前 Solution 下新建一个测试项目:
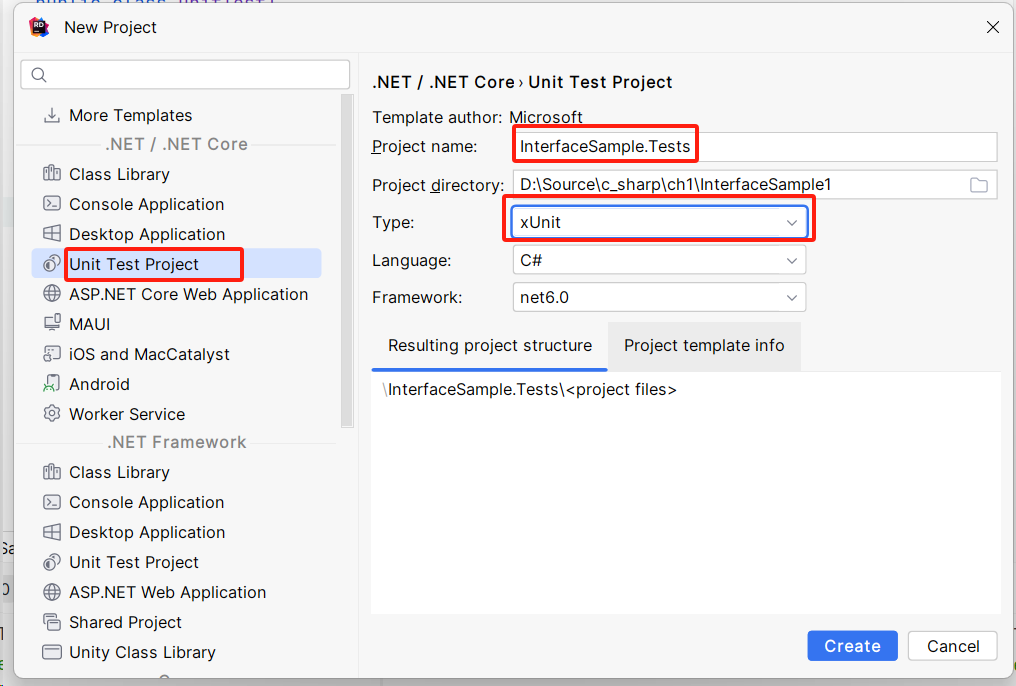
注意:命名建议为:当前项目名称/解决方案名称.Tests;类型建议选择 xUnit,Visual Studio 建立测试方式和 Rider 中一样,只是界面少许有区别。
打开生成测试 .cs 文件,大致如下:
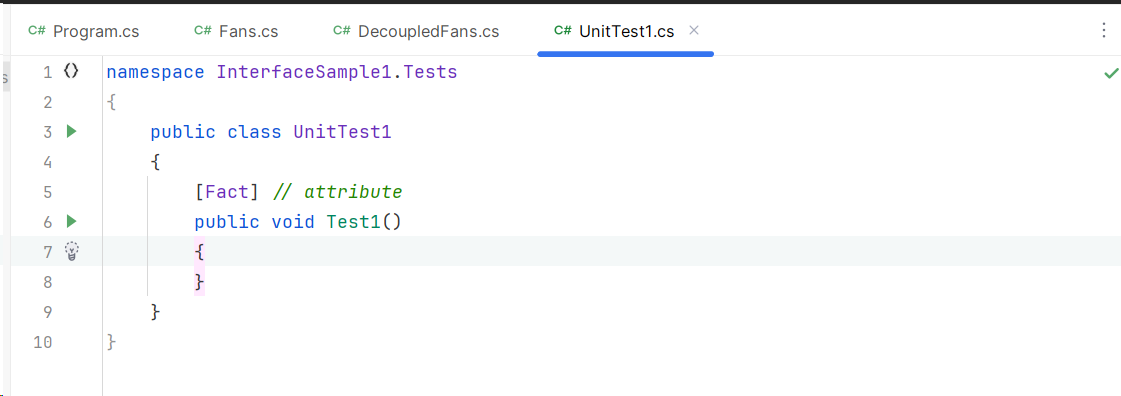
单元测试方法之前有一个 attribute 标识:[Fact],表示它是一个单元测试的方法。整个测试用例编写好了:
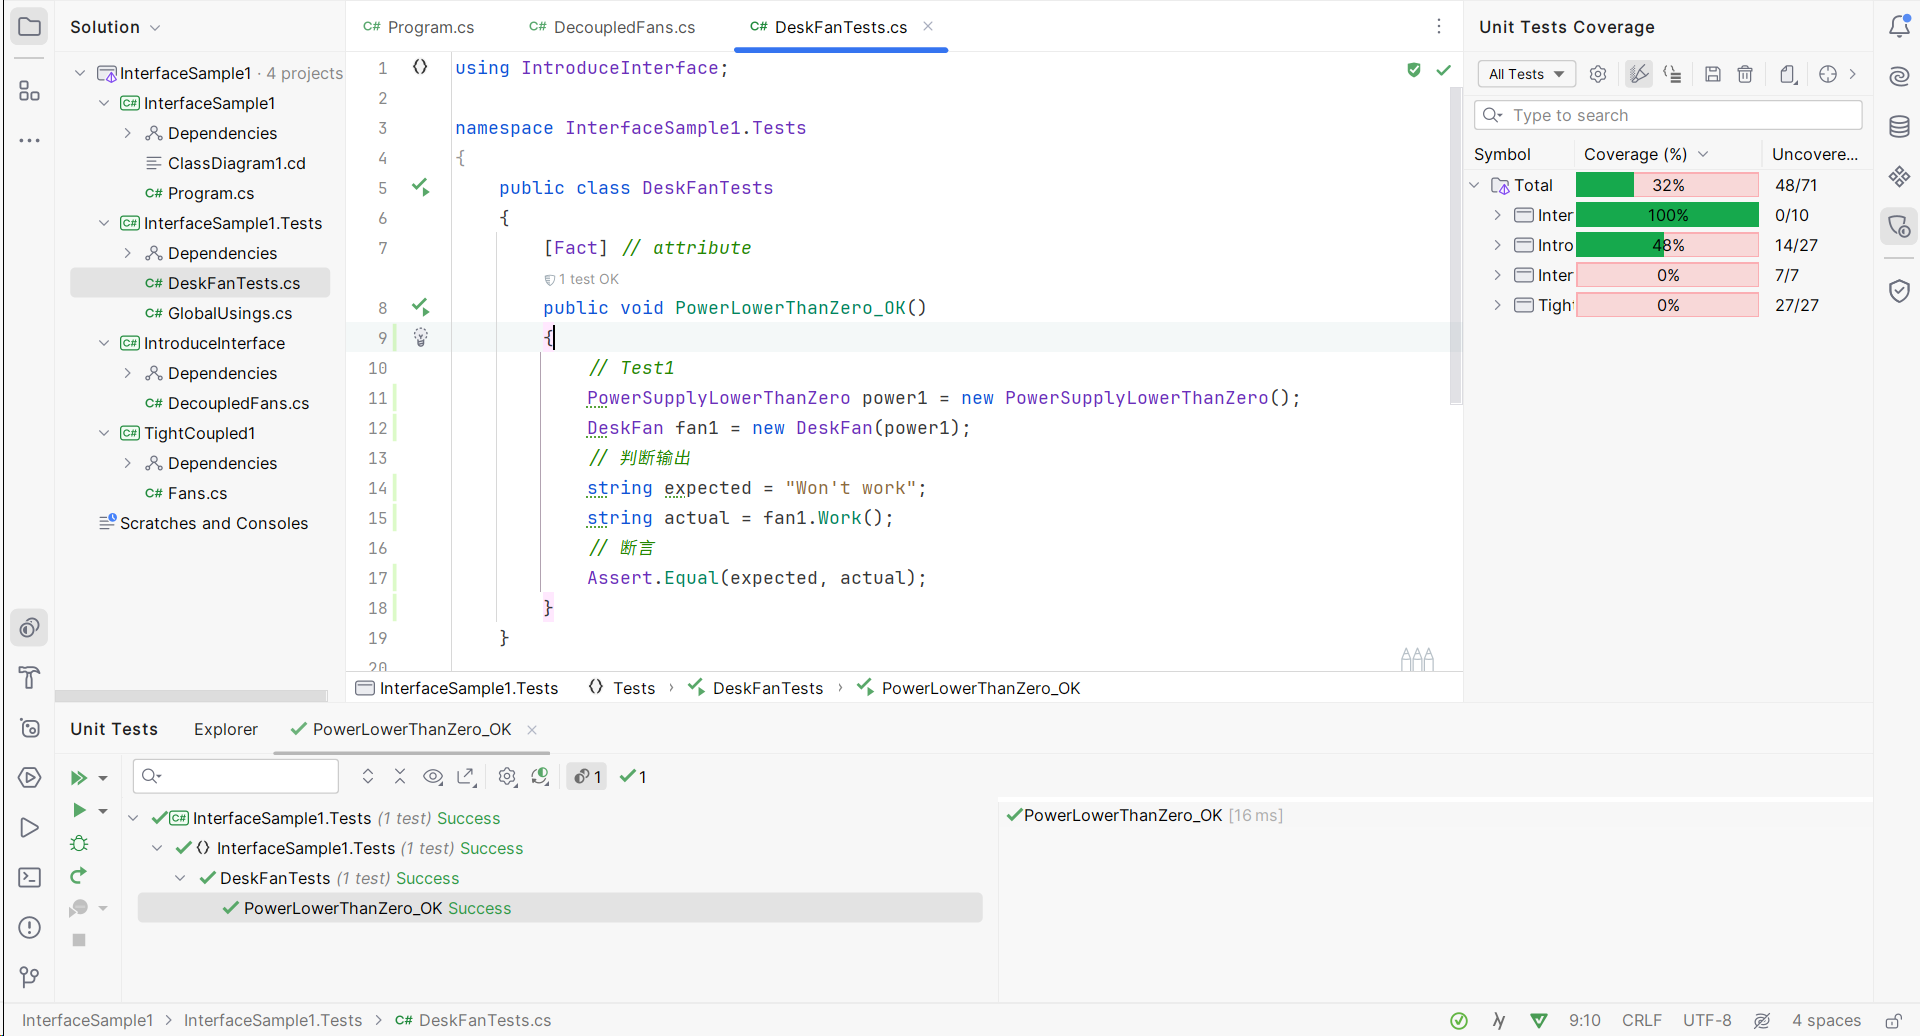
在 rider 中点击左侧的运行按钮,就能运行测试用例,可以一次只允许一个用例,也可以每次全部运行。右侧的 Unit Tests Coverage 为测试覆盖率图示。
下面是我写的一些测试用例
using IntroduceInterface; namespace InterfaceSample1.Tests { public class DeskFanTests { [Fact] // attribute public void PowerLowerThanZero_OK() { DeskFan fan = new DeskFan(new PowerSupplyLowerThanZero()); // 判断输出 string expected = "Won't work"; string actual = fan.Work(); // 断言 Assert.Equal(expected, actual); } [Fact] public void PowerEqualZero_OK() { DeskFan fan = new DeskFan(new PowerSupplyEqualZero()); string expected = "Won't work"; string actual = fan.Work(); Assert.Equal(expected, actual); } [Fact] public void PowerLowerThanLowerThreshold_OK() { DeskFan fan = new DeskFan(new PowerSupplyLessThanLowerThreshold()); string expected = "Slow"; string actual = fan.Work(); Assert.Equal(expected, actual); } [Fact] public void PowerGreaterThanModeratePowerThreshold_OK() { DeskFan fan = new DeskFan(new PowerSupplyGreaterThanModeratePowerThreshold()); string expected = "warning!"; string actual = fan.Work(); Assert.Equal(expected, actual); } } // 创建小于0的电源 class PowerSupplyLowerThanZero : IPowerSupply { public int GetPower() { return -10; } } // 创建等于0的电源 class PowerSupplyEqualZero : IPowerSupply { public int GetPower() { return 0; } } // 创建小于100的电源 class PowerSupplyLessThanLowerThreshold : IPowerSupply { public int GetPower() { return 99; } } // 创建大于200的电源 class PowerSupplyGreaterThanModeratePowerThreshold : IPowerSupply { public int GetPower() { return 300; } } } 这个测试用例的问题很明显:为了生成不同的电源实例,每次都要对 IPowerSupply 进行不同的实现。如果我们要编写的测试用例很多,这个重复性会是地狱级别的。
因此我们要对接口进行 Mock,以减少不必要的工作量
使用 Moq 进行 Mock
-
使用 nuget 安装
Moq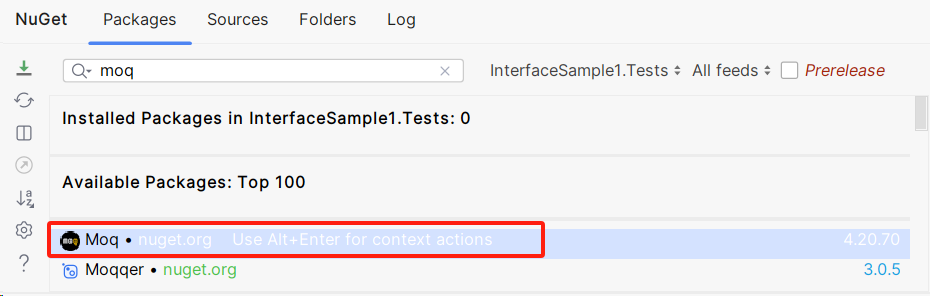
-
使用 moq 直接实现接口方法的实例,从而越过创建类的这一步:
using IntroduceInterface; using Moq; namespace InterfaceSample1.Tests { public class DeskFanTests { [Fact] // attribute public void PowerLowerThanZero_OK() { // 使用 Moq 直接模拟接口 IPowerSupply的实现,跳过手动实现接口 var mock = new Mock<IPowerSupply>(); // 传入接口 mock.Setup(ps => ps.GetPower()).Returns(() => -1); DeskFan fan = new DeskFan(mock.Object); // mock.Object 获取返回的数据 // 判断输出 string expected = "Won't work"; string actual = fan.Work(); // 断言 Assert.Equal(expected, actual); } // ... [Fact] public void PowerGreaterThanModeratePowerThreshold_OK() { var mock = new Mock<IPowerSupply>(); mock.Setup(ps => ps.GetPower()).Returns(() => 300); DeskFan fan = new DeskFan(mock.Object); string expected = "warning!"; string actual = fan.Work(); Assert.Equal(expected, actual); } } }解释如下代码:
mock.Setup(ps => ps.GetPower()).Returns(() => -1);使用
Setup方法配置IPowerSupply接口中的GetPower方法。在这里,设置GetPower方法的返回值为-1。DeskFan fan = new DeskFan(mock.Object);创建了一个
DeskFan对象,通过传入上面创建的模拟的IPowerSupply实例。这里通过mock.Object获取了模拟的实例。注意:编写测试用例和编写功能代码拥有同等的重要性,因为要保证代码功能正确
2.10.3 反射和依赖注入
接口隔离
接口隔离原则(ISP)的核心是:将本质不同的功能隔离开,然后再用接口封装起来。
接口隔离原则一
Clients should not be forced to depend upon interfaces that they don't use.
不应该强行要求客户端依赖它们不需要使用的接口。
一个类不应该被迫依赖它不使用的接口。调用者不能要不使用的方法,如果接口中有一个或者多个没有使用到,说明违反了接口隔离原则,也说明接口的设计过大,不合理。
解决方案:将过大的接口拆分成更小的多个接口。 下面给出一个示例:定义一个 Vehicle 接口,它有 Run 这个功能。而坦克也有 Run 这个功能,但是它还能开火,这个功能名为 Fire。
有一个驾驶员,他能开车也能开坦克,但是他在常规情况下不会使用坦克开火,而是把它像车一样开。按照我们先前的设计:
Vehicle.cs
namespace ISPSample; public interface IVehicle // IVehicle 接口 { void Run(); } public class Car : IVehicle { public void Run() { Console.WriteLine("Car is running......"); } } public class Truck : IVehicle { public void Run() { Console.WriteLine("Truck is running......"); } } 这里定义了 Vehicle 接口,并有两个该接口的具体实现
Tank.cs
namespace ISPSample; public interface IWeapon // IWeapon 接口 { void Fire(); } public interface ITank : IWeapon, IVehicle // 一个接口继承其他多个基接口 { } public class LightTank : ITank { public void Run() { Console.WriteLine("Ka ka ka..."); } public void Fire() { Console.WriteLine("Boom!"); } } public class MediumTank : ITank { public void Run() { Console.WriteLine("Ka!! ka!! ka!!..."); } public void Fire() { Console.WriteLine("Boom!!"); } } public class HeavyTank : ITank { public void Run() { Console.WriteLine("Ka!!!! ka!!!! ka!!!!..."); } public void Fire() { Console.WriteLine("Boom!!!!"); } } 这里我们定义了一个基接口 IWeapon ,另一个接口 ITank 继承了基接口 IWeapon 和 IVehicle。如第 8 行代码。这样做的目的是后续调用的时候降低耦合度。
第一种违反接口隔离原则的情况:如果不做接口隔离会怎么样?
如果不拆分
ITank接口(不做接口隔离),那么它是这样的:这里面有两个功能Run和Fire,而功能Fire我们永远用不上
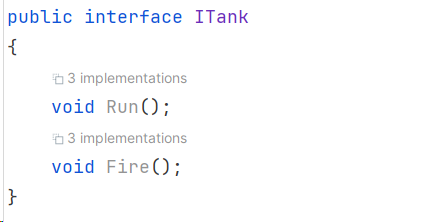
到时候
Driver类中就要有一个ITank字段和IVehicle字段,明显就增加了耦合度不说。还需要繁琐的写法才能解决两个字段中Run方法调用的问题。或者直接使用
ITank替换了IVehicle字段,但这样构造函数和Run方法中的响应位置都要重写,如果被引用的次数过多,那么将是灾难性的问题。
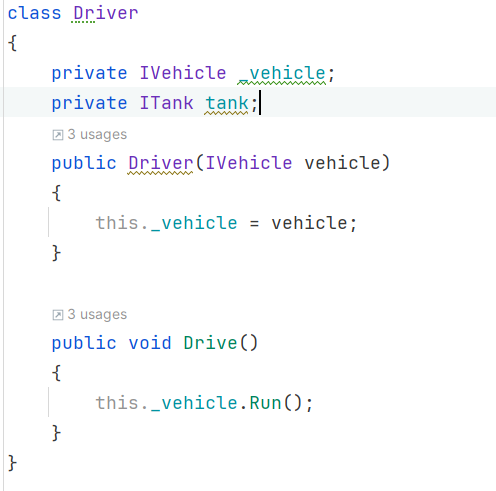
而遇到了这种两个功能相差极大的接口,我们可以拆分它,从而达到接口隔离的目的
这里还有三个类,都实现了接口 ITank。
Driver.cs
namespace ISPSample; class Driver { private IVehicle _vehicle; public Driver(IVehicle vehicle) { this._vehicle = vehicle; } public void Drive() { this._vehicle.Run(); // 进行驾驶,就是调用该载具的 Run 功能 } } Program.cs
namespace ISPSample; class Program { static void Main(string[] args) { Driver d1 = new Driver(new Car()); d1.Drive(); Driver d2 = new Driver(new Truck()); d2.Drive(); Driver d3 = new Driver(new HeavyTank()); d3.Drive(); } } 编译运行结果:
Car is running...... Truck is running...... Ka!!!! ka!!!! ka!!!!... 上述代码 Program.cs 的第 13 行:因为继承了 ITank 接口,而 ITank 继承了 IVehicle 和 IWeapon ,所以类 HeavyTank 中实现了 IVehicle。故这里传入的时候不会报错。
注意:过犹不及,请注意不要产生很细碎的单一功能的接口和类。颗粒度太小的接口和类会产生另外的问题。所以要将接口和类的大小控制在一定的范围之内。
接口隔离原则二
The dependency of one class to another one should depend on the smallest possible interface.
类之间的依赖应该建立在最小的接口上。
即:调用者绝不多调。下面我们自定义了一个只读的集合类,它实现了 IEnumerable 接口,相当于它是 IEnumerable 的一个封装。而计算和的方法 Sum 一开始接收一个 ICollection 类型的参数(ICollection 参数也继承了 IEnumerable ,不严谨的说,它和 ReadonlyCollection 是同级别,都是 IEnumerable 的子接口(类))。
因为 ICollection 实现的方法更多,所以要求比 IEnumerable 更严格(但是多余的方法在这里没有用处),它要求传入的参数要实现它的所有方法:
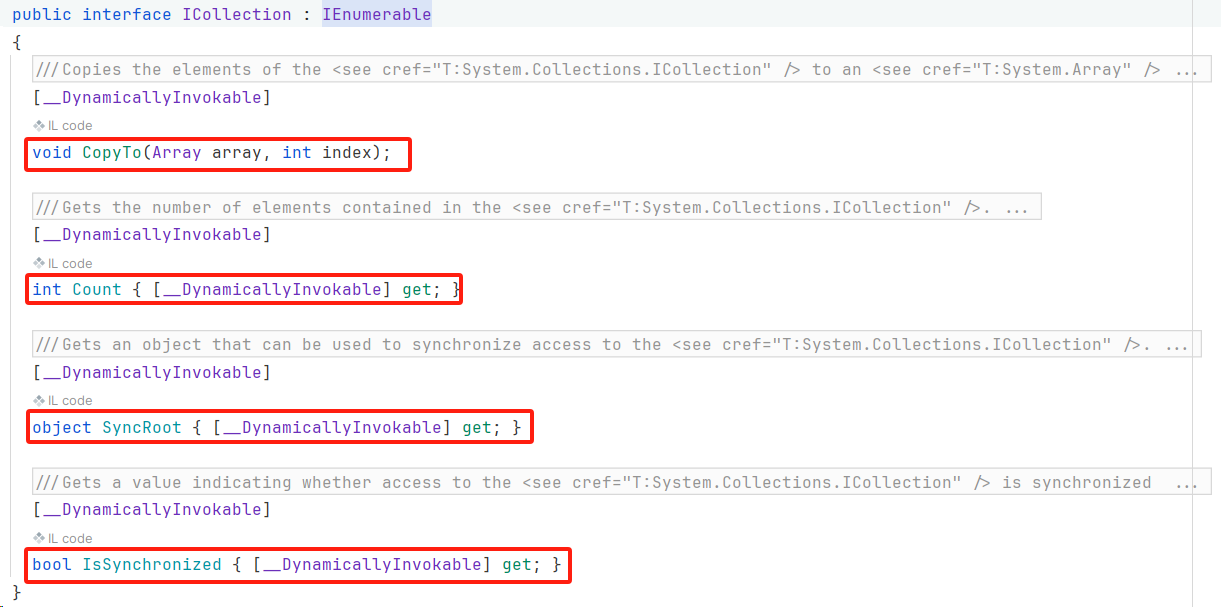
而在 Sum 方法中,我们只用得上迭代方法,其他的方法都用不上,所以不需要将类型设置为 ICollection ,因为这样会把很多使用者“挡”在外面。故将他更换为更小的接口 IEnumerable。下面是实现的具体代码:
LSPSample2.cs
using System; using System.Collections; namespace MyReadonlyEnumerator { internal class Program { public static void Main(string[] args) { int[] nums1 = { 1, 2, 3, 4, 5 }; IEnumerable nums3 = new ReadonlyCollection(nums1); // 使用接口接收子类成员 foreach (var item in nums3) { Console.WriteLine(item); } int res = Sum(nums3); Console.WriteLine(res); } // static int Sum(ICollection nums) static int Sum(IEnumerable nums) // ICollection 太大,而这里服务使用者只使用迭代,不需要其他的功能: { int sum = 0; foreach (var item in nums) { sum += (int)item; } return sum; } } // 定义并实现一个只读集合类,实现IEnumerable接口 public class ReadonlyCollection : IEnumerable { private int[] _inputArray; public ReadonlyCollection(int[] inputArray) { this._inputArray = inputArray; } public IEnumerator GetEnumerator() // 接口IEnumerable中待实现的方法 { return new Enumerator(this); } // 为了实现 IEnumerable 接口的方法,要定义一个Enumerator类,继承 IEnumerator 接口 // 其防止名称污染,所以定义在类种 class Enumerator : IEnumerator { private ReadonlyCollection _readonlyCollection; private int _head; public Enumerator(ReadonlyCollection readonlyCollection) { this._readonlyCollection = readonlyCollection; _head = -1; } public bool MoveNext() { if (++_head < _readonlyCollection._inputArray.Length) // 因为在另一个类中,所以可以访问外层类的成员 { return true; } else { return false; } } public void Reset() { _head = -1; } public object Current { get { object o = _readonlyCollection._inputArray[_head]; return o; } } } } } 对上面代码进行解释:
这段代码演示了一个只读集合(ReadonlyCollection)和一个用于计算集合元素和的方法(Sum)。以下是代码的解释:
ReadonlyCollection类:- 这是一个实现了
IEnumerable接口的只读集合类。 - 构造函数接受一个整数数组
inputArray作为参数,并将其存储在私有字段_inputArray中。 - 实现了
IEnumerable接口的GetEnumerator方法,返回一个自定义的迭代器Enumerator的实例。
- 这是一个实现了
Enumerator类:- 迭代器用于在只读集合上遍历元素。
- 构造函数接受一个
ReadonlyCollection实例作为参数,并将其存储在私有字段_readonlyCollection中。迭代器的初始位置_head设为 -1。 MoveNext方法用于移动迭代器到下一个元素,如果还有元素未遍历,则返回true,否则返回false。Reset方法将迭代器重置到初始位置。Current属性返回当前元素的值。
接口隔离原则三
展示 C# 语言的独特能力:显式接口实现,C# 语言不仅能够做到接口隔离,还能够将隔离的接口隐藏起来,直到我们显式使用一个该接口类型的变量去引用实现了该接口的实例为止。
如一个方法不能轻易被外部调用,那么就不能轻易暴露出来,这时候就需要显式的实现了,否则普通实现就很容易暴露这些重要接口。(如一个杀手走在大街上,不能被轻易的看出是杀手一样)
普通实现的代码:
using System; namespace ExplicitInterfaceImplementation { internal class Program { public static void Main(string[] args) { WarmKiller wk = new WarmKiller(); // WarmKiller 类型声明 wk.Kill(); } } public interface IGentleman { void Love(); } public interface IKiller { void Kill(); } // 普通实现 public class WarmKiller : IGentleman, IKiller { public void Love() { Console.WriteLine("That's not the shape of my HEART."); } public void Kill() { Console.WriteLine("Kill la kill..."); } } } 编译运行结果:
Kill la kill 效果:轻易暴露接口

而显式实现就能够做到重要接口隐藏,正如杀手平时不会让别人看出自己是杀手,而当接到任务的时候才能被看出来,而对被猎杀的对象是不需要抱有仁慈之心的。?
using System; namespace ExplicitInterfaceImplementation { internal class Program { public static void Main(string[] args) { WarmKiller wk = new WarmKiller(); // wk.Kill(); // Error wk.Love(); // 1. 使用显式接口实现类的的实例,声明变量类型时候要显式声明,不能使用 var // var 使用的是构建实例的类的类型 IKiller killer = new WarmKiller(); killer.Kill(); // killer.Love(); // Error // 2. 强制类型转换 // IGentleman gt = killer as WarmKiller; // 使用 as 强制转换 IGentleman gt = (WarmKiller)killer; // 直接强制转换 gt.Love(); IGentleman gentleman = new WarmKiller(); gentleman.Love(); // gentleman.Kill(); // Error IKiller killer1 = (IKiller)gentleman; killer1.Kill(); } } public interface IGentleman { void Love(); } public interface IKiller { void Kill(); } // 普通实现 public class WarmKiller : IGentleman, IKiller { public void Love() { Console.WriteLine("That's not the shape of my HEART."); } void IKiller.Kill() // 显式接口实现不能使用 任何 修饰符 { Console.WriteLine("Kill la kill..."); } } } 编译运行结果:
That's not the shape of my HEART. Kill la kill... That's not the shape of my HEART. That's not the shape of my HEART. Kill la kill... 反射
值得一提的是,反射不是 C# 语言所具有的功能,而是 .Net 框架所具有的功能,像是 vb.Net,F# 都能使用反射功能。使用反射,可以在不使用 new 操作符,在不知道对象类型的情况下,创建出同类型的对象,还能访问该对象具有的各个成员。它具有更松的耦合,因为不用 new 操作符,不会紧绑定类型,就没有强耦合。大部分情况下,反射都是被包装好的,可以让使用者无痛使用。
托管类型的语言和需要手动管理内存的语言(如 C/C++)最大的不同点,反射就占其一。反射能做到以不变应万变。
下面是我们之前的代码示例:不过在主函数中使用反射来使用它:
Tank.cs
namespace ISPSample; public interface IVehicle // IVehicle 接口 { void Run(); } public class Car : IVehicle { public void Run() { Console.WriteLine("Car is running......"); } } public class Truck : IVehicle { public void Run() { Console.WriteLine("Truck is running......"); } } public interface IWeapon // IWeapon 接口 { void Fire(); } public interface ITank : IWeapon, IVehicle // 一个接口继承其他多个基接口 { } public class LightTank : ITank { public void Run() { Console.WriteLine("Ka ka ka..."); } public void Fire() { Console.WriteLine("Boom!"); } } public class MediumTank : ITank { public void Run() { Console.WriteLine("Ka!! ka!! ka!!..."); } public void Fire() { Console.WriteLine("Boom!!"); } } public class HeavyTank : ITank { public void Run() { Console.WriteLine("Ka!!!! ka!!!! ka!!!!..."); } public void Fire() { Console.WriteLine("Boom!!!!"); } } class Driver { private IVehicle _vehicle; public Driver(IVehicle vehicle) { this._vehicle = vehicle; } public void Drive() { this._vehicle.Run(); // 进行驾驶,就是调用该载具的 Run 功能 } } .Net Core 中的名称空间和 .Net Framework 中不同,如下的为 .Net Core 下的代码:
using System.Reflection; using System.Reflection.Emit; using ISPSample; namespace ReflectionSample; internal class Program { static void Main() { ITank tank = new HeavyTank(); // HeavyTank 和 ITank 都是静态类型的 // =====动态类型的分割线===== // 获取类型 var t = tank.GetType(); // 创建类型对应对象 object o = Activator.CreateInstance(t); // 不知道静态类是什么,但一定是 object 的子类对象 // 获取类型对应方法 MethodInfo fireMethod = t.GetMethod("Fire"); MethodInfo runMethod = t.GetMethod("Run"); // 在创建的对象(o)上运行这些方法 fireMethod.Invoke(o, null); // 第二个参数为当前方法需要的参数 runMethod.Invoke(o, null); } } 编译运行结果:
Boom!!!! Ka!!!! ka!!!! ka!!!!... 可以看到:在使用反射的时候,我们完全是从内存中读取类型相关信息,而没有使用到静态类型,这大大降低了程序的耦合性。
依赖注入
依赖注入:英语为 Dependency Injection(DI,与依赖反转(Dependency Inversion)是不同的,虽然简写都一样…… 但是依赖注入依赖于依赖反转)。
要在C#中使用依赖注入,我们先要使用 nuget 安装依赖注入框架:Microsoft.Extensions.DependencyInjection,如下的代码都是在 .Net Core 框架下使用的

依赖注入的最基本用法:
using ISPSample; using System; using System.Reflection; using Microsoft.Extensions.DependencyInjection; // 使用安装的依赖注入框架 namespace DependencyInjectionSample; class Program { static void Main(string[] args) { // 一次性的注册 // 创建容器 var sc = new ServiceCollection(); sc.AddScoped(typeof(ITank), typeof(HeavyTank)); // 修改此处的类型即可修改提供服务的类 var sp = sc.BuildServiceProvider(); //=====分割线===== ITank tank = sp.GetService<ITank>(); tank.Run(); tank.Fire(); } } 使用依赖注入的好处是,我们在非常多的地点都使用了 ITank 的子类,有一天程序升级,不使用 HeavyTank ,而是使用 LightTank,使用依赖注入的优势就体现了,我只需要修改注册处代码为 sc.AddScoped(typeof(ITank), typeof(LightTank)); 而不需要修改成千上上万处的 new 表达式。
依赖注入的第二个示例:自动装配,即按需使用已经注册了的类或者接口,示例代码:
using ISPSample; using System; using System.Reflection; using Microsoft.Extensions.DependencyInjection; using Microsoft.Extensions.DependencyInjection.Extensions; // 使用安装的依赖注入框架 namespace DependencyInjectionSample; class Program { static void Main(string[] args) { // 一次性的注册 var sc = new ServiceCollection(); sc.AddScoped(typeof(ITank), typeof(MediumTank)); sc.AddScoped(typeof(IVehicle), typeof(LightTank)); sc.AddScoped<Driver>(); var sp = sc.BuildServiceProvider(); var sp1 = sc.BuildServiceProvider(); // =====分割线===== Driver driver = sp.GetService<Driver>(); driver.Drive(); ITank mediumTank = sp1.GetService<ITank>(); mediumTank.Fire(); } } 编译运行结果:
Ka ka ka... Boom!! 反射与接口/特征的结合
主体程序与插件的关系:不变与万变的关系。
为什么有了反射之后还需要 API 呢?
因为有了反射之后,写程序就变得非常自由了,而太过自由就可能变得没有约束。为了避免第三方开发商开发插件时候犯没有必要的小错误,约束开发者的开发,同时减轻开发者的劳动负担。
假如我们做开发的时候,有一个主体程序,然后别的厂商可以根据我们给的 SDK 中的 API 开发插件,而插件可以插入主题程序进行工作。
举一个具体场景:如我们开发一个婴儿车,这个婴儿车上面有一些动物的叫声,而别的厂商拿到我们的SDK,就可以开发新动物的叫声给这个婴儿车使用。这个程序该怎么设计?下面给出两种解决方案。
纯反射的解决方案
主体程序:BabyStroller.App
Program.cs
using System.IO; using System.Runtime.Loader; namespace BabyStroller; class Program { static void Main(string[] args) { var folder = Path.Combine(Environment.CurrentDirectory, "Animals"); var files = Directory.GetFiles(folder); // 获取 folder 中的文件 List<Type> animalTypes = new List<Type>(); foreach (var file in files) { var assembly = AssemblyLoadContext.Default.LoadFromAssemblyPath(file); Type[] types = assembly.GetTypes(); foreach (var t in types) { if (t.GetMethod("Voice") != null) { animalTypes.Add(t); // 添加所有的动物类 } } } while (true) { for (int i = 0; i < animalTypes.Count; ++i) { Console.WriteLine($"{i + 1}. {animalTypes[i].Name}"); } Console.WriteLine("============================"); Console.WriteLine("Please choose animal: "); string? inputString = (Console.ReadLine()).Trim(); int index; bool ok = int.TryParse(inputString, out index); if (ok) { if (index < 1 || index > animalTypes.Count) { Console.WriteLine("No such animal, please input again"); continue; } } Console.WriteLine($"How many times?"); int times = int.Parse(Console.ReadLine()); var t = animalTypes[index - 1]; var m = t.GetMethod("Voice"); // 获取方法 var o = Activator.CreateInstance(t); m.Invoke(o, new object[]{times}); } } } 新解决方案类型:Library,名称:Animals.Lib
插件:Animals.Lib
namespace Animals.Lib2; public class Cow { public void Voice(int times) { Console.WriteLine("Moo moo moo!"); } } public class Sheep { public void Voice(int times) { Console.WriteLine("Mee mee mee!"); } } 插件:Animals.Lib2
namespace Animals.Lib2; public class Cat { public void Voice(int times) { for (int i = 0; i < times; i++) { Console.WriteLine("Meow meow meow!"); } } } public class Dog { public void Voice(int times) { Console.WriteLine("Woof woof woof!"); } } 在编译库之后,将生成的库文件放在可执行文件 BabyStroller.exe 的目录下,新建一个目录 Animals 用于存放库文件,将生成的库文件放在里面。
然后编译执行可执行程序:
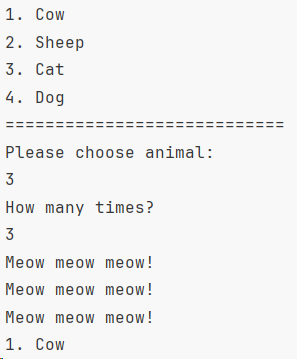
全为反射的方案存在的问题:
- 第三方开发商开发插件时候容易犯小错误(如将
Voice写成了voice),但很影响使用 - 无SDK协助,开发较为不便
一般第一方会准备 SDK,帮助第三方更快开发工具。
第一方 SDK 开发
在原来的 BabyStroller 的可执行文件的 Solution 下新建一个项目,取名:BabyStroller.SDK
-
创建一个接口
IAnimalIAnimal.csnamespace BabyStroller.SDK; public interface IAnimal { void Voice(int times); } -
创建一个
UnfinishedAttribute,因为要作为特征(Attribute)使用,这里什么都不用实现UnfinishedAttribute.csnamespace BabyStroller; public class UnfinishedAttribute : Attribute { } -
构建该库:
BabyStroller.SDK,并将生成的库文件.dll分发给第三方开发者,且配备响应的说明手册用以注明接口和类。 -
主体程序开发商引用编写的类库,第三方开发者也引用该类库进行开发
将第三方代码进行修改,将没有做完的添加上
Unfinished的 Attribute:Animals.Libusing BabyStroller; using BabyStroller.SDK; namespace Animals.Lib2; [Unfinished] public class Cow : IAnimal { public void Voice(int times) { for (int i = 0; i < times; i++) { Console.WriteLine("Moo moo moo!"); } } } public class Sheep { public void Voice(int times) { for (int i = 0; i < times; i++) { Console.WriteLine("Mee mee mee!"); } } }Animals.Lib2using BabyStroller; using BabyStroller.SDK; namespace Animals.Lib2; [Unfinished] public class Cat { public void Voice(int times) { for (int i = 0; i < times; i++) { Console.WriteLine("Meow meow meow!"); } } } public class Dog { public void Voice(int times) { for (int i = 0; i < times; i++) { Console.WriteLine("Woof woof woof!"); } } }重新编译该库,将生成的 .dll 文件复制到可执行文件所在目录的
Animal子目录下。 -
主体程序更新
判断实例类型是否为
IAnimal子类生成的类型,以及是否被UnfinishedAttribute所修饰:using System.IO; using System.Runtime.Loader; using System.Linq; using BabyStroller.SDK; namespace BabyStroller { class Program { // 主程序入口 static void Main(string[] args) { // 获取存放动物类的程序集所在的文件夹路径 var folder = Path.Combine(Environment.CurrentDirectory, "Animals"); // 获取文件夹中的所有文件路径 var files = Directory.GetFiles(folder); // 用于存储实现了 IAnimal 接口的类型 List<Type> animalTypes = new List<Type>(); // 遍历每个文件 foreach (var file in files) { // 通过 AssemblyLoadContext 加载程序集 var assembly = AssemblyLoadContext.Default.LoadFromAssemblyPath(file); // 获取程序集中的所有类型 Type[] types = assembly.GetTypes(); // 遍历每个类型 foreach (var t in types) { // 判断类型是否实现了 IAnimal 接口 if (t.GetInterfaces().Contains(typeof(IAnimal))) { // 判断类型是否被 UnfinishedAttribute 修饰 var isUnfinished = t.GetCustomAttributes(false) .Any(a => a.GetType() == typeof(UnfinishedAttribute)); // 如果被修饰,则跳过该类型 if (isUnfinished) { continue; } // 将符合条件的类型添加到 animalTypes 列表中 animalTypes.Add(t); } } } // 进入一个无限循环,允许用户选择动物并模拟叫声 while (true) { // 显示可选的动物类型列表 for (int i = 0; i < animalTypes.Count; ++i) { Console.WriteLine($"{i + 1}. {animalTypes[i].Name}"); } Console.WriteLine("============================"); Console.WriteLine("Please choose animal: "); string? inputString = (Console.ReadLine()).Trim(); int index; bool ok = int.TryParse(inputString, out index); // 判断用户输入是否有效 if (ok) { if (index < 1 || index > animalTypes.Count) { Console.WriteLine("No such animal, please input again"); continue; } } // 获取用户输入的叫声次数 Console.WriteLine($"How many times?"); int times = int.Parse(Console.ReadLine()); // 根据用户选择的索引创建具体的动物对象 var t = animalTypes[index - 1]; var o = Activator.CreateInstance(t); // 将动物对象转换为 IAnimal 接口引用,并调用 Voice 方法 IAnimal a = o as IAnimal; a.Voice(times); } } } }这样,第一方程序就通过 SDK 和第三方插件组合在了一起。
总体来说,这段代码是一个简单的动态加载程序集并使用反射的控制台应用程序,允许用户选择不同的动物并模拟它们的叫声。
2.11 泛型
泛型即 generic,泛型是无处不在的。
2.11.1 泛型的作用
泛型拥有良好的正交性,在其他的编程实体中都有广泛的应用。其中最主要的作用是抑制类型膨胀和成员膨胀。
泛型类
下面是一个泛型可以解决的实际问题:假设一个商店售卖一种商品,如苹果,出售的时候使用盒子装着。而后每新增一个新品类的时候,都需要使用响应的盒子装着。下面是我们能想到的最简单的写法:
namespace GenericSample1; class Program { static void Main(string[] args) { Apple apple = new Apple() { Color = "Red" }; AppleBox appleBox = new AppleBox() { Cargo = apple }; Console.WriteLine(appleBox.Cargo.Color); // 查看盒子中苹果的颜色 Book book = new Book(){Name = "My Name Is Red"}; BookBox bookBox = new BookBox() { Cargo = book }; Console.WriteLine(bookBox.Cargo.Name); // 查看书的名字 } } public class Apple { public string Color { get; set; } } public class Book { public string Name { get; set; } } public class AppleBox { public Apple Cargo { get; set; } } public class BookBox { public Book Cargo { get; set; } } 上面的代码看起来没什么问题,但实际上已经出问题了:类型膨胀。当每新增一个品类的时候,我们都要新增它的包装盒类型,重写里面的字段。这很明显代码设计出了问题。
有人说可以只设定一个 Box类型,然后在里面添加各种。但这样又会造成成员膨胀。每次使用的时候都只用其中的个别属性,剩下的全是用不着的。而且每次都需要添加新的属性或者移除属性。这也是不好的。
使用泛型解决上述问题是极好的:
namespace GenericSample1; class Program { static void Main(string[] args) { Apple apple = new Apple() { Color = "Red" }; Book book = new Book() { Name = "My Name Is Red" }; // 特化 Box<Apple> box1 = new Box<Apple>() { Cargo = apple }; Box<Book> box2 = new Box<Book>() { Cargo = book }; // 可以访问各自的属性 Console.WriteLine(box1.Cargo.Color); Console.WriteLine(box2.Cargo.Name); } } public class Apple { public string Color { get; set; } } public class Book { public string Name { get; set; } } public class Box<TCargo> { public TCargo Cargo { get; set; } } 泛型接口
泛型接口及其常用,下面我们手写一个泛型接口:
namespace GenericInterface; class Program { static void Main(string[] args) { // 学生的ID 是个整数 Student<int> stu = new Student<int>(); stu.ID = 101; stu.Name = "Yuzu"; // 学生的ID 是长整型 Student<ulong> stu1 = new Student<ulong>(); stu1.ID = 10000000000001; stu1.Name = "Yuki"; } } // 声明一个泛型接口 public interface IUnique<TId> { TId ID { get; set; } } // 泛型类实现泛型接口,该类本身也是泛型的 // 也可以直接特化 // class Student:IUnique<ulong> class Student<TId> : IUnique<TId> { // public ulong ID { get; set; } public TId ID { get; set; } public string Name { get; set; } } 我们在实现泛型接口的时候,可以不特化,也可以直接传入类型参数,然后进行特化。如上面代码中,在实现 IUnique 的时候,特化了方法返回值类型为 ulong。
.Net 中常见的数据结构几乎都是泛型的。它们在 System.Collections.Generic 中。
很多泛型类型带有不止一个类型参数,如 Dictionary:
using System.Collections.Generic; IDictionary<int, string> dic = new Dictionary<int, string>(); dic[1] = "Yuzu"; dic[2] = "Yuki"; Console.WriteLine($"Student #1 is {dic[1]}"); 泛型方法
下面是一个将两个数组合为一个的方法:
namespace GenericMethod; class Program { static void Main(string[] args) { int[] arr1 = new[] { 1, 2, 3, 4 }; int[] arr2 = new[] { 5, 6, 7, 8 }; int[] arr3 = Zip(arr1, arr2); // 无需显式特化Zip,编译器可以推断 // Array.Sort(arr3); foreach (int item in arr3) { Console.WriteLine(item); } } static T[] Zip<T>(T[] first, T[] second) { int length = first.Length + second.Length; T[] newArray = new T[length]; int ai = 0; int bi = 0; int ci = 0; do { if (ai < first.Length) { newArray[ci] = first[ai]; ci++; ai++; } if (bi < second.Length) { newArray[ci] = second[bi]; ci++; bi++; } } while (ai < first.Length || bi < second.Length); return newArray; } } 编译运行结果:
1 5 2 6 3 7 4 8 泛型委托
之前我么最常使用的委托 Action 和 Func 都是具有泛型能力的,具体的示例如下:
namespace GenericDelegate; class Program { static void Main(string[] args) { // 泛型委托 Action:无返回值 Action<int> ac1 = Mul; ac1.Invoke(42); Action<string> ac2 = Say; ac2.Invoke("Yuzu"); // 泛型委托 Func:有返回值,<T, U, ...> 最右侧的就为返回值类型 Func<double, double, double> func1 = Add; double res1 = func1(3.14, 6.18); Console.WriteLine(res1); Func<int, int, int> func2 = Add; int res2 = func2(42, 30); Console.WriteLine(res2); } static void Mul(int x) { int res = x * 100; Console.WriteLine(res); } static void Say(string str) { Console.WriteLine($"Hello, {str}"); } static double Add(double a, double b) { return a + b; } static int Add(int a, int b) { return a + b; } } 要注意:Action 不能绑定有返回值的方法,而 Func 可以,Func<T, U, V, ...> 中最右侧的类型即为返回值的类型,如 Func<double, double, double> 表示该方法的返回值输入参数类型为 (double, double) ,返回值类型也为 double。
泛型委托和 Lambda 表达式
如下:
namespace LambdaExpressionSample; class Program { static void Main(string[] args) { // Lambda 表达式和泛型的结合 Func<double, double, double> func1 = (a, b) => { return a + b; }; Console.WriteLine(func1(1, 2.2)); } } (a, b) 中不需要声明类型,是因为 Lambda 表达式可以进行自动类型推导。
2.12 枚举和结构体
这一部分比较简单
2.12.1 枚举类型
枚举类型为人为限定了取值范围的整数。更多相关信息请访问微软文档
namespace EnumSample; class Program { static void Main(string[] args) { Person p1 = new Person() { Name = "Yuzu", Id = 100001, Level = Level.Employee }; Person p2 = new Person() { Name = "Aoko", Id = 1000002, Level = Level.Boss }; Console.WriteLine(p2.Level > p1.Level); // True } } public class Personnamespace EnumSample; class Program { static void Main(string[] args) { Person p1 = new Person() { Name = "Yuzu", Id = 100001, Level = Level.Employee }; Person p2 = new Person() { Name = "Aoko", Id = 1000002, Level = Level.Boss }; Console.WriteLine(p2.Level > p1.Level); // True Console.WriteLine((uint)Level.Employee); Console.WriteLine((uint)Level.Manager); Console.WriteLine((uint)Level.Boss); Console.WriteLine((uint)Level.BigBoss); } } public class Person { public string Name { get; set; } public int Id { get; set; } public Level Level { get; set; } } public enum Level : uint { Employee, Manager, Boss, BigBoss, } { public string Name { get; set; } public int Id { get; set; } public Level Level { get; set; } } public enum Level : uint { Employee, Manager, Boss, BigBoss, } 编译运行结果:
True 0 1 2 3 也可以自定义枚举值,语法如下:
public enum Level { Employee = 0b0001, Manager = 0b0010, Boss = 0b0100, BigBoss = 0b1000, } 枚举类型的 bitwise 用法
枚举类型可以定义 bitwise 形式的结构体,有一些特殊的用法,示例如下:
using System; namespace EnumSample; class Program { static void Main(string[] args) { Person p1 = new Person() { Name = "Yuzu", Id = 100001, Level = Level.Employee }; p1.Skill = Skill.Sing | Skill.Dance | Skill.Rap; Console.WriteLine(p1.Skill); Console.WriteLine((p1.Skill & Skill.Dance) > 0); // 判断会不会跳舞 Console.WriteLine((p1.Skill & Skill.Rap) > 0); // 判断会不会说唱 Console.WriteLine((p1.Skill & Skill.Play) > 0); // 判断会不会玩 False } } public class Person { public string Name { get; set; } public int Id { get; set; } public Level Level { get; set; } public Skill Skill { get; set; } } public enum Level : uint { Employee, Manager, Boss, BigBoss, } [Flags] public enum Skill { Sing = 0b0001, Dance = 0b0010, Rap = 0b0100, Play = 0x1000, } 编译运行结果:
Sing, Dance, Rap True True False bitwise 的数值可以通过二进制运算进行合并。这里这个可以表示 p1 具有多种技能。
读取文件的权限定义也是使用这种方式实现的
2.12.2 结构体
结构体为值类型,它也可以有属性和成员以及方法等,但是不能有显式的无参构造器。
namespace StructSample; class Program { static void Main(string[] args) { Student student = new Student() { Name = "Yuzu", Id = 100001 }; Student student1 = new Student("Aoko", 100002); Console.WriteLine($"Name: {student1.Name}, ID: {student1.Id}"); // 装箱:从栈上拷贝到堆上 object o = student; // 拆箱:从堆上拷贝到栈上 Student student2 = (Student)o; Console.WriteLine($"Name: {student2.Name}, ID: {student2.Id}"); } } struct Student { public Student(string _name, int _id) // 显式有参构造器 { Name = _name; Id = _id; } public string Name { get; set; } public int Id { get; set; } public void Speak() { Console.WriteLine($"Name: {this.Name}, ID: {this.Id}"); } } 编译运行结果:
Name: Aoko, ID: 100002 Name: Yuzu, ID: 100001 结构体也能实现接口
struct Student : ISpeak // 实现接口 { public Student(string _name, int _id) { Name = _name; Id = _id; } public string Name { get; set; } public int Id { get; set; } public void SpeakOut() // 实现接口中的方法 { Console.WriteLine($"Name: {this.Name}, ID: {this.Id}"); } } public interface ISpeak { void SpeakOut(); } 注意:结构体不能从其他类、其他结构体派生而来,这是类和结构体的另一个区别。
2.13 委托、Lambda和LINQ
委托的示例:
namespace DelegateSample3; class Program { static void Main(string[] args) { MyDele myDele = new MyDele(SaySomething); myDele += SaySomething; // 多播委托 Student student = new Student(); myDele += student.SayHello; myDele.Invoke(); // 带参数的委托 MyDeleWithParams del = Mul; var res = del(3, 4); Console.WriteLine(res); } static void SaySomething() { Console.WriteLine("I'm called!"); } static int Mul(int first, int second) { return first * second; } } public delegate void MyDele(); public delegate int MyDeleWithParams(int x, int y); class Student { public void SayHello() { Console.WriteLine("Hello this world!"); } } 编译运行结果:
I'm called! I'm called! Hello this world! 12 这里重要的不是参数的名字,而是参数列表的类型,要和委托声明的类型一致。
2.13.1 泛型委托声明
我们最常使用的委托 Action 和 Func 就是支持泛型的。支持泛型的好处不言而喻,可以减少方法或者类的膨胀。所以当泛型和委托相结合,就有了泛型委托这一新的概念。
namespace GenericDelegate1; class Program { // 泛型委托 static void Main(string[] args) { MyDel<int> myDel = Add; var result = myDel(3, 4); // myDel += Mul; // 多播委托,带参数和返回值,绑定的第一个方法的返回值无法获取 MyDel<double> myDelDouble = Mul; var res = myDelDouble.Invoke(3.14, 6.18); Console.WriteLine(result); Console.WriteLine(res); } static int Add(int first, int second) { return first + second; } static double Mul(double first, double second) { return first * second; } static int Mul(int first, int second) { return first * second; } } public delegate T MyDel<T>(T first, T second); // 泛型委托声明 编译运行结果:
7 19.4052 上面的委托确实有用,但我们平时几乎不使用自己定义的委托,而是使用 Func 和 Action 。
2.13.2 Lambda 表达式
什么是 Lambda 表达式:
- 匿名方法(函数)
- inline 方法:调用时候才声明的方法(函数)
- 可以推导类型
如下面是具名方法和 Lambda 表达式的一个使用对比:
using System; namespace LambdaExpressionSample1; class Program { static void Main(string[] args) { var res = Add(100, 200); Console.WriteLine(res); // Lambda 表达式:inline 方法,lambda 表达式参数列表中的类型可以省略,可使用委托中参数进行类型推导 // 单行代码,不用添加大括号 Func<double, double, double> sum = (first, second) => first + second; // 多行代码需要添加大括号 Func<double, double> area = (radius) => { var res = Math.PI * Math.Pow(radius, 2); // res 遮蔽了外层同名变量 return res; }; Console.WriteLine(area(6)); Console.WriteLine(sum(3, 4)); } // 具名方法:非inline方法 static int Add(int fisrt, int second) { return fisrt + second; } } 调用结果:
300 113.09733552923255 7 2.13.3 高阶函数和委托
高阶函数有如下特征:
- 使用一个或者多个函数作为参数
- 使用函数作为返回结果
C# 中,Lambda 表达式可以作为高阶函数使用,它也能作为回调函数。
namespace HigherOrderFuncSample; class Program { static void Main(string[] args) { // 高阶函数作为参数 var result = DoSomeCalc((x, y) => x + y, 42, 34); // 类型推导 Console.WriteLine(result); // 柯里化:(x, y) -> (x)(y) // 使用柯里化:高阶函数作为返回值 int result1 = CurryMul(3)(4); Console.WriteLine(result1); // 结果为 12 } static int Mul(int x, int y) { return x * y; } private static T DoSomeCalc<T>(Func<T, T, T> func, T first, T second) { var res = func(first, second); return res; } // 柯里化辅助函数 static Func<int, Func<int, int>> CurryMul = a => b => Mul(a, b); } 编译运行结果:
76 12 第 29 行的柯里化函数也可以这么写:
static Func<int, Func<int, int>> CurryMul(int a) { int CurriedMul(int b) { return Mul(a, b); } return new Func<int, int>(CurriedMul); } 2.13.4 回调方法
回调函数是在某个操作完成时通过参数传递给另一个函数的函数。在 C# 中,可以使用委托来实现回调函数。以下是一个简单的 C# 回调函数示例:
using System; class Program { // 定义一个委托用于回调 delegate void CallbackDelegate(int result); // 执行一些操作的函数,并在操作完成后调用回调函数 static void PerformOperation(int a, int b, CallbackDelegate callback) { // 模拟一些耗时的操作 System.Threading.Thread.Sleep(1000); // 完成操作并调用回调函数 int result = a + b; callback(result); } // 回调函数 static void CallbackFunction(int result) { Console.WriteLine($"Callback function called with result: {result}"); } static void Main() { // 调用 PerformOperation,并传递回调函数 PerformOperation(5, 3, CallbackFunction); // 主程序继续执行其他操作 Console.WriteLine("Main program continues..."); // 防止控制台窗口关闭 Console.ReadLine(); } } 可以看出,代码第 16 行 callback 的功能根据我们传入的回调方法功能不同而不同,相当于引入了一个外部方法。不过要注意,回调方法不要嵌套过多层数,否则可能导致回调次数过多,代码难以维护。
2.13.5 LINQ
LINQ:即 Language-Integrated Query,翻译为 语言集成查询 (LINQ) ,是一系列直接将查询功能集成到 C# 语言的技术统称。
LINQ 最明显的“语言集成”部分就是查询表达式。 查询表达式采用声明性查询语法编写而成。 使用查询语法,可以用最少的代码对数据源执行筛选、排序和分组操作。 可使用相同的基本查询表达式模式来查询和转换 SQL 数据库、ADO.NET 数据集、XML 文档和流以及 .NET 集合中的数据。
LINQ 的缺点也很明显:速度较慢。
简单的 LINQ 示例:类 SQL 写法:
using System.Linq; namespace LinqSample; class Program { static void Main(string[] args) { int[] arr = new[] { 1, 3, 2, 5, 4, 6, 9 }; IEnumerable<int> items = from item in arr where item >= 5 select item; foreach (var ele in items) { Console.Write($"{ele} "); } } } C# 链式调用写法: