- A+
背景介绍
我们存在着大量在PC页面通过表格看数据业务场景,表格又分为两种,一种是 antd / fusion 这种基于 dom 元素的表格,另一种是通过 canvas 绘制的类似 excel 的表格。
基于 dom 的表格功能丰富较为美观,能实现多表头、合并单元格和各种自定义渲染(如表格中渲染图形 / 按钮 / 进度条 / 单选框 / 输入框),以展示为主,不提供圈选、整列复制等功能。
canvas 绘制的类 excel 外表朴素更为实用,大量数据渲染不卡顿,操作类似 excel,能行/列选中,圈选、复制等功能。
两者使用场景有所差异,各有利弊,但业务方不希望一套系统中出现两种类型的交互,期望能将两种表格的优缺点进行融合,在美观的dom表格中增加圈选、复制的功能。
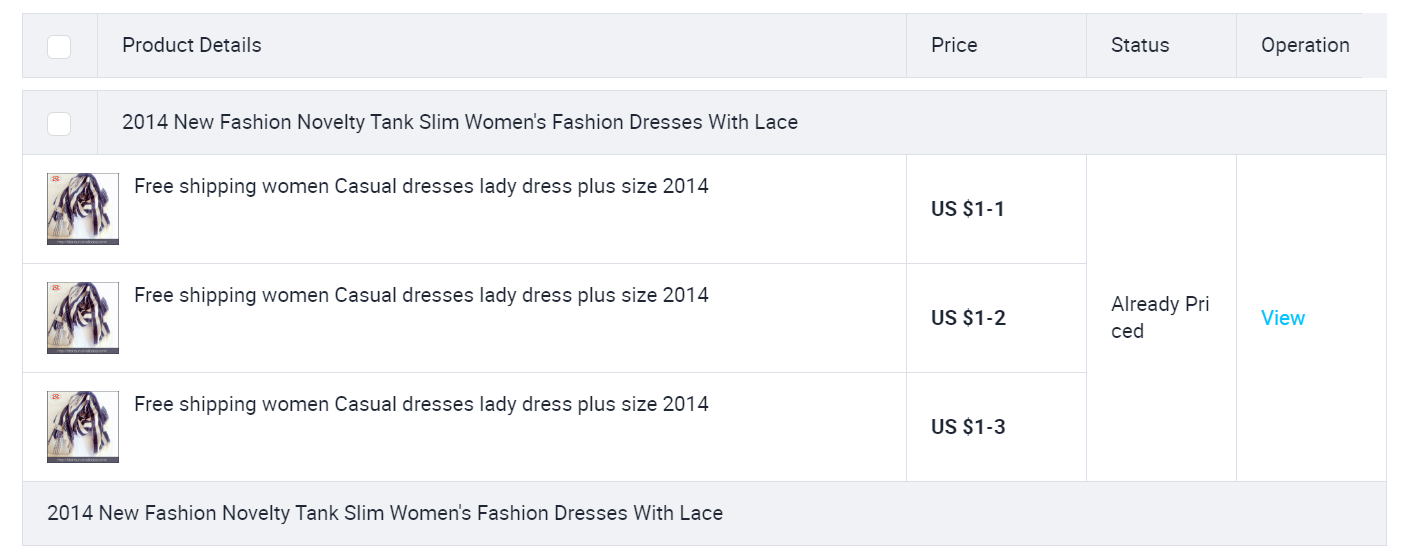
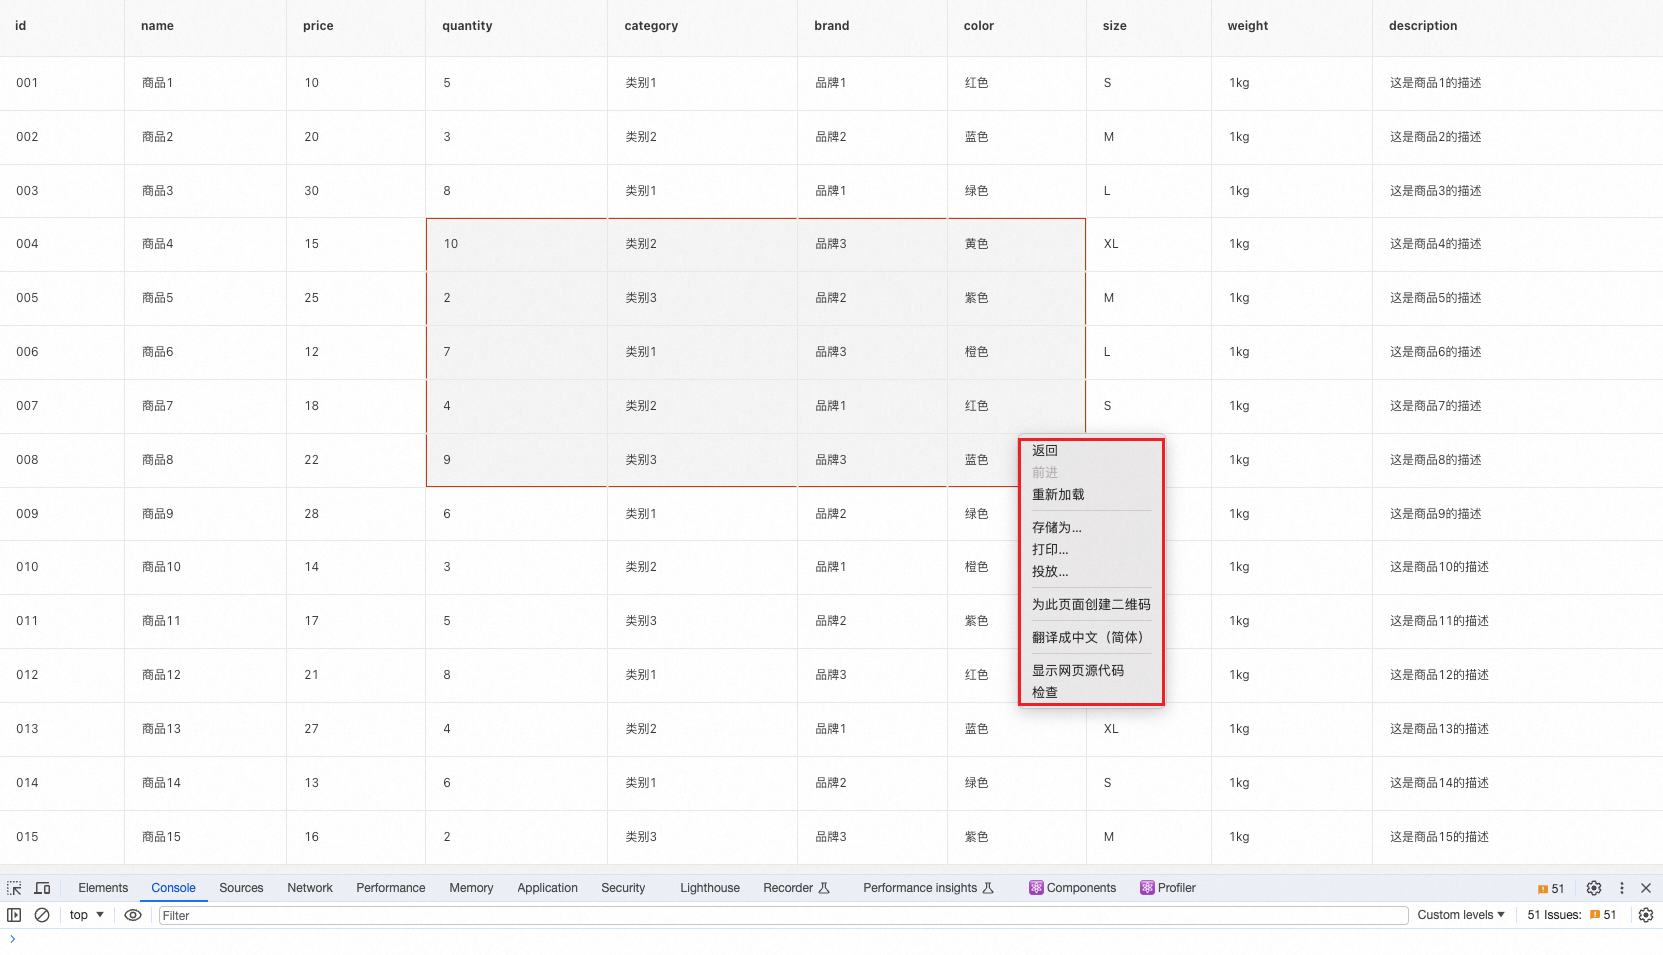
圈选效果
业务方所期望的圈选效果和excel类似,鼠标按下即选中元素,然后滑动鼠标,鼠标所经过形成的四边形就是选中区域,此时鼠标右键点击复制按钮,或者键盘按下 ctrl + c 复制文本。

而dom表格经过如上操作,会把一整行数据都选上,不符合业务同学的使用预期。
实现过程
去除默认样式
我们需要自行定义鼠标事件、元素样式,需要先将无用的默认样式清除,包括上图中的 hover 和选中元素的背景色。
- 禁用表格本身的鼠标点击选择功能,设置css,userSelect: none
<Table style={{ userSelect: 'none' }} ></Table> - 去除 hover 样式(这里使用的是 fusion 组件)
.next-table-row:hover { background-color: transparent !important; } 鼠标按下,记录选中元素
为表格绑定鼠标按键时触发事件 mousedown。
当鼠标按下时,这个元素就是中心元素,无论是向哪个方向旋转,所形成的区域一定会包含初始选中的元素。
getBoundingClientRect() 用于获得页面中某个元素的上下左右分别相对浏览器视窗的位置。
const onMouseDown = (event) => { const rect = event.target.getBoundingClientRect(); // funsion 判断点击是否为表头元素,为否时才继续后面的逻辑。antd 不需要判断,因为点击表头不会触发该事件 const isHeaderNode = event.target?.parentNode?.getAttribute('class')?.indexOf('next-table-header-node') > -1; if (isHeaderNode) return; originDir = { top: rect.top, left: rect.left, right: rect.right, bottom: rect.bottom, }; // 渲染 renderNodes(originDir); }; <Table style={{ userSelect: 'none' }} onMouseDown={onMouseDown}></Table> 鼠标滑过
为表格绑定鼠标滑过时触发事件 mousemove。
根据滑动元素的上下左右距离与鼠标按下时的位置进行判断,圈选元素存在四个方向,以第一次选中的元素为中心位置。滑动时元素位于鼠标按下的右下、左下、右上、左上方,根据不同的情况来设置四个角的方位。

const onMouseMove = (event) => { if (!originDir.top) return; const rect = event.target.getBoundingClientRect(); let coordinates = {}; // 鼠标按下后往右下方拖动 if ( rect.top <= originDir.top && rect.left <= originDir.left && rect.right <= originDir.left && rect.bottom <= originDir.top ) { coordinates = { top: rect.top, left: rect.left, right: originDir.right, bottom: originDir.bottom, }; } // 鼠标按下后往左下方拖动 if ( rect.top >= originDir.top && rect.left <= originDir.left && rect.right <= originDir.right && rect.bottom >= originDir.bottom ) { coordinates = { top: originDir.top, left: rect.left, right: originDir.right, bottom: rect.bottom, }; } // 鼠标按下后往右上方拖动 if ( rect.top <= originDir.top && rect.left >= originDir.left && rect.right >= originDir.right && rect.bottom <= originDir.bottom ) { coordinates = { top: rect.top, left: originDir.left, right: rect.right, bottom: originDir.bottom, }; } // 鼠标按下后往左上方拖动 if ( rect.top >= originDir.top && rect.left >= originDir.left && rect.right >= originDir.right && rect.bottom >= originDir.bottom ) { coordinates = { top: originDir.top, left: originDir.left, right: rect.right, bottom: rect.bottom, }; } renderNodes(coordinates); }; <Table style={{ userSelect: 'none' }} onMouseDown={onMouseDown} onMouseMove={onMouseMove} ></Table> 渲染/清除样式
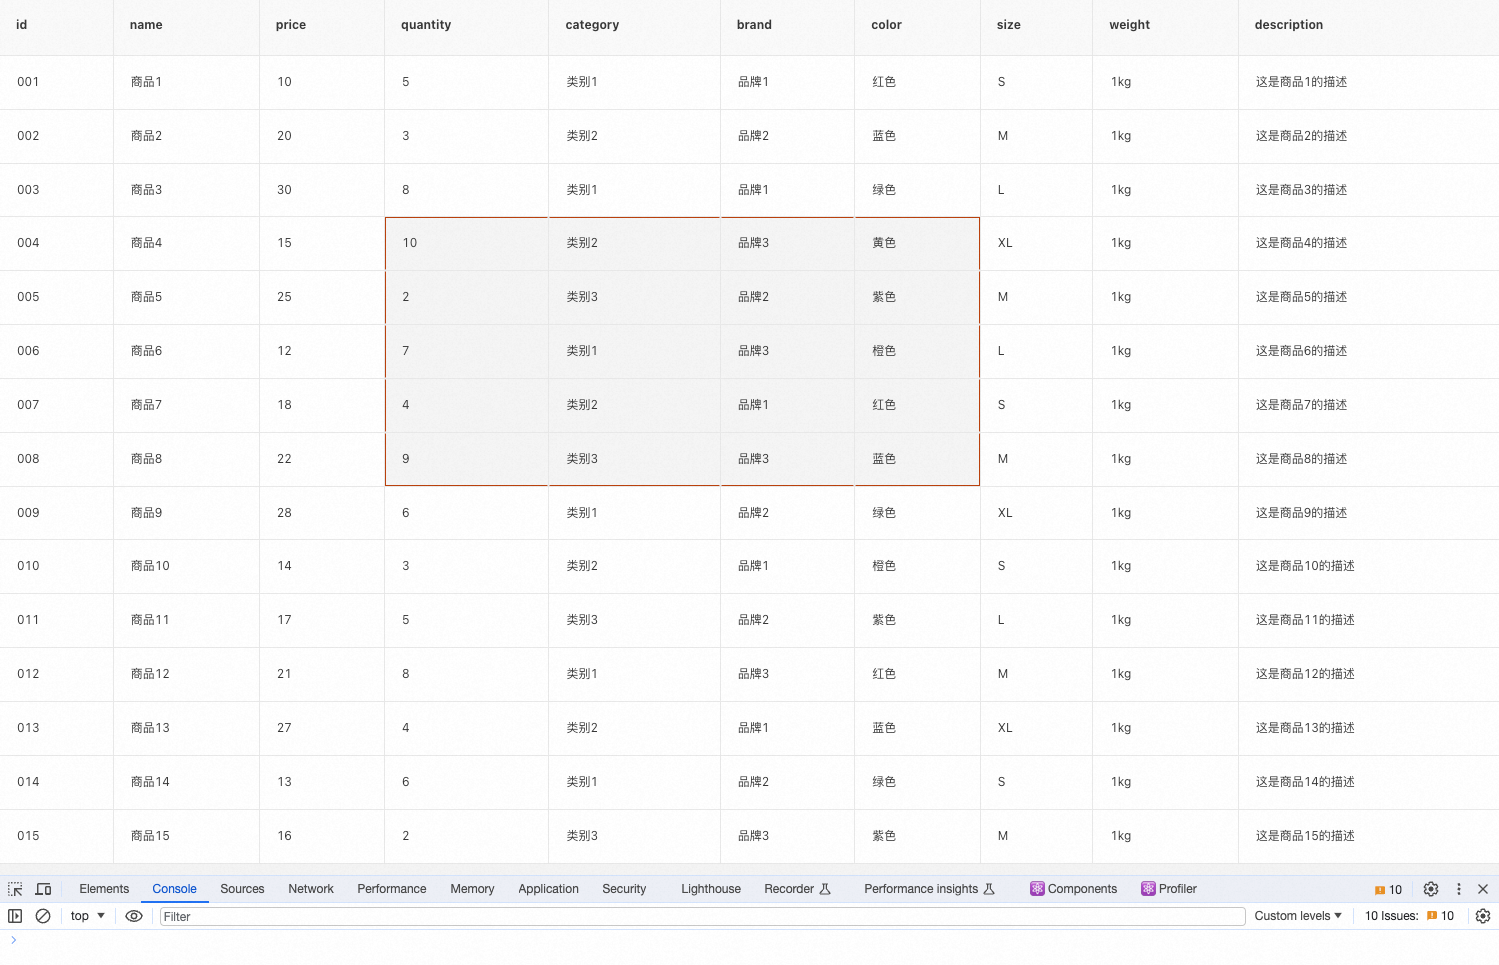
遍历表格中 dom 元素,如果该元素在圈选的区域内,为其添加选中的背景色,再为四边形区域增加边框。
这里无论是直接设置 style 还是添加 classname 都不是很好。直接添加 classname 时,antd 会在 hover 操作时重置 classname,原来设置的 classname 会被覆盖。直接设置 style 可能存在和其他设置冲突的情况,并且最后获取所有圈选元素时比较麻烦。
以上两种方法都尝试过,最后选择了直接往 dom 元素上面添加属性,分别用5个属性保存是否圈选,上下左右边框,这里没有进行合并是因为一个dom元素可能同时存在这五个属性。
const renderNodes = (coordinates) => { const nodes = document.querySelectorAll('.next-table-cell-wrapper'); nodes.forEach((item) => { const target = item?.getBoundingClientRect(); clearStyle(item); if ( target?.top >= coordinates.top && target?.right <= coordinates.right && target?.left >= coordinates.left && target?.bottom <= coordinates.bottom ) { item.setAttribute('data-brush', 'true'); if (target.top === coordinates.top) { item.setAttribute('brush-border-top', 'true'); } if (target.right === coordinates.right) { item.setAttribute('brush-border-right', 'true'); } if (target.left === coordinates.left) { item.setAttribute('brush-border-left', 'true'); } if (target.bottom === coordinates.bottom) { item.setAttribute('brush-border-bottom', 'true'); } } }); }; const clearStyle = (item) => { item.hasAttribute('data-brush') && item.removeAttribute('data-brush'); item.hasAttribute('brush-border-top') && item.removeAttribute('brush-border-top'); item.hasAttribute('brush-border-right') && item.removeAttribute('brush-border-right'); item.hasAttribute('brush-border-left') && item.removeAttribute('brush-border-left'); item.hasAttribute('brush-border-bottom') && item.removeAttribute('brush-border-bottom'); }; 使用 fusion 的 table 需要为每一个元素添加上透明的边框,不然会出现布局抖动的情况。(antd 不用)
/* 为解决设置样式抖动而设置 */ .next-table td .next-table-cell-wrapper { border: 1px solid transparent; } [brush-border-top="true"] { border-top: 1px solid #b93d06 !important; } [brush-border-right="true"] { border-right: 1px solid #b93d06 !important; } [brush-border-left="true"] { border-left: 1px solid #b93d06 !important; } [brush-border-bottom="true"] { border-bottom: 1px solid #b93d06 !important; } [data-brush="true"] { background-color: #f5f5f5 !important; } .next-table-row:hover { background-color: transparent !important; } 鼠标松开
为表格绑定鼠标松开时触发事件 mouseup。
从鼠标按下,到滑动,最后松开,是一整个圈选流程,在鼠标按下时保存了初始的方位,滑动时判断是否存在方位再进行计算,松开时将初始方位置空。
const onMouseUp = () => { originDir = {}; }; <Table style={{ userSelect: 'none' }} onMouseDown={onMouseDown} onMouseMove={onMouseMove} onMouseUp={onMouseUp} ></Table> 到这一步,就已经实现了鼠标圈选功能。
复制功能
表格圈选的交互效果其实是为复制功能做准备。
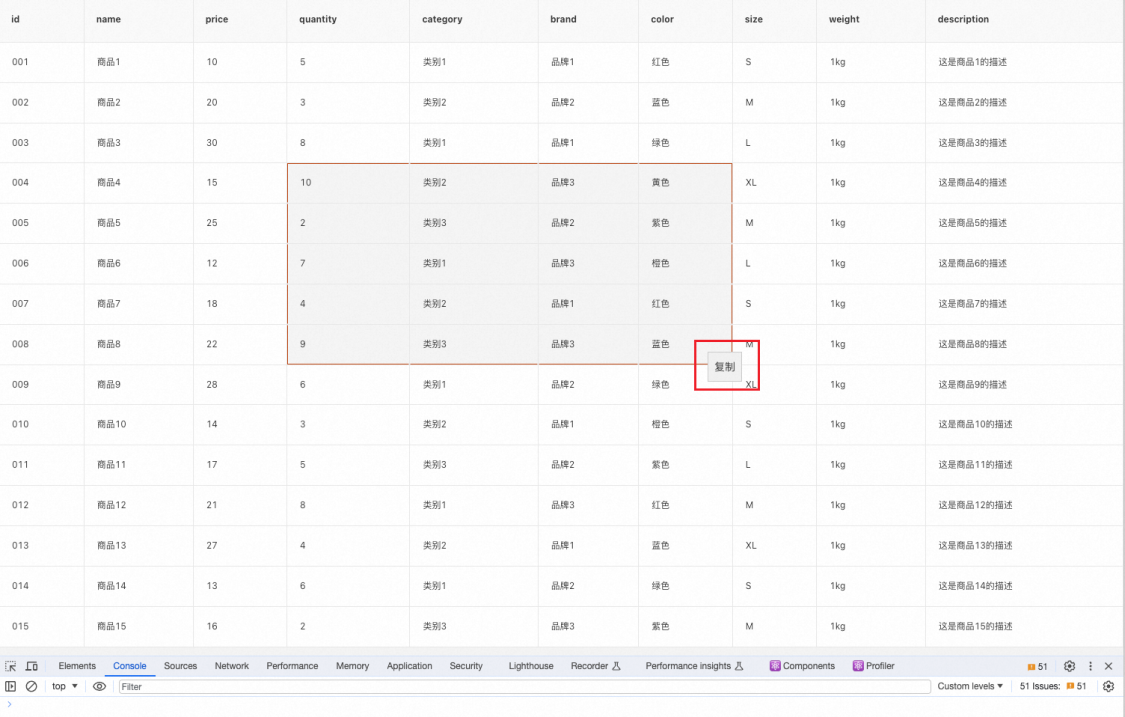
鼠标右键复制
原表格在选中元素时鼠标右键会出现【复制】按钮,点击后复制的效果是图中圈选到的元素每一个都换行展示,圈选行为不能满足使用需求,复制的内容也无法按照页面中展示的行列格式。

而当我们实现圈选功能之后,因为使用 css 属性 "user-select: none" 禁止用户选择文本,此时鼠标右键已经不会出现复制按钮。
为了实现鼠标右键出现复制按钮,我们需要覆盖原鼠标右键事件,自定义复制功能。
1、为表格绑定鼠标右键事件 contextMenu
<Table style={{ userSelect: 'none' }} onMouseDown={onMouseDown} onMouseMove={onMouseMove} onMouseUp={onMouseUp} onContextMenu={onContextMenu} ></Table> 2、创建一个包含复制按钮的自定义上下文菜单
<div id="contextMenu" className="context-menu" style={{ cursor: 'pointer' }}> <div onClick={onClickCopy}>复制</div> </div> 3、阻止默认的右键菜单弹出,将自定义上下文菜单添加到页面中,并定位在鼠标右键点击的位置。
const onContextMenu = (event) => { event.preventDefault(); // 阻止默认右键菜单弹出 const contextMenu = document.getElementById('contextMenu'); // 定位上下文菜单的位置 contextMenu.style.left = `${event.clientX}px`; contextMenu.style.top = `${event.clientY}px`; // 显示上下文菜单 contextMenu.style.display = 'block'; }; 这里复制按钮没有调整样式,可根据自己项目情况进行一些美化。
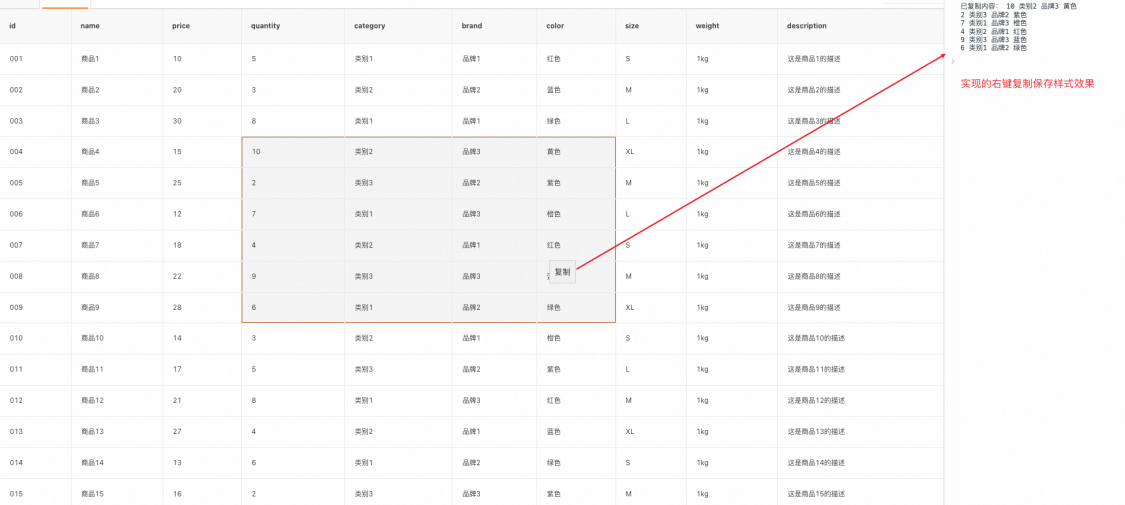
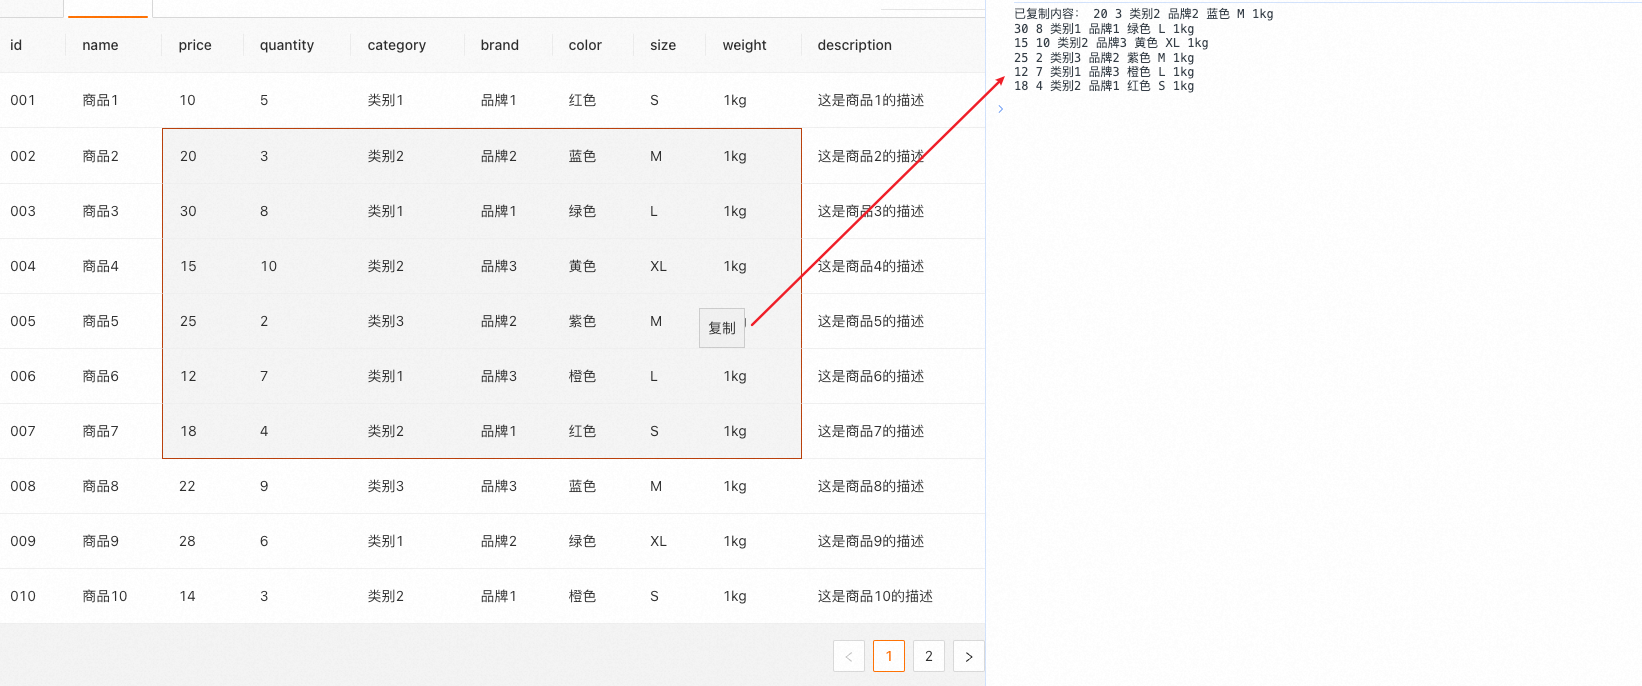
4、点击复制按钮时,保存当前行列格式执行复制操作。
复制仍然保留表格的样式,这里想了很久,一直在想通过保存dom元素的样式来实现,这种方案存在两个问题,一是保存html样式的api,document.execCommand('copy') 不被浏览器支持,二是表格元素都是行内元素,即使复制了样式,也和页面上看到的布局不一样。
最后采取的方案还是自己对是否换行进行处理,遍历元素时判断当前元素的 top 属性和下一个点距离,如果相同则添加空字符串,不同则添加换行符 n 。
const onClickCopy = () => { const contextMenu = document.getElementById('contextMenu'); const copyableElements = document.querySelectorAll('[data-brush=true]'); // 遍历保存文本 let copiedContent = ''; copyableElements.forEach((element, index) => { let separator = ' '; if (index < copyableElements.length - 1) { const next = copyableElements?.[index + 1]; if (next?.getBoundingClientRect().top !== element.getBoundingClientRect().top) { separator = 'n'; } } copiedContent += `${element.innerHTML}${separator}`; }); // 执行复制操作 navigator.clipboard.writeText(copiedContent).then(() => { console.log('已复制内容:', copiedContent); }) .catch((error) => { console.error('复制失败:', error); }); // 隐藏上下文菜单 contextMenu.style.display = 'none'; }; 5、对鼠标按下事件 onMouseDown 的处理
- 鼠标点击右键也会触发 onMouseDown ,这时会造成选中区域错乱,需要通过 event.button 判断当前事件触发的鼠标位置。
- 鼠标右键后如果没有点击复制按钮而是滑走或者使用鼠标左键选中,这时候相当于执行取消复制操作,复制按钮的上下文需要清除。
const onMouseDown = (event) => { // 0:表示鼠标左键。2:表示鼠标右键。1:表示鼠标中键或滚轮按钮 if (event.button !== 0) return; // 隐藏复制按钮 const contextMenu = document.getElementById('contextMenu'); contextMenu.style.display = 'none'; }; 到这里,就已经实现了圈选鼠标右键复制的功能。
ctrl+s / command+s 复制
使用 event.ctrlKey 来检查 Ctrl 键是否按下,使用 event.metaKey 来检查 Command 键是否按下,并使用 event.key 来检查按下的键是否是 c 键。
useEffect(() => { const clickSave = (event) => { if ((event.ctrlKey || event.metaKey) && event.key === 'c') { onClickCopy(); event.preventDefault(); // 阻止默认的保存操作 } }; document.addEventListener('keydown', clickSave); return () => { document.removeEventListener('keydown', clickSave); }; }, []); antd 也可以使用
以上功能是在 fusion design 中实现的,在 antd 中也可以使用,语法稍有不同。
表格中鼠标事件需要绑定在 onRow 函数中
<Table style={{ userSelect: 'none' }} onRow={() => { return { onContextMenu, onMouseDown, onMouseMove, onMouseUp, }; }} > 获取所有表格 dom 元素的类名替换一下
const nodes = document.querySelectorAll('.ant-table-cell'); 覆盖表格 hover 时样式
.ant-table-cell-row-hover { background: transparent; } .ant-table-wrapper .ant-table .ant-table-tbody > tr.ant-table-row:hover > td, .ant-table-wrapper .ant-table .ant-table-tbody > tr > td.ant-table-cell-row-hover { background: transparent; } 实现效果是这样的
完整代码
完整代码在这里 table-brush-copy,包括 fusion design 和 ant design 两个版本。
总结
表格圈选复制功能的实现主要是以下五步
- mousedown 按下鼠标,记录初始坐标
- mousemove 滑动鼠标,计算所形成的四边形区域
- mouseup 松开鼠标,清空初始坐标
- contextmenu 自定义鼠标右键事件,定位上下文事件
- keydown 监听键盘按下位置,判断是否为复制操作
集合了较多的鼠标、键盘事件,以及 javascript 获取属性、元素。


