- A+
我们是袋鼠云数栈 UED 团队,致力于打造优秀的一站式数据中台产品。我们始终保持工匠精神,探索前端道路,为社区积累并传播经验价值。
本文作者:景明
升级背景
目前公司产品有关 react 的工具版本普遍较低,其中 react router 版本为 3.x(是的,没有看错,3.x 的版本)。而最新的 react router 已经到了 6.x 版本。
为了能够跟上路由的脚步,也为了使用 router 相关的 hooks 函数,一次必不可少的升级由此到来!
版本确定
react-touter 6.x 版本,只对 react 和 react-dom 版本有要求,我们的项目满足条件。
"peerDependencies": { "react": ">=16.8", "react-dom": ">=16.8" } 确定使用 react-router-dom: 6.11.1 为目标升级版本。是的,跳过了v4/v5 版本,直接上 v6 一步到位
React Router 使用场景以及变化介绍
组件引用
在 v6 版本,分为了 3 个包(PS:兼容包不算)
- react-router : 核心包,只提供核心的路由和 hook 函数,不会直接使用
- react-router-dom :供浏览器/Web 应用使用的 API。依赖于 react-router, 同时将 react-router 的 API 重新暴露出来
- react-router-native :供 React Native 应用使用的 API。同时将 react-router 的 API 重新暴露出来(无 native 相关项目,与我们无关不管)
从 V6 开始,只需要使用 react-router-dom 即可,不会直接使用 react-router。
对应的是组件引用的变更,如下:
// v3 版本 import { Link } from 'react-router' // v6 版本后 import { Link } from 'react-router-dom'; 路由
interface RouteObject { path?: string; index?: boolean; // 索引路由 children?: React.ReactNode; // 子路由 caseSensitive?: boolean; // 区分大小写 id?: string; loader?: LoaderFunction; // 路由元素渲染前执行 action?: ActionFunction; element?: React.ReactNode | null; Component?: React.ComponentType | null; errorElement?: React.ReactNode | null; // 在 loader / action 过程中抛出异常展示 ErrorBoundary?: React.ComponentType | null; handle?: RouteObject["handle"]; lazy?: LazyRouteFunction<RouteObject>; } path
v6 中使用简化的路径格式。<Route path> 在 v6 中仅支持 2 种占位符:动态:id参数和*通配符。通配符*只能用在路径的末尾,不能用在中间。
// 有效地址 /groups /groups/admin /users/:id /users/:id/messages /files/* /files/:id/* // 无效地址 /users/:id? /tweets/:id(d+) /files/*/cat.jpg /files-* index
判断该路由是否为索引路由(默认的子路由)。
<Route path="/teams" element={<Teams />}> <Route index element={<TeamsIndex />} /> <Route path=":teamId" element={<Team />} /> </Route> 设置了 index 的 route 不允许存在子路由
loader
在路由组件渲染前执行并传递数据,组件可通过 useLoaderData 获取 loader 的返回值。
createBrowserRouter([ { element: <Teams />, path: "/", // 打开配置将造成死循环,因为 /view 也会触发 / 的 loader // loader: async () => { // return redirect('/view'); // }, children: [ { element: <Team />, path: "view", loader: async ({ params }) => { return fetch(`/api/view/${params.id}`); }, }, ], }, ]); 需要注意的是,loader 是并行触发,匹配多个 route,这些 route 上如果都存在 loader,都会执行。
想要针对特定的路由,可以采用如下写法:
export const loader = ({ request }) => { if (new URL(request.url).pathname === "/") { return redirect("/view"); } return null; }; element/Component
// element?: React.ReactNode | null; <Route path="/a" element={<Properties />} /> // Component?: React.ComponentType | null; <Route path="/a" Component={Properties} /> 与 v3 相比,v6 是大写开头的 Component。
v6 更推荐采用 element 的方式,可以非常方便的传递 props
中心化配置
在 v6 版本支持中心化配置,可以通过 createHashRouter 进行配置。
使用如下,结构就是 route 的定义:
export const getRoutes = createHashRouter([ { path: '/', Component: AuthLayout, children: [ ...commonRouteConfig, { Component: SideLayout, children: [ { path: 'metaDataCenter', Component: MetaDataCenter, }, { path: 'metaDataSearch', Component: MetaDataSearch, }, { path: 'metaDataDetails', Component: MetaDataDetails, }, { path: 'dataSourceDetails', Component: MetaDataDetails, }, } ] } ] 引入如下:
import { RouterProvider } from 'react-router-dom'; <RouterProvider router={getRoutes} /> 与 v3 相比:
- component -> Component
- childRoutes -> children
- 增加 loader
nameindexRoute,采用布局 route- 在布局组件中,使用
进行占位展示,而不是 children - 在 v3 中路径前带 /代表绝对路径,在 v6 中不管带不带都是相对父级的路径,推荐不带 /
- 配合 RouterProvider 使用
组件化路由
在组件内使用:
- Routes: 当地址发生变化,Routes 会在 Route 中进行匹配(原v5 中 Switch)
- Route:子路由信息
// This is a React Router v6 app import { BrowserRouter, Routes, Route, Link, } from "react-router-dom"; function App() { return ( <BrowserRouter> <Routes> <Route path="/" element={<Home />} /> <Route path="users/*" element={<Users />} /> </Routes> </BrowserRouter> ); } function Users() { return ( <div> <nav> <Link to="me">My Profile</Link> </nav> <Routes> <Route path=":id" element={<UserProfile />} /> <Route path="me" element={<OwnUserProfile />} /> </Routes> </div> ); } <Route path>和<Link to>是相对父元素的地址。- 你可以把 Route 按你想要的任何顺序排列,Routes 会根据当前路由信息进行生成权重,进行排序,在匹配最佳路由
// 动态路由权重,比如 /foo/:id const dynamicSegmentValue = 3; // 索引路由权重,也就是加了 index 为 true 属性的路由 const indexRouteValue = 2; // 空路由权重,当一段路径值为空时匹配,只有最后的路径以 / 结尾才会用到它 const emptySegmentValue = 1; // 静态路由权重 const staticSegmentValue = 10; // 路由通配符权重,为负的,代表当我们写 * 时实际会降低权重 const splatPenalty = -2; 路由跳转
useNavigate
declare function useNavigate(): NavigateFunction; interface NavigateFunction { ( to: To, options?: { replace?: boolean; state?: any; relative?: RelativeRoutingType; } ): void; (delta: number): void; } 在组件内原本采用 history 进行跳转,在 V6 修改成使用 navigate 进行跳转。
import { useNavigate } from "react-router-dom"; function App() { let navigate = useNavigate(); function handleClick() { navigate("/home"); } return ( <div> <button onClick={handleClick}>go home</button> </div> ); } 如果需要替换当前位置而不是将新位置推送到历史堆栈,请使用 navigate(to, { replace: true })。 如果你需要增加状态,请使用 navigate(to, { state })
如果当前正在使用 history 中的 go、goBack 或 goForward 来向后和向前导航,则还应该将它们替换为 navigate 的第一个数字参数,表示在历史堆栈中移动指针的位置
// v3 -> v6 go(-2)} -> navigate(-2) goBack -> navigate(-1) goForward -> navigate(1) go(2) -> navigate(2) Navigate
declare function Navigate(props: NavigateProps): null; interface NavigateProps { to: To; replace?: boolean; state?: any; relative?: RelativeRoutingType; } 如果你更喜欢使用声明式 API 进行导航( v5 的 Redirect),v6 提供了一个 Navigate 组件。像这样使用它:
import { Navigate } from "react-router-dom"; function App() { return <Navigate to="/home" replace state={state} />; } 注意:v6
history
history 库是 v6 的直接依赖项,在大多数情况下不需要直接导入或使用它。应该使用 useNavigate 钩子进行所有导航。
然而在非 tsx 中,如 redux 、 ajax 函数中。我们是无法使用react hooks的。
这个时候可以使用 location ,或者 history 进行跳转。
history.push("/home"); history.push("/home?the=query", { some: "state" }); history.push( { pathname: "/home", search: "?the=query", }, { some: state, } ); history.go(-1); history.back(); location
采用 window.location 对象进行跳转。
window.location.hash = '/' 传参
query
// V3 type Location = { pathname: Pathname; search: Search; query: Query; state: LocationState; action: Action; key: LocationKey; }; // V6 type Location = { pathname: Pathname; search: Search; state: LocationState; key: LocationKey; }; 在 v3 中,我们可以通过 location.query 进行 Url 的参数获取或设置,而在 v6 中是不支持的。
在使用 useNavigate 时,接收一个完整的 pathname,如:/user?name=admin
在我们自己的工具库 dt-utils 中,新增 getUrlPathname 方法用来生成 pathname。
getUrlPathname(pathname: string, queryParams?: {}): string // example DtUtils.getUrlPathname('/metaDataSearch', { metaType, search }) 获取时使用 getParameterByName 进行获取单个 query param。也新增了 getUrlQueryParams 方法获取所有的 query params
// getParameterByName(name: string, url?: string): string | null // 需要注意 getParameterByName 返回的是 null。在多数情况下,需要转成 undefined const standardId = DtUtils.getParameterByName('standardId') || undefined; // getQueryParams(url: string): Record<string, string> const query = DtUtils.getUrlQueryParams(location.search); params
通过 useParams 获取到路由上的参数。
import * as React from 'react'; import { Routes, Route, useParams } from 'react-router-dom'; function ProfilePage() { // Get the userId param from the URL. let { userId } = useParams(); // ... } function App() { return ( <Routes> <Route path="users"> <Route path=":userId" element={<ProfilePage />} /> </Route> </Routes> ); } state
在进行路由跳转时可以通过传递 state 状态进行传参。
// route 传递 <Route path="/element" element={<Navigate to="/" state={{ id: 1 }} />} /> // link 传递 <Link to="/home" state={state} /> // 跳转传递 navigate('/about', { state: { id: 1 } }) // 获取 state export default function App() { // 通过 location 中的 state 获取 let location = useLocation(); const id = location.state.id return ( <div className="App"> <header>首页</header> <p>我的id是:{id}</p> </div> ); } Outlet
可通过 useOutletContext 获取 outlet 传入的信息。
function Parent() { const [count, setCount] = React.useState(0); return <Outlet context={[count, setCount]} />; } import { useOutletContext } from "react-router-dom"; function Child() { const [count, setCount] = useOutletContext(); const increment = () => setCount((c) => c + 1); return <button onClick={increment}>{count}</button>; } 路由跳转前拦截
在 v3 中使用 setRouteLeaveHook 进行路由的拦截,在 v6 被移除了。
this.props.router.setRouteLeaveHook(this.props.route, () => { if (!this.state.finishRule) { return '规则还未生效,是否确认取消?'; } return true; }); 在 V6 中采用 usePrompt 进行组件跳转拦截。
需要注意的是,由于 usePrompt 在各浏览器中交互可能不一致。
目前可拦截前进,后退,正常跳转。
刷新页面不可拦截。
/** * Wrapper around useBlocker to show a window.confirm prompt to users instead * of building a custom UI with useBlocker. * * Warning: This has *a lot of rough edges* and behaves very differently (and * very incorrectly in some cases) across browsers if user click addition * back/forward navigations while the confirm is open. Use at your own risk. */ declare function usePrompt({ when, message }: { when: boolean; message: string; }): void; export { usePrompt as unstable_usePrompt }; 针对这个功能,封装了一个 usePrompt
import { unstable_usePrompt } from 'react-router-dom'; import useSyncState from '../useSyncState'; /** * 拦截路由改变 * @param {boolean} [initWhen = true] 是否弹框 * @param {string} [message = ''] 弹框内容 * @returns {(state: boolean, callback?: (state: boolean) => void) => void} */ const usePrompt = (initWhen = true, message = '') => { const [when, setWhen] = useSyncState(initWhen); unstable_usePrompt({ when, message }); return setWhen; }; export default usePrompt; // example import usePrompt from 'dt-common/src/components/usePrompt'; const EditClassRule = (props: EditClassRuleProps) => { const setWhen = usePrompt( checkAuthority('DATASECURITY_DATACLASSIFICATION_CLASSIFICATIONSETTING'), '规则还未生效,是否确认取消?' ); return ( <EditClassRuleContent {...(props as EditClassRuleContentProps)} setFinishRule={setWhen} /> ); }; router Props 注入
路由注入
在 V3 中 router 会给每一个匹配命中的组件注入相关的 router props
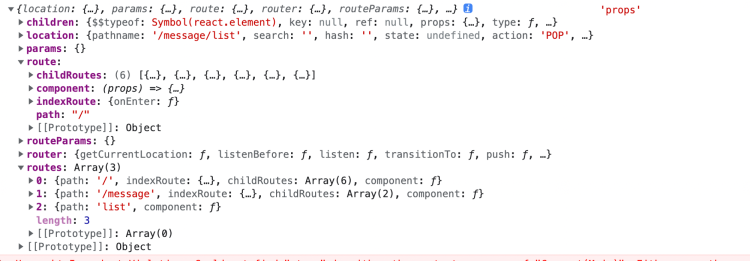
- location: 当前 url 的信息
- params: 路由参数,刷新不会重置
- route:所有路由配置信息
- routerParams: 路由参数,刷新后重置
- router:router 实例,可以调用其中的各种方法,常用的有:push、go、goBack
- routes:当前路由面包屑
注入 props 在 V6 是没有的。
withRouter 注入
v3 中的 withRouter 将 react-router 的 history、location、match 三个对象传入props对象上。
在 v6 上 withRouter 这个方法也是没有的。
实现 withRouter
在 v6 中,提供了大量 hooks 用于获取信息。
获取 location 的 useLocation。获取路由 params 的 useParams,获取 navigate 实例的 useNavigate 等。
实现了一个 withRouter 的高阶函数,用于注入这 3 个 props。
这里没有直接传入,采用 router 对象的原因是:
- 考虑 props 的覆盖,像 params 都是大概率出现的名字。
- 原有使用中,大部分都是直接从 this.props 点出来,可以与升级前有个区分,避免混淆。
import React from 'react'; import { useNavigate, useParams, useLocation, Params, NavigateFunction, Location, } from 'react-router-dom'; export interface RouterInstance { router: { params: Readonly<Params<string>>; navigate: NavigateFunction; location: Location; }; } function withRouter<P extends RouterInstance = any, S = any>( Component: typeof React.Component<P, S> ) { return (props: P) => { const params = useParams(); const navigate = useNavigate(); const location = useLocation(); const router: RouterInstance['router'] = { params, navigate, location, }; return <Component {...props} router={router} />; }; } export default withRouter; // example export default withRouter<IProps, IState>(Sidebar); 总结
该篇文章中主要记录了,我们项目从 react-router@3.x 升级到 @6.x 遇到的一些问题以及相关的解决方案,也简单讲解了 v3 与 v6 的部分差异,欢迎大家讨论提出相关的问题~
最后
欢迎关注【袋鼠云数栈UED团队】~
袋鼠云数栈UED团队持续为广大开发者分享技术成果,相继参与开源了欢迎star


