- A+
所属分类:.NET技术
个人博客 前端:https://lujiesheng.cn
个人博客 后端:https://api.lujiesheng.cn
个人博客 运维:https://portainer.lujiesheng.cn
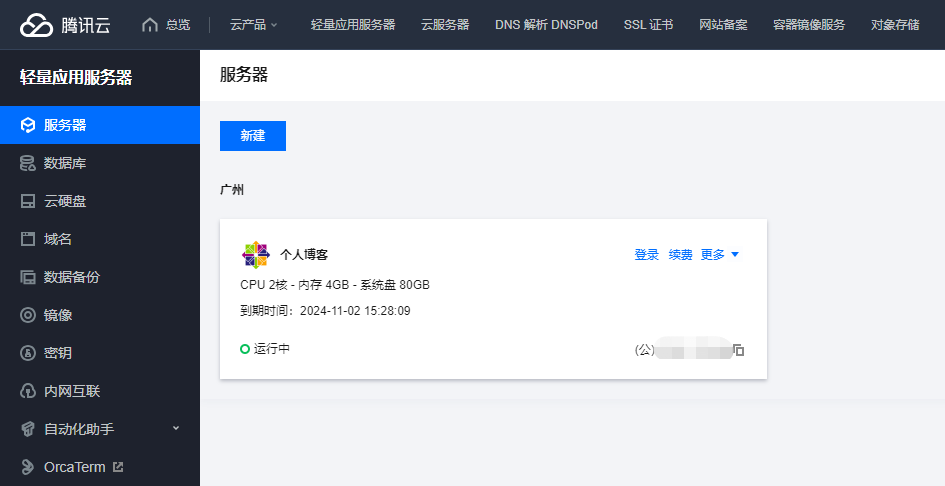
1. 服务器准备
我采用的是 腾讯云轻量应用服务器(2C 4G 8M 80G),配置如下图:
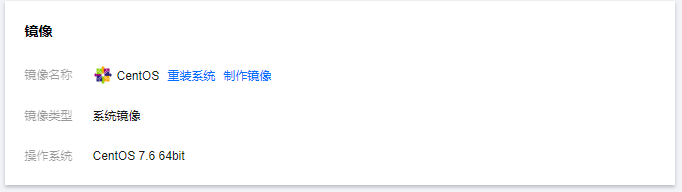
安装镜像选择 CentOS 7.6 64bit:
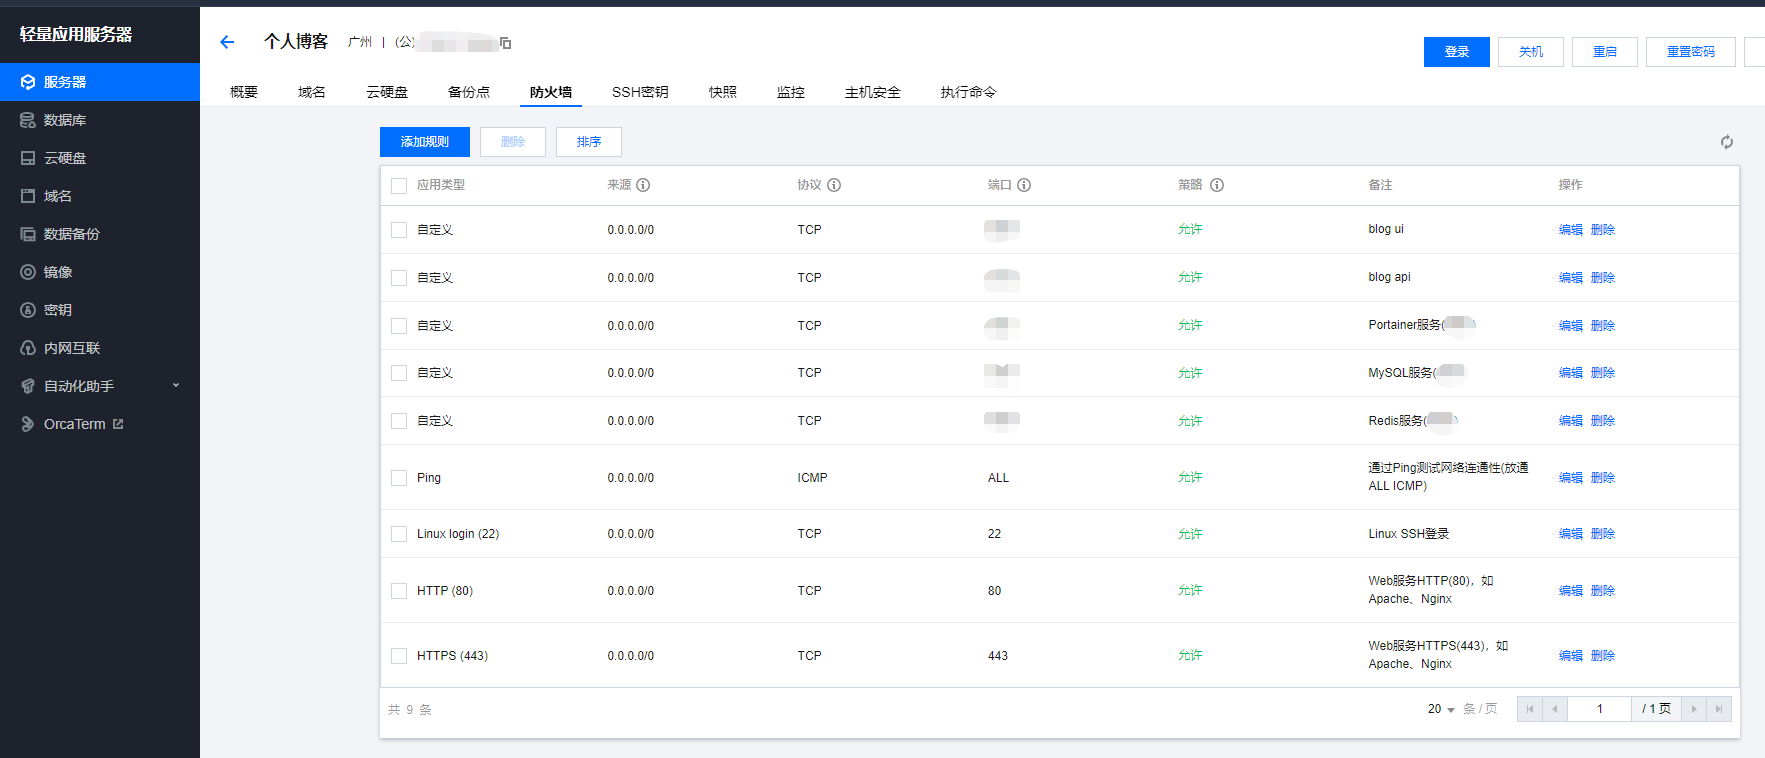
2. 服务器防火墙设置
添加防火墙出入站规则,设置如下图:
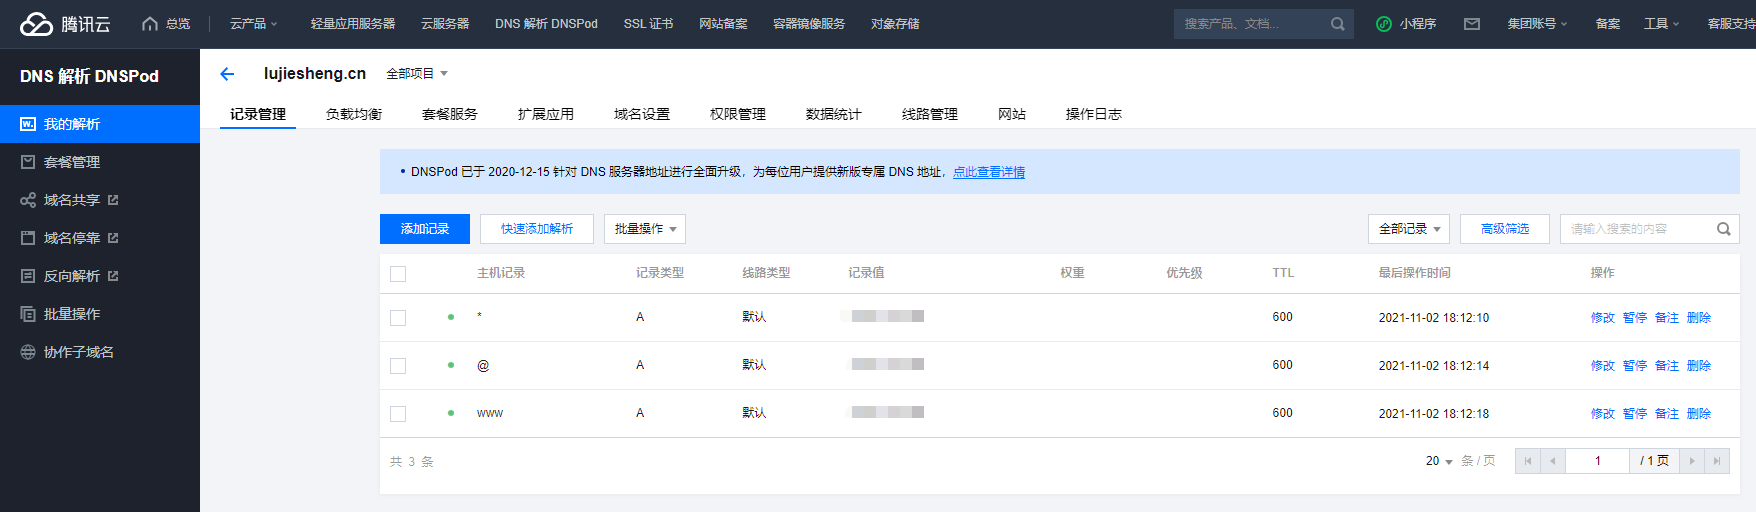
3. 域名解析
把已备案的域名解析到服务器,记录如下图:
4. SSL证书准备
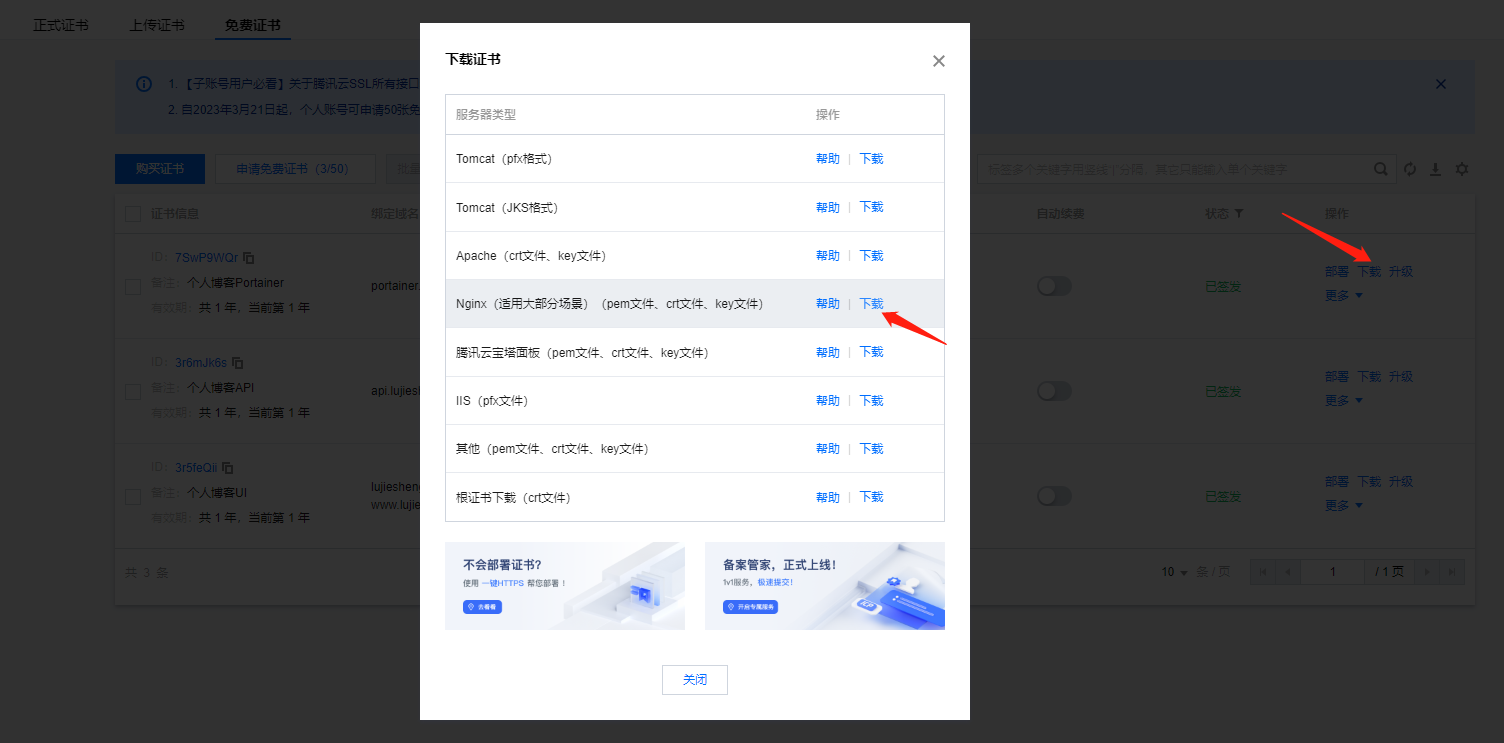
通过腾讯云申请免费证书:

把对应的证书下载到本地:
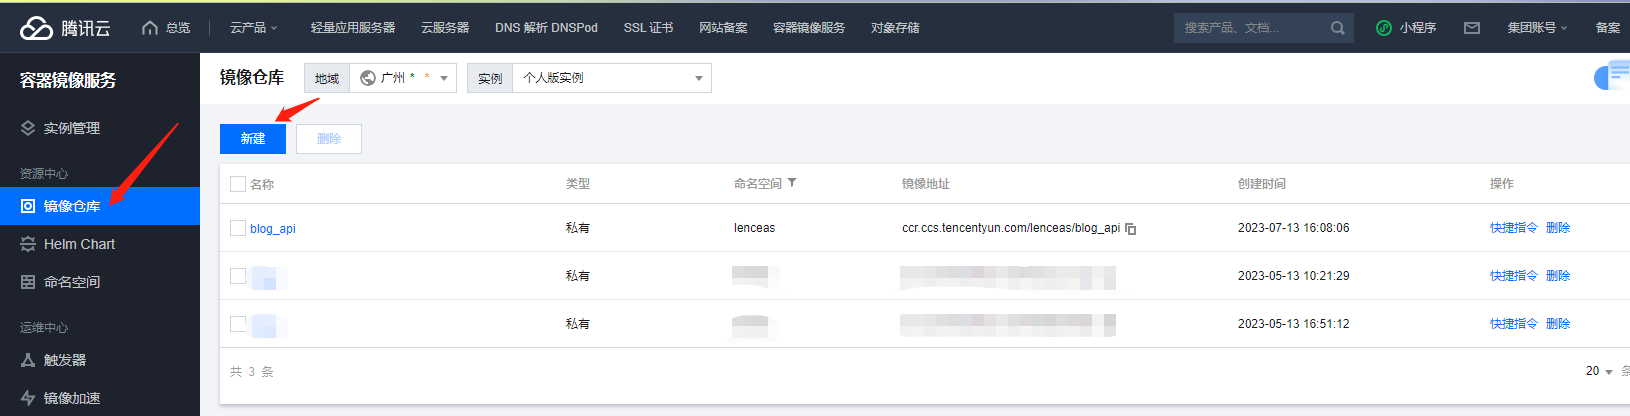
5. 容器镜像服务准备
新建命名空间:

新建私有镜像仓库:
6. 连接登录到服务器
我采用的是 FinalShell:

更新服务器系统和内核版本:
# 执行更新命令: yum -y update # 等待更新完毕后,执行查看命令,确认系统和内核版本: cat /etc/redhat-release uname -r 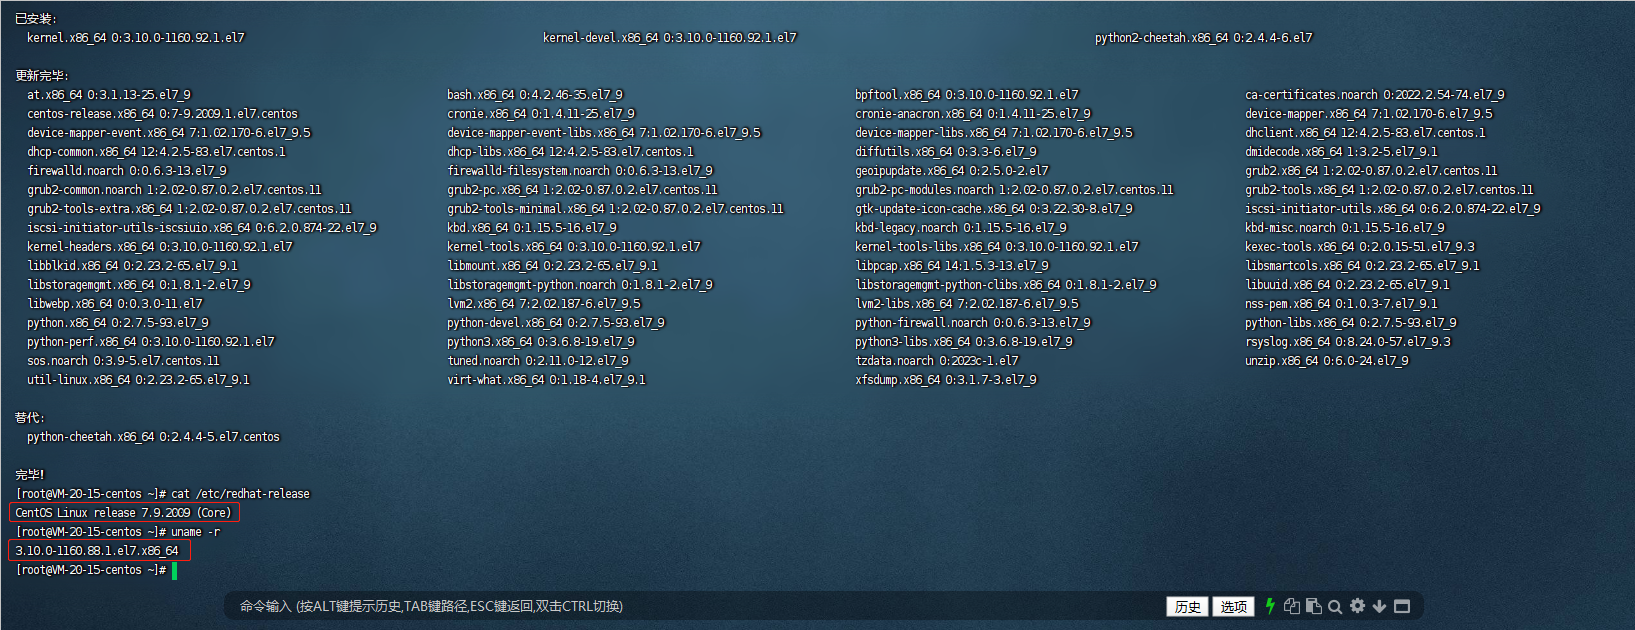
7. 安装插件依赖包
yum -y install gcc 
yum -y install gcc-c++ 
yum install -y yum-utils 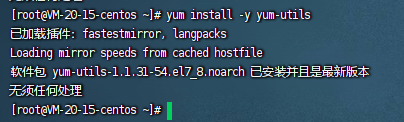
yum-config-manager --add-repo https://mirrors.aliyun.com/docker-ce/linux/centos/docker-ce.repo 
yum makecache fast 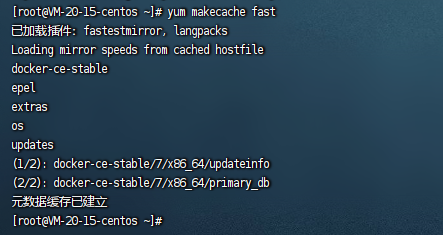
8. 安装 Docker
# 执行安装命令: yum install -y docker-ce docker-ce-cli containerd.io 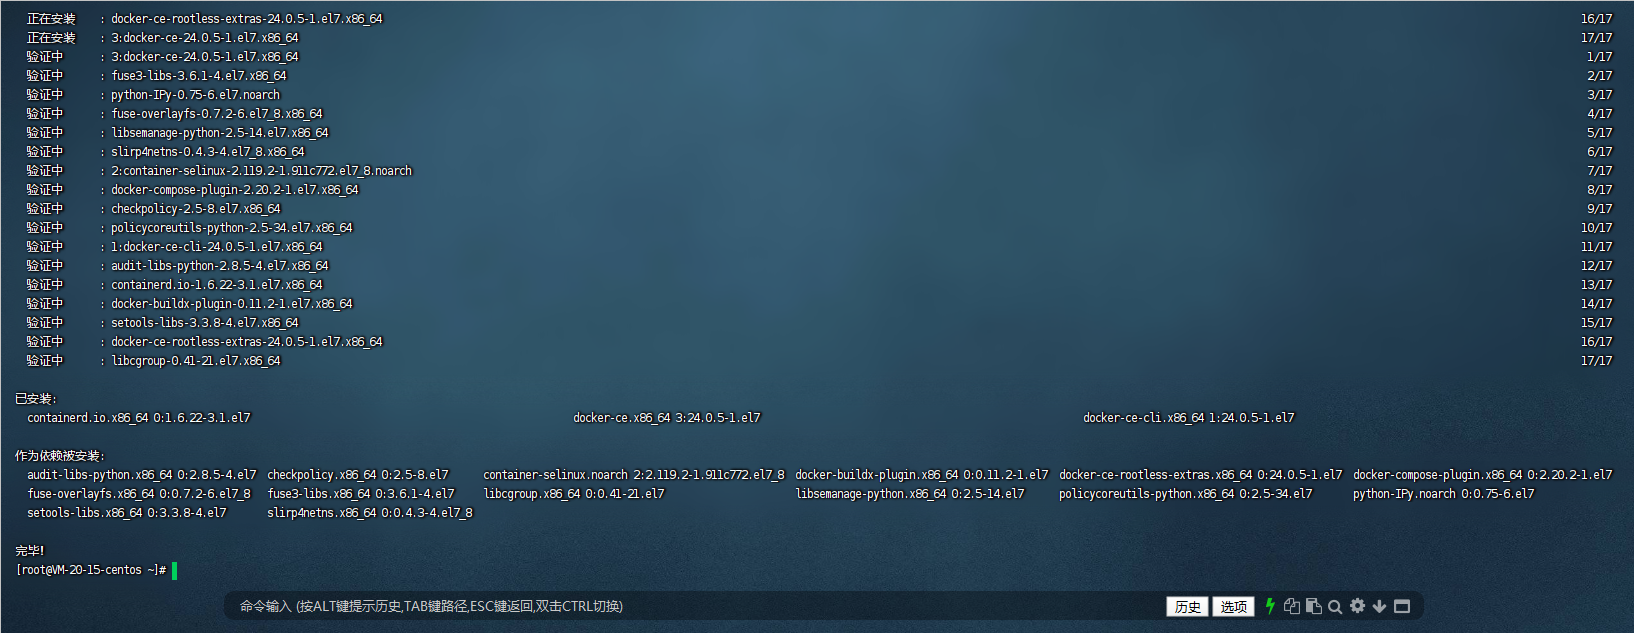
# 启动 Docker systemctl start docker.socket systemctl start docker # 查看 Docker 状态 systemctl status docker # 设置 Docker 自启 systemctl enable docker systemctl enable docker.socket # 检查自启状态 systemctl list-unit-files | grep docker 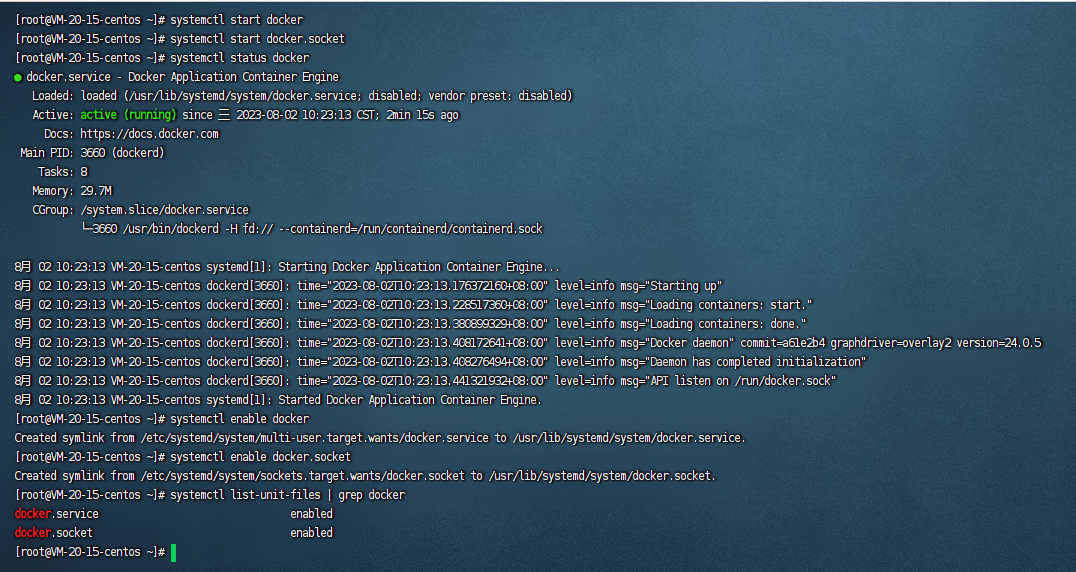
# 查看当前docker版本 docker version 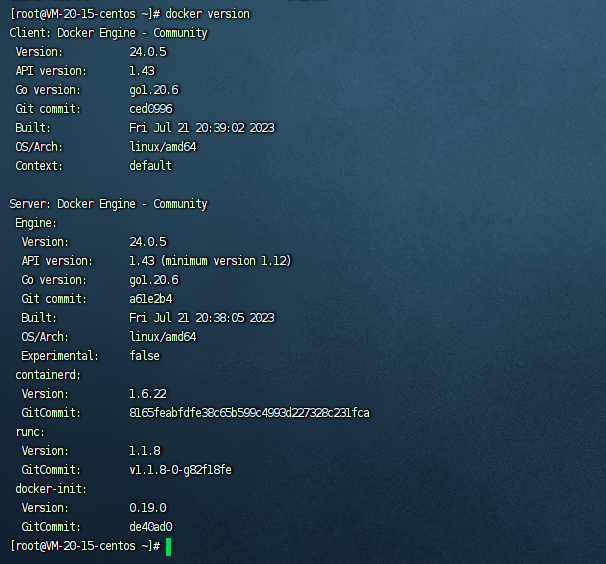
更新Docker远程仓库镜像源:
https://cr.console.aliyun.com/cn-shenzhen/instances/mirrors
# 创建deamon.json文件用来保存源 vim /etc/docker/daemon.json # 添加稳定而且不经常变动的镜像源 {"registry-mirrors": ["https://i0q82fc7.mirror.aliyuncs.com"]} # 保存并重启一下Docker systemctl daemon-reload systemctl restart docker 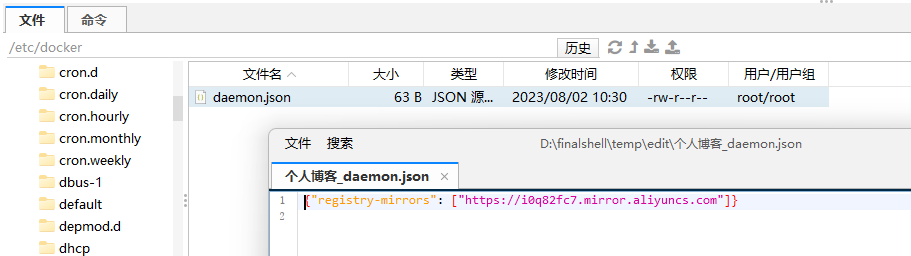
# 按照以下步骤来修改时区 cd /etc/ # 首先备份原有的 /etc/localtime 文件 mv /etc/localtime /etc/localtime.bak # 然后创建一个新的链接文件 ln -s /usr/share/zoneinfo/Asia/Shanghai /etc/localtime # 修改 /etc/timezone 文件,将其内容修改为所需的时区(例如 "Asia/Shanghai") echo "Asia/Shanghai" | sudo tee /etc/timezone # 查看是否设置成功 date cat /etc/timezone 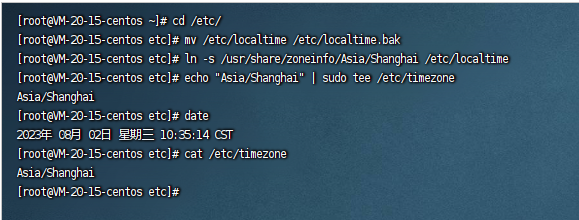
9. 安装 Docker Compose
我们这里选择离线安装:
# 去官网下载 https://github.com/docker/compose/releases/download/v2.20.2/docker-compose-linux-x86_64 # 切换服务器目录 cd /usr/local/bin # 把下载的文件上传上去 
# 改名 mv docker-compose-linux-x86_64 docker-compose # 授权 chmod +x /usr/local/bin/docker-compose # 测试是否安装成功 docker-compose version 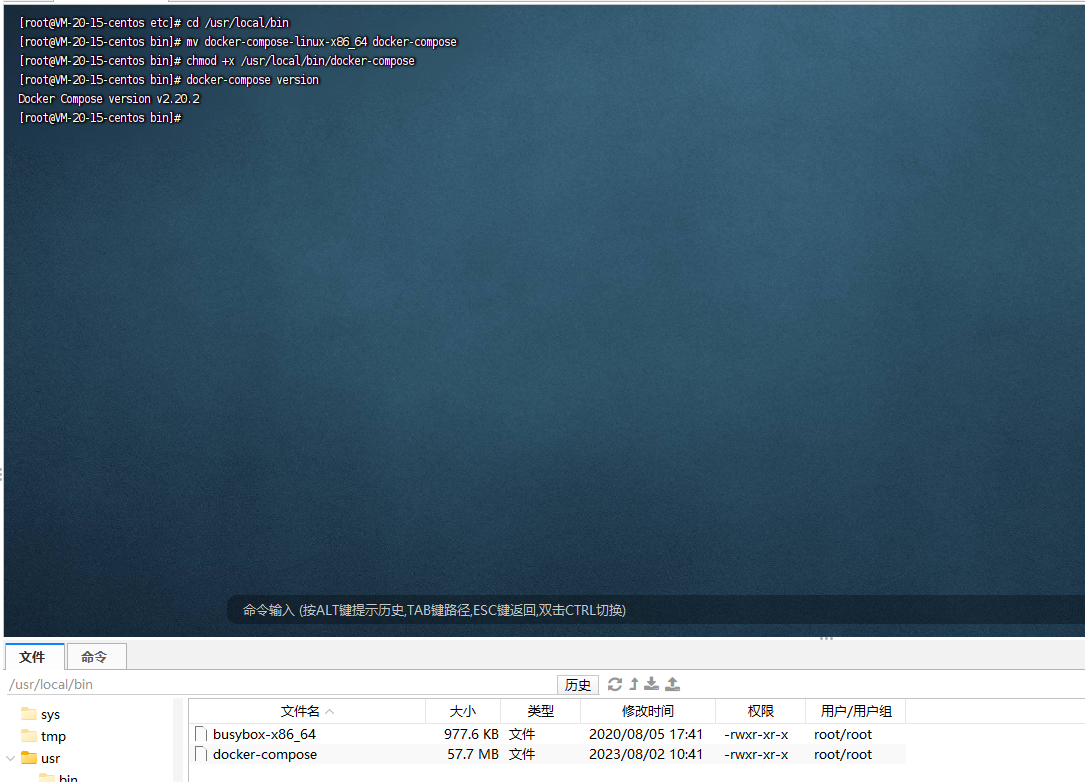
10. 准备部署目录和配置文件
cd /home mkdir blog cd blog mkdir nginx mkdir ui cd nginx mkdir ssl 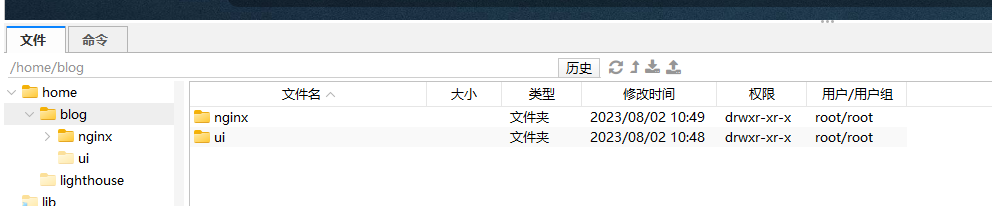
# 在 /home/blog 目录下创建 docker-compose.yml 文件,编辑该文件,内容如下: 点击查看代码
version: "3.8" services: nginx: image: nginx container_name: nginx ports: - "80:80" - "443:443" volumes: - ./nginx/nginx.conf:/etc/nginx/nginx.conf - ./nginx/ssl:/etc/nginx/certs - ./ui/dist:/var/www/html restart: always networks: - network portainer: image: portainer/portainer container_name: portainer ports: - "xxxx:xxxx" # 把xxxx改成自己portainer的端口,需要跟服务器防火墙添加的规则对应! environment: - TZ=Asia/Shanghai volumes: - /etc/localtime:/etc/localtime:ro - /etc/timezone:/etc/timezone:ro - /var/run/docker.sock:/var/run/docker.sock restart: always networks: - network depends_on: - nginx redis: image: redis container_name: redis ports: - "xxxx:6379" # 把xxxx改成自己redis的端口,需要跟服务器防火墙添加的规则对应! environment: - TZ=Asia/Shanghai volumes: - /etc/localtime:/etc/localtime:ro - /etc/timezone:/etc/timezone:ro - redis_data:/data command: redis-server --requirepass xxx # 把xxx改成自己的redis连接密码 restart: always networks: - network depends_on: - portainer mysql: image: mysql container_name: mysql ports: - "xxxx:3306" # 把xxxx改成自己mysql的端口,需要跟服务器防火墙添加的规则对应! environment: - TZ=Asia/Shanghai - MYSQL_ROOT_PASSWORD=xxx # 把xxx改成自己的mysql连接密码 volumes: - mysql_data:/var/lib/mysql restart: always networks: - network depends_on: - redis api: image: ccr.ccs.tencentyun.com/lenceas/blog_api:v1.0 container_name: api ports: - "xxxx:xxxx" # 把xxxx改成自己api的端口 environment: - TZ=Asia/Shanghai volumes: - /etc/localtime:/etc/localtime:ro - /etc/timezone:/etc/timezone:ro restart: always networks: - network depends_on: - mysql networks: network: driver: bridge volumes: redis_data: mysql_data: 
# 切换到ui目录下,并把前端build打包的dist文件上传: cd /home/blog/ui 
# 切换到nginx/ssl 目录下,并把之前下载的ssl证书全部上传(只上传 crt 和 key 文件): cd /home/blog/nginx/ssl 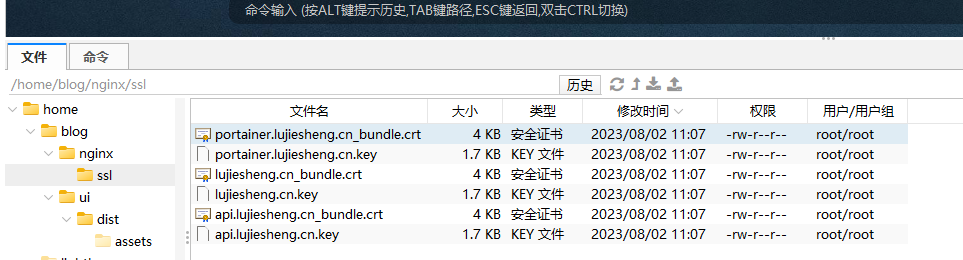
# 切换到 nginx 目录下,并创建 nginx.conf 文件,编辑该文件,内容如下: cd /home/blog/nginx 点击查看代码
user nginx; worker_processes auto; error_log /var/log/nginx/error.log notice; pid /var/run/nginx.pid; events { worker_connections 1024; } http { log_format main '$remote_addr - $remote_user [$time_local] "$request" ' '$status $body_bytes_sent "$http_referer" ' '"$http_user_agent" "$http_x_forwarded_for"'; access_log /var/log/nginx/access.log main; sendfile on; tcp_nopush on; tcp_nodelay on; keepalive_timeout 65; types_hash_max_size 4096; include /etc/nginx/mime.types; default_type application/octet-stream; # Load modular configuration files from the /etc/nginx/conf.d directory. # See http://nginx.org/en/docs/ngx_core_module.html#include # for more information. include /etc/nginx/conf.d/*.conf; # lujiesheng.cn start server { listen 80; listen [::]:80; server_name lujiesheng.cn; #把http的域名请求转成https return 301 https://$host$request_uri; #root /etc/www; # Load configuration files for the default server block. include /etc/nginx/default.d/*.conf; error_page 404 /404.html; location = /404.html { } error_page 500 502 503 504 /50x.html; location = /50x.html { } } server { #SSL 默认访问端口号为 443 listen 443 ssl; #请填写绑定证书的域名 server_name lujiesheng.cn; #请填写证书文件的相对路径或绝对路径 ssl_certificate /etc/nginx/certs/lujiesheng.cn_bundle.crt; #请填写私钥文件的相对路径或绝对路径 ssl_certificate_key /etc/nginx/certs/lujiesheng.cn.key; ssl_session_timeout 5m; #请按照以下协议配置 ssl_protocols TLSv1.2 TLSv1.3; #请按照以下套件配置,配置加密套件,写法遵循 openssl 标准。 ssl_ciphers ECDHE-RSA-AES128-GCM-SHA256:HIGH:!aNULL:!MD5:!RC4:!DHE; ssl_prefer_server_ciphers on; location / { #网站主页路径。此路径仅供参考,具体请您按照实际目录操作。 #例如,您的网站主页在 Nginx 服务器的 /etc/www 目录下,则请修改 root 后面的 html 为 /etc/www。 root /var/www/html; index index.html index.htm; } } # lujiesheng.cn end # api.lujiesheng.cn start server { listen 80; listen [::]:80; server_name api.lujiesheng.cn; # 把http的域名请求转成https return 301 https://$host$request_uri; #root /etc/www; # Load configuration files for the default server block. include /etc/nginx/default.d/*.conf; error_page 404 /404.html; location = /404.html { } error_page 500 502 503 504 /50x.html; location = /50x.html { } } server { #SSL 默认访问端口号为 443 listen 443 ssl; #请填写绑定证书的域名 server_name api.lujiesheng.cn; #请填写证书文件的相对路径或绝对路径 ssl_certificate /etc/nginx/certs/api.lujiesheng.cn_bundle.crt; #请填写私钥文件的相对路径或绝对路径 ssl_certificate_key /etc/nginx/certs/api.lujiesheng.cn.key; ssl_session_timeout 5m; #请按照以下协议配置 ssl_protocols TLSv1.2 TLSv1.3; #请按照以下套件配置,配置加密套件,写法遵循 openssl 标准。 ssl_ciphers ECDHE-RSA-AES128-GCM-SHA256:HIGH:!aNULL:!MD5:!RC4:!DHE; ssl_prefer_server_ciphers on; location / { #网站主页路径。此路径仅供参考,具体请您按照实际目录操作。 #例如,您的网站主页在 Nginx 服务器的 /etc/www 目录下,则请修改 root 后面的 html 为 /etc/www。 proxy_pass http://ip:port/; #root /etc/www; #index index.html index.htm; } } # api.lujiesheng.cn end # portainer.lujiesheng.cn start server { listen 80; listen [::]:80; server_name portainer.lujiesheng.cn; # 把http的域名请求转成https return 301 https://$host$request_uri; #root /etc/www; # Load configuration files for the default server block. include /etc/nginx/default.d/*.conf; error_page 404 /404.html; location = /404.html { } error_page 500 502 503 504 /50x.html; location = /50x.html { } } server { #SSL 默认访问端口号为 443 listen 443 ssl; #请填写绑定证书的域名 server_name portainer.lujiesheng.cn; #请填写证书文件的相对路径或绝对路径 ssl_certificate /etc/nginx/certs/portainer.lujiesheng.cn_bundle.crt; #请填写私钥文件的相对路径或绝对路径 ssl_certificate_key /etc/nginx/certs/portainer.lujiesheng.cn.key; ssl_session_timeout 5m; #请按照以下协议配置 ssl_protocols TLSv1.2 TLSv1.3; #请按照以下套件配置,配置加密套件,写法遵循 openssl 标准。 ssl_ciphers ECDHE-RSA-AES128-GCM-SHA256:HIGH:!aNULL:!MD5:!RC4:!DHE; ssl_prefer_server_ciphers on; location / { #网站主页路径。此路径仅供参考,具体请您按照实际目录操作。 #例如,您的网站主页在 Nginx 服务器的 /etc/www 目录下,则请修改 root 后面的 html 为 /etc/www。 proxy_pass http://ip:port/; #root /etc/www; #index index.html index.htm; } } # portainer.lujiesheng.cn end } # 记得把截图部分改成自己的服务器IP和对应服务的端口: 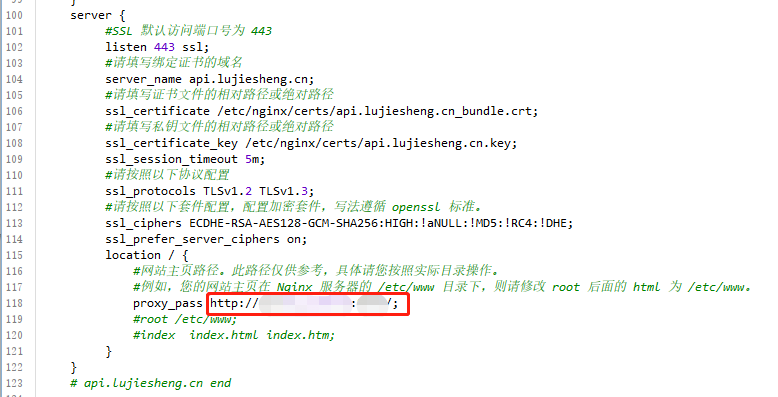


# 切换到 blog 目录下(docker-compose.yml 同级目录): cd /home/blog 
11. 打包 .NET6 API 镜像
# 切换到工程文件的解决方案根目录,把里层的 Dockerfile 文件复制过来: 
# 先登录腾讯云容器服务 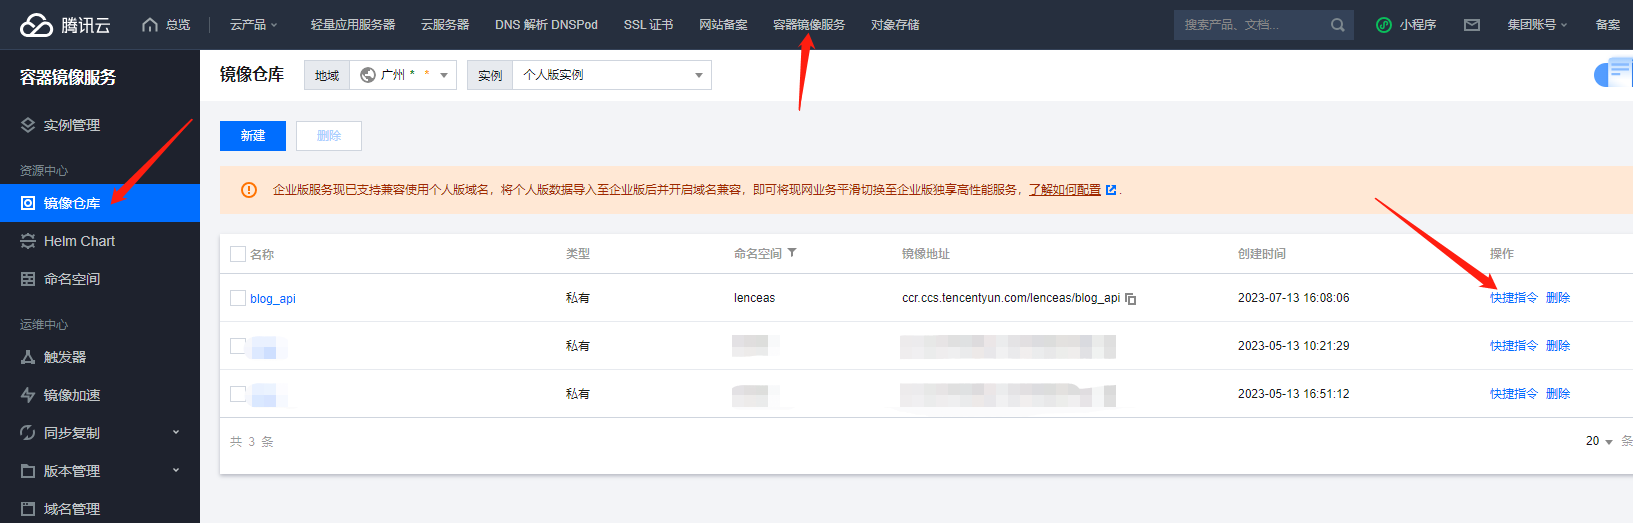
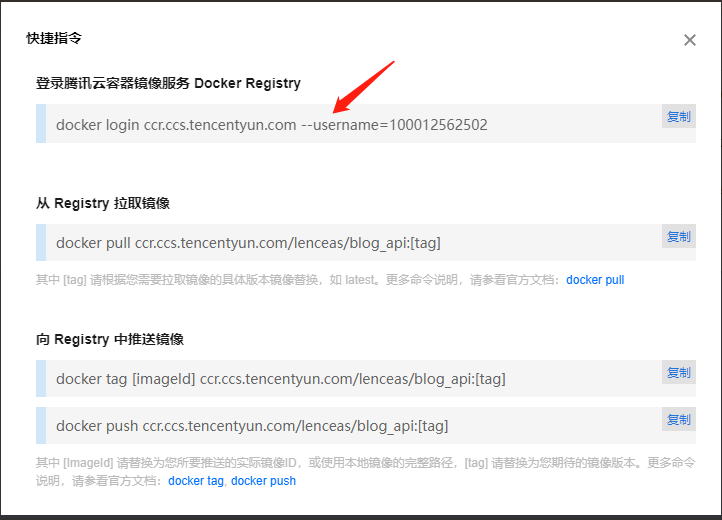
# 本地登录一下 
# 登录 docker login ccr.ccs.tencentyun.com --username=100012562502 # 开始打包 docker build -t ccr.ccs.tencentyun.com/lenceas/blog_api:v1.0 . # 推送到腾讯云容器 docker push ccr.ccs.tencentyun.com/lenceas/blog_api:v1.0 # 然后切换到服务器窗口登录并拉取镜像: docker login ccr.ccs.tencentyun.com --username=100012562502 docker pull ccr.ccs.tencentyun.com/lenceas/blog_api:v1.0 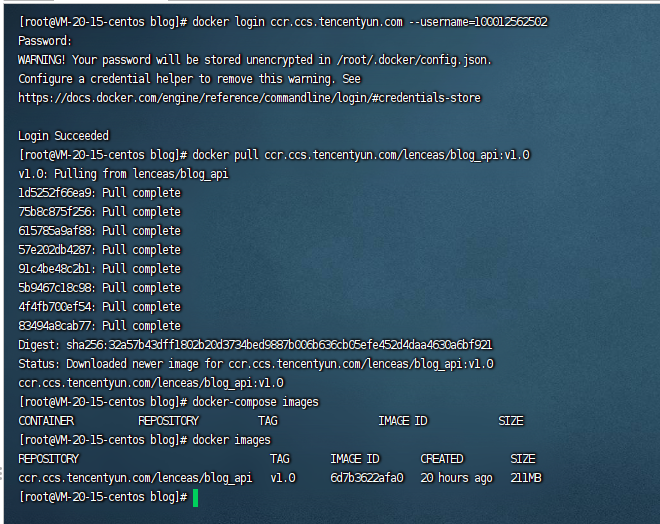
12. 启动 Docker Compose 服务
# 启动 docker-compose (第一次启动需要拉取镜像,耐心等候几分钟即可...) docker-compose up -d 
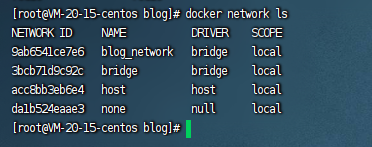
# 查看是否运行成功命令 docker-compose images docker-compose ps docker network ls 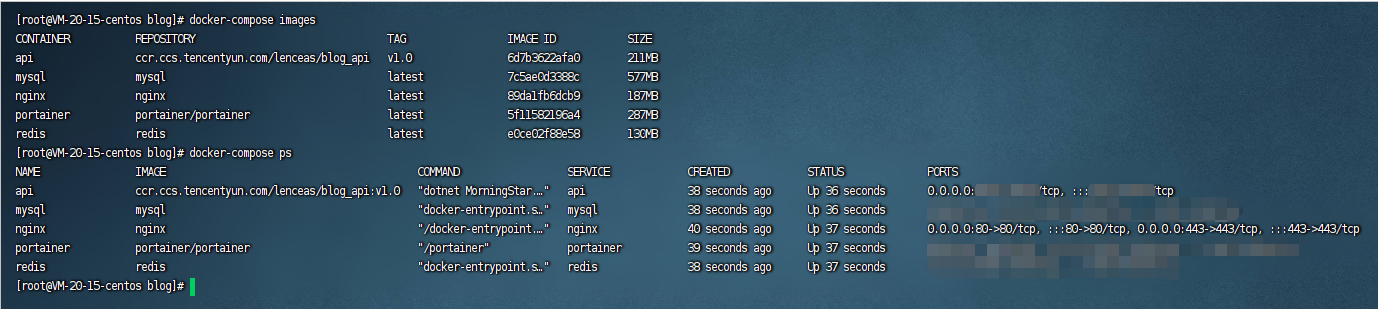
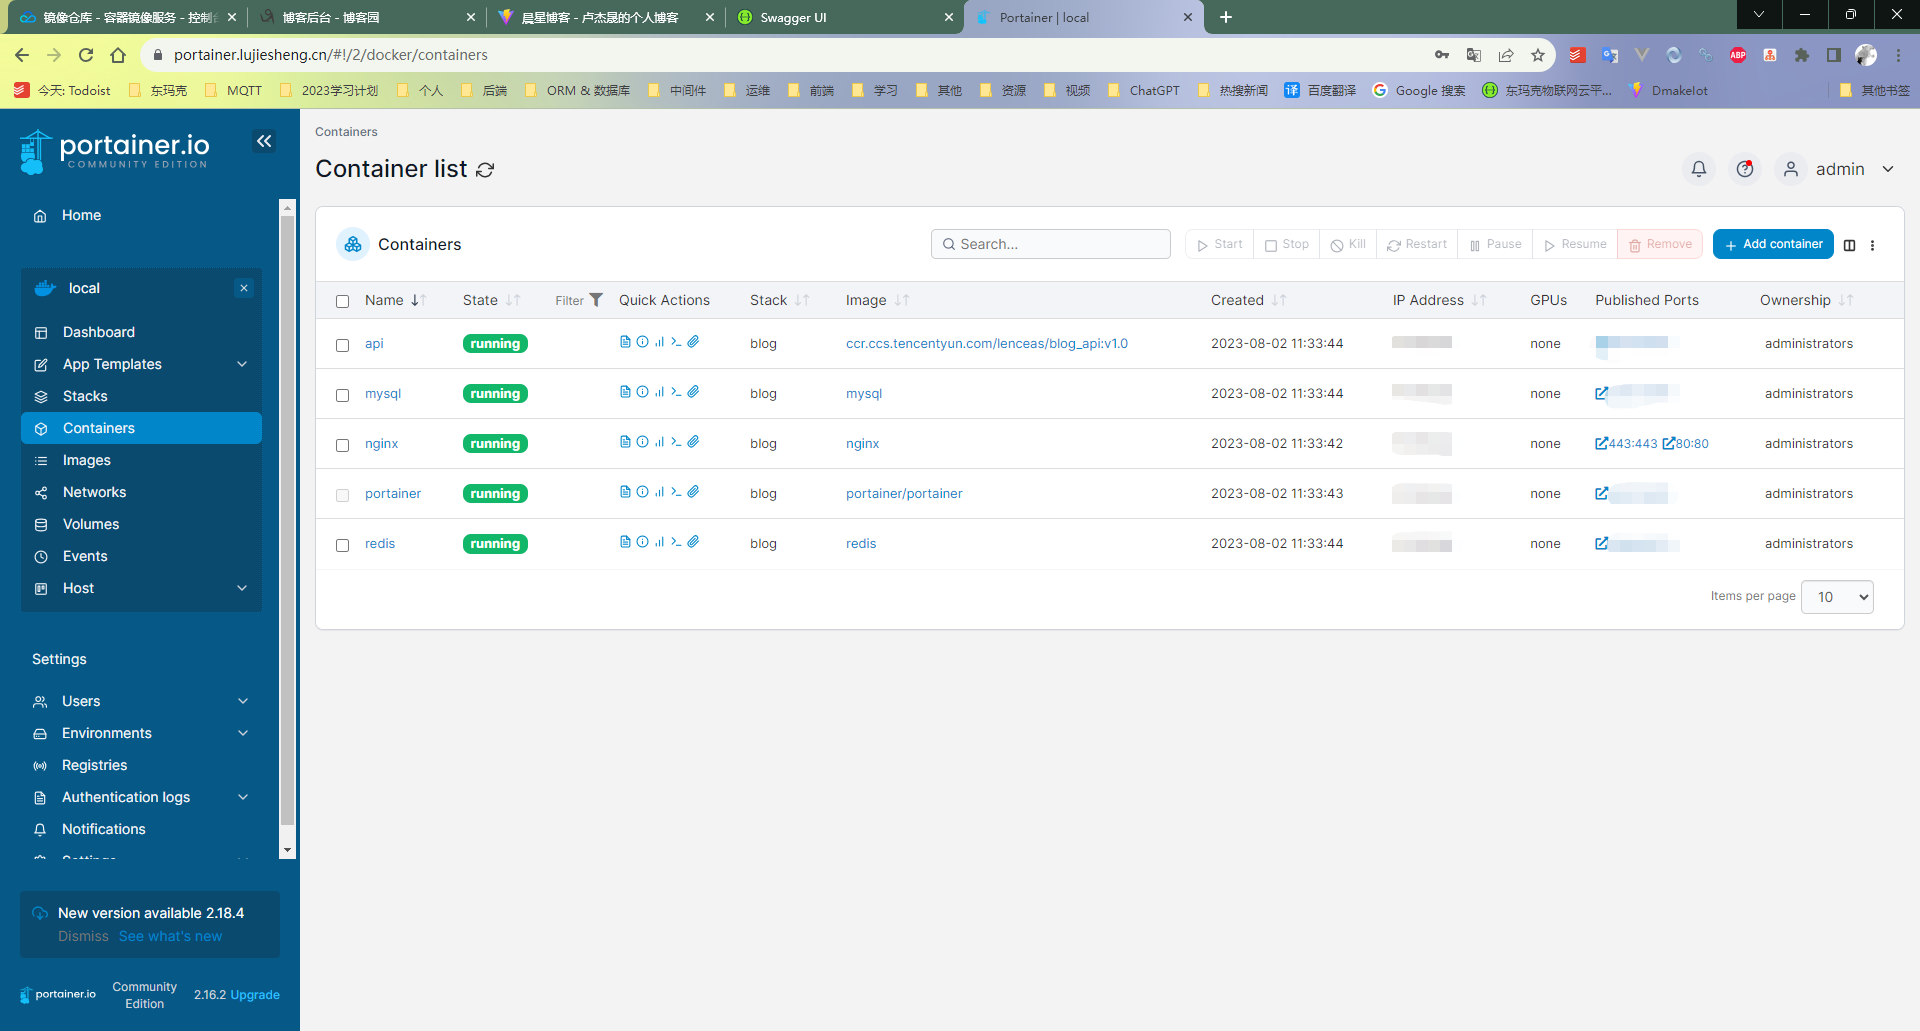
# docker-compose 常用命令 # 启动容器: docker-compose up # 或者后台运行: docker-compose up -d # 停止容器: docker-compose down # 构建和启动容器: docker-compose up --build # 显示容器日志: docker-compose logs # 显示运行的服务列表: docker-compose ps # 查看当前 Docker 中所有网络列表 docker network ls # 停止并移除容器,网络,卷和镜像(慎用): docker-compose down --volumes --rmi all # 查看 Docker Compose 配置文件(默认为 docker-compose.yml)的帮助信息: docker-compose config # 执行一个容器内的命令: docker-compose exec <service_name> <command> # 重新构建指定服务的容器: docker-compose build <service_name> # 停止并删除所有容器,但保留网络和卷等资源: docker-compose down --volumes 13. 验证访问是否部署成功
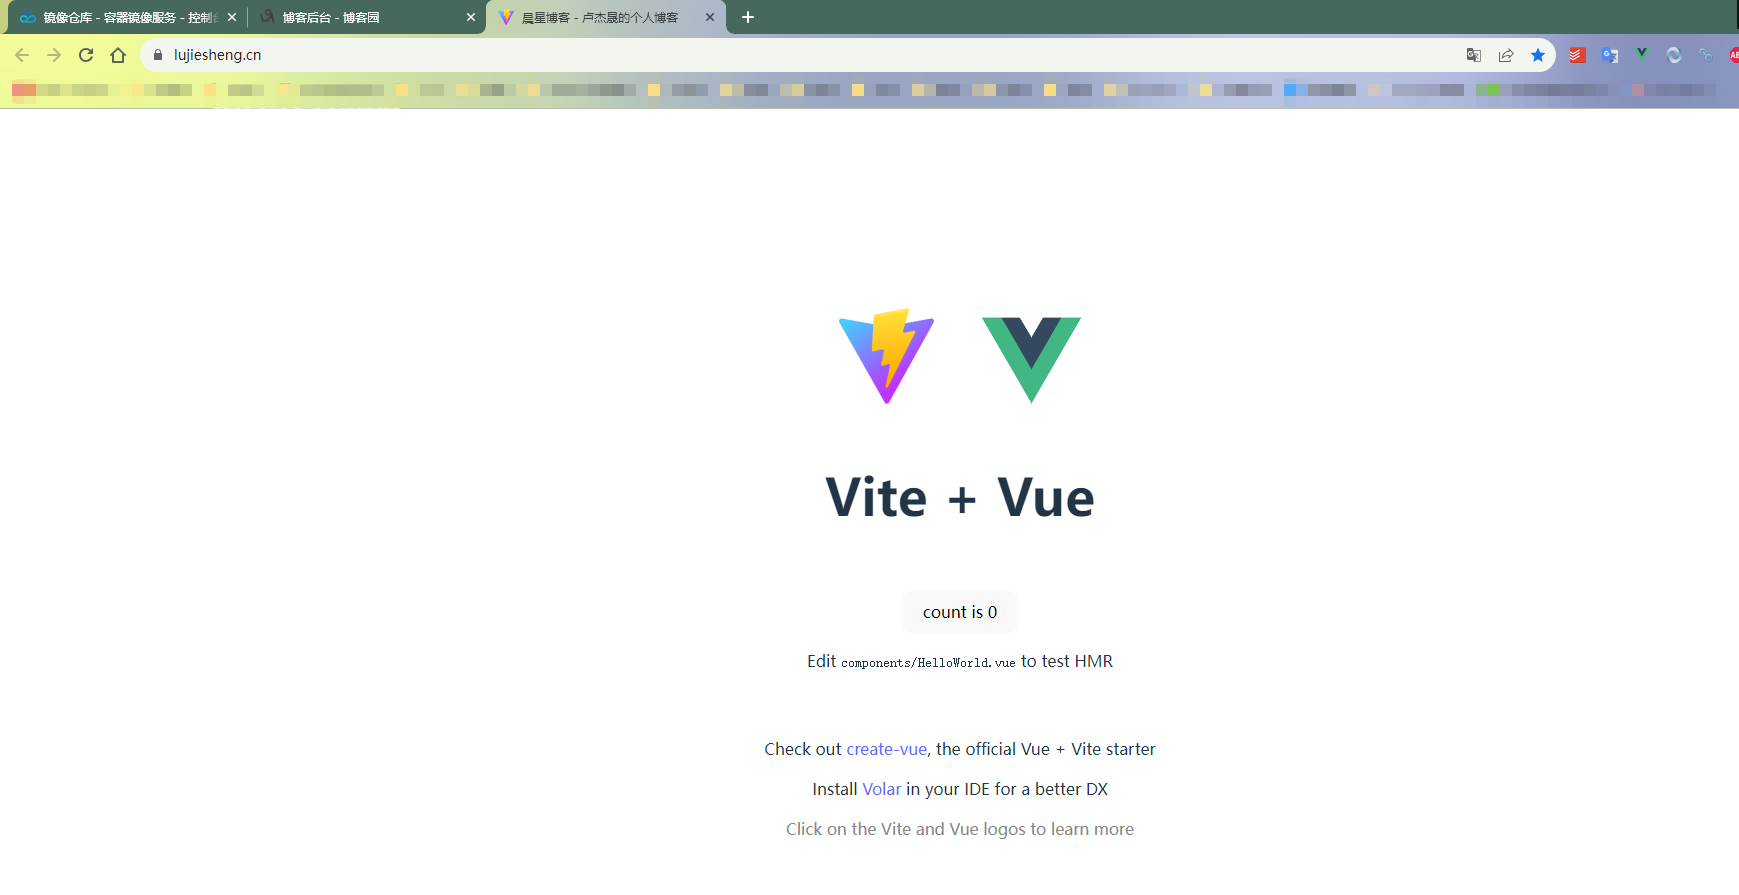
个人博客 前端:https://lujiesheng.cn
个人博客 后端:https://api.lujiesheng.cn

个人博客 运维:https://portainer.lujiesheng.cn
至此,所有流程完毕,部署成功!!!