- A+
随着技术的发展,ASP.NET Core MVC也推出了好长时间,经过不断的版本更新迭代,已经越来越完善,本系列文章主要讲解ASP.NET Core MVC开发B/S系统过程中所涉及到的相关内容,适用于初学者,在校毕业生,或其他想从事ASP.NET Core MVC 系统开发的人员。 经过前几篇文章的讲解,初步了解ASP.NET Core MVC项目创建,启动运行,以及命名约定,创建控制器,视图,模型,接收参数,传递数据,路由,页面布局,wwwroot和客户端库,Razor语法,EnityFrameworkCore与数据库等内容,今天继续讲解ASP.NET Core MVC 中HttpContext等相关内容,仅供学习分享使用。
什么是HttpContext?
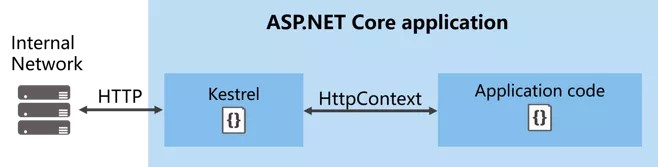
在B/S模式开发的程序中,客户端是浏览器,服务器端Web服务程序,HttpContext是连接客户端和服务器端程序的桥梁,交代了当前请求的环境信息,它封装了请求[Request]和响应[Response]及其他所有信息,示意图如下所示:
图一 内网访问程序
图二 反向代理访问程序

在示意图中,Kestrel 是一个基于 libuv 的跨平台ASP.NET Core web服务器。不清楚 Kerstrel 没关系,以后慢慢了解。
注意:HttpContext从客户端发起一个请求开始,到服务器端响应完成结束,每一个新的请求,都会创建一个新的HttpContext对象。
HttpContext属性
在HttpContext中,最常用的属性有3个【Request,Response,Session】具体属性如下表所示:

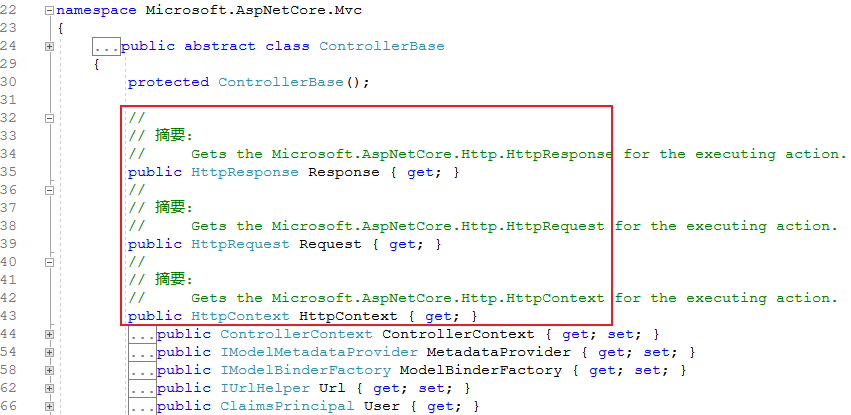
控制器中应用HttpContext
在控制器中,HttpContext作为控制器父类ControllerBase的属性存在,且Request和Response作为使用频率非常高的常用对像,控制器也声明成了属性,都可以直接使用。如下所示:
控制器外使用HttpContext
在应用程序中,控制器继承了Controller类,所以才能不用声明就可以直接使用HttpContext,但是除了控制器,还在其他的程序,那在其他程序中,如何使用HttpContext呢?
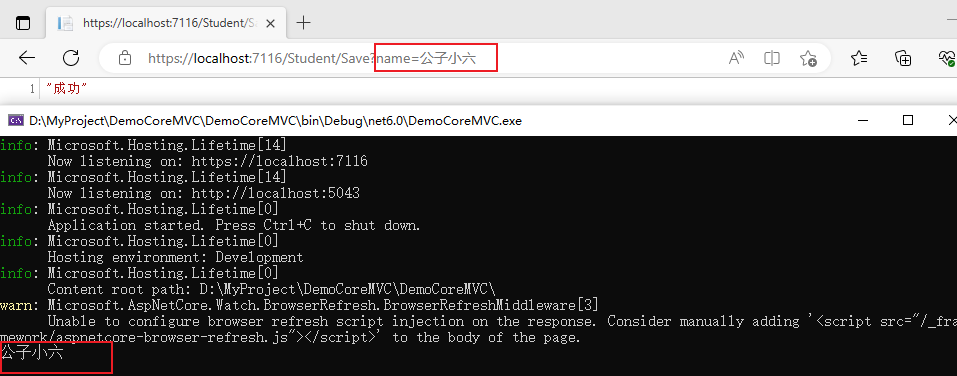
首先有一个服务接口IStudentService和服务实现类StudentService,其他中在StudentService中访问HttpContext,如下所示:
1 namespace DemoCoreMVC.Services 2 { 3 public interface IStudentService 4 { 5 /// <summary> 6 /// 保存类 7 /// </summary> 8 void Save(); 9 } 10 } 11 12 namespace DemoCoreMVC.Services 13 { 14 public class StudentService : IStudentService 15 { 16 private readonly IHttpContextAccessor contextAccessor; 17 18 public StudentService(IHttpContextAccessor contextAccessor) 19 { 20 this.contextAccessor = contextAccessor; 21 } 22 23 public void Save() 24 { 25 var name = this.contextAccessor.HttpContext?.Request.Query["Name"]; 26 Console.WriteLine(name); 27 } 28 } 29 }
在控制器中,通过构造函数的方式将IStudentService注入进去,如下所示:
1 using DemoCoreMVC.Services; 2 using Microsoft.AspNetCore.Mvc; 3 4 namespace DemoCoreMVC.Controllers 5 { 6 public class StudentController : Controller 7 { 8 private readonly IStudentService studentService; 9 10 public StudentController(IStudentService studentService) 11 { 12 this.studentService = studentService; 13 } 14 15 public IActionResult Save() 16 { 17 studentService.Save(); 18 return Json("成功"); 19 } 20 21 public IActionResult Index() 22 { 23 return View(); 24 } 25 } 26 }
在Program.cs中,将服务添加到容器中,如下所示:
1 //增加一个默认的HttpContextAccessor 2 builder.Services.AddHttpContextAccessor(); 3 //增加服务 4 builder.Services.AddScoped<IStudentService, StudentService>();
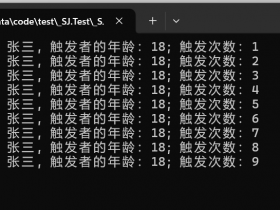
经过以上3步,就可以实现在控制器之外的类中,访问HttpContext,测试示例,如下所示:
注意:在ASP.NET Core MVC项目中,对象的创建,优先从容器中获取,这样可以不需要考虑它的创建过程和构造参数。如:创建服务Service,控制器对象Controller,视图对象View,数据访问层Repository等内容。对于模型对象,如视图模型,数据模型等不依赖其他对象的类型,则可以通过New进行创建。
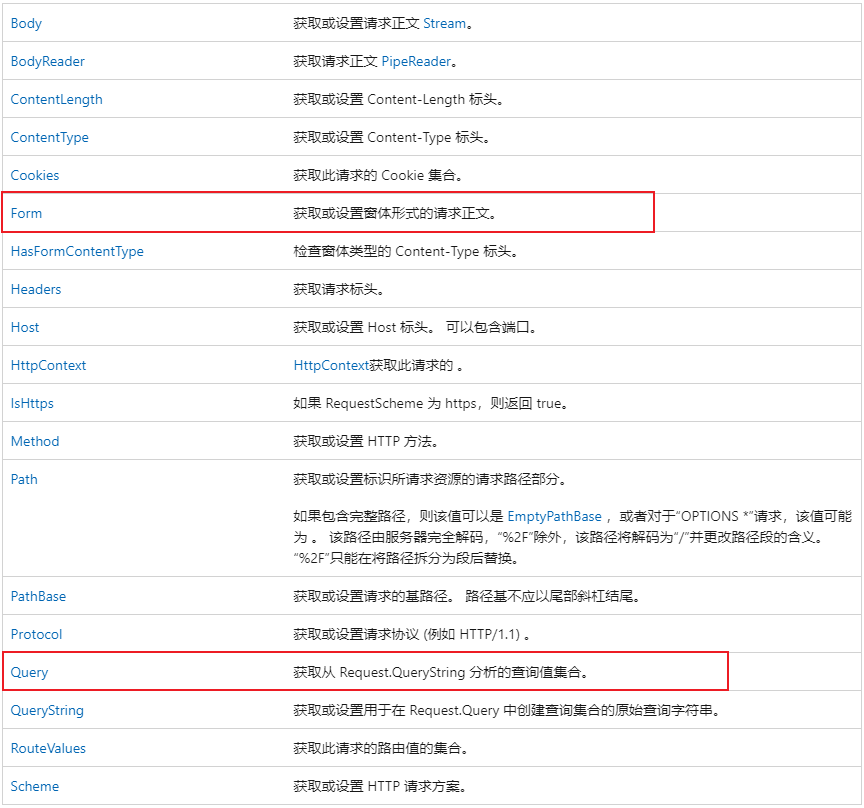
HttpRequest
HttpRequest表示单个请求的传入端,常用的Query用于获取Get请求传递的参数,Form用于获取Post请求传递的参数,如下所示:
HttpRequest示例
在本示例中,以Request.Form为例,获取Post方式传递的参数,客户端将所有需要传递的内容包括在Form表单内容,在服务器端Action中通过Request.Form["Key"]进行获取。如下所示:
Add.cshtml视图中Form表单内容,如下所示:
1 <form action="~/Hello/Save" method="post"> 2 <div style="margin:10px;"> 3 <span>学号:</span> 4 <input type="text" name="Id" /> 5 </div> 6 <div style="margin:10px;"> 7 <span>姓名:</span> 8 <input type="text" name="Name" /> 9 </div style="margin:10px;"> 10 <div style="margin:10px;"> 11 <span>年龄:</span> 12 <input type="text" name="Age" /> 13 </div> 14 <div style="margin:10px;"> 15 <span>性别:</span> 16 <input type="text" name="Sex" /> 17 </div> 18 <div style="margin:10px;"> 19 <input type="submit" name="submit" value="保存" /> 20 </div> 21 </form>
HelloController中Save方法,如下所示:
1 [HttpPost] 2 public IActionResult Save() 3 { 4 5 var id = Request.Form["Id"]; 6 var name = Request.Form["Name"]; 7 var age = Request.Form["Age"]; 8 var sex = Request.Form["Sex"]; 9 var student = new Student() 10 { 11 Id = string.IsNullOrEmpty(id) ? 0 : int.Parse(id), 12 Name = name, 13 Age = string.IsNullOrEmpty(age) ? 0 : int.Parse(age), 14 Sex = sex 15 }; 16 return Json(student); 17 }
运行测试,在浏览器中输入网址【https://localhost:7116/Hello/add】进行测试,如下所示:

HttpRequest其它示例
HttpRequest中的其它示例,如下所示:
1 public IActionResult Index() 2 { 3 Console.WriteLine($"Request.Host:{Request.Host}" ); 4 Console.WriteLine($"Request.Path:{Request.Path}"); 5 Console.WriteLine($"Request.Protocol:{Request.Protocol}"); 6 Console.WriteLine($"Request.ContentType:{Request.ContentType}"); 7 Console.WriteLine($"Request.Headers:"); 8 foreach(var header in Request.Headers) 9 { 10 Console.WriteLine($"{header.Key}:{header.Value}"); 11 } 12 Console.WriteLine($"Request.Cookies:"); 13 foreach (var cookie in Request.Cookies) 14 { 15 Console.WriteLine($"{cookie.Key}:{cookie.Value}"); 16 } 17 return View(); 18 }
其它属性示例截图,如下所示:
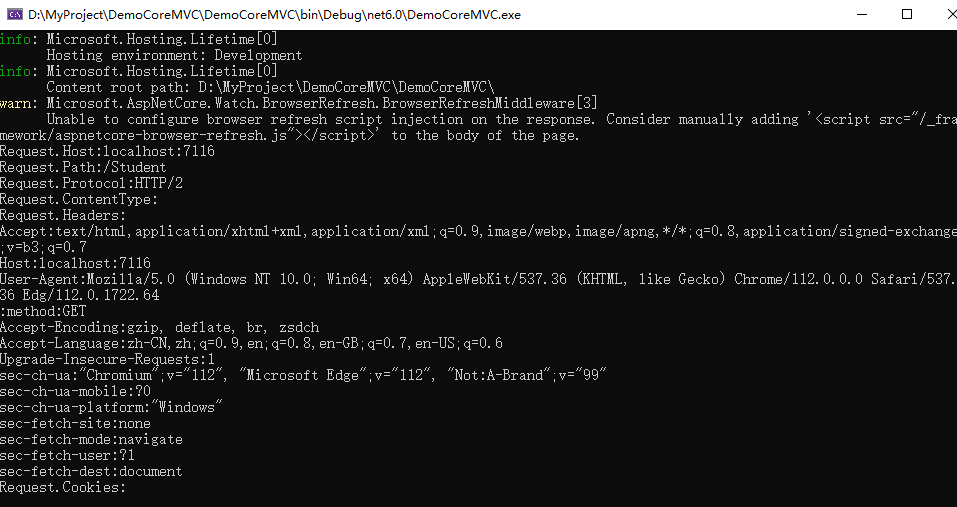
注意:在Request的Get请求中,默认ContentType为空,Cookies如果没有设置,也为空。
Cookie存放于客户端浏览器中,可以通过浏览器开发者模式F12下进行查看,以www.bilibili.com为例,如下所示:

HttpResponse
HttpResponse表示单个请求的传出内容,

状态码StatusCode
StatusCode是一个int类型,表示当前响应Http请求的状态,可以通过System.Net.HttpStatusCode(枚举)进行转换,常用的有以下几种:
- OK = 200,成功,这是最常用的一个响应状态码
- NotFound = 404, 未发现,即请求的信息不存在
- InternalServerError = 500,服务器内部错误
- Redirect = 302, 请求已被重定向
在Controller中,常见的状态码返回值,以被定义为方法,如:Ok(),NotFound()等,可以直接调用。
HttpResponse示例
在响应的Headers中,添加Author信息,如下所示:
1 public IActionResult Test2() 2 { 3 Response.Headers.Add("Author", "公子小六"); 4 return Json("ABC"); 5 }
在添加Headers时,如果是汉字,则会报下面一个错误,如下所示:
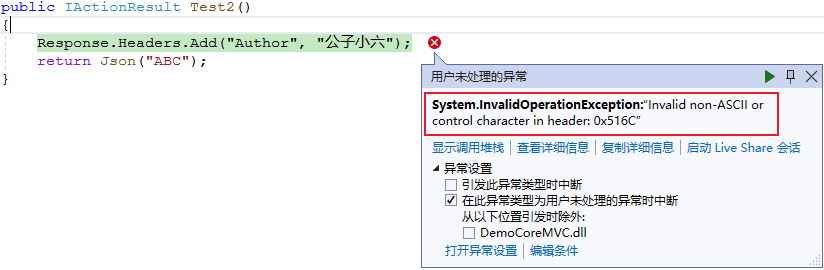
以上错误表示编码错误,汉字无效,需要进行编码转换,如下所示:
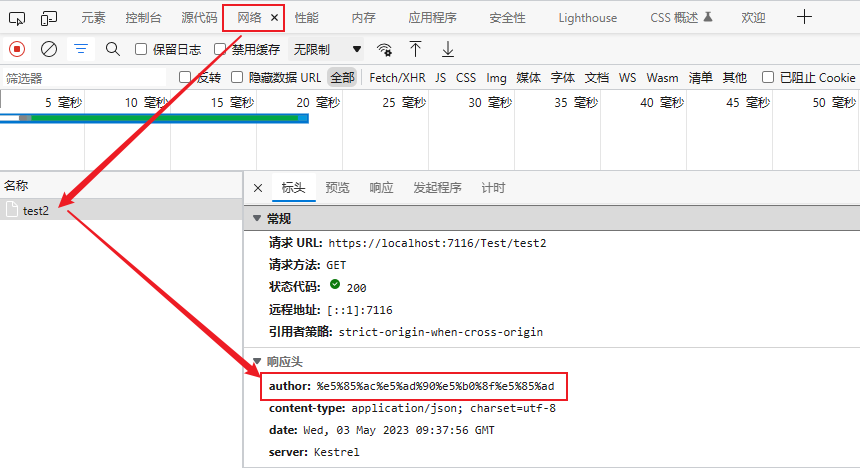
1 public IActionResult Test2() 2 { 3 var author = HttpUtility.UrlEncode("公子小六", Encoding.UTF8); 4 Response.Headers.Add("Author", author); 5 return Json("ABC"); 6 }
请求示例如下所示:
会话Session
由于Http请求是无状态的,单次请求完成后,就会进行释放,那么如何在无状态的请求中,保留一些相关的数据呢?这就用到了Session,Session在用户打开浏览器登录系统开始,到关闭浏览器退出系统结束,将用户请求的一些数据,以键值对的形式保存在服务器端的缓存中,可以解决无状态协议模式下数据的频繁传递传递,减少请求数据量,提高性能。Session一般应用在小型的单体应用程序中,对于大型的分布式程序,则不适用。
每一个用户的浏览器请求都有自己的Session内存块,不会和其他用户的请求相混淆。
要启用Session,首先需要在Program.cs中添加Session服务,和启用Session中间件,如下所示:
1 using DemoCoreMVC.Services; 2 using Microsoft.AspNetCore.Server.Kestrel.Core; 3 using System.Text.Encodings.Web; 4 using System.Text.Unicode; 5 6 var builder = WebApplication.CreateBuilder(args); 7 8 // Add services to the container. 9 builder.Services.AddControllersWithViews().AddJsonOptions(options => 10 { 11 options.JsonSerializerOptions.Encoder = JavaScriptEncoder.Create(UnicodeRanges.All); 12 }); 13 14 builder.Services.Configure<KestrelServerOptions>(options => 15 { 16 options.AllowSynchronousIO = true; 17 }); 18 19 //1. 往容器中添加Session服务,启用Session服务 20 builder.Services.AddSession(); 21 22 var app = builder.Build(); 23 24 // Configure the HTTP request pipeline. 25 if (!app.Environment.IsDevelopment()) 26 { 27 app.UseExceptionHandler("/Home/Error"); 28 // The default HSTS value is 30 days. You may want to change this for production scenarios, see https://aka.ms/aspnetcore-hsts. 29 app.UseHsts(); 30 } 31 32 //2.使用Session中间件,主要用于拦截Http请求 33 app.UseSession(); 34 app.UseHttpsRedirection(); 35 app.UseStaticFiles(); 36 37 //1. 添加路由中间件EndpointRoutingMiddleware 38 app.UseRouting(); 39 app.MapControllers(); 40 app.UseAuthorization(); 41 42 app.MapControllerRoute( 43 name: "default", 44 pattern: "{controller=Home}/{action=Index}/{id?}"); 45 46 47 app.Run();
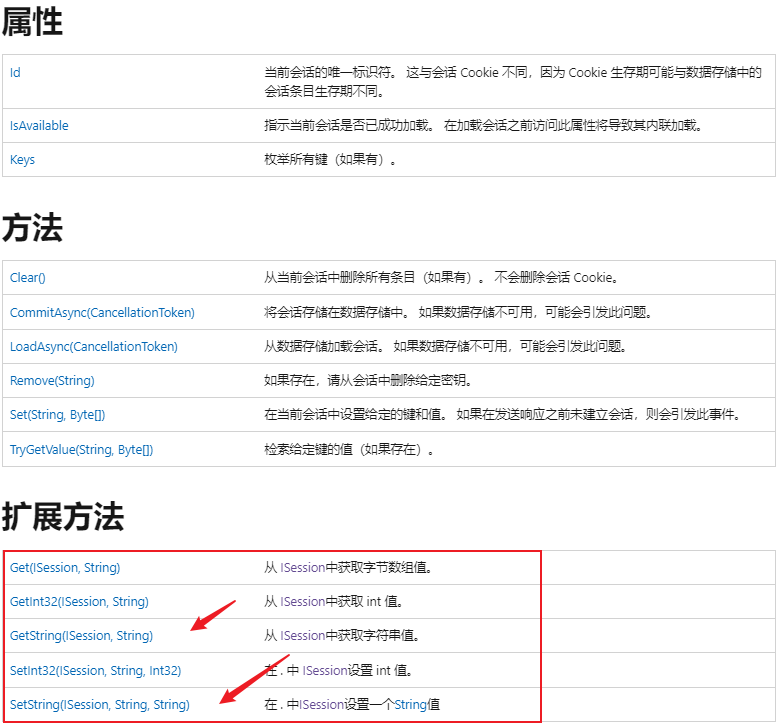
Session属性和方法
在实际应用中,一般使用扩展方法SetString(key,value),GetString(key)进行Session值的设置和获取,如下所示:
注意,关于Session使用,有以下两点需要注意:
- 在控制器中,可以直接使用Session属性
- 在非控制器中,可以使用请求上下文HttpContext进行获取。
Session示例
以常用的登录为例,实现如下功能:
- 用户打开登录页面,输入账号密码,点击登录按钮
- 验证用户名密码,验证成功后,保存Session,跳转到首页
- 首页获取Session中保存的内容,并通过ViewBag传递到客户端,显示在页面上。
首先创建控制器LoginController,如下所示:
1 namespace DemoCoreMVC.Controllers 2 { 3 public class LoginController : Controller 4 { 5 public IActionResult Index() 6 { 7 return View(); 8 } 9 10 public IActionResult Login() 11 { 12 var username = Request.Form["username"]; 13 var password = Request.Form["password"]; 14 if(username=="admin" && password == "abc123") 15 { 16 HttpContext.Session.SetString("username", username); 17 } 18 return Redirect("/Home"); 19 } 20 } 21 }
然后创建Login/Index.cshtml视图,如下所示:
1 <form action="~/Login/Login" method="post"> 2 <div style="margin:10px;"> 3 <span style="display:inline-block; width:80px;">用户名:</span> 4 <input type="text" name="username" /> 5 </div> 6 <div style="margin:10px;"> 7 <span style="display:inline-block;width:80px;">密 码:</span> 8 <input type="password" name="password" /> 9 </div style="margin:10px;"> 10 <div style="margin:10px;"> 11 <input type="submit" name="submit" value="登录" /> 12 </div> 13 </form>
修改HomeController中代码,如下所示:
1 public class HomeController : Controller 2 { 3 4 public HomeController() 5 { 6 } 7 8 public IActionResult Index() 9 { 10 var username = HttpContext.Session.GetString("username"); 11 ViewBag.Username = username; 12 return View(); 13 } 14 }
Home/Index.cshtml中修改代码,获取ViewBag传递的值,如下所示:
1 <div class="text-center"> 2 <h1 class="display-4">Welcome @ViewBag.Username</h1> 3 <p>Learn about <a href="https://docs.microsoft.com/aspnet/core">building Web apps with ASP.NET Core</a>.</p> 4 </div>
以上就是Session示例的创建和获取的相关代码,页面测试如下所示:

Session唯一标识
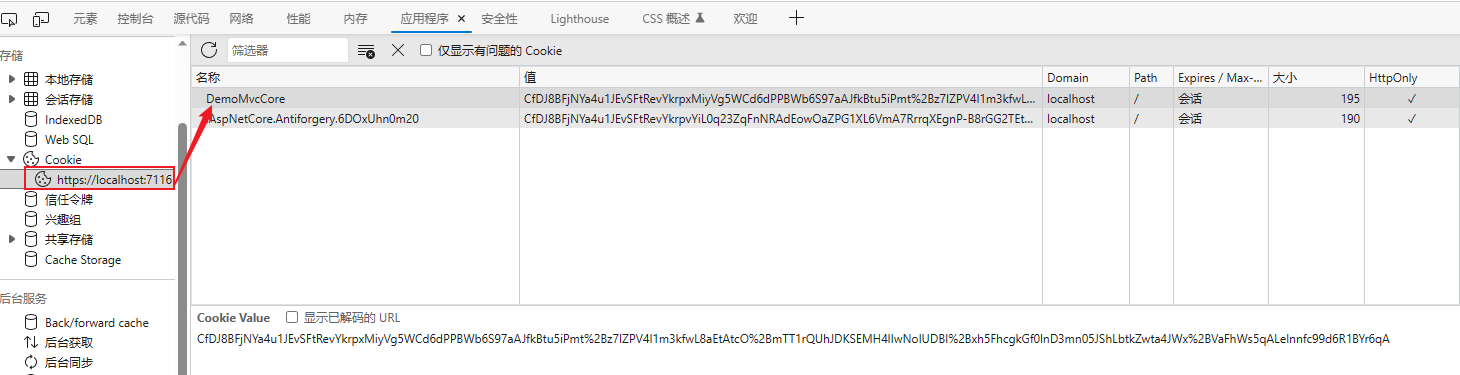
每一个浏览器打开的Session都有一个唯一标识,在控制器中,可以通过HttpContext.Session.Id进行区分。可以在Program.cs中添加服务到容器时配置相关参数,如下所示:
1 //1. 往容器中添加Session服务,启用Session服务 2 builder.Services.AddSession(option => 3 { 4 option.IdleTimeout = TimeSpan.FromMinutes(10); 5 option.Cookie.Name = "DemoMvcCore"; 6 });
设置Session选项中的Cookie的名称后,会在浏览器客户端创建对应的值,如下所示:
参考文章
本篇文章主要参考内容如下:
1. https://learn.microsoft.com/zh-cn/dotnet/api/microsoft.aspnetcore.http.httpcontext?view=aspnetcore-7.0
2. https://learn.microsoft.com/zh-cn/dotnet/api/microsoft.aspnetcore.http.httprequest?view=aspnetcore-7.0
3. https://learn.microsoft.com/zh-cn/dotnet/api/microsoft.aspnetcore.http.httpresponse?view=aspnetcore-7.0
4. https://learn.microsoft.com/zh-cn/dotnet/api/microsoft.aspnetcore.http.isession?view=aspnetcore-7.0
以上就是ASP.NET Core MVC从入门到精通之HttpContext的全部内容。