- A+
所属分类:linux技术
一. 网络检查
1.1 网卡管理
- ifconfig用于
查看/修改IP,查看MAC信息,启动/关闭网卡等。
$ ifconfig #网卡信息 $ ifconfig eth0 down #关闭 $ ifconfig eth0 up #开启 $ ifconfig eth0 192.168.1.2 #修改IP $ ifconfig eth0 192.168.1.2 netmask 255.255.255.0 #修改掩码
1.2 DNS解析
- dig是UNIX/BSD系统都自带的DNS诊断工具,功能强大。
- host是轻量级的dig,值返回dig的
ANSWER section。 - nslookup功能类似,简单方便,但已弃用。
$ host www.google.cn #DNS解析 $ dig www.google.cn #DsNS解析 $ dig www.google.cn +trace #跟踪解析 $ dig -x 203.208.50.98 #反向解析 $ nslookup www.google.cn #已弃用
1.3 网关探测
- traceroute 命令用于探测报文经过的所有网关/路由器,默认四层使用UDP协议发送数据包。
$ traceroute www.google.cn #IP和域名 $ traceroute -n www.google.cn #仅IP探测
1.4 网络状态
netstat命令用来打印Linux中网络系统的状态信息,可让你得知整个Linux系统的网络情况。
| 参数 | 说明 |
|---|---|
| -r (route) | 显示路由表 |
| -i (interfaces) | 显示网络接口 |
| -s (statistice) | 显示统计表 |
| -t (TCP) | 显示TCP传输协议的连线状况 |
| -u (UDP) | 显示UDP传输协议的连线状况 |
| -l (listening) | 显示监控中的Socket |
| -n (numeric) | 使用ip地址 |
| -p (programs/protocal) | 显示程序名称(Unix)/协议(mac) |
$ netstat -i #显示接口 $ netstat -r #显示路由表 $ netstat -ts #显示TCP统计 $ netstat -us #显示UDP统计 $ netstat -tln #列出tcp端口 $ netstat -uln #列出udp端口 $ netstat -tulnp #列出所有端口/程序
二. 网络工具
2.1 telnet
Telnet:TCP/IP协议族成员,是Internet远程登录服务的标准协议和主要方式,默认端口为23。
$ telnet 10.0.0.11 #登录服务 $ telnet 10.0.0.11 3306 #探测端口
2.2 netcat
netcat是网络工具中的瑞士军刀,用作端口监听/端口扫描/远程传输/远程shell等。
2.1.1 单工监听
# server $ nc -lp 2222 -e /bin/bash #监听2222端口 # client $ nc 192.168.1.10 2222 #连接到server > ...进入远程终端模式... 2.1.2 双工对话
# server(ip:192.168.1.10) $ nc -lkp 2222 #启动监听(k为连续监听) $ nc -lkp 2222 -o a.txt #将对话内容写入文件 # client $ nc 192.168.1.10 2222 #连接到server > ...进入双工对话模式... 也可以直接使用http访问serverA:
curl -X POST http://192.168.1.10:2222 -d '{"key":"apple"}'
2.1.3 信息探测
- 端口扫描
# -n: 不进行DNS解析 ; # -v:输出信息; # -z:即zero,发送的数据包中不包含任何payload ; $ nc -zvn 192.168.1.10 21-80 #扫描21到80端口 $ nc -v 192.168.1.10 80 #80端口是否开放 - banner信息
$ echo " "|nc -vn -w1 192.168.1.10 80 2.1.4 文件传输:
适用于传输
取证文件或无法正常下载的敏感文件。
- 场景一:服务器接收文件
$ nc -lp 2222 >./outfile #server $ nc 192.168.1.10 2222 < infile #client - 场景二:服务器(暴露)分发文件
$ nc -lp 2222 <./infile #server $ nc 192.168.1.10 2222 > outfile #client 2.1.5 目录传输
- 场景一:服务器作为接受者
$ nc -lp 2222 | tar zxf - #server $ tar zcf - ./share_dir| nc 192.168.1.10 2222 #client(先断开客户端) - 场景二:服务器作为发送者
$ tar -c share_dir |nc -lp 2222 #server $ nc 192.168.1.10 2222|tar -x #client - 避免连接服务端时端
假死
$ nc -w3 192.168.1.11 2222 #cleint:等待3秒(此处访问一个不存在的ip来模拟超时) 2.1.6 磁盘复制
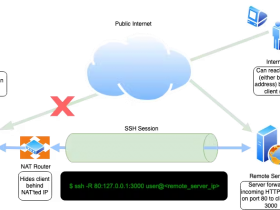
# server $ nc -lp port |dd of=/dev/sda #of是output filter # client $ dd if=/dev/sda | nc -nc ip port -q 1 #if是input filter 2.1.7 端口转发
2.3 curl
curl是用于通过URL传输数据的命令行工具和库。
2.3.1 查看过程
#查看过程 $ curl -I www.example.cn #查看头部 $ curl -i www.example.cn #查看响应 $ curl -v www.example.cn #查看全过程 $ curl --trace dump.txt www.example.cn #抓包数据 2.3.2 设置头部
USER_AGENT='Mozilla/5.0 AppleWebKit/600 Mobile MicroMessenger/6.0' REFERER='http://www.referer.com' $ curl -H 'Authorization:Bearer xxx' http://example.com #内容HEAD $ curl -A $USER_AGENT http://example.com #用户代理 $ curl -u "root:123456" example.com #用户认证 $ curl -e $REFERER http://www.example.com #推荐网址 2.3.3 请求方法
$ curl -X HEAD http://example.com #获取报文首部 $ curl -X GET http://example.com #请求资源 $ curl -X POST http://example.com #提交数据 $ curl -X DELETE http://example.com #删除URI资源 $ curl -X PUT http://example.com #修改资源/传输文件,参数是一个完整的对象 $ curl -X PATCH http://example.com #与PUT类似(强调局部修改),参数可包含对象的部分字段 $ curl -X OPTION http://example.com #询问URI资源支持的方法 $ curl -X TRACE http://example.com #环回诊断,即检查原报文在穿过防火墙、代理、网关时是否被修改或毁坏 $ curl -X CONNECT http://example.com #使用隧道协议链接代理 $ curl -X LINK http://example.com #建立和资源之间的联系 $ curl -X UNLINK http://example.com #断开连接关系 2.3.4 提交数据
# -G: GET (Content-Type: text/plain; charset=utf-8) # -d: POST(Content-Type: application/x-www-form-urlencoded) # -F: POST(Content-Type: multipart/form-data;boundary=-----4a1a7a53) #内容格式 $ curl -H 'Content-Type:text/plain' -d "hello" http://example.com #文本 $ curl -H 'Content-Type:application/json' -d "{'name':Tom}" http://example.com #Json $ curl -H 'Content-Type:application/x-www-form-urlencoded' -d "name=tom" http://example.com #Form #URL参数 $ curl "http://localhost:8080?name=tom" $ curl -G "http://localhost:8080?name=tom" $ curl -G -d 'name=jack' -d 'age=20' http://localhost:8080 #BODY参数 #-d:会将多个参数进行拼接,默认以Post(application/x-www-form-urlencode)提交数据 $ curl -d "name=tom&age=22" http://localhost:8080 $ curl -d "name=tom" -d "age=18" http://localhost:8080 #多个参数拼接 $ curl -d "@param.txt" http://localhost:8080 #从文件读取参数 #数据类型(URL) $ curl -G "http://localhost:8080?hobby=golang&hobby=java" #数组 $ curl -G "http://localhost:8080?score[math]=88&score[han]=96" #字典 #数据类型(Form) $ curl -d "hobby=golang&hobby=java" localhost:8080 #数组 $ curl -d "score[math]=88&score[han]=96" http://localhost:8080 #字典 $ curl -F "hobby=golang" -F "hobby=javascript" http://localhost:8080 #数组 $ curl -F "score[math]=88" -F "score[han]=96" http://localhost:8080 #字典 2.3.5 上传文件
#-F: 即Form,可指定多个MIME数据,一般用于提交文件数据 # file:文件路径; type:文件MIME; filename:文件名 $ curl -F "name=tom" -F "age=18" http://localhost:8080 #一般数据 $ curl -F type="thumb" -F '[email protected]' http://localhost:8080 #MIME:multipart/form-data $ curl -F '[email protected];type=image/png;filename=a.png' http://localhost:8080 #文件/MIME/名称 2.3.6 下载文件
DOWNLOAD_URL=mirrors.aliyun.com/centos/7.9.2009/isos/x86_64/CentOS-7-x86_64-Minimal-2009.iso $ curl -o dump.html http://www.example.com/a.html # 下载网页(自定义文件名) $ curl -O http://www.example.com/a.html # 下载网页(默认文件名) $ curl -# -O $DOWNLOAD_URL # 下载文件(-#:显示进度) $ curl -# -O -C - $DOWNLOAD_URL # 断点续传(-C <offset>:偏移量) 2.3.7 会话数据
COOKIE='key1=hello; Path=/; Domain=www.abc.com; Expires=Tue, 02 Aug 2022 06:14:45 GMT;' # -b/--cookie <name=string/file> cookie字符串或文件读取位置 # -c/--cookie-jar <file> 操作结束后把cookie写入到这个文件中 $ curl -b "$COOKIE" http://example.com #设置Cookie curl -b cookies.txt -c newcookies.txt itbilu.com 2.3.8 执行脚本
#L: location; S: show-error; s: silent mode(静音模式) $ curl -sSL http://test.sh|bash #方式一 $ bash <(curl -sSL http:xxx.sh) #方式二 $ bash <(curl -Ls https://install.direct/go.sh) #示例1:下载安装V2.ray $ curl -sSL https://get.docker.com|sh #示例2:下载安装docker
三. 防火墙
Centos7中默认使用
Firewalld取代了(通用的)Iptables作为防火墙管理工具。 iptables服务会把配置好的防火墙策略交由内核层面的netfilter网络过滤器来处理,而firewalld服务则是把配置好的防火墙策略交由内核层面的nftables包过滤框架来处理。它们的作用都是为了方便运维人员管理Linux系统的防火墙策略,而我们只要配置妥当其中一个就足够了。
3.1 firewalld
3.1.1 服务管理
$ yum install firewalld systemd -y #安装防火墙 $ firewall-cmd --state #防火墙状态 $ systemctl status firewalld #查看服务状态 $ systemctl start firewalld #启动 $ systemctl stop firewalld #停止 $ systemctl restart firewalld #重启 $ systemctl disable/enable firewalld #禁用/启用 $ systemctl is-enabled firewalld.service #是否开机启动 $ systemctl list-unit-files|grep enabled #已启动的服务列表 $ systemctl --failed #启动失败的服务列表 3.1.2 规则配置
$ firewall-cmd --zone=public --query-port=80/tcp #查看端口状态 $ firewall-cmd --zone=public --add-port=80/tcp --permanent #添加端口 $ firewall-cmd --reload #重新载入 $ firewall-cmd --zone=public --remove-port=80/tcp --permanent #删除端口 $ firewall-cmd --zone=public --list-ports #查看打开的端口 $ firewall-cmd -V #查看版本 $ firewall-cmd -h #查看帮助
3.2 iptables
3.2.1 服务管理
$ yum install -y iptables iptables-services #安装服务 $ service iptables status|start|stop|restart #服务管理 $ chkconfig iptables off|on #永久开启/关闭 $ service iptables save #保存规则 3.2.2 规则配置
| 参数 | 说明 |
|---|---|
| ACCEPT | 接收/白名单 |
| DROP | 丢弃/黑名单 |
-A |
附加到规则链 |
-P |
设置默认策略 |
--dport |
目标端口 |
--sport |
来源端口 |
$ iptables -L -n #查看规则 $ iptables -Z #计数归零 $ iptables -F #清空默认规则 $ iptables -X #清空我的规则 $ iptables -P OUTPUT ACCEPT #出站绿灯 $ iptables -P INPUT ACCEPT #入站绿灯 $ iptables -A INPUT -i lo -j ACCEPT #允许回环访问 $ iptables -A OUTPUT -o lo -j ACCEPT #允许回环访问 $ iptables -A INPUT -p tcp --dport 3306 -j ACCEPT #开放端口 $ iptables -A INPUT -p tcp -s 10.0.0.12 -j ACCEPT #信任IP $ iptables -P INPUT DROP #禁止入站 $ iptables -P FORWARD DROP #禁止转发 $ iptables -I INPUT -s ***.***.***.*** -j DROP #插入黑名单(封锁) $ iptables -D INPUT -s ***.***.***.*** -j DROP #删除黑名单(解封)
参考链接
https://www.linuxprobe.com/25-iptables-common-examples.html
https://blog.csdn.net/u012486840/article/details/52635263