- A+
linux挂载新硬盘
前言
最近一些功能需要一些虚拟机,考虑到创建虚拟机和配置一些常用软件比较麻烦,故打算先创建一个资源最小化的虚拟机,然后配置一些常用软件,以后需要可以直接复制后就能使用。
虽然虚拟机大部分资源都可以动态修改,但是硬盘空间并不是那么容易改。初始化硬盘设置过大了,不好回收,设置小了又不够用。针对这个问题,我打算用挂载新硬盘的形式来解决,在linux中一切皆文件,添加一块新的硬盘相当于多挂载几个目录而已。
由于很久没有使用挂载硬盘进行操作了,一些关键命令的参数都忘记了?,今天实操一下记录下来,免得以后又满世界找资料。
一、硬盘分区、格式化、挂载分区的关系
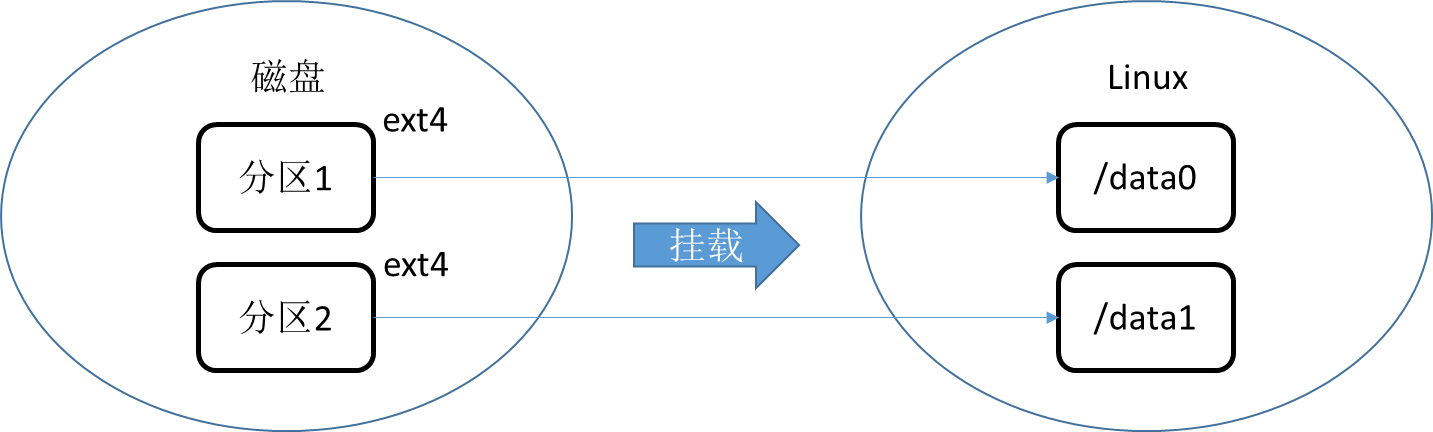
从上图可以看出它们之间的关系:
- 分了方便管理,硬盘需要分区,可以分多个,也可以把整个硬盘弄成一个分区。
- 分区需要使用文件系统来格式后才能使用
- 格式化后的分区就可以被挂载到系统中某个目录下
二、查找新硬盘
首先我们需要找到硬盘在哪,linux中设备都挂载到/dev目录下,名称由系统自动生成。但是这个名称也不是乱随机生成的,硬盘接口的类型,把IDE的命名位hd[a-z],把SCSI等的命名位sd[a-z],如果有多个类型相同的硬盘,会在后面加个数字,例如第二块SCSI硬盘的命名为sdb2。
可以用fdisk查看分区,fdisk所在的目录在/usr/sbin在某些发行版是没有配置到PATH上,如果要直接使用需要手动把/usr/sbin目录配置到PATH,或者使用绝对路径/usr/sbin/fdisk使用。使用fdisk -l列出设备信息,以下是我的虚拟机的输出。
debian@debian:~$ sudo fdisk -l Disk /dev/sdb: 20 GiB, 21474836480 bytes, 41943040 sectors Disk model: VMware Virtual S Units: sectors of 1 * 512 = 512 bytes Sector size (logical/physical): 512 bytes / 512 bytes I/O size (minimum/optimal): 512 bytes / 512 bytes Disklabel type: dos Disk identifier: 0x606baa63 Disk /dev/sda: 30 GiB, 32212254720 bytes, 62914560 sectors Disk model: VMware Virtual S Units: sectors of 1 * 512 = 512 bytes Sector size (logical/physical): 512 bytes / 512 bytes I/O size (minimum/optimal): 512 bytes / 512 bytes Disklabel type: dos Disk identifier: 0x953d4c78 Device Boot Start End Sectors Size Id Type /dev/sda1 * 2048 60913663 60911616 29G 83 Linux /dev/sda2 60915710 62912511 1996802 975M 5 Extended /dev/sda5 60915712 62912511 1996800 975M 82 Linux swap / Solaris 这里可以看到设备/dev/sdb是我挂载的一块新硬盘,大小是20G,分区表格式是dos(MBR)。
三、挂载新硬盘实操
挂载一个新的硬盘,需要先对硬盘进行分区,然后对分区进行格式化,最后挂载即可。但是手动挂载每次重启后都需要重新手动挂载,所以需要一个配置让系统每次开机自动对分区进行挂载,这里修改的配置是fstab。
1、硬盘分区
使用fdisk /dev/sdb进入交互式命令,可以输入m显示帮助信息
debian@debian:~$ sudo fdisk /dev/sdb Welcome to fdisk (util-linux 2.36.1). Changes will remain in memory only, until you decide to write them. Be careful before using the write command. Command (m for help): m Help: DOS (MBR) a toggle a bootable flag b edit nested BSD disklabel c toggle the dos compatibility flag Generic d delete a partition F list free unpartitioned space l list known partition types n add a new partition p print the partition table t change a partition type v verify the partition table i print information about a partition Misc m print this menu u change display/entry units x extra functionality (experts only) Script I load disk layout from sfdisk script file O dump disk layout to sfdisk script file Save & Exit w write table to disk and exit q quit without saving changes Create a new label g create a new empty GPT partition table G create a new empty SGI (IRIX) partition table o create a new empty DOS partition table s create a new empty Sun partition table Command (m for help): fdisk的每个修改都是在内存中的,并没有真正写入硬盘,需要输入w指令才会被写入。
MBR格式下主分区只能有4个,我不是很喜欢,所以我先把分区表改为GPT。输入g,然后输入w保存修改
Command (m for help): g Created a new GPT disklabel (GUID: 2B2D211A-2B85-9049-8AD7-BAA27DDCD243). The device contains 'dos' signature and it will be removed by a write command. See fdisk(8) man page and --wipe option for more details. Command (m for help): w The partition table has been altered. Calling ioctl() to re-read partition table. Syncing disks. 然后再次输入fdisk /dev/sdb,这次按n添加一个新的分区,命令会询问一些分区参数,含义如下:
Partition number:分区号,选个喜欢的数字就行
First sector:起始扇区,直接回车用默认的
Last sector:结束扇区,这个参数决定了这个分区的容量,直接回车用默认的参数就是用整个硬盘的容量。分区的容量等于(结束扇区 - 起始扇区)* 扇区容量,扇区容量在之前的fdisk中的Sector size (logical/physical)可以查询到。fdisk也支持直接输入容量自动帮我们算出扇区数。这里我们输入+10g,相当于创建了一个10g的分区。
debian@debian:~$ sudo fdisk /dev/sdb Welcome to fdisk (util-linux 2.36.1). Changes will remain in memory only, until you decide to write them. Be careful before using the write command. Command (m for help): n Partition number (1-128, default 1): 1 First sector (2048-41943006, default 2048): Last sector, +/-sectors or +/-size{K,M,G,T,P} (2048-41943006, default 41943006): +10g 按p打印当前分区设置,这里我分了两个区,所以打印了两个分区。
Command (m for help): p Disk /dev/sdb: 20 GiB, 21474836480 bytes, 41943040 sectors Disk model: VMware Virtual S Units: sectors of 1 * 512 = 512 bytes Sector size (logical/physical): 512 bytes / 512 bytes I/O size (minimum/optimal): 512 bytes / 512 bytes Disklabel type: gpt Disk identifier: 2B2D211A-2B85-9049-8AD7-BAA27DDCD243 Device Start End Sectors Size Type /dev/sdb1 2048 20973567 20971520 10G Linux filesystem /dev/sdb2 20973568 41943006 20969439 10G Linux filesystem Filesystem/RAID signature on partition 1 will be wiped. Filesystem/RAID signature on partition 2 will be wiped. 最后输入w保存分区设置
Command (m for help): w The partition table has been altered. Calling ioctl() to re-read partition table. Syncing disks. 2、格式化
现在/dev目录下班会有两个disk设备,分别是sdb1和sdb2。但是这个分区不能直接被挂载,要先格式化。
这里我选择格式化类型是ext4,输入mkfs.ext4 /dev/sdb1格式化分区
debian@debian:~$ sudo mkfs.ext4 /dev/sdb1 mke2fs 1.46.2 (28-Feb-2021) Creating filesystem with 2621440 4k blocks and 655360 inodes Filesystem UUID: 2adfc50c-bf82-4be4-bbeb-46c7f7e1d149 Superblock backups stored on blocks: 32768, 98304, 163840, 229376, 294912, 819200, 884736, 1605632 Allocating group tables: done Writing inode tables: done Creating journal (16384 blocks): done Writing superblocks and filesystem accounting information: done 3、挂载分区
格式化后的分区就可以挂载了,使用mount挂载。首先要创建一个空的目录,这里我在根目录创建了/data1目录
然后输入命令mount /dev/sdb1 /data1挂载分区sdb1到目录/data,最后输入df -h /data1可以看到挂载于容量信息
debian@debian:~$ df -h /data1 文件系统 容量 已用 可用 已用% 挂载点 /dev/sdb1 9.8G 24K 9.3G 1% /data1 4、fstab
使用mount手动挂载的分区在重启后需要重新挂载,可以通过修改/etc/fstab文件使操作系统开机后自动挂载分区。
fstab文件内容如下,可以看到它的内容格式为:
debian@debian:~$ cat /etc/fstab # /etc/fstab: static file system information. # # Use 'blkid' to print the universally unique identifier for a # device; this may be used with UUID= as a more robust way to name devices # that works even if disks are added and removed. See fstab(5). # # systemd generates mount units based on this file, see systemd.mount(5). # Please run 'systemctl daemon-reload' after making changes here. # # <file system> <mount point> <type> <options> <dump> <pass> # / was on /dev/sda1 during installation UUID=8536b2a1-854c-40bb-870f-0d9b251f4d3f / ext4 errors=remount-ro 0 -
file system
可以直接输入设备路径,也可以输入设备的UUID,建议用UUID。因为设备的UUID是不会变的,但是/dev的挂载名称会变,UUID可以通过blkid命令查看 -
mount point
挂载路径,就是需要把刚才的设备路径挂载到哪个目录 -
type
分区格式,分区格式有很多种,比如nfts、ext3、ext4等。我的分区是ext4,所以就输入ext4
-
options
选项,我不是很理解这个参数,大概是用来设置挂载参数的,但是有一个常用的值是defaults
-
dump
用于备份文件系统时使用,设置成0表示不备份 -
pass
这个参数用来决定在启动时需要被fsck扫描的文件系统的顺序,根文件系统"/"对应该字段的值应该为1,其他的应该逐渐递增,如果设置为0则表示不扫描
首先使用blkid命令查看分区的文件系统和uuid,blkid命令和fdisk命令一样都在/usr/sbin目录下。命令示例输出如下:
debian@debian:~$ blkid /dev/sdb1 /dev/sdb1: UUID="4d395554-ad3c-4b83-b4bb-a65853e3da71" BLOCK_SIZE="4096" TYPE="ext4" 所以我们需要加上一行新的内容,重启可以看到/sdb1被自动挂载到/data1上了;
UUID=4d395554-ad3c-4b83-b4bb-a65853e3da71 /data1 ext4 defaults 0 0 四、总结
- 使用fdisk分区
- 使用mkfs.ext4格式化分区
- 使用mount挂载分区
- 如果需要自动挂载,修改/etc/fstab文件实现自动挂载
至此,本文结束。