- A+
在上一篇 学习ASP.NET Core Blazor编程系列二十——文件上传(完) 文章中曾经谈过文件上传功能遗留了二个问题。第一个问题我们已经在上一篇文章中解决了,第二个问题,就是数据刷新问题,这不仅仅是上传中会碰到,只要是用数据列表或表格呈现数据,都可能会碰到没有及时刷新,数据不是最新的这个问题。
十、刷新数据
Blazor 绑定(绑定就是刷新)机制有以下几种
- 首次加载时的自动绑定
- 调用 StateHasChanged 强制重新绑定(重新绑定即刷新)
- 注册事件自动刷新
Blazor组件在第一次渲染完成之后,ShouldRender 会返回为 false,然后后面调用都返回 false,对于任意一个组件,若出现没刷新的情况下,请考虑这个因素。
那么,如何让Blazor组件进行刷新呢?方法很简单,手动调用该组件的StateHasChanged 方法,然后绑定数据。
StateHasChanged 方法
这个方法至关重要,我们来看看这个方法里面有什么。如下图。
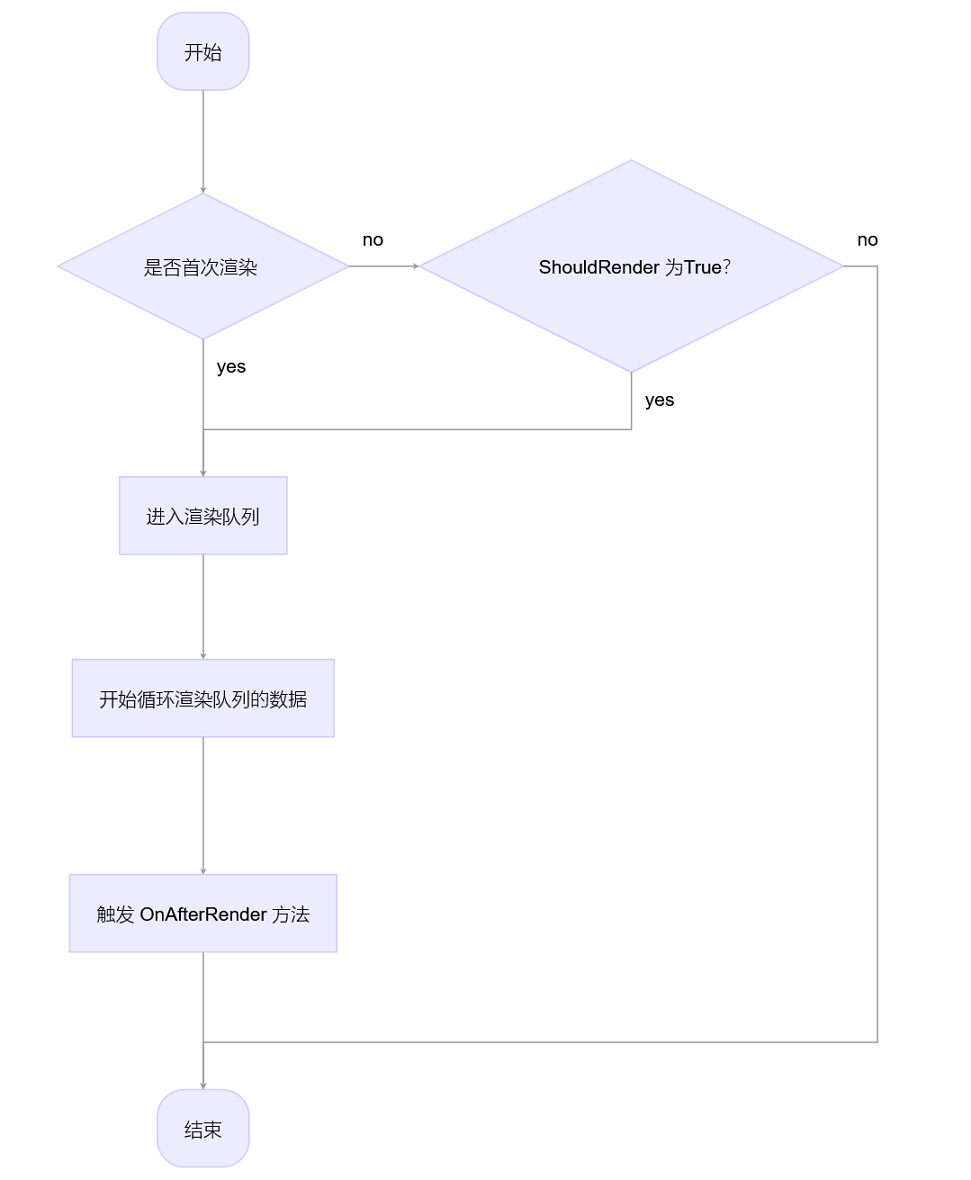
数据刷新的流程以上图来讲解,接下来,我们以具体的代码来实现此功能。
1. 在Visual Studio 2022中的解决方案资源管理器中使用鼠标左键双击打开UpFileInfoList.razor文件。在@code代码块中声明一个事件。代码如下:
[Parameter] public EventCallback RefterData { get; set; }
2.在Visual Studio 2022中的解决方案资源管理器中使用鼠标左键双击打开FileUpload1.razor文件。在@code代码块中用代码实现RefterData事件的一个方法 RefterDataHandler,并在UpFileInfoList组件中调用我们刚才写的RefterDataHandler方法,在上传方法中调用RefterDtaHandler方法 。代码如下:
@page "/FileUpload1" @using BlazorAppDemo.Models @using BlazorAppDemo.Utils @using Microsoft.AspNetCore.Mvc.ModelBinding @using Microsoft.EntityFrameworkCore @inject IWebHostEnvironment Environ @inject IDbContextFactory<BookContext> dbFactory <h3>多文件上传示例</h3> <p> <label> 提示信息:@Message </label> </p> <p> <label> 上传文件最大可以为:<input type="number" @bind="maxFileSize"/>字节 </label> </p> <p> <label> 一次可上传:<input type="number" @bind="maxAllowedFiles" />个文件 </label> </p> <p> <label> 选择上传文件:<InputFile OnChange="@LoadFiles" multiple /> </label> <BlazorAppDemo.Pages.Descri.UpFileInfoList RefterData="RefterDataHandler" @ref="@upfileList"></BlazorAppDemo.Pages.Descri.UpFileInfoList> </p> @if (isLoading) { <p>文件上传中......</p> } else { <ul> @foreach (var file in loadedFiles) { <li> <ul> <li>文件名:@file.Name</li> <li>最后修改时间:@file.LastModified.ToString()</li> <li>文件大小(byte):@file.Size</li> <li>文件类型:@file.ContentType</li> </ul> </li> } </ul> } @code { private List<IBrowserFile> loadedFiles = new(); private long maxFileSize = 1024 * 18; private int maxAllowedFiles = 2; private bool isLoading; private string Message = string.Empty; private BlazorAppDemo.Pages.Descri.UpFileInfoList upfileList; private async Task LoadFiles(InputFileChangeEventArgs e) { isLoading = true; loadedFiles.Clear(); foreach (var file in e.GetMultipleFiles(maxAllowedFiles)) { try { ModelStateDictionary modelState = new ModelStateDictionary(); loadedFiles.Add(file); FileHelpers.db = dbFactory.CreateDbContext(); string result= await FileHelpers.ProcessFormFile(file, modelState, Environ, maxFileSize); if (string.IsNullOrEmpty(result)) { Message = "上传成功!"; RefterDataHandler(); }else Message = "上传失败!"; } catch (Exception ex) { Message = ex.Message; } } isLoading = false; } public void RefterDataHandler() { StateHasChanged(); upfileList.BindData(); } }
@page "/Descri/UpFileInfoList" @using BlazorAppDemo.Models @using BlazorAppDemo.Utils @using Microsoft.EntityFrameworkCore @inject IDbContextFactory<BookContext> dbFactory @inject IJSRuntime JsRuntime <h3>已上传文件列表</h3> <table class="table" width="99%"> <thead> <tr> <th></th> <th> @HtmlHelper.GetDisplayName(fileDesc,m=>m.Name) </th> <th> @HtmlHelper.GetDisplayName(fileDesc ,m=> m.NewName) </th> <th class="text-center"> @HtmlHelper.GetDisplayName(fileDesc ,m=>m.UploadDateTime) </th> <th class="text-center"> @HtmlHelper.GetDisplayName(fileDesc ,m=> m.FileSize) </th> </tr> </thead> <tbody> @foreach (var item in fileDescs) { <tr> <td> <button id="delete" class="btn btn-primary" @onclick="@(async e => await ShowConfirmMsg(e, @item.ID))">删除</button> </td> <td> @item.Name </td> <td> @item.NewName </td> <td class="text-center"> @item.UploadDateTime </td> <td class="text-center"> @item.FileSize </td> </tr> } </tbody> </table> @code { private static BookContext _context; private List<FileDescribe> fileDescs = new List<FileDescribe>(); private FileDescribe fileDesc = new FileDescribe(); [Parameter] public EventCallback RefterData { get; set; } protected override async Task OnInitializedAsync() { BindData(); await base.OnInitializedAsync(); } public void BindData() { _context = dbFactory.CreateDbContext(); fileDescs = _context.FileDescribe.ToList(); } public void DeleteFile(MouseEventArgs e, int Id) { List<int> listId = new(); listId.Add(Id); int[] Ids= listId.ToArray(); var entity = _context.Find<FileDescribe>(Id); _context.Remove<FileDescribe>(entity); _context.SaveChangesAsync(); } public async Task ShowConfirmMsg(MouseEventArgs e,int Id) { if (await JsRuntime.InvokeAsync<bool>("confirm",$"你是否确认要删除当前文件?")) { DeleteFile(e, Id); await RefterData.InvokeAsync(); } } }
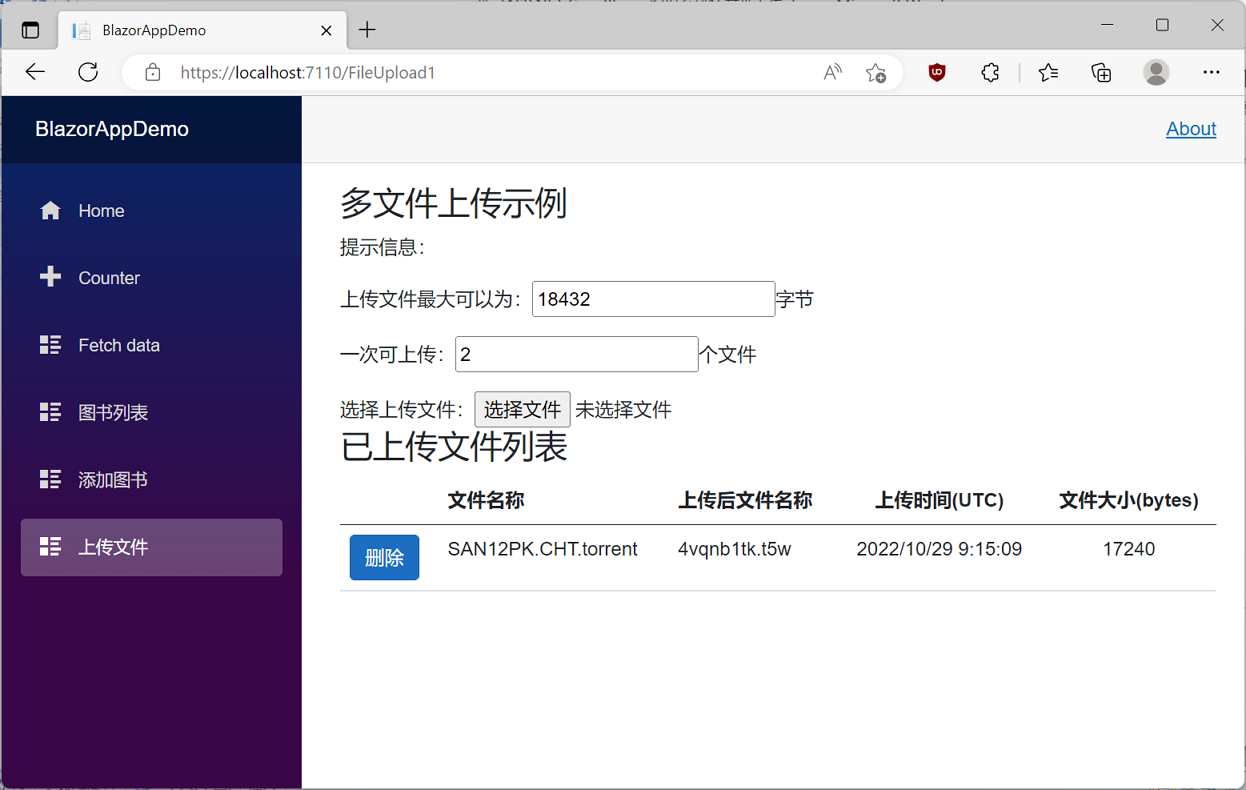
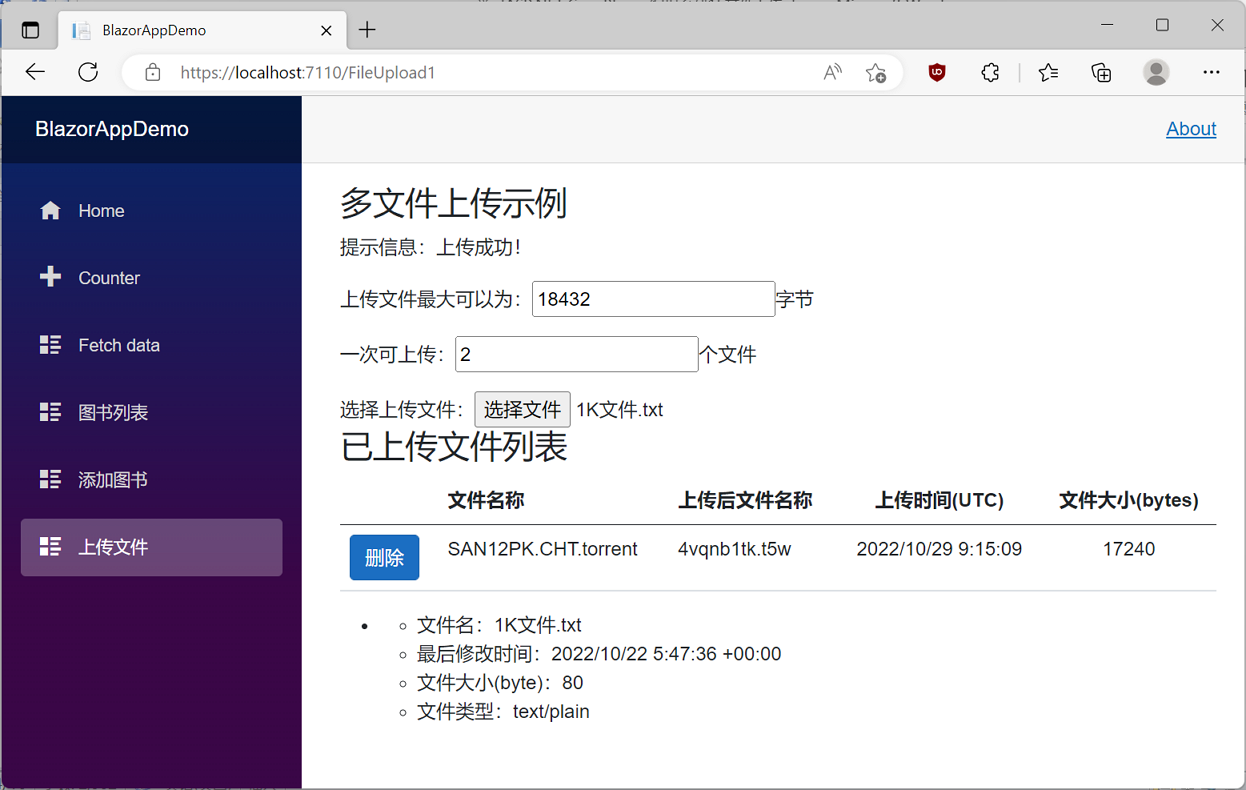
5. 在浏览器的“多文件上传示例”页面中使用鼠标左键点击“选择文件”按钮,在弹出的对话框中,选择“1K文件”,文件将被上传,文件信息会在上传成功之后,及时更新到“已上传文件列表”中。如下图。
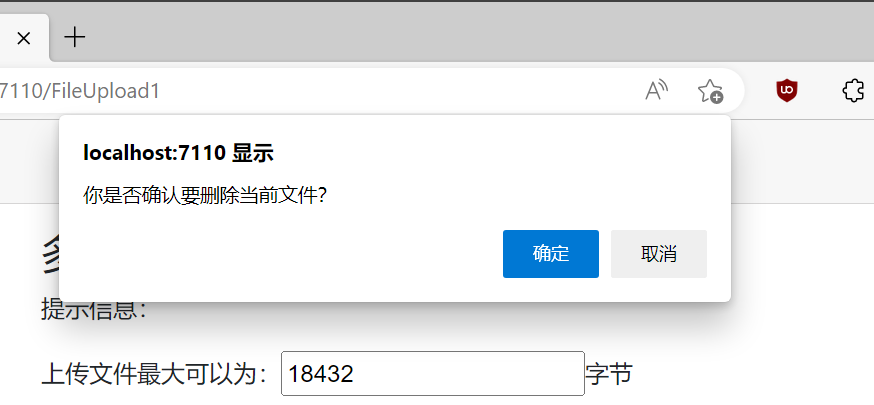
6. 在已上传文件列表中,点击要删除的上传文件记录前面的删除按钮。系统会弹出一个“你是否确认要删除当前文件”的提示信息,如下图。
7. 使用鼠标左键点击“确定”按钮,系统将把文件信息删除,同时刷新“已上传文件列表”信息。如下图。