- A+
所属分类:linux技术
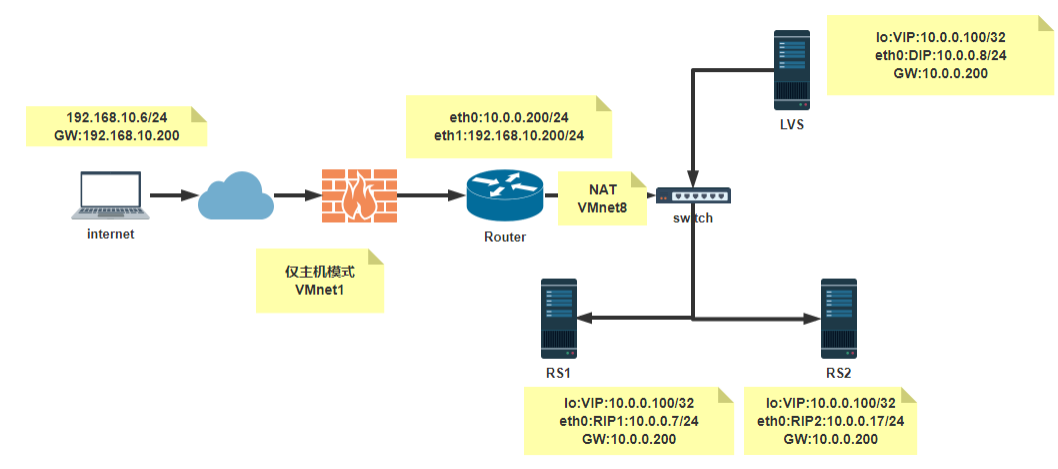
架构图:
环境:
一台:客户端 eth0:仅主机 192.168.10.6/24 GW:192.168.10.200 一台:ROUTER eth0 :NAT 10.0.0.200/24 eth1: 仅主机 192.168.10.200/24 启用 IP_FORWARD 一台:LVS eth0:NAT:DIP:10.0.0.8/24 GW:10.0.0.200 两台RS: RS1:eth0:NAT:10.0.0.7/24 GW:10.0.0.200 RS2:eth0:NAT:10.0.0.17/24 GW:10.0.0.200 配置:
Router
[root@Router ~]# cat /etc/sysconfig/network-scripts/ifcfg-eth0 TYPE=Ethernet BOOTPROTO=none NAME=eth0 DEVICE=eth0 ONBOOT=yes IPADDR=10.0.0.200 PREFIX=24 [root@Router ~]# cat /etc/sysconfig/network-scripts/ifcfg-eth1 TYPE=Ethernet BOOTPROTO=none NAME=eth1 DEVICE=eth1 ONBOOT=yes IPADDR=192.168.10.200 PREFIX=24 #开启Router的ip_forward功能 [root@Router ~]# cat /etc/sysctl.d/99-sysctl.conf net.ipv4.ip_forward = 1 [root@Router ~]# sysctl -p net.ipv4.ip_forward = 1 Client:
tom@Client:~$ cat /etc/network/interfaces # This file describes the network interfaces available on your system # and how to activate them. For more information, see interfaces(5). source /etc/network/interfaces.d/* # The loopback network interface auto lo iface lo inet loopback # The primary network interface #auto eth0 #iface eth0 inet dhcp auto eth0 iface eth0 inet static address 192.168.10.6 netmask 255.255.255.0 gateway 192.168.10.200 tom@Client:~$ route -n Kernel IP routing table Destination Gateway Genmask Flags Metric Ref Use Iface 0.0.0.0 192.168.10.200 0.0.0.0 UG 0 0 0 eth0 192.168.10.0 0.0.0.0 255.255.255.0 U 0 0 0 eth0 LVS:
[root@LVS ~]# cat /etc/sysconfig/network-scripts/ifcfg-ens160 TYPE=Ethernet BOOTPROTO=none NAME=eth0 DEVICE=eth0 ONBOOT=yes IPADDR=10.0.0.8 PREFIX=24 GATEWAY=10.0.0.200 DNS1=180.76.76.76 [root@LVS ~]# route -n Kernel IP routing table Destination Gateway Genmask Flags Metric Ref Use Iface 0.0.0.0 10.0.0.200 0.0.0.0 UG 100 0 0 eth0 10.0.0.0 0.0.0.0 255.255.255.0 U 100 0 0 eth0 #在LVS上添加VIP ifconfig lo:1 10.0.0.100/32 #实现LVS 规则 [root@LVS ~]#dnf -y install ipvsadm [root@LVS ~]#ipvsadm -A -t 10.0.0.100:80 -s rr [root@LVS ~]#ipvsadm -a -t 10.0.0.100:80 -r 10.0.0.7:80 -g [root@LVS ~]#ipvsadm -a -t 10.0.0.100:80 -r 10.0.0.17:80 -g [root@LVS ~]# ipvsadm -ln IP Virtual Server version 1.2.1 (size=4096) Prot LocalAddress:Port Scheduler Flags -> RemoteAddress:Port Forward Weight ActiveConn InActConn TCP 10.0.0.100:80 rr -> 10.0.0.7:80 Route 1 0 0 -> 10.0.0.17:80 Route 1 0 0 RS1:
[root@RS1 ~]# cat /etc/sysconfig/network-scripts/ifcfg-eth0 TYPE=Ethernet BOOTPROTO=none NAME=eth0 DEVICE=eth0 ONBOOT=yes IPADDR=10.0.0.7 PREFIX=24 GATEWAY=10.0.0.200 [root@RS1 ~]# route -n Kernel IP routing table Destination Gateway Genmask Flags Metric Ref Use Iface 0.0.0.0 10.0.0.200 0.0.0.0 UG 100 0 0 eth0 10.0.0.0 0.0.0.0 255.255.255.0 U 100 0 0 eth0 #设置RS1的VIP [root@RS1 ~]# ifconfig lo:1 10.0.0.100/32 #RS1的IPVS配置 #关闭配置vip网卡的arp的两个内核参数 #需要写入配置文件中才会重启生效 [root@RS1 ~]#echo 1 > /proc/sys/net/ipv4/conf/all/arp_ignore [root@RS1 ~]#echo 2 > /proc/sys/net/ipv4/conf/all/arp_announce [root@RS1 ~]#echo 1 > /proc/sys/net/ipv4/conf/lo/arp_ignore [root@RS1 ~]#echo 2 > /proc/sys/net/ipv4/conf/lo/arp_announce #设置RS1的web服务 [root@RS1 ~]# yum -y install httpd [root@RS1 ~]# systemctl enable --now httpd [root@RS1 ~]# 10.0.0.17 rs1 -I > /var/www/html/index.html [root@RS1 ~]# curl 10.0.0.17 10.0.0.17 rs1 RS2:
[root@RS2 ~]# cat /etc/sysconfig/network-scripts/ifcfg-eth0 TYPE=Ethernet BOOTPROTO=none NAME=eth0 DEVICE=eth0 ONBOOT=yes IPADDR=10.0.0.17 PREFIX=24 GATEWAY=10.0.0.200 [root@RS2 ~]# route -n Kernel IP routing table Destination Gateway Genmask Flags Metric Ref Use Iface 0.0.0.0 10.0.0.200 0.0.0.0 UG 100 0 0 eth0 10.0.0.0 0.0.0.0 255.255.255.0 U 100 0 0 eth0 #设置RS2的VIP [root@RS2 ~]# ifconfig lo:1 10.0.0.100/32 #RS2的IPVS配置 [root@RS2 ~]#echo 1 > /proc/sys/net/ipv4/conf/all/arp_ignore #忽略请求 [root@RS2 ~]#echo 2 > /proc/sys/net/ipv4/conf/all/arp_announce #对外宣传 [root@RS2 ~]#echo 1 > /proc/sys/net/ipv4/conf/lo/arp_ignore [root@RS2 ~]#echo 2 > /proc/sys/net/ipv4/conf/lo/arp_announce #安装并启动web服务 [root@RS2 ~]# yum -y install httpd [root@RS2 ~]# systemctl enable --now httpd [root@RS2 ~]# 10.0.0.17 rs1 -I > /var/www/html/index.html [root@RS2 ~]# curl 10.0.0.7 10.0.0.7 rs2 测试:
tom@Client:~$ curl 10.0.0.100 10.0.0.7 rs1 tom@Client:~$ curl 10.0.0.100 10.0.0.7 rs1 说明:
DR模型中各主机上均需要配置VIP,解决地址冲突的方式有三种:
-
(1) 在前端网关做静态绑定
-
(2) 在各RS使用arptables
-
(3) 在各RS修改内核参数,来限制arp响应和通告的级别
限制响应级别:arp_ignore
-
0:默认值,表示可使用本地任意接口上配置的任意地址进行响应
-
1:仅在请求的目标IP配置在本地主机的接收到请求报文的接口上时,才给予响应
限制通告级别:arp_announce
-
0:默认值,把本机所有接口的所有信息向每个接口的网络进行通告
-
1:尽量避免将接口信息向非直接连接网络进行通告
-
2:必须避免将接口信息向非本网络进行通告
注意:
lvs的DR模式,不支持端口映射功能,DR模式只修改数据链路层,不会修改网络链层以上。