- A+
所属分类:linux技术
结构图:

环境准备
lvs
[root@lvs ~]# cat /etc/sysconfig/network-scripts/ifcfg-eth0 TYPE=Ethernet BOOTPROTO=none NAME=eth0 DEVICE=eth0 ONBOOT=yes IPADDR=10.0.0.8 PREFIX=24 [root@lvs ~]# cat /etc/sysconfig/network-scripts/ifcfg-eth1 TYPE=Ethernet BOOTPROTO=none NAME=eth1 DEVICE=eth1 ONBOOT=yes IPADDR=192.168.10.100 PREFIX=24 client:
root@ubuntu1604:~# cat /etc/network/interfaces # This file describes the network interfaces available on your system # and how to activate them. For more information, see interfaces(5). source /etc/network/interfaces.d/* # The loopback network interface auto lo iface lo inet loopback # The primary network interface #auto eth0 #iface eth0 inet dhcp auto eth0 iface eth0 inet static address 192.168.10.6 netmask 255.255.255.0 RS1:
#安装并启动httpd服务 [root@RS1 ~]# echo 10.0.0.7 rs1 > /var/www/html/index.html [root@RS1 ~]# cat /etc/sysconfig/network-scripts/ifcfg-eth0 TYPE=Ethernet BOOTPROTO=none NAME=eth0 DEVICE=eth0 ONBOOT=yes IPADDR=10.0.0.7 PREFIX=24 GATEWAY=10.0.0.8 #rs的网关地址要指向DIP Rs2:
#安装并启动apache服务 [root@RS2 ~]# echo 10.0.0.17 rs2 > /var/www/html/index.html [root@RS2 ~]# cat /etc/sysconfig/network-scripts/ifcfg-eth0 TYPE=Ethernet BOOTPROTO=none NAME=eth0 DEVICE=eth0 ONBOOT=yes IPADDR=10.0.0.17 PREFIX=24 GATEWAY=10.0.0.8 负载均衡集群配置:
#开启Ip_forward功能 [root@lvs ~]# cat /etc/sysctl.conf # sysctl settings are defined through files in # /usr/lib/sysctl.d/, /run/sysctl.d/, and /etc/sysctl.d/. # # Vendors settings live in /usr/lib/sysctl.d/. # To override a whole file, create a new file with the same in # /etc/sysctl.d/ and put new settings there. To override # only specific settings, add a file with a lexically later # name in /etc/sysctl.d/ and put new settings there. # # For more information, see sysctl.conf(5) and sysctl.d(5). # # net.ipv4.ip_forward = 1 #开启ip_forward功能 [root@lvs ~]# sysctl -p net.ipv4.ip_forward = 1 [root@lvs ~]# ipvsadm -A -t 192.168.10.100:80 -s wrr #创建要给集群 使用wrr(加权轮询)这种调度算法 [root@lvs ~]# ipvsadm -a -t 192.168.10.100:80 -r 10.0.0.7:80 -m #将10.0.0.7这个rs加入集群中 -m表示使用nat这种工作模式 [root@lvs ~]# ipvsadm -a -t 192.168.10.100:80 -r 10.0.0.17:80 -m [root@lvs ~]# ipvsadm -ln #查看集群信息 IP Virtual Server version 1.2.1 (size=4096) Prot LocalAddress:Port Scheduler Flags -> RemoteAddress:Port Forward Weight ActiveConn InActConn TCP 192.168.10.100:80 wrr -> 10.0.0.7:80 Masq 1 0 0 -> 10.0.0.17:80 Masq 1 0 0 客户端测试:
采用轮询的调度算法,每个rs轮询一遍。
root@ubuntu1604:~# curl 192.168.10.100 10.0.0.17 rs2 root@ubuntu1604:~# curl 192.168.10.100 10.0.0.7 rs1 root@ubuntu1604:~# curl 192.168.10.100 10.0.0.17 rs2 root@ubuntu1604:~# root@ubuntu1604:~# curl 192.168.10.100 10.0.0.7 rs1 ........... 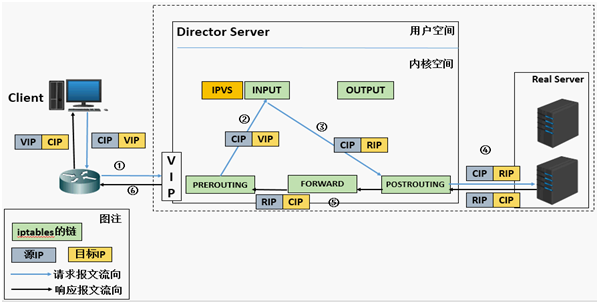
LVS工作的时候是工作在内核的内核空间
不开启ip_forward的时候,能将请求发送给RS的原因(响应请求回来的时候要通过forward):
iptables的五链,报文通过网卡进入lvs后,首先通过prerouting进行路由选择,因为报文就是发给本机的,所以就将报文发给了input,正常情况下input会把报文交给用户空间的应用程序(例如用户访问xxx的web服务)。而lvs自身没有这个服务,所以就截住请求转发到postrouting里面去。
截住请求:在input链的前面加一个lvs规则,当用户访问vip的时候,就把目标地址改为rip。就实现了不往input上发,而是往postrouting上转发。
实现流程:
1.发送请求:
客户端请求:192.168.10.6(源)--->192.168.10.100(目标) lvs服务器:192.168.10.6(源不变)--->10.0.0.7/17(目标) --- lvs服务器转发请求的是偶目标地址发生了改变。 2.rs响应请求:
RS的那个端口收到请求,就使用那个端口来回应这个请求。因为lvs是内核的一个功能,内核不存在端口这些说法,所以不用在lvs上开启对Client请求端口的监听, RS:10.0.0.7(源地址)---->10.0.0.8(目标IP)----响应报文发到达lvs服务器 192.168.10.100(源地址)--->192.168.10.6(client的地址) 注意;
端口也会发生改变,比如CID请求的是80端口,但是RS提供web服务的端口是8080,这个时候就会自动把端口变为8080