- A+
RHCSA
帐户信息
f0主机的root密码为 Asimov ,f0上其他用户的密码均为 redhat
f0里面所有虚拟系统的 root 密码是 redhat ,请勿更改 root 密码。serverb的root
密码未知,需要进行密码重置,要求请查看后面的题目。所有系统上已预装了 SSH 密
钥,允许在不输入密码的前提下通过 SSH 进行 root 访问。请勿对系统上的 root SSH
配置文件进行任何修改
开启虚拟机:
[root@foundation0 ~]# virsh start bastion [root@foundation0 ~]# virsh start servera [root@foundation0 ~]# virsh start serverb [root@foundation0 ~]# virsh list --all 重置虚拟机:
[root@foundation0 ~]# rht-vmctl reset bastion [root@foundation0 ~]# rht-vmctl reset classroom [root@foundation0 ~]# rht-vmctl reset servera [root@foundation0 ~]# rht-vmctl reset serverb [root@foundation0 ~]# rht-vmctl reset workstation 说明:考试需要通过图形界面对虚拟机进行开机(start),关机(poweroff),重启
(reboot)和重置(rebuilt)操作,重置虚拟机后,虚拟机所有的配置将会清空。
virt-manager 开启虚拟机控制台 [root@foundation0 ~]# ssh workstation #不能直接连接servera,b [student@workstation ~]$ ssh root@servera 虚拟机servera
⼀、配置网络地址
虚拟机servera的root密码为redhat,请为此虚拟机配
1)主机名:servera.lab.example.com
2)IP地址:172.25.250.10/24
3)默认网关:172.25.250.254
4)DNS服务器:172.25.250.254
[root@localhost ~]# hostnamectl set-hostname # 设置主机名servera.lab.example.com [root@localhost ~]# bash # 设置ip地址,网关和dns # 首先查看网卡配置文件,如果网卡没有配置文件需要自己创建并设置;若有配置文件直接修改即可 [root@servera ~]# cd /etc/sysconfig/network-scripts/ [root@servera network-scripts]# ls ifcf-Wired_connection_1 #网卡名 [root@servera network-scripts]# cp ifcfg-Wired_connection_1 ifcfg-eth0 [root@servera network-scripts]# ls ifcfg-eth0 ifcfg-Wired_connection_1 [root@servera network-scripts]# vim ifcfg-eth0 TYPE=Ethernet #方式是以太网 BOOTPROTO=static #静态获取 NAME="eth0" #连接名字叫eth0 DEVICE=eth0 #设备名字叫eth0 ONBOOT=yes #开机自动激活 IPADDR=172.25.250.10 #IP PREFIX=24 #24位子网掩码 GATEWAY=172.25.250.254 #网关 DNS1=172.25.250.254 [root@servera network-scripts]# mv ifcfg-Wired_connection_1 /opt [root@servera network-scripts]# ls ifcfg-eth0 [root@servera network-scripts]# systemctl restart NetworkManager [root@servera network-scripts]# ip a #查看 方法2 [root@servera network-scripts]# ifdown eth0:ifup eth0 #禁用再启用 ⼆、配置软件仓库
请配置你虚拟机的yum仓库,地址如下:
http://content.example.com/rhel8.0/x86_64/dvd/BaseOS http://content.example.com/rhel8.0/x86_64/dvd/AppStream # 准备工作,清空yum仓库,考试不需要做 [root@servera ~]# rm -rf /etc/yum.repos.d/* #实际操作 [root@servera ~]# vim /etc/yum.repos.d/base.repo [BaseOS] name=BaseOS baseurl=http://content.example.com/rhel8.0/x86_64/dvd/BaseOS enabled=1 gpgcheck=0 [AppStream] name=AppStream baseurl=http://content.example.com/rhel8.0/x86_64/dvd/AppStream enabled = 1 gpgcheck = 0 [root@servera ~]# dnf clean all #清除缓存 [root@servera ~]# dnf list all #列出 三、调试SELinux
非标准端口 82 上运行的 Web 服务器在提供内容时遇到问题。根据需要调试并解决问题, 使其满足以下条件:
1. 系统上的 Web 服务器能够提供 /var/www/html 中所有现有的 HTML 文件(注:不要删除或以其他方式改动现有的文件内容)
2. Web 服务器在端口 82 上提供此内容
3. Web 服务器在系统启动时自动启动
# 准备工作,安装httpd服务,修改监听的端口号为80,考试不需要做。 [root@servera ~]# getenforce Enforcing [root@servera ~]# yum -y install httpd [root@servera ~]# vim /etc/httpd/conf/httpd.conf # 修改监听的端口号 Listen 82 [root@servera ~]# echo "tese page" > /var/www/html/index.html [root@servera ~]# systemctl enable --now httpd #开机自启 [root@servera ~]# systemctl status httpd #刷新状态 # 实际操作 [root@servera ~]# systemctl restart httpd #重启服务报错,原因是selinux Job for httpd.service failed because the control process exited with e rror code. See "systemctl status httpd.service" and "journalctl -xe" for details. # 考试需要查看监听的端口号为多少,再将对应的端口号(82端口)设置为httpd的标准端口即可 [root@servera ~]# semanage port -a -t http_port_t -p tcp 82 [root@servera ~]# systemctl start httpd #重启服务 [root@servera ~]# systemctl status httpd #查看端口号82已经监听 [root@servera ~]# firewall-cmd --add-rich-rule 'rule family=ipv4 source address=0.0.0.0/0 port port=82 protocol=tcp accept' --permanent #放行所有 success [root@servera ~]# firewall-cmd --reload #重新加载 success [root@servera ~]# firewall-cmd --list-all #查看 # 说明:考试环境http已经配置好了,考⽣只需要将82号端口设置为httpd的标准端口即可 如遇到无法访问的情况请尝试以下操作: [root@servera ~]# ls -ldZ /var/www/html/ [root@servera ~]# semanage fcontext -d -t default_t /var/www/html/file1 [root@servera ~]# semanage fcontext -a -t httpd_sys_content_t '/var/www/html(/.*)?' [root@servera ~]# restorecon -Rv /var/www/html/ 四、创建用户账户
根据下列要求创建用户及组账号:
1)名为admins的组
2)用户harry,其附属组为admins
3)用户natasha,其附属组还属于admins
4)用户alice,没有可交互的登录Shell,且不属于admins组
5)harry、natasha、alice的密码都应该是redhat
[root@servera ~]# useradd admins #创建用户 [root@servera ~]# id admins #查看 [root@servera ~]# grep admins /etc/group admins:x:1002: [root@servera ~]# useradd -G admins harry #在主组admins下创建harry用户 [root@servera ~]# useradd -G admins natasha [root@servera ~]# grep admins /etc/group admins:x:1002:harry,natasha [root@servera ~]# useradd -s /sbin/nologin alice [root@servera ~]# grep alice /etc/passwd alice:x:1005:1005::/home/alice:/sbin/nologin [root@servera ~]# id alice uid=1005(alice) gid=1005(alice) groups=1005(alice) [root@servera ~]# echo 'redhat' | passwd --stdin harry [root@servera ~]# echo 'redhat' | passwd --stdin natasha [root@servera ~]# echo 'redhat' | passwd --stdin alice 五、配置cron计划任务
配置计划任务,以用户harry的身份每5分钟执行一次命令 echo woshinidie
[root@servera ~]# which echo #使用绝对路径,不要直接写命令 /usr/bin/echo [root@servera ~]# crontab -e -u harry */5 * * * * /usr/bin/echo "woshinidie" [root@servera ~]# crontab -u harry -l */5 * * * * /usr/bin/echo "woshinidie" 六、创建共享目录
创建具有以下特点的共用目录:
1)/home/tools的所有组是admins
2)此目录能被admins组的成员读取、写入和访问,除root外其他用户没有这些权限
3)在此目录下创建的文件,其组的所有权自动设置为admins组
[root@servera ~]# mkdir /home/tools #建立一个新的子目录 [root@servera ~]# ll /home/ [root@servera ~]# chown -R .admins /home/tools/ #改组 [root@servera ~]# chmod 2770 /home/tools/ 一般 r 表示 4;w 表示 2;x 表示 1,每种身份各自的权限是需要累加的,比如 rwx 就表示 4 + 2 + 1 = 7。比如我们最常见的 chmod 777 它就表示赋予所有的权限,也就是说谁都能看/写/执行,所以这种文件也存在极大的安全问题。使用数字改变文件权限是我们最常用的一种方式。 使用符号改变文件权限 九种文件权限分别对应着:(1) user (2) group (3) others,所以我们可以借由 u,g,o 来代表三种身份的权限。除此之外,a 代表 all 即全部的身份。 SUID(4) //运行程序时,这个程序启动的进程的属主是程序文件自身的属主,而不是启动者为属主 SGID(2) //运行程序时,这个程序启动的进程的属组是程序文件自身的属组,而不是启动者所属的基本组 Sticky(1) //在一个公共目录,每个人都能创建文件,删除自己的文件,但是不能删除别人创建的文件 4755 //有SUID,文件权限为755 2755 //有SGID,文件权限为755 1755 //有Sticky,文件权限为755 //这里前面的4、2、1分别表示SUID、SGID、Sticky 七、配置NTP时间客户端
配置你的系统,使其成为classroom.example.com的NTP客户端
[root@servera ~]# ls /etc/chrony.conf #如果没有查看到该文件,yum安装chronyd [root@servera ~]# vim /etc/chrony.conf #修改 server classroom.example.com iburst [root@servera ~]# systemctl restart chronyd #重启 [root@servera ~]# chronyc sources #读一下立即生效 210 Number of sources = 1 MS Name/IP address Stratum Poll Reach LastRx Last sample ====================================================================== ========= ^* classroom.example.com 8 6 17 1 -23us[ -23us] +/- 561us [root@servera ~]# date #对比时间 [root@classroom ~]# date #对比时间 八、配置autofs
准备工作:在serverb主机准备NFS服务端环境,过程如下,考试不需要配置
[root@serverb ~]# mkdir -p /rhome/ldapuser0 [root@serverb ~]# vim /etc/exports /rhome/ldapuser0 *(rw) [root@serverb ~]# systemctl restart nfs-server #重启 [root@serverb ~]# systemctl enable --now nfs-server #自启动 [root@serverb ~]# firewall-cmd --add-service=rpc-bind --permanent #永久添加rpc-bind [root@serverb ~]# firewall-cmd --add-service=nfs --permanent [root@serverb ~]# firewall-cmd --add-service=mountd --permanent [root@serverb ~]# firewall-cmd --reload #重新载入 按照以下要求,在servera上配置autofs自动挂载
1)serverb通过NFS共享目录/rhome到你的系统,此文件系统中包含为用户ldapuser0
预配置的家目录
2)预设用户ldapuser0的家目录应自动挂载到本地的/rhome/ldapuser0目录
3)预设用户ldapuser0的家目录是serverb.lab.example.com:/rhome/ldapuser0
4)预设用户ldapuser0的家目录应自动挂载到本地的/rhome/ldapuser0目录
5)挂载后的家目录必须可读写
[root@servera ~]# showmount -e serverb Export list for 172.25.250.11: /rhome/ldapuser0 * [root@servera ~]# dnf -y install autofs [root@servera ~]# vim /etc/auto.master /rhome /etc/auto.ldap [root@servera ~]# cp /etc/auto.misc /etc/auto.ldap [root@servera ~]# vim /etc/auto.ldap ldapuser0 -rw serverb.lab.example.com:/rhome/ldapuser0 [root@servera ~]# systemctl enable --now autofs [root@servera ~]# systemctl status autofs [root@servera ~]# ls /rhome [root@servera ~]# cd /rhome/ldapuser0 [root@servera ldapuser0]# df -h [root@serverb ~]# setfacl -m u:nobody:rwx /rhome/ldapuser0/ ##考试可不做 [root@serverb ~]# getfacl /rhome/ldapuser0/ ##考试可不做 九、配置文件权限
将文件/etc/fstab复制到/var/tmp/,并按要求配置/var/tmp/fstab的权限:
1.文件/var/tmp/fstab属于root用户
2.文件/var/tmp/fstab属于root组
3.任何用户对/var/tmp/fstab都没有可执行权限
4.用户harry能够读取和写入/var/tmp/fstab文件
5.用户natasha无法读取或写⼊/var/tmp/fstab文件
6.所有其他用户(包括未来创建的用户)能够读取/var/tmp/fstab文件
[root@servera ~]# cp /etc/fstab /var/tmp/ [root@servera ~]# ll /var/tmp/fstab -rw-r--r--. 1 root root 427 Jun 17 17:06 / [root@servera ~]# setfacl -m u:harry:rw- /var/tmp/fstab [root@servera ~]# setfacl -m u:natasha:--- /var/tmp/fstab [root@servera ~]# getfacl /var/tmp/fstab getfacl: Removing leading '/' from absolute path names # file: var/tmp/fstab # owner: root # group: root user::rw- user:harry:rw- user:natasha:--- group::r-- mask::rw- other::r-- 十、配置用户账户
创建用户woshinidie,其用户ID为2020,此用户的密码应当是redhat
[root@servera ~]# useradd -u 2020 woshinidie [root@servera ~]# echo 'redhat' | passwd --stdin woshinidie 十一、查找文件
找出/etc/目录下大小超过5MB的⽂件,并将其复制到/root/findfiles目录下
[root@servera ~]# mkdir findfiles [root@servera ~]# ls [root@servera ~]# find /etc -size +5M -exec cp -r {} /root/findfiles/ ; -perm(权限) -user(用户) -size(文件大小) 十二、查找字符串
找出文件/etc/man_db.conf中包含字符串sbin的所有行,将其按原始顺序导入到文
件/root/out.txt中,文件/root/out.txt中不得包含空行
[root@servera ~]# grep sbin /etc/man_db.conf > /root/out.txt //或者 [root@servera ~]# grep "sbin" /etc/man_db.conf |grep -v "^$" > /root/out.txt 十三、 创建归档
创建一个名为/root/backup.tar.bz2的tar归档,其应该包含/usr/local/的内容。此归
档文件必须使用bzip2进行压缩
[root@servera ~]# tar -jcf /root/backup.tar.bz2 /usr/local/ [root@servera ~]# ls [root@servera ~]# file backup.tar.bz2 # 验证 backup.tar.bz2: bzip2 compressed data, block size = 900k #几种压缩: -z : gzip -j : bzip2 -J : xz 十四、配置sudo提权
允许admins组的成员可以以root的身份执行任何命令,并且不需要密码
[root@servera ~]# visudo %admins ALL=(root) NOPASSWD: ALL //有百分号是组,没有百分号是用户 #测试: [root@servera ~]# su - harry [harry@servera ~]$ sudo useradd testuser #创建成功 十五、设置密码默认策略
为新创建的用户设置密码策略,要求创建用户时,密码默认20 天后过期
[root@servera ~]# vim /etc/login.defs PASS_MAX_DAYS 20 # 测试: [root@servera ~]# useradd user1 [root@servera ~]# cat /etc/shadow user1:!!:18782:0:20:7::: //最后一行 十六、配置umask值
设置natasha用户创建的目录权限默认为733,文件权限为622,要求永久生效
# 只需要根据目录的权限推算出umask即可,目录最大权限为777,去掉733的权限,得到umask为044 # 为natasha设置umask值 [root@servera ~]# su - natasha [natasha@servera ~]$ vim .bashrc umask 044 [natasha@servera ~]$ source .bashrc //立马执行 [natasha@servera ~]$ mkdir test [natasha@servera ~]$ touch file [natasha@servera ~]$ ll total 0 -rw--w--w-. 1 natasha natasha 0 Jun 5 01:37 file drwx-wx-wx. 2 natasha natasha 6 Jun 5 01:37 test 虚拟机serverb
十七、设置root密码
将serverb的root密码设置为123456
1. 重启系统 2. 将光标移动到要启动的内核 3. 按e编译当前条目 4. 将光标移⾄以linux开头的行,此为内核命令行 5. 在末尾添加rd.break 6. 按ctrl+x继续启动 7. 重启以读写方式挂载/sysroot switch_root:/# mount -o remount,rw /sysroot 8. 切换⾄真正操作系统的根/sysroot switch_root:/# chroot /sysroot 9. 重置密码 sh-4.4# echo 123456 | passwd --stdin root 10. 打标签 sh-4.4# touch /.autorelabel exit退出两次 十八、配置软件仓库
请配置你虚拟机的yum仓库,地址如下:
http://content.example.com/rhel8.0/x86_64/dvd/BaseOS http://content.example.com/rhel8.0/x86_64/dvd/AppStream [root@servera ~]# scp /etc/yum.repos.d/base.repo root@serverb:/etc/yum.repos.d/ #远程传输文件,输入更改后serverb的密码即可 # 准备工作,清空yum仓库,考试不需要做 [root@serverb ~]# rm -rf /etc/yum.repos.d/* #实际操作 [root@serverb ~]# vim /etc/yum.repos.d/base.repo [BaseOS] name=BaseOS baseurl=http://content.example.com/rhel8.0/x86_64/dvd/BaseOS enabled=1 gpgcheck=0 [AppStream] name=AppStream baseurl=http://content.example.com/rhel8.0/x86_64/dvd/AppStream enabled = 1 gpgcheck = 0 [root@serverb ~]# dnf clean all [root@serverb ~]# dnf list all 十九、调整逻辑卷大小
1.预先创建2GiB的分区/dev/vdb1,并用于创建卷组testvg
2.创建大小为200MiB的逻辑卷/dev/testvg/vo,格式化为xfs文件系统,并挂载
在/mnt/vo上
3.将逻辑卷/dev/testvg/vo及其文件系统大小调整到300MiB,确保文件系统内容保
持不变。
# 准备工作 [root@serverb ~]# fdisk /dev/vdb Welcome to fdisk (util-linux 2.32.1). Changes will remain in memory only, until you decide to write them. Be careful before using the write command. Device does not contain a recognized partition table. Created a new DOS disklabel with disk identifier 0xae75bf0a. Command (m for help): n Partition type p primary (0 primary, 0 extended, 4 free) e extended (container for logical partitions) Select (default p): p Partition number (1-4, default 1): First sector (2048-10485759, default 2048): Last sector, +sectors or +size{K,M,G,T,P} (2048-10485759, default 10485759): +2G Created a new partition 1 of type 'Linux' and of size 2 GiB. [root@serverb ~]# partprobe [root@serverb ~]# lsblk [root@serverb ~]# pvcreate /dev/vdb1 [root@serverb ~]# pvs [root@serverb ~]# vgcreate testvg /dev/vdb1 [root@serverb ~]# lvcreate -n vo -L 200M testvg [root@serverb ~]# mkfs.xfs /dev/testvg/vo [root@serverb ~]# blkid /dev/testvg/vo /dev/testvg/vo: UUID="fe323058-93db-428d-883c-2c0210cd10c6" TYPE="xfs" [root@serverb ~]# vim /etc/fstab UUID="fe323058-93db-428d-883c-2c0210cd10c6" /mnt/vo xfs defaults 0 0 [root@serverb ~]# mkdir /mnt/vo [root@serverb ~]# mount -a [root@serverb ~]# df -h #查看200M的Size 实际操作
[root@serverb ~]# lvextend -L 300M /dev/testvg/vo [root@serverb ~]# lvs [root@serverb ~]# df -h #发现没有修改成功 扩展文件系统,ext类型的文件系统用resize2fs /dev/testvg/vo ,后⾯接的是逻辑卷的路径。 [root@serverb ~]# xfs_growfs /mnt/vo #后面接的是挂载点的路径 [root@serverb ~]# xfs_growfs /dev/testvg/vo #后面接绝对路径也可 [root@serverb ~]# df -h 二十、添加交换分区
在系统上添加⼀个512MiB的交换分区,设置交换分区应在系统启动时自动挂载,不要
删除或修改系统上已存在的交换分区。
注意:要使用/dev/vdb创建一个主分区,改变分区类型为82,其余所有/dev/vdb的空间分给扩展分区,在其上分逻辑分区。
[root@serverb ~]# fdisk /dev/vdb Welcome to fdisk (util-linux 2.32.1). Changes will remain in memory only, until you decide to write them. Be careful before using the write command. Command (m for help): n Partition type p primary (1 primary, 0 extended, 3 free) e extended (container for logical partitions) Select (default p): e #分成扩展分区 Partition number (2-4, default 2): First sector (4196352-10485759, default 4196352): Last sector, +sectors or +size{K,M,G,T,P} (4196352-10485759, default 10485759): Created a new partition 2 of type 'Extended ' and of size 3 GiB. Command (m for help): n Partition type p primary (1 primary, 0 extended, 3 free) e extended (container for logical partitions) First sector (2048-10485759, default 2048): Last sector, +sectors or +size{K,M,G,T,P} (4196352-10485759, default 10485759): +512M Created a new partition 5 of type 'Linux' and of size 512 MiB. Command (m for help): l 找到82的类型 Command (m for help): t Partition number ( 1,2,5,default 5): Hex code (type L to list all codes):82 Changed type od partition 'Linux' to 'Linux swap / Solaris'. Command (m for help): p Command (m for help): w The partition table has been altered. Syncing disks. Failed to add partition 5 to system: Device or resource busy #如果报错说无法加载或者无法读取,就reboot重启,重新读取 [root@serverb ~]# mkswap /dev/vdb5 #格式化 [root@serverb ~]# blkid /dev/vdb5 #查看uuid /dev/vdb5: UUID="f626f11c-4363-4caf-aba6-5a418ea04079" TYPE="swap" PARTUUID="ae75bf0a-02" [root@serverb ~]# vim /etc/fstab #写入永久挂载 UUID=f626f11c-4363-4caf-aba6-5a418ea04079 swap swap defaults 0 0 [root@serverb ~]# free -m #查看有没有swap分区 [root@serverb ~]# swapon -a #打开swap [root@serverb ~]# free -m #查看 [root@serverb ~]# swapon -s #free -m 比较直观查看swap Filename Type Size Used Priority /dev/vdb2 partition 524284 0 -2 二十一、创建逻辑卷
根据以下要求,创建新的逻辑卷:
1.逻辑卷的名字为mylv,属于myvg卷组,大小为50个pe
2.卷组myvg中的逻辑卷的pe大小应当为16MiB
3.使用vfat文件系统将逻辑卷mylv格式化
4.此逻辑卷应当在系统启动时自动挂载到/mnt/mydata目录下
[root@serverb ~]# fdisk /dev/vdb Welcome to fdisk (util-linux 2.32.1). Changes will remain in memory only, until you decide to write them. Be careful before using the write command. Command (m for help): n All space for primary partitions is in use.Adding logical partition 6 First sector (5249024-10485759,default 5249024): Last sector,+sectors or +size{K,N,6,T,P} (5249024-10485759,default 10485759):+816M created a new partition 6 of type 'Linux' and of size 816 MiB. Command (m for help): t Partition number ( 1,2,5,default 5): Hex code (type L to list all codes):8e Command (m for help): p Disk /dev/vdb: 5 GiB,5368709120 bytes,10485760 sectorsUnits: sectors of 1 * 512 =512 bytes sector size (logical/physical): 512 bytes / 512 bytesI/o size (minimum/ optimal) : 512 bytes/ 512 bytes Disklabel type: dos Disk identifier: oxc749f3ea Device Boot start End sectors size Id Type /dev/vdb1 2048 4196351 4194304 2G 8e Linux LVM /dev/vdb2 4196352 10485759 6289408 3G 5 Extended /dev/vdb5 4198400 5246975 1048576 512M 82 Linux swap / Solaris /dev/vdb6 5249024 6920191 1671168 816M 83 Linux Command (m for help) : w The partition table has been altered.syncing disks. [root@serverb ~]# partprobe //刷新分区表 [root@serverb ~]# lsblk [root@serverb ~]# pvcreate /dev/vdb6 Physical volume " /dev/vdb6" successfully created . [root@serverb ~]# pvs [root@serverb ~]# vgcreate -s 16M myvg /dev/vdb6 volume group "myvg" successfully created [root@serverb ~]# vgs vG #PV #LV #SN Attr VSize VFree myvg 1 0 0 wz--n- 800.00m 800.00m testvg 1 0 0 wz--n- <2.00g 1.70g [root@serverb ~]# vgdisplay --- volume group --- VG Name myvg vG size 800.00 MiB PE Size 16.00 MiB Total PE 50 Free PE / size 50 / 800.00 MiB [root@serverb ~]# lvcreate -l 50 -n mylv myvg #指定个数 Logical volume "mylv" created . [root@serverb ~]# lvs [root@serverb ~]# lvdisplay 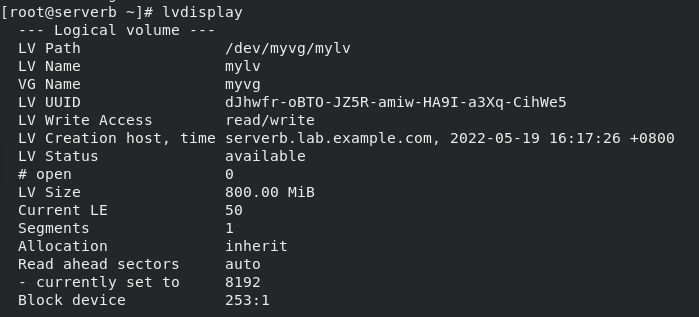
[root@serverb ~]# mkfs.vfat /dev/myvg/mylv #格式化指定到详细 mkfs.fat 4.1(2017-01-24) [root@serverb ~]# blkid /dev/myvg/mylv #查看uuid /dev/myvg/mylv: UUID="D875-EE2A" TYPE="vfat" [root@serverb ~]# mkdir /mnt/mydata [root@serverb ~]# vim /etc/fstab UUID="D875-EE2A" /mnt/mydata vfat defaults 0 0 [root@serverb ~]# mount -a [root@serverb ~]# df -h 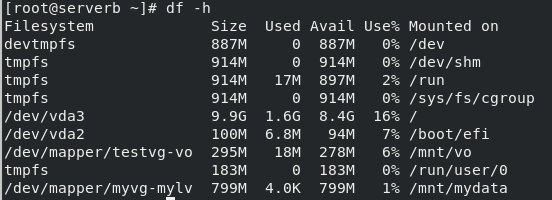
为什么是816M,不是更大:将个数与大小相乘,多一个即可;严格按照要求来,如果是1G,16M一个,就不是题目的五十个,或者分了五十个,每一个里面不是16M
二十二、创建VDO卷
根据如下要求,创建新的VDO卷:
1.使用未分区的磁盘(/dev/vdc)
2.此VDO卷的名称为myvdo
3.此VDO卷的逻辑大小为50G
4.此VDO卷使用xfs文件系统格式化
5.此VDO卷在系统启动时自动挂载到/vblock目录下
dnf provides *bin/vdo //查找vdo [root@serverb ~]# yum -y install vdo [root@serverb ~]# man vdo # 命令man vdo 找example Creating VDO myvdo Starting VDO myvdo Starting compression on VDO myvdo VDO instance 0 volume is ready at /dev/mapper/myvdo [root@serverb ~]# vdo create --name=myvdo --device=/dev/vdc --vdoLogicalSize=50G 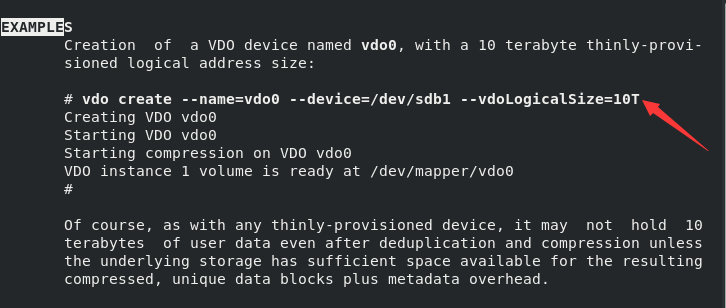
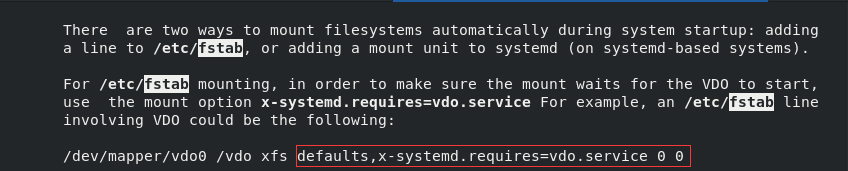
[root@serverb ~]# mkdir /vblock [root@serverb ~]# mkfs.xfs /dev/mapper/myvdo [root@serverb ~]# blkid /dev/mapper/myvdo /dev/mapper/myvdo: uUID="130e8e89-e6be-4a3f-92c2-4366b40e946b"TYPE="xfs" [root@serverb ~]# vim /etc/fstab uuID="27a018bb-2b66-48c9-938b-588cfe14b6cd" /vblock xfs defaults,x-systemd.requires=vdo.service 0 0 [root@serverb ~]# mount -a [root@serverb ~]# df -h 
注意:挂载参数不好记的,使用man vdo 搜索fstab,附近有相关挂载参数
二十三、创建用于定位文件的脚本
1.创建名为/usr/local/bin/file.sh的脚本
2.查找 /usr 下面所有小于10M 并有设置sgid权限的文件
3.将查找到的文件列表保存到 /root/myfile 中
[root@servera ~]# vim /usr/local/bin/file.sh #!/bin/bash //第一行必须加!!! find /usr -size -10M -perm -2000 > /root/myfile //查找 /usr 下面所有小于10M 并有设置sgid权限的文件 [root@servera ~]# chmod a+x /usr/local/bin/file.sh [root@servera ~]# file.sh [root@servera ~]# cat /root/myfile /usr/bin/write /usr/bin/locate /usr/libexec/utempter/utempter /usr/libexec/openssh/ssh-keysign ⼆⼗四、配置系统调优
先查看tuned推荐的配置⽂件,并将系统的调优配置⽂件设置为throughputperformance
提示:考试要求是将系统的调优配置⽂件设置为tuned推荐的配置⽂件。
# 说明:考试题⽬中当前⽣效和配置⽂件和推荐的配置⽂件不⼀致,⽽我们的虚拟机是⼀样的,考试只需要按照下⾯的配置做即可。 [root@serverb ~]# tuned-adm recommend #查看推荐的配置文件 virtual-guest [root@serverb ~]# tuned-adm profile virtual-guest #指定使用该(virtual-guest)配置文件 [root@serverb ~]# tuned-adm list #确保当前⽣效的配置⽂件是系统推荐的配置⽂件即可 Available profiles: - balanced - General non-specialized tuned profile - desktop - Optimize for the desktop use-case - latency-performance - Optimize for deterministic performance at the cost of increased power consumption - network-latency - Optimize for deterministic performance at the cost of increased power consumption, focused on low latency network pe rformance - network-throughput - Optimize for streaming network throughput, generally only necessary on older CPUs or 40G+ networks - powersave - Optimize for low power consumption - throughput-performance - Broadly applicable tuning that provides excellent performance across a variety of common server workloads - virtual-guest - Optimize for running inside a virtual guest - virtual-host - Optimize for running KVM guests Current active profile: virtual-guest #观察此处是否为你所修改的配置文件,是即成功 二十五、容器开机⾃启
- 安装容器相关软件
- 登录注册镜像服务器(账号以考试环境为准)
- 使用syslog 镜像创建一个名为 logserver 的容器
- 将其配置位 systemed 服务的形式运⾏,仅⾯向 eldorado 用户
- 服务名应为 container-logserver,并在重新启动系统后⾃动启动
二十六、容器持久化存储,通过以下⽅式拓展上一个任务服务
- 配置主机系统⽇志以在系统重新引导后保留其数据,并重新启动⽇志服务
- 将主机/var/log/journale ⽬录及任何⽬录中的任何.journal ⽂件复制到⽬录 /home/eldorado/container-journal
- 将服务器配置位启动时⾃动将⽬录/home/eldorado/container-journal⽬录到容 器中的/var/log/journal 下面
[root@foundation0 ~]# ssh -X workstation //远程用大X连接workstation用户变成student [student@workstation ~]$ lab rhcsa-compreview4 start //执行podman启动检查(考试没有) Starting lab. Preparing serverb for lab exercise work: · Checking the status of the container registry............... SUCCESS · Checking that image rhel8/httpd-24:1-105 exists in the registry SUCCESS · Creating required user containers in serverb ............... SUCCESS · Adding containers to the wheel group on serverb............. SUCCESS · Configuring Yum repository on serverb....................... SUCCESS · Configuring containers access to registry on serverb........ SUCCESS · Deploying the help files on serverb......................... SUCCESS · Creating the web content archive on serverb................. SUCCESS //都为SUCCESS才能执行下一步操作 [student@workstation ~]$ ssh containers@serverb //远程连接到containers@serverb [containers@serverb ~]$ sudo -i //切换到root用户 [sudo] containers 的密码: [root@serverb ~]# mkdir /srv/web //因为要在特殊的目录里创建目录所以必须得root用户 [root@serverb ~]# cd /srv/web/ //进去 [root@serverb web]# tar xf /home/containers/rhcsa-compreview4/web-content.tgz //解压这个文件,这个文件是目前的考试环境自带的,考试的时候是没有的 [root@serverb web]# ls html //这个文件是网站文件 [root@serverb web]# chown -R containers /srv/web/ //设置属主为containers(因为接下来是用这个用户的身份运行) [root@serverb web]# ll /srv/web/ 总用量 0 drwxr-xr-x. 2 containers root 24 8月 18 2022 html [root@serverb web]# ll /srv/web/html/index.html -rw-r--r--. 1 containers root 546 8月 18 2022 /srv/web/html/index.html [root@serverb web]# dnf -y module install container-tools //安装container-tools模组插件 [root@serverb web]# exit [containers@serverb ~]$ cat rhcsa-compreview4/variables //考试没有这个文件,这个只是方便我们复制粘贴的一些题目信息 Container name: web //名字 Image: registry.lab.example.com/rhel8/httpd-24 //镜像地址和名字 Image Tag: 1-105 //版本 Host port: 8888 //主机的端口 Container port: 8080 //容器的端口 Local directory: /srv/web //本机存放网站文件的位置 Web content directory: /var/www //容器的网站存放位置 Environment variable: HTTPD_MPM=event //环境变量 [containers@serverb ~]$ podman login registry.lab.example.com --tls-verify=false //因为要拉取镜像,所以必须登录私有仓库拉取,不然会直接寻找官方的docker hub仓库(--tls-verify=false 忽略https登录检查) Username: admin Password: //此处密码为redhat321 Login Succeeded! //看到这个说明登录成功 [containers@serverb ~]$ podman pull registry.lab.example.com/rhel8/httpd-24:1-105 --tls-verify=false //拉取镜像 [containers@serverb ~]$ podman run -d --name web -p 8888:8080 -v /srv/web:/var/www:Z -e HTTPD_MPM=event registry.lab.example.com/rhel8/httpd-24:1-105 //在后台运行一个叫web的容器,端口号是真机的端口8888映射到容器的8080端口,链接主机的/srv/web到容器的/var/www,其中Z表示私有的,并且实时更新的那种,-e指定环境变量为HTTPD_MPM=event,然后选择刚刚拉下来的容器即可 [containers@serverb ~]$ podman ps -a CONTAINER ID IMAGE COMMAND CREATED STATUS PORTS NAMES 63b92ee200b6 registry.lab.example.com/rhel8/httpd-24:1-105 /usr/bin/run-http... 22 seconds ago Up 20 seconds ago 0.0.0.0:8888->8080/tcp web [containers@serverb ~]$ curl localhost:8888 //访问本机的8888端口(localhost表示本机) Comprehensive Review Web Content Test Lorem ipsum dolor sit amet, consectetur adipiscing elit. Sed sit amet lacus vestibulum, varius magna sit amet, tempus neque. Praesent porttitor ligula a leo pharetra porttitor. Nunc a finibus diam, a condimentum augue. Nulla pulvinar nulla id imperdiet luctus. Donec tempus risus quis ultricies iaculis. Ut accumsan eu lectus eu fermentum. Duis ac nulla turpis. Nam aliquet elementum pellentesque. Fusce imperdiet tortor vel ligula egestas fermentum. Curabitur ut metus sit amet arcu ultricies vestibulum. [containers@serverb ~]$ cat /srv/web/html/index.html //看一下真机的这个文件,发现和刚刚访问的一样 Comprehensive Review Web Content Test Lorem ipsum dolor sit amet, consectetur adipiscing elit. Sed sit amet lacus vestibulum, varius magna sit amet, tempus neque. Praesent porttitor ligula a leo pharetra porttitor. Nunc a finibus diam, a condimentum augue. Nulla pulvinar nulla id imperdiet luctus. Donec tempus risus quis ultricies iaculis. Ut accumsan eu lectus eu fermentum. Duis ac nulla turpis. Nam aliquet elementum pellentesque. Fusce imperdiet tortor vel ligula egestas fermentum. Curabitur ut metus sit amet arcu ultricies vestibulum. [containers@serverb ~]$ exit //退出 注销 [student@workstation ~]$ ssh containers@serverb //再次连接containers@serverb(一定要确保是这个用户连接的,必须是这种方式!!!) [containers@serverb ~]$ ls -a //看看隐藏文件发现有.config . .bash_history .bash_profile .config rhcsa-compreview4 .. .bash_logout .bashrc .local [containers@serverb ~]$ cd .config/ //进去 [containers@serverb .config]$ ls //看看 containers [containers@serverb .config]$ mkdir -p systemd/user //创建一个目录为systemd/user的目录 [containers@serverb .config]$ cd [containers@serverb ~]$ tree .config/ //目录结构如下 .config/ ├── containers │ └── registries.conf └── systemd └── user 3 directories, 1 file [containers@serverb ~]$ cd .config/systemd/user/ //进去 [containers@serverb user]$ podman generate systemd --files --name web --new //生成一个.service文件,名字叫web,后面的--new如果有就必须带上如果没有就不带,具体的方法执行(podman generate systemd --help)查看 [containers@serverb user]$ ls //查看 container-web.service //已经生成了这个文件了 [containers@serverb user]$ podman rm -f web //删掉正在运行的容器,不然运行这个文件的时候会出错 [containers@serverb user]$ podman ps -a //删除成功 CONTAINER ID IMAGE COMMAND CREATED STATUS PORTS NAMES [containers@serverb user]$ systemctl --user enable --now container-web.service //把container-web.service加入开机自启动项,并且启动它,以当前用户的身份 [containers@serverb user]$ systemctl --user status container-web.service //查看状态 ● container-web.service - Podman container-web.service Loaded: loaded (/home/containers/.config/systemd/user/container-web.service; enab> Active: active (running) since Thu 2022-05-19 19:54:01 CST; 10s ago //起来了 Docs: man:podman-generate-systemd(1) Process: 27928 ExecStart=/usr/bin/podman run --conmon-pidfile /run/user/1002/conta> Process: 27927 ExecStartPre=/usr/bin/rm -f /run/user/1002/container-web.service-pi> Main PID: 27967 (conmon) CGroup: /user.slice/user-1002.slice/[email protected]/container-web.service ├─27943 /usr/bin/fuse-overlayfs -o lowerdir=/home/containers/.local/share> ├─27944 /usr/bin/slirp4netns --disable-host-loopback --mtu 65520 --enable> ├─27947 containers-rootlessport ├─27954 containers-rootlessport-child ├─27967 /usr/bin/conmon --api-version 1 -c 847f499c9bc1b4d7409101897c6b15> └─847f499c9bc1b4d7409101897c6b157e265a423f4634021aa389c60a9de293f8 ├─27978 httpd -D FOREGROUND ├─28022 /usr/bin/coreutils --coreutils-prog-shebang=cat /usr/bin/cat ├─28023 /usr/bin/coreutils --coreutils-prog-shebang=cat /usr/bin/cat ├─28024 /usr/bin/coreutils --coreutils-prog-shebang=cat /usr/bin/cat ├─28025 /usr/bin/coreutils --coreutils-prog-shebang=cat /usr/bin/cat ├─28026 httpd -D FOREGROUND ├─28027 httpd -D FOREGROUND ├─28045 httpd -D FOREGROUND └─28064 httpd -D FOREGROUND 5月 19 19:53:59 serverb.lab.example.com systemd[24936]: Starting Podman container-we> 5月 19 19:54:01 serverb.lab.example.com systemd[24936]: Started Podman container-web> [containers@serverb user]$ podman ps -a //查看现在新建了个容器出来了 CONTAINER ID IMAGE COMMAND CREATED STATUS PORTS NAMES 847f499c9bc1 registry.lab.example.com/rhel8/httpd-24:1-105 /usr/bin/run-http... 26 seconds ago Up 25 seconds ago 0.0.0.0:8888->8080/tcp web [containers@serverb user]$ loginctl enable-linger //这一步最重要!!!,让这个虚拟机启动的时候加载所有用户(不知道这样翻译对不对望指教) [containers@serverb user]$ exit //退出当前用户到student 注销 [student@workstation ~]$ lab rhcsa-compreview4 grade //执行podman完成后自检程序(考试没有) Grading the student's work on serverb: · The web content is extracted in /srv/web.................... PASS · The web content is availabre through port 8888.............. PASS · Required container packages exist........................... PASS · The web container exists.................................... PASS · The container is using the correct image.................... PASS · The container is using the correct image tag................ PASS · The container host port is 8888............................. PASS · The HTTPD_MPM variable is set to event...................... PASS · The container uses /srv/web for storage..................... PASS · The storage is mounted in /var/www.......................... PASS · SELinux context is set for /srv/web......................... PASS · The systemd unit file exists for the container.............. PASS · The systemd service for the container is enabled............ PASS · The services for containers start at boot................... PASS Overall lab grade.............................................. PASS //全为PASS表示成功