- A+
前端埋点对于那些营销活动的项目是必须的,它可以反应出用户的喜好与习惯,从而让项目的运营者们能够调整策略优化流程提高用户体验从而获取更多的$。这篇文章将实现一个Vue3版本的埋点上报插件,主要功能有
- 通过Vue自定义指令形式实现点击事件上报
- 提供手动调用上报方法
- 上报每个页面访问人数与次数(UV,PV)
- 上报用户在每个页面停留时长
项目环境搭建
本项目采用pnpm进行Monorepo环境搭建,因为未来这个项目可能会加入更多的工具包.
安装pnpm
npm install pnpm -g 初始化package.json
pnpm init 新建配置文件 .npmrc
shamefully-hoist = true 新建pnpm-workspace.yaml
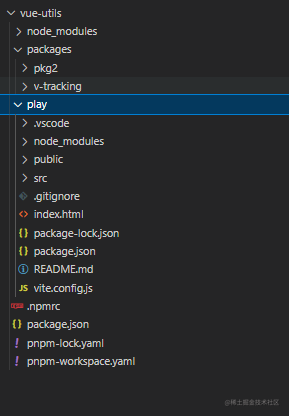
packages: - "packages/**" - "play" 此时我们的packages目录和play目录便关联起来的,我们后面就可以愉快的在本地调试了。其中packages是我们各种包存放的地方,具体我们本次开发的埋点插件v-tracking便是其中之一。play则是一个Vue3项目用来测试我们的本地包,它的创建方法这里就不再详细说了。最终它的目录结构如下
插件开发
终端进入v-tracking,执行pnpm init让它成为一个包,然后新建index.js作为入口。
在vue3是通过 app.use(plugin)的形式引入插件的,它会直接调用插件的install方法.install会接收到应用实例和传递给 app.use() 的额外选项作为参数。所以我们在v-tracking/index.js默认导出一个带有install函数的对象
export default { install: (app, options) => { console.log(options) } } 进入paly执行pnpm add v-tracking此时你会发现paly下的package.json多了个这样的依赖
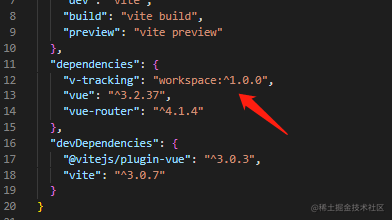
这样就是表示play已经关联到本地的包[email protected]的包了,然后我们在paly的main.js引入我们的插件
import { createApp } from 'vue' import App from './App.vue' import router from './router/index' import vTracking from 'v-tracking' const app = createApp(App) app.use(router) app.use(vTracking, { baseParams: { uid: 123 } }) app.mount('#app') 启动项目我们会发现install函数被调用了,并且获取到了传来的额外参数.

点击事件上报
点击事件的上报我们提供两种方式,一种是以Vue自定义指令的形式,一种是手动调用上报方法。因为指令形式的点击上报并不能实现异步上报,所以加入手动调用上报的方法
vue自定义指令
首先我们简单了解一下什么是自定义指令。我们都用过Vue的内置的一系列指令 (比如 v-model 或 v-show) 等,而Vue还提供了注册自定义指令的函数directive用法如下,其中el是我们绑定指令的dom,binding则是指令传来的一系列参数,比如
<div v-example:foo.bar="baz"> binding则是这样一个对象
{ arg: 'foo', modifiers: { bar: true }, value: /* `baz` 的值 */, oldValue: /* 上一次更新时 `baz` 的值 */ } 了解完指令我们便可以开始自定义指令click的开发了。其实很简单,就是监听el的点击事件然后获取到指令的value上报给后端即可
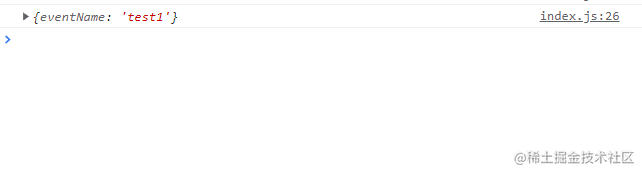
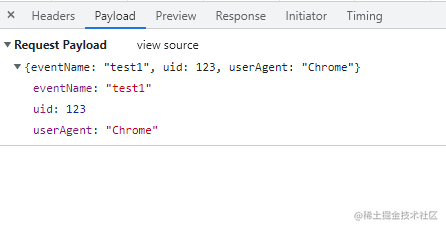
export default { install: (app, options) => { app.directive('click', (el, bind) => { el.addEventListener('click', () => { console.log(bind.value) }) }) } } 我们在play的page1.vue种进行绑定指令测试
<template> <div v-click="{ eventName: 'test1' }">test1</div> </template> 我们点击test1便可以在控制台看到我们需要上报的数据
手动上报方法
我们可以手动调用上报方法挂载在实例全局即可,在vue3种挂载全局属性的方法是app.config.globalProperties.xxx,所以我们定义一个全局上报方法$vtrack
export default { install: (app, options) => { app.directive('click', (el, bind) => { el.addEventListener('click', () => { console.log(bind.value) }) }) //挂载全局用于手动上报 app.config.globalProperties.$vtrack = (params) => { console.log(params) } } } 然后我们在page1.vue中进行使用
<template> <div v-click="{ eventName: 'test1' }">test1</div> </template> <script setup> import { getCurrentInstance } from 'vue'; const { proxy } = getCurrentInstance() proxy.$vtrack({ eventName: 'test1' }) </script> 同样的我们可以获取到我们需要的上报数据。
页面访问次数上报(pv,uv)
对于页面访问次数或者人数我们可以通过检测路由的变化从而上报当前页面事件。比如在page1页面我们可以以prefix_/page1(这个前缀可以由自己来定义)形式上报。但是在插件中如何检测路由变化呢?
起初我想通过监听onhashchange事件来监听路由变化的,但是经过测试发现Vue中的push事件根本不会触发onhashchange。所以我便引入了@vue/reactivity,通过它的reactive让传入app实例进行一个响应式包裹,再通过effect函数监听路由变化从而实现统计每个页面的进入事件,首先安装
pnpm add @vue/reactivity -w 然后引用
import { reactive,effect } from '@vue/reactivity' //uv and pv const getVisitor = (app, prefix) => { const globalProperties = reactive(app.config.globalProperties); effect(() => { const path = globalProperties.$route.path; console.log({ eventName: `${prefix}_${path}`, }); }); }; export default { install: (app, options) => { stayTime(); getVisitor(app, "track"); app.directive("click", (el, bind) => { el.addEventListener("click", () => { console.log(bind.value); }); }); //挂载全局用于手动上报 app.config.globalProperties.$vtrack = (params) => { console.log(params); }; }, }; 然后在项目中切换路由就会获取到需要上报的事件
页面停留时间(TP)
页面停留时长同样借助effect函数,通过计算页面变化的时间差从而上报页面停留时长事件,一般当进入第二个页面才会统计第一个页面的TP,进入三个页面计算第二个页面的TP。。。所以我们把逻辑写在getVisitor函数中然后给它改个名
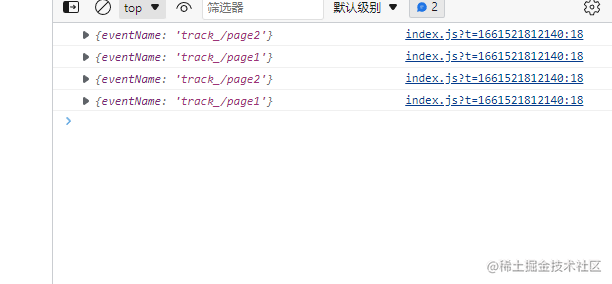
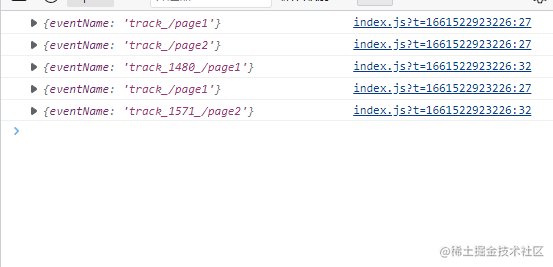
//上报uv&pv&TP const getVisitorAndTP = (app, prefix) => { const globalProperties = reactive(app.config.globalProperties); let startTime = new Date().getTime(); let path = ""; let lastPath = ""; effect(() => { const endTime = new Date().getTime(); const TP = endTime - startTime; startTime = endTime; lastPath = path; path = globalProperties.$route.path; //间隔为0不上报 if (!TP) return; console.log({ eventName: `${prefix}_${path}`, }); //页面停留时长小于0.5s不上报 if (TP < 500) return; console.log({ eventName: `${prefix}_${TP}_${lastPath}`, }); }); }; export default { install: (app, options) => { getVisitorAndTP(app, "track"); app.directive("click", (el, bind) => { el.addEventListener("click", () => { console.log(bind.value); }); }); //挂载全局用于手动上报 app.config.globalProperties.$vtrack = (params) => { console.log(params); }; }, }; 上传TP事件的格式为prefix_TP_path,因此我们切换页面的时候可以看到同时上报的两个事件
获取公共参数
根据用户传来的固定参数baseParams和事件前缀prefix调整我们上报事件形式。假设在main.js用户传来这些数据
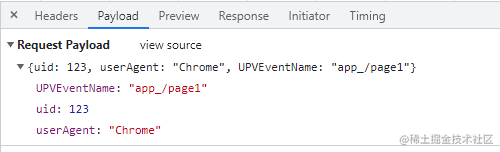
import { createApp } from "vue"; import App from "./App.vue"; import router from "./router/index"; import vTracking from "v-tracking"; const app = createApp(App); app.use(router); app.use(vTracking, { baseParams: { uid: 123, userAgent: "Chrome", }, prefix: "app", }); app.mount("#app"); 然后修改一下我们的插件(这里将uv/pv还有TP作为单独参数上报,不再使用上面的eventName形式,太懒了,上面的写法不想改了?)
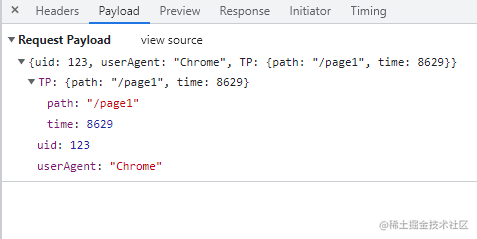
import { reactive, effect } from "@vue/reactivity"; //上报uv&pv&TP const getVisitorAndTP = (app, prefix, baseParams) => { const globalProperties = reactive(app.config.globalProperties); let startTime = new Date().getTime(); let path = ""; let lastPath = ""; effect(() => { const endTime = new Date().getTime(); const TP = endTime - startTime; startTime = endTime; lastPath = path; path = globalProperties.$route.path; //间隔为0不上报 if (!TP) return; console.log({ ...baseParams, UPVEventName: `${prefix}_${path}`, }); //页面停留时长小于0.5s不上报 if (TP < 500) return; console.log({ ...baseParams, TP: { path: lastPath, time: TP, }, }); }); }; export default { install: (app, options) => { const { prefix, baseParams } = options; getVisitorAndTP(app, prefix || "track", baseParams || {}); app.directive("click", (el, bind) => { el.addEventListener("click", () => { console.log({ ...bind.value, ...(baseParams || {}) }); }); }); //挂载全局用于手动上报 app.config.globalProperties.$vtrack = (params) => { console.log(params); }; }, }; 此时这控制台打印出事件类型上报格式为

引入axios
最后简单写一个axios的请求函数,这里不考虑请求失败的情况,此时需要用户传入一个baseUrl
import { reactive, effect } from "@vue/reactivity"; import axios from "axios"; axios.defaults.headers["Content-Type"] = "application/json"; const request = (baseUrl, params) => { axios({ url: baseUrl, method: "post", data: params, }); }; //上报uv&pv&TP const getVisitorAndTP = (app, prefix, baseParams, baseUrl) => { const globalProperties = reactive(app.config.globalProperties); let startTime = new Date().getTime(); let path = ""; let lastPath = ""; effect(() => { const endTime = new Date().getTime(); const TP = endTime - startTime; startTime = endTime; lastPath = path; path = globalProperties.$route.path; //间隔为0不上报 if (!TP) return; request(baseUrl, { ...baseParams, UPVEventName: `${prefix}_${path}`, }); //页面停留时长小于0.5s不上报 if (TP < 500) return; request(baseUrl, { ...baseParams, TP: { path: lastPath, time: TP, }, }); }); }; export default { install: (app, options) => { const { prefix, baseParams, baseUrl } = options; getVisitorAndTP(app, prefix || "track", baseParams || {}, baseUrl); app.directive("click", (el, bind) => { el.addEventListener("click", () => { request(baseUrl, { ...bind.value, ...(baseParams || {}) }); }); }); //挂载全局用于手动上报 app.config.globalProperties.$vtrack = (params) => { request(baseUrl, { ...params, ...(baseParams || {}) }); }; }, }; 此时便可以看到事件的请求了
打包发布
最后使用vite进行打包发布,全局安装vite
pnpm add vite -w -D 然后在v-tracking下新建vite.config.js,配置库模式打包cjs和es格式
import { defineConfig } from "vite"; import { resolve } from "path"; export default defineConfig({ build: { target: "modules", //压缩 minify: true, rollupOptions: { input: ["index.js"], //忽略文件 external: ["@vue/reactivity", "axios"], output: [ { format: "es", //不用打包成.es.js,这里我们想把它打包成.js entryFileNames: "[name].js", //配置打包根目录 dir: resolve(__dirname, "./dist/es"), }, { format: "cjs", //不用打包成.mjs entryFileNames: "[name].js", //配置打包根目录 dir: resolve(__dirname, "./dist/lib"), }, ], }, lib: { entry: "./index.js", name: "vtrack", }, }, }); 然后将v-tracking/package.json入口文件指向打包后路径,其中module代表如果项目支持es格式的话就会使用dist/es/index.js这个路径
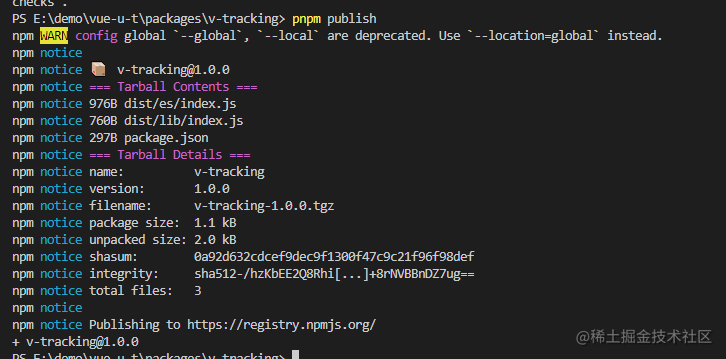
{ "name": "v-tracking", "version": "1.0.0", "main": "dist/lib/index.js", "module": "dist/es/index.js", "description": "", "keywords": [], "files": [ "dist" ], "dependencies": { "@vue/reactivity": "^3.2.37", "axios": "^0.27.2" }, "author": "", "license": "MIT" } 最后在v-tracking目录下执行pnpm publish进行发布(这里需要注册npm账户等等)
使用说明
安装
npm install v-tracking -S 在 main.js 中引入插件
import { createApp } from "vue"; import App from "./App.vue"; import router from "./router/index"; import vTracking from "v-tracking"; const app = createApp(App); app.use(router); app.use(vTracking, Options); app.mount("#app"); 注意
因为涉及到路由检测,所以必须配合vue-router使用
Options
- baseParams (string)
公共参数,每次上报都会携带的参数,比如用户的登录信息 uid 等
- baseUrl (string)
上报的后台请求地址,后端接口需按照前端请求参数设计
- prefix (string)
PV&UV&TP 事件前缀,一般用于区分不同项目等(建议和普通事件前缀一致)
- isVisTP (Boolean)
是否统计页面 UV&PV&PT
Options 示例
app.use(vTracking, { baseParams: { uid: 123 }, baseUrl: "http://example/event", prefix: "app", isVisTP: false, }); 点击指令上报
<template> <div>page1</div> <div v-click="{ eventName: 'test1' }">click</div> </template> 后台接收数据格式为
{ uid: 123 , eventName: "test1" } 手动上报
<template> <div>page1</div> <div @click="track">click</div> </template> <script setup> import { getCurrentInstance } from 'vue'; const { proxy } = getCurrentInstance() //手动上报事件 const track = ()=>{ proxy.$vtrack({ eventName: 'test1' }) } </script> 后台接收数据格式为
{ uid: 123, eventName: "test1" } UV&PV
isVisTP为 true 时候插件会自动上报每个页面进入时的数据,其中后台接收数据格式为
{ uid: 123, UPVEventName: `${prefix}_${path}` } 其中path为页面路由路径,如/page1
页面停留时长(TP)
isVisTP为 true 时候插件会自动上报每个页面用户停留时长,其中后台接收数据格式为
{ uid: 123, TP: { path: "/page2", time: 1269446 }, } time 则表示时长(ms)
写在最后
本篇文章旨在提供一些思路,难免会有不妥或者错误之处,也欢迎大家评论区指出不胜感激。仓库地址vue-utils
都看到这了,点个赞再走吧~?