- A+
所属分类:linux技术
LVM管理
lvm管理
部署lvm
格式化逻辑卷(刚刚创建出来的):mkfs.ext4格式、还是xfs_growfs 格式都可以
[root@lnh ~]# lsblk NAME MAJ:MIN RM SIZE RO TYPE MOUNTPOINT sda 8:0 0 100G 0 disk ├─sda1 8:1 0 1G 0 part /boot └─sda2 8:2 0 99G 0 part ├─cs-root 253:0 0 65.2G 0 lvm / ├─cs-swap 253:1 0 2G 0 lvm [SWAP] └─cs-home 253:2 0 31.8G 0 lvm /home sdb 8:16 0 5G 0 disk sdc 8:32 0 5G 0 disk sdd 8:48 0 5G 0 disk sde 8:64 0 5G 0 disk sr0 11:0 1 9G 0 rom //查看一下磁盘 [root@lnh ~]# pvcreate /dev/sd{d,e} //创建物理卷 Physical volume "/dev/sdd" successfully created. Physical volume "/dev/sde" successfully created. [root@lnh ~]# pvs //查看物理卷 PV VG Fmt Attr PSize PFree /dev/sda2 cs lvm2 a-- <99.00g 0 /dev/sdd lvm2 --- 5.00g 5.00g /dev/sde lvm2 --- 5.00g 5.00g [root@lnh ~]# vgcreate lnh /dev/sd{d,e} //创建卷组 Volume group "lnh" successfully created [root@lnh ~]# vgs //查看卷组 VG #PV #LV #SN Attr VSize VFree cs 1 3 0 wz--n- <99.00g 0 lnh 2 0 0 wz--n- 9.99g 9.99g [root@lnh ~]# lvcreate -n lnh1 -L 3G lnh //创建逻辑卷 Logical volume "lnh1" created. [root@lnh ~]# lvs //查看逻辑卷 LV VG Attr LSize Pool Origin Data% Meta% Move Log Cpy%Sync Convert home cs -wi-ao---- 31.81g root cs -wi-ao---- 65.15g swap cs -wi-ao---- 2.03g lnh1 lnh -wi-a----- 3.00g [root@lnh ~]# mkfs.ext4 /dev/lnh/lnh1 //格式化逻辑卷(绝对路径) mke2fs 1.45.6 (20-Mar-2020) //也可以用 xfs_growfs格式化 Creating filesystem with 786432 4k blocks and 196608 inodes Filesystem UUID: 00961f51-0f48-492d-aac0-1e2fb3de6922 Superblock backups stored on blocks: 32768, 98304, 163840, 229376, 294912 Allocating group tables: done Writing inode tables: done Creating journal (16384 blocks): done Writing superblocks and filesystem accounting information: done [root@lnh ~]# mkdir /ma //创建逻辑卷挂载点目录 [root@lnh ~]# blkid | grep lnh1 //过滤出逻辑卷的uuid /dev/mapper/lnh-lnh1: UUID="00961f51-0f48-492d-aac0-1e2fb3de6922" BLOCK_SIZE="4096" TYPE="ext4" [root@lnh ~]# vim /etc/fstab //进行永久挂载 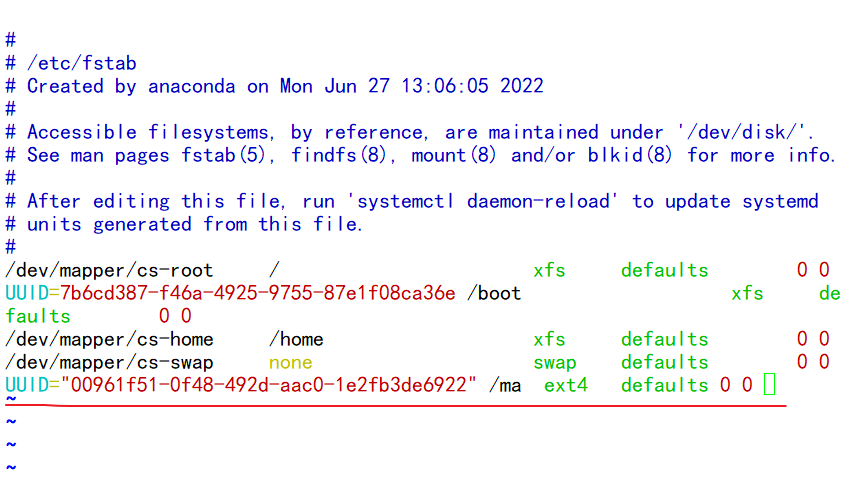
[root@lnh ~]# mount -a //重新加载挂载 [root@lnh ~]# df -Th //查看 Filesystem Type Size Used Avail Use% Mounted on devtmpfs devtmpfs 956M 0 956M 0% /dev tmpfs tmpfs 975M 0 975M 0% /dev/shm tmpfs tmpfs 975M 8.8M 966M 1% /run tmpfs tmpfs 975M 0 975M 0% /sys/fs/cgroup /dev/mapper/cs-root xfs 66G 4.2G 62G 7% / /dev/mapper/cs-home xfs 32G 260M 32G 1% /home /dev/sda1 xfs 1014M 178M 837M 18% /boot tmpfs tmpfs 195M 0 195M 0% /run/user/0 /dev/mapper/lnh-lnh1 ext4 2.9G 9.0M 2.8G 1% /ma 扩展逻辑卷
扩展逻辑卷:mkfs.ext4格式、还是xfs_growfs 格式都可以
[root@lnh ~]# lvextend -L 6G /dev/lnh/lnh1 //将原来的3G扩展到6G(指定大小) Size of logical volume lnh/lnh1 changed from 3.00 GiB (768 extents) to 6.00 GiB (1536 extents). Logical volume lnh/lnh1 successfully resized. [root@lnh ~]# resize2fs /dev/lnh/lnh1 //格式化扩展(mkfs.ext4格式) resize2fs 1.45.6 (20-Mar-2020) Filesystem at /dev/lnh/lnh1 is mounted on /ma; on-line resizing required old_desc_blocks = 1, new_desc_blocks = 1 The filesystem on /dev/lnh/lnh1 is now 1572864 (4k) blocks long. [root@lnh ~]# df -Th //查看 Filesystem Type Size Used Avail Use% Mounted on devtmpfs devtmpfs 956M 0 956M 0% /dev tmpfs tmpfs 975M 0 975M 0% /dev/shm tmpfs tmpfs 975M 8.8M 966M 1% /run tmpfs tmpfs 975M 0 975M 0% /sys/fs/cgroup /dev/mapper/cs-root xfs 66G 4.2G 62G 7% / /dev/mapper/cs-home xfs 32G 260M 32G 1% /home /dev/sda1 xfs 1014M 178M 837M 18% /boot tmpfs tmpfs 195M 0 195M 0% /run/user/0 /dev/mapper/lnh-lnh1 ext4 5.9G 12M 5.6G 1% /ma //lvextend -L +6G /dev/lnh/lnh1在我这个lnh1逻辑卷3G的基础上再扩展6G 如果这个逻辑卷之前是xfs_growfs格式的那么要用xfs_growfs 格式扩展格式化 裁剪逻辑卷
[root@lnh ~]# umount /ma //取消挂载 [root@lnh ~]# e2fsck -f /dev/lnh/lnh1 //检查lnh1逻辑卷文件系统 e2fsck 1.45.6 (20-Mar-2020) Pass 1: Checking inodes, blocks, and sizes Pass 2: Checking directory structure Pass 3: Checking directory connectivity Pass 4: Checking reference counts Pass 5: Checking group summary information /dev/lnh/lnh1: 11/393216 files (0.0% non-contiguous), 47214/1572864 blocks [root@lnh ~]# resize2fs /dev/lnh/lnh1 4G resize2fs 1.45.6 (20-Mar-2020) Resizing the filesystem on /dev/lnh/lnh1 to 1048576 (4k) blocks. The filesystem on /dev/lnh/lnh1 is now 1048576 (4k) blocks long. [root@lnh ~]# lvreduce -L 4G /dev/lnh/lnh1 //格式化裁剪到4G WARNING: Reducing active logical volume to 4.00 GiB. THIS MAY DESTROY YOUR DATA (filesystem etc.) Do you really want to reduce lnh/lnh1? [y/n]: y Size of logical volume lnh/lnh1 changed from 6.00 GiB (1536 extents) to 4.00 GiB (1024 extents). Logical volume lnh/lnh1 successfully resized. [root@lnh ~]# e2fsck -f /dev/lnh/lnh1 //检查lnh1逻辑卷文件系统 e2fsck 1.45.6 (20-Mar-2020) Pass 1: Checking inodes, blocks, and sizes Pass 2: Checking directory structure Pass 3: Checking directory connectivity Pass 4: Checking reference counts Pass 5: Checking group summary information /dev/lnh/lnh1: 11/262144 files (0.0% non-contiguous), 38990/1048576 blocks [root@lnh ~]# mount -a //读取挂载 [root@lnh ~]# df -Th //查看 Filesystem Type Size Used Avail Use% Mounted on devtmpfs devtmpfs 956M 0 956M 0% /dev tmpfs tmpfs 975M 0 975M 0% /dev/shm tmpfs tmpfs 975M 8.8M 966M 1% /run tmpfs tmpfs 975M 0 975M 0% /sys/fs/cgroup /dev/mapper/cs-root xfs 66G 4.2G 62G 7% / /dev/mapper/cs-home xfs 32G 260M 32G 1% /home /dev/sda1 xfs 1014M 178M 837M 18% /boot tmpfs tmpfs 195M 0 195M 0% /run/user/0 /dev/mapper/lnh-lnh1 ext4 3.9G 24M 3.7G 1% /ma 删除卷
[root@lnh ~]# df -Th Filesystem Type Size Used Avail Use% Mounted on devtmpfs devtmpfs 956M 0 956M 0% /dev tmpfs tmpfs 975M 0 975M 0% /dev/shm tmpfs tmpfs 975M 8.8M 966M 1% /run tmpfs tmpfs 975M 0 975M 0% /sys/fs/cgroup /dev/mapper/cs-root xfs 66G 4.2G 62G 7% / /dev/mapper/cs-home xfs 32G 260M 32G 1% /home /dev/sda1 xfs 1014M 178M 837M 18% /boot tmpfs tmpfs 195M 0 195M 0% /run/user/0 /dev/mapper/lnh-lnh1 ext4 3.9G 24M 3.7G 1% /ma [root@lnh ~]# umount /ma //取消挂载 [root@lnh ~]# lvs //查看逻辑卷 LV VG Attr LSize Pool Origin Data% Meta% Move Log Cpy%Sync Convert home cs -wi-ao---- 31.81g root cs -wi-ao---- 65.15g swap cs -wi-ao---- 2.03g lnh1 lnh -wi-ao---- 4.00g [root@lnh ~]# lvremove /dev/lnh/lnh1 //删除逻辑卷 Do you really want to remove active logical volume lnh/lnh1? [y/n]: y Logical volume "lnh1" successfully removed [root@lnh ~]# lvs LV VG Attr LSize Pool Origin Data% Meta% Move Log Cpy%Sync Convert home cs -wi-ao---- 31.81g root cs -wi-ao---- 65.15g swap cs -wi-ao---- 2.03g [root@lnh ~]# vgs VG #PV #LV #SN Attr VSize VFree cs 1 3 0 wz--n- <99.00g 0 lnh 2 1 0 wz--n- 9.99g 5.99g [root@lnh ~]# vgremove lnh //删除卷组 Volume group "lnh" successfully removed [root@lnh ~]# vgs VG #PV #LV #SN Attr VSize VFree cs 1 3 0 wz--n- <99.00g 0 [root@lnh ~]# pvs PV VG Fmt Attr PSize PFree /dev/sda2 cs lvm2 a-- <99.00g 0 /dev/sdd lvm2 --- 5.00g 5.00g /dev/sde lvm2 --- 5.00g 5.00g [root@lnh ~]# pvremove /dev/sd{d,e} //删除物理卷 Labels on physical volume "/dev/sdd" successfully wiped. Labels on physical volume "/dev/sde" successfully wiped. [root@lnh ~]# pvs PV VG Fmt Attr PSize PFree /dev/sda2 cs lvm2 a-- <99.00g 0 [root@lnh ~]# pvcreate /dev/sd{c,d,e} WARNING: sun signature detected on /dev/sdc at offset 508. Wipe it? [y/n]: y Wiping sun signature on /dev/sdc. Physical volume "/dev/sdc" successfully created. Physical volume "/dev/sdd" successfully created. Physical volume "/dev/sde" successfully created. [root@lnh ~]# pvs PV VG Fmt Attr PSize PFree /dev/sda2 cs lvm2 a-- <99.00g 0 /dev/sdc lvm2 --- 5.00g 5.00g /dev/sdd lvm2 --- 5.00g 5.00g /dev/sde lvm2 --- 5.00g 5.00g [root@lnh ~]# vgcreate lnh /dev/sd{c,d,e} Volume group "lnh" successfully created [root@lnh ~]# vgs VG #PV #LV #SN Attr VSize VFree cs 1 3 0 wz--n- <99.00g 0 lnh 3 0 0 wz--n- <14.99g <14.99g [root@lnh ~]# vgreduce lnh /dev/sdc Removed "/dev/sdc" from volume group "lnh" [root@lnh ~]# vgs VG #PV #LV #SN Attr VSize VFree cs 1 3 0 wz--n- <99.00g 0 lnh 2 0 0 wz--n- 9.99g 9.99g [root@lnh ~]# vgreduce lnh /dev/sdd Removed "/dev/sdd" from volume group "lnh" [root@lnh ~]# vgs VG #PV #LV #SN Attr VSize VFree cs 1 3 0 wz--n- <99.00g 0 lnh 1 0 0 wz--n- <5.00g <5.00g //从同一个卷组的中移除物理卷 同卷组进行数据迁移
[root@lnh ~]# vgcreate lnh /dev/sd{b,c} Volume group "lnh" successfully created [root@lnh ~]# vgs VG #PV #LV #SN Attr VSize VFree cs 1 3 0 wz--n- <99.00g 0 lnh 2 0 0 wz--n- 9.99g 9.99g [root@lnh ~]# pvs PV VG Fmt Attr PSize PFree /dev/sda2 cs lvm2 a-- <99.00g 0 /dev/sdb lnh lvm2 a-- <5.00g <5.00g /dev/sdc lnh lvm2 a-- <5.00g <5.00g [root@lnh ~]# pvmove /dev/sdb /dev/sdb: Moved: 5.08% /dev/sdb: Moved: 100.00% [root@lnh ~]# pvs PV VG Fmt Attr PSize PFree /dev/sda2 cs lvm2 a-- <99.00g 0 /dev/sdb lnh lvm2 a-- <5.00g <5.00g /dev/sdc lnh lvm2 a-- <5.00g <4.00g //本来是sdb里面它的总大小是5G,内部资料占用了1G,然后数据转移后就变成sdc里面的内部质量占1G,总大小5G linux计划任务管理
作业
- 在linux系统中备份脚本backup.sh需要再每周1-5的每天下午1点和晚上8点执行,下列哪个cron命令可以完成(d)
a. 00 13,20 * 1-5 * backup.sh b. 0 13,20 1,5 * * backup.sh c. * 13,20 * * 1-5 backup.sh d. 00 13,20 * * 1-5 backup.sh 说明以上答案每一行是什么含义 a:每年1-5月的每天下午1点和晚上8点执行 b:每月的1号和5号每天下午1点和晚上8点执行 c:错误表示 d:每周星期一到星期五的每天下午1点和晚上8点执行 - 新建/scripts/httpd.sh文件,并让/scripts/httpd.sh脚本在每天的00:10分执行
[root@lnh ~]# mkdir /scripts [root@lnh ~]# touch /scripts/httpd.sh [root@lnh ~]# crontab -e crontab: installing new crontab [root@lnh ~]# crontab -l 10 00 * * * /usr/bin/sh /scripts/httpd.sh - 新建/backup目录,每周一下午5:50将/backup目录下的所有文件打包成 backup.tar.gz
[root@lnh ~]# mkdir /backup [root@lnh ~]# which tar /usr/bin/tar [root@lnh ~]# crontab -e crontab: installing new crontab [root@lnh ~]# crontab -l ##压缩 50 17 * * * /usr/bin/tar -zcf backup.tar.gz /backup - 写一个定时任务,每天0点5分把/var/log/nginx下7天前的文件转移到/backup/2018_xx_xx的目录中
[root@lnh ~]# crontab -e crontab: installing new crontab [root@lnh ~]# crontab -l ##转移文件 5 0 * * * /usr/bin/find /var/log/nginx -mtime +7 | xargs /usr/bin/mv {} /backup/$(date '+%Y_%m_%d') - 系统脚本/scripts/which.sh,如何定时每隔7分钟执行一次?
[root@lnh ~]# crontab -e crontab: installing new crontab [root@lnh ~]# crontab -l */7 * * * * /usr/bin/scripts /scripts/which.sh - 如何不小心删除了/var/spool/cron/root文件,该如何恢复。
经查,CentOS 系统的 crontab 任务的日志,打印在 /var/log/cron 之中。考虑过滤日志: cat /var/log/cron* | grep -i "某个用户" | grep "CMD" | awk -F ‘(‘ ‘{print $3}‘ | awk -F ‘)‘ ‘{print $1}‘ | sort -u > crontab_tmp 说明??: grep -i "某个用户" :是为了过滤某个用户的信息。比如你在test这个账户下误操作“crontab -r”删除当前用户的crontab文件,那么你可以使用 grep -i "test" 过滤test账户使用的 命令。 后续根据提取出来的命令再去 /var/log/cron文件中确认一下时间间隔,按照指定的方式恢复至/var/spool/cron/。