- A+
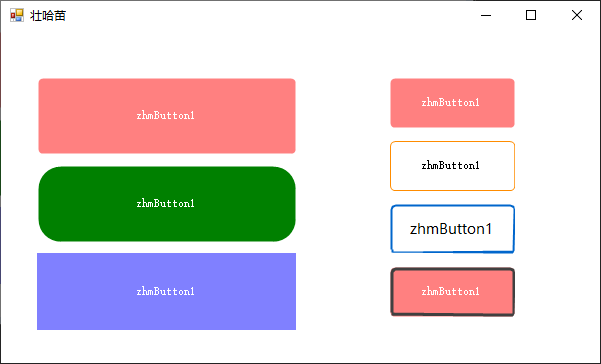
以下代码实现自定义Button,继承WinForm的Button,新增了边框、圆角设置的相关属性。
public class ZhmButton : Button { private int borderSize = 0; // 边框 private Color borderColor = ColorTranslator.FromHtml("#5A6268"); // 边框色 private int borderRadius = 25; //圆角角度 public ZhmButton() { // 去除系统默认样式,并设置自定义样式 this.FlatStyle = FlatStyle.Flat; this.FlatAppearance.BorderSize = 0; this.Size = new Size(150, 46); this.BackColor = ColorTranslator.FromHtml("#23272B"); this.ForeColor = Color.White; this.Resize += ZhmButton_Resize; } [Category("扩展属性")] public int BorderSize { get => borderSize; set { borderSize = value; this.Invalidate(); } } [Category("扩展属性")] public Color BorderColor { get => borderColor; set { borderColor = value; this.Invalidate(); } } [Category("扩展属性")] public int BorderRadius { get => borderRadius; set { borderRadius = value <= Height ? value : Height; this.Invalidate(); } } private GraphicsPath DrawGraphicsPath(RectangleF rectangle, float radius) { GraphicsPath path = new GraphicsPath(); path.StartFigure(); // 从左上角开始按顺时针方向 分别在空间的四个角追加一段圆弧 // 270° // | //180°----|-----0° // | // 90° path.AddArc(rectangle.X, rectangle.Y, radius, radius, 180, 90); path.AddArc(rectangle.Width - radius, rectangle.Y, radius, radius, 270, 90); path.AddArc(rectangle.Width - radius, rectangle.Height - radius, radius, radius, 0, 90); path.AddArc(rectangle.X, rectangle.Height - radius, radius, radius, 90, 90); path.CloseFigure(); return path; } private void ZhmButton_Resize(object sender, EventArgs e) { if (borderRadius > this.Height) borderRadius = this.Height; } protected override void OnPaint(PaintEventArgs pevent) { base.OnPaint(pevent); pevent.Graphics.SmoothingMode = SmoothingMode.AntiAlias; RectangleF rectSurface = new RectangleF(0, 0, this.Width, this.Height); RectangleF rectBorder = new RectangleF(1, 1, this.Width - 0.8F, this.Height - 1); if (BorderRadius > 2) { using (var pathSurface = DrawGraphicsPath(rectSurface, BorderRadius)) using (var pathBorder = DrawGraphicsPath(rectBorder, BorderRadius - 1)) using (var penSurface = new Pen(this.Parent.BackColor, 2)) using (var penBorder = new Pen(BorderColor, BorderSize)) { penBorder.Alignment = PenAlignment.Inset; this.Region = new Region(pathSurface); pevent.Graphics.DrawPath(penSurface, pathSurface); if (BorderSize > 0) pevent.Graphics.DrawPath(penBorder, pathBorder); } } else { this.Region = new Region(rectSurface); if (BorderSize > 0) { using (var penBorder = new Pen(BorderColor, BorderSize)) { penBorder.Alignment = PenAlignment.Inset; pevent.Graphics.DrawRectangle(penBorder, 0, 0, this.Width - 1, this.Height - 1); } } } } protected override void OnHandleCreated(EventArgs e) { base.OnHandleCreated(e); this.Parent.BackColorChanged += Parent_BackColorChanged; } private void Parent_BackColorChanged(object sender, EventArgs e) { if(this.DesignMode) this.Invalidate(); } } --------------------------------------------------------以下仅为凑字数---------------------------------------------------------------------------------
使用 .NET Framework 可以开发和实现新的控件。 可以通过继承来扩展熟悉的用户控件和现有控件的功能。 还可以编写自定义控件,这些控件执行自己的绘制。
基控件类
Control 类是 Windows 窗体控件的基类。 它提供了在 Windows 窗体应用程序中进行可视显示所需的基础结构。
Control 类执行下列任务,以便在 Windows 窗体应用程序中提供可视显示:
公开窗口句柄。
管理消息路由。
提供鼠标和键盘事件,以及许多其他用户界面事件。
提供高级布局功能。
包含特定于可视化显示的多个属性,如 ForeColor、BackColor、Height 和 Width。
为 Windows 窗体控件充当 Microsoft® ActiveX® 控件提供必需的安全性和线程支持。
由于基类提供了大量基础结构,因此使开发自己的 Windows 窗体控件变得相对简单。
控件种类
Windows 窗体支持三种用户定义的控件:复合、扩展和自定义。 以下各节分别介绍各种控件,并就如何选择项目中使用的控件种类提供建议。
复合控件
复合控件是封装在公共容器内的 Windows 窗体控件的集合。 这种控件有时称为用户控件。 其包含的控件称为构成控件。
复合控件包含与每个包含的 Windows 窗体控件相关联的所有固有功能,允许选择性地公开和绑定它们的属性。 复合控件还提供了大量的默认键盘处理功能,用户不需要进行任何额外的开发。
例如,可以生成复合控件,以显示来自数据库的客户地址数据。 此控件可包括用于显示数据库字段的 DataGridView 控件、用于处理到数据源的绑定的 BindingSource,以及用于在记录之间移动的 BindingNavigator 控件。 可以选择性地公开数据绑定属性,还可以将整个控件打包并在不同应用程序之间重复使用。 有关这种复合控件的示例,请参阅如何:应用 Windows 窗体控件中的特性。
若要创作复合控件,请从 UserControl 类派生。 基类 UserControl 为子控件提供了键盘路由,并使子控件可以作为组进行工作。 有关详细信息,请参阅开发复合 Windows 窗体控件。
建议
如果为以下情况,则从 UserControl 类继承:
你想要将多个 Windows 窗体控件的功能组合到单个可重用单元。
扩展控件
你可以从任何现有的 Windows 窗体控件派生继承的控件。 使用此方法,你可以保留 Windows 窗体控件的所有固有功能,然后通过添加自定义属性、方法或其他功能来扩展该功能。 可以使用此选项重写基控件的绘制逻辑,然后通过更改该控件的外观来扩展其用户界面。
例如,可以创建一个由 Button 控件派生的控件,并用它来跟踪用户的单击次数。
在某些控件中,也可以通过重写基类的 OnPaint 方法为控件的图形用户界面添加自定义外观。 对于跟踪单击次数的扩展按钮,可以重写 OnPaint 方法以调用 OnPaint 的基实现,然后在 Button 控件的工作区的一角绘制单击计数。
建议
如果为以下情况,则从 Windows 窗体控件继承:
大部分所需功能与现有的 Windows 窗体控件相同。
不需要自定义图形用户界面,或者想为现有控件设计一个新的图形用户界面。
自定义控件
创建控件的另一种方法是通过从 Control 继承,从头开始充分创建一个控件。 Control 类提供控件所需的所有基本功能(包括鼠标和键盘处理事件),但不提供特定于控件的功能或图形界面。
相比从 UserControl 或现有 Windows 窗体控件继承来说,通过从 Control 类继承来创建控件需要花费更多心思和精力。 由于用户还需执行大量的实现,因此,控件可以具有比复合控件或扩展控件更好的灵活性,而且可以使控件完全满足自己的需要。
若要实现自定义控件,必须编写该控件的 OnPaint 事件的代码,以及所需的任何功能特定的代码。 还可以重写 WndProc 方法并直接处理窗口消息。 这是创建控件的最强大的方法,但若要有效地使用此技术,需熟悉 Microsoft Win32® API。
时钟控件即是一个自定义控件,它复制模拟时钟的外观和行为。 调用自定义绘制来使指针移动,以响应来自内部 Timer 组件的 Tick 事件。 有关详细信息,请参阅如何:开发简单的 Windows 窗体控件。
建议
如果为以下情况,则从 Control 类继承:
你想要提供控件的自定义图形表示形式。
你需要实现不能通过标准控件实现的自定义功能。
ActiveX 控件
尽管 Windows 窗体基础结构已为承载 Windows 窗体控件进行了优化,但仍可以使用 ActiveX 控件。 Visual Studio 中对此任务提供支持。 有关详细信息,请参阅如何:向 Windows 窗体添加 ActiveX 控件。
无窗口控件
Microsoft Visual Basic® 6.0 和 ActiveX 技术支持无窗口控件。 Windows 窗体中不支持无窗口控件。